Forum sponsored by:

Countryman's Steam - Chain drilling
| JasonB | 04/04/2011 14:57:12 |
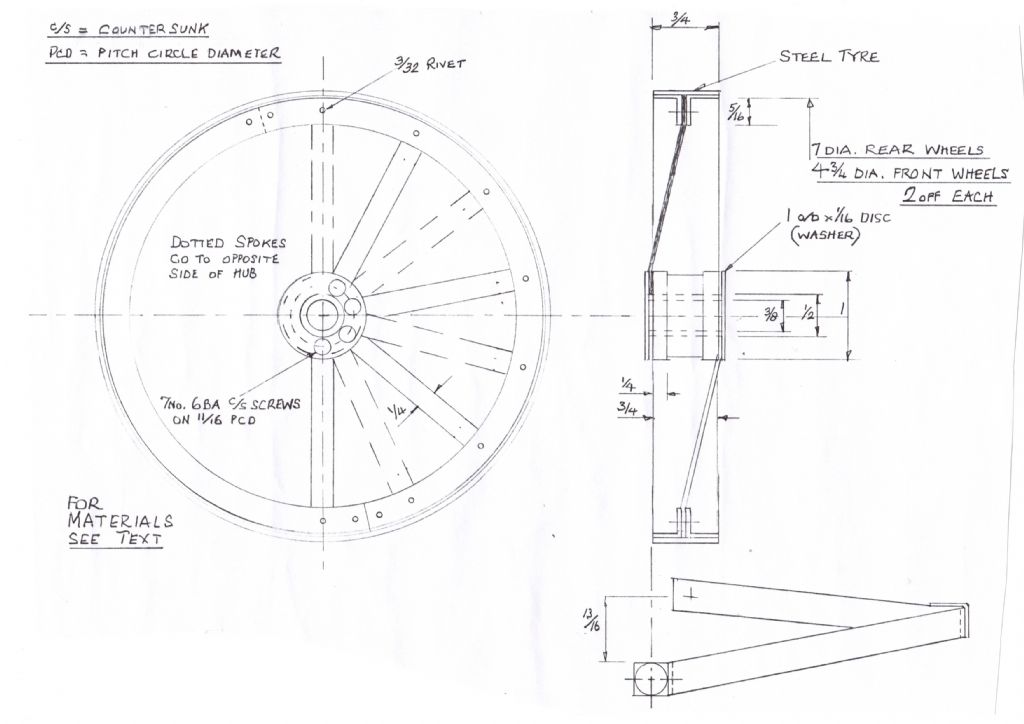
 25215 forum posts 3105 photos 1 articles | In the latest issue Tony suggests chain drilling out the wheel rims by stepping out 1/8" along a scribed circle and then drilling 3mm holes, all well and good so far.
He than says to open out the holes to 4mm BUT not any that are likely to run into adjacent holes. 4mm into 1/8" spacing won't go so the holes will run into each other.
Is it a typo and should the beginner be stepping out at 3/16" or just drilling 3mm and sawing these holes.
It would also help the beginner if he gave a radius for the chaindrilled holes and also the radius the rivits should be drilled at as its not on the drawing
There is also no mention in the text or on the drawings of what thickness angle the rims are made from if rolled. I would assume it should be 1/16" rather than the beginner looking for 18swg x 3/8" angle. Also does not mention that the angle will need cutting down to 3/8x11/32" approx
And being nit picky there are too many dotted hidden detail lines on the hub section, it should only show the bore dotted and not the outer spigots carried through. Also why colour one spoke? is it to show it in section if so why not the hub & rim
Hopefully these items will be sorted as it will confuse beginners that this series is aimed at.
Jason
Edited By JasonB on 04/04/2011 15:15:36 Edited By JasonB on 04/04/2011 15:17:35 |
| David Clark 1 | 04/04/2011 15:17:57 |
 3357 forum posts 112 photos 10 articles | Hi There
I have checked the original text and dimensions are correct as published.
I would suggest marking out at 3/16in. apart might be a better bet.
I would make the hole pitch circle diameter 1/4in. smaller than the inside of the wheel rim.
regards david
|
| JasonB | 04/04/2011 15:26:33 |
25215 forum posts 3105 photos 1 articles | And for any beginners that will work out at 6 1/8" dia which will mean the holes come just inside the Angle leg NOT the rim
 Jason |
| Clive Foster | 04/04/2011 15:50:51 |
| 3630 forum posts 128 photos | Jason
Probably a typo on the chain drilling. Drilling every other hole on 1/8" spacing out to 4 mm will clear the webs between the holes with minimal chance of drill wander. Or maybe drill every other hole 4 mm in the first place by going round twice. The inexperienced worker can do without slightly misplaced holes running into each other on their first efforts at chain drilling. Not to mention the broken drills!
Mixing imperial (1/8") and metric dimensions may be frowned upon but its an excellent way of getting a small clearance / space with limited tools and no need for super accurate measuring gear. Laying divider points onto a good engraved rule is very accurate, especially via a magnifier.
Often thought that a proof reading panel would be good for beginners constructional series articles. Normal ones are hard enough to write when at least you can assume that a bit of reader experience will click in to tide over small errors and "not quite what I meant" phrasing. Beginners stuff is a nightmare for the experienced guy to write, especially as he has his head full of the design and how he made / will make it. Infinite scope for "mentos" (mental equivalent of typos). Hard for experienced workers to spot too as we tend to read what is meant not what is written. Our overworked editor doesn't have time for the detail attention needed.
Clive |
| V8Eng | 04/04/2011 16:17:45 |
| 1826 forum posts 1 photos | I cannot find anything about the Countryman's Steam series in issue 4400, it does not seem to be in the 'next issue' listing for 4401 either. Where are you finding the drawings and ongoing articles? Edited By V8Eng on 04/04/2011 16:19:21 |
| JasonB | 04/04/2011 16:36:12 |
25215 forum posts 3105 photos 1 articles | It is in 4401 which postie dropped off today although it does not say its going to be in the "next issue" in 4400
Should be in the shops Friday |
| David Costello | 04/04/2011 17:29:10 |
| 79 forum posts 9 photos | Jason 4401 comes after 4400,Sorry Jason i understand now it will be in 4401
 Dave Edited By David Costello on 04/04/2011 17:33:27 |
| V8Eng | 04/04/2011 17:42:54 |
| 1826 forum posts 1 photos | Thanks Jason, I do get my copy from shop so look forward to reading the next part. Edited By V8Eng on 04/04/2011 17:44:19 |
| JasonB | 04/04/2011 18:41:43 |
25215 forum posts 3105 photos 1 articles | Two other points on the hub cross section
1. No diameter shown for the reduced central section, assume it should be about 7/8" Would also look better with radiused internal & external corners as it represents a casting
2. The 1/4" dimension given for the hub flanges is not in proportion to whats drawn, the 1/4" should have been dimensioned from the outer face of the cover "washer" to the back of the flange.
Jason
Oh and no idea what the bits in the bottom right are meant to be, hopefully the next installment will enlighten us  Edited By JasonB on 04/04/2011 18:47:30 |
| John Olsen | 04/04/2011 21:05:25 |
| 1294 forum posts 108 photos 1 articles | This might seem a bit like overkill...but if you select a stub drill of a suitable size, for straight lines you can use the coordinate drilling idea. For instance my mill has 2.5mm leadscrews, so by selecting a stub drill that is a little under that, say 2.4mm, you can step along one whole turn of the leadscrew each time and be assured that the drill will not wander into the last hole. ( or use 4.8 and do two turns.) For a circle you can do much the same thing, by establishing what size drill will suit a fixed number of degrees on the rotary table. If you can manage to have nice consistent lands between the holes it does become easier to remove the waste piece afterwards. regards John |
| KWIL | 05/04/2011 09:00:45 |
| 3681 forum posts 70 photos | If you are "chain drilling" along a straight line in a mill, then use a 3 flute cutter and chain mill, then any slight overlap will not hurt, I use the same technique in a circular fashion as well. Edited By KWIL on 05/04/2011 09:01:13 |
| Laurence B | 08/04/2011 10:44:44 |
| 58 forum posts | Posted by JasonB on 04/04/2011 18:41:43:
Two other points on the hub cross section
1. No diameter shown for the reduced central section, assume it should be about 7/8" Would also look better with radiused internal & external corners as it represents a casting
2. The 1/4" dimension given for the hub flanges is not in proportion to whats drawn, the 1/4" should have been dimensioned from the outer face of the cover "washer" to the back of the flange.
Jason
Oh and no idea what the bits in the bottom right are meant to be, hopefully the next installment will enlighten us
Edited By JasonB on 04/04/2011 18:47:30 Like Jason,I have no idea quite what the figure bottom right represents.Also missing from the drawing is the spoke thickness.Is it supposed to be 18g or 16g as implied in the text,or if the angle rims are equal at 5/16,should the spokes be 1/8" thick?
And despite giving the tyre width of 3/4" twice on the drawing,there is no mention of how thick that should be.
Why not put all the dimensions needed to make the wheels on the drawing,especially as the series is aimed for the beginner?
Again it poses the question about the standards of some of the drawings published in the magazine,whereas those excellently provided by Ray McMahon and Peter Rich for their respective locomotive designs should be what all contributors should aim for.
I hope Mr Webster and the Editor accept my comments in a constructive way,as I think this is a most interesting project.
Whether we love or loathe the subject,technical drawing is the language of engineering,whether at full size or in 'our' scales. |
| Terryd | 08/04/2011 13:07:42 |
 1946 forum posts 179 photos | Posted by KWIL on 05/04/2011 09:00:45: If you are "chain drilling" along a straight line in a mill, then use a 3 flute cutter and chain mill, then any slight overlap will not hurt, I use the same technique in a circular fashion as well. Edited By KWIL on 05/04/2011 09:01:13 Can I ask why, if chain drilling for a slot on a milling machine, one should not use a slot drill and just cut the slot. Is there a reason I should know of? Or is there another reason apart from a slot that one needs to chain drill. I thought that the reason for using this method of profiling is for beginners who may not have fully equipped workshops. Thanks and best regards, Terry |
| David Clark 1 | 08/04/2011 13:29:58 |
3357 forum posts 112 photos 10 articles | Hi Terry
The simple answer is it is a lot quicker to remove material with a drill than a slot drill.
Secondly, slot drills can cut oversize and also can keyhole the end of a hole.
To cut a through slot, I would normally drill undersize holes at each end, finish the hole to size with a size slot drill, remove the material by chain drilling or an undersize slot drill and finally finish each side with an undersize slot drill.
However, if cutting a keyway, I would plunge the end of the keyway to full depth then run along the keyway slowly (using feed if available) from one end to the other.
I would also use a new cutter for a keyway for each batch of keyways I did.
regards David Edited By David Clark 1 on 08/04/2011 15:53:54 |
| David Clark 1 | 08/04/2011 13:31:32 |
3357 forum posts 112 photos 10 articles | Hi Laurence
Bottom right are the spokes.
regards David
|
| JasonB | 08/04/2011 17:04:46 |
25215 forum posts 3105 photos 1 articles | Terry I think Kwil was mostly talking about cutting curves to remove the central waste( which is what the thread is about), just set the DRO for a large number of holes on the correct PCD so they just overlap and then plunge cut with an endcutting 2 or 3 flute cutter which won't wander into the adjacent hole. Something like This
Laurence, I did not comment on the tyres as hopefully the thickness and fixing method will be covered in the next issue but agree it should all be on the same drawing or are we going to get a second drawing which will waste space. Agree about the possible two spoke thicknesses and the angles needing to be unequal.
David, Are there any photos that show the flanging process, I have spoken with several other people and they all agreed that the text was hard to follow and a pic or two would help a beginner no end. I know this portable was built a few years ago so maybe there were no work in progress photos taken, this would be a real let down on a beginners series.
I can't see how that can be the spokes as they are drawn in the wrong plane relative to the angle at the extream right, have a kink in them and a hole drilled their full width??? and also not to the same scale/proporting as the rest of the drawing. Also would be nice to referance the drawings some way eg Fig. No or even just say "back wheel" then we all know what drawing is being refered to.
Jason Edited By JasonB on 08/04/2011 17:09:08 |
| JasonB | 08/04/2011 17:35:14 |
25215 forum posts 3105 photos 1 articles | Two maybe three other items missing from the drawing
1. Tapped holes for hubcaps
2. Position of spacers where the two half circle flanges are rivited together so they don't get crushed
3. Should there be a tapped hole in the hub to take an oil tube?
J
|
| David Costello | 08/04/2011 18:52:14 |
| 79 forum posts 9 photos | Much confusion already on this beginners build.Looking through "Reading Iron Works" by Brown & Green,the drawings & photos show these portables with round or oval spokes set into channel rims,possibly made of wood,none of the drawings show flat section spokes or the angle T rims.
Dave
, |
| JasonB | 08/04/2011 19:56:03 |
25215 forum posts 3105 photos 1 articles | Thanks for the info Dave. Though to be fair to the author if he was basing his model solely on the etching that appeared in the first installment then that does seem to show the double angle rims with flat spokes which are quite a common construction on portables.
Jason |
| David Clark 1 | 08/04/2011 22:23:50 |
3357 forum posts 112 photos 10 articles | Hi There
Original drawing attached.
We can only publish what we are given.
 It appears to have been redrawn correctly.
I will ask the author about spoke thickness and hub dimensions.
regards David
Edited By David Clark 1 on 08/04/2011 22:24:09 |
Please login to post a reply.
Magazine Locator
Want the latest issue of Model Engineer or Model Engineers' Workshop? Use our magazine locator links to find your nearest stockist!
Sign up to our Newsletter
Sign up to our newsletter and get a free digital issue.
You can unsubscribe at anytime. View our privacy policy at www.mortons.co.uk/privacy
Latest Forum Posts
- hemingway ball turner
04/07/2025 14:40:26 - *Oct 2023: FORUM MIGRATION TIMELINE*
05/10/2023 07:57:11 - Making ER11 collet chuck
05/10/2023 07:56:24 - What did you do today? 2023
05/10/2023 07:25:01 - Orrery
05/10/2023 06:00:41 - Wera hand-tools
05/10/2023 05:47:07 - New member
05/10/2023 04:40:11 - Problems with external pot on at1 vfd
05/10/2023 00:06:32 - Drain plug
04/10/2023 23:36:17 - digi phase converter for 10 machines.....
04/10/2023 23:13:48 - More Latest Posts...
- View All Topics
Support Our Partners


Shopping Partners
Subscription Offer

Latest "For Sale" Ads
- Reeves** - Rebuilt Royal Scot by Martin Evans
by John Broughton
£300.00 - BRITANNIA 5" GAUGE James Perrier
by Jon Seabright 1
£2,500.00 - Drill Grinder - for restoration
by Nigel Graham 2
£0.00 - WARCO WM18 MILLING MACHINE
by Alex Chudley
£1,200.00 - MYFORD SUPER 7 LATHE
by Alex Chudley
£2,000.00 - More "For Sale" Ads...
Latest "Wanted" Ads
- D1-3 backplate
by Michael Horley
Price Not Specified - fixed steady for a Colchester bantam mark1 800
by George Jervis
Price Not Specified - lbsc pansy
by JACK SIDEBOTHAM
Price Not Specified - Pratt Burnerd multifit chuck key.
by Tim Riome
Price Not Specified - BANDSAW BLADE WELDER
by HUGH
Price Not Specified - More "Wanted" Ads...
Get In Touch!
Do you want to contact the Model Engineer and Model Engineers' Workshop team?
You can contact us by phone, mail or email about the magazines including becoming a contributor, submitting reader's letters or making queries about articles. You can also get in touch about this website, advertising or other general issues.
Click THIS LINK for full contact details.
For subscription issues please see THIS LINK.
Digital Back Issues


Donate

 Register
 Log-in
Model Engineer Magazine
- Percival Marshall
- M.E. History
- LittleLEC
- M.E. Clock

ME Workshop
- An Adcock
- & Shipley
- Horizontal
- Mill

Subscribe Now
- Great savings
- Delivered to your door

Pre-order your copy!
- Delivered to your doorstep!
- Free UK delivery!
All Forum Topics > General Questions > Countryman's Steam - Chain drilling