Forum sponsored by:

Stuart S50
| Wolfie | 24/10/2010 22:19:14 |
 502 forum posts | OK as mentioned elsewhere I have taken up the challenge of building this machine from plans only, mainly for financial reasons. I already have about a million questions so I better have a thread for them. First off I have a small lathe, a pillar drill, a bench grinder and a hacksaw. I'm not great on terminology yet so may need some things explaining that you chaps will all know about. OK so far I have made the piston and piston rod, the piston gland (terminology??) and one end of the cylinder. My next plan is to make the other end through which the piston rod will pass and the gland will screw into. So far I have managed to use all the correct materials. The plans dictate that I put some kind of packing into this part but don't tell me what it is! And what do I use as a gasket? Is this a good place to start? Having a number of engineering contacts I can scrounge odd bits of rod and bar fairly easily but living out here anything special like 'silver steel' (is this stainless steel???) I have to get mail order. But I do have a chunk of cast iron. I went to a local scrap man I know and begged it. They cut me off a piece of farming tackle they were recycling. Thing is its huge. About 6" x 5" and 2" thick. How the hell am I going to make the cylinder out of it cos thats not just round, it has a rectangular piece on it too. OK more questions later  |
| Andrew Johnston | 24/10/2010 22:33:44 |
 7061 forum posts 719 photos | Hi Chris, 'Silver steel' is a high carbon steel that can be hardened and tempered by simple heat treatment processes. I assume it is called silver steel because the finish is normally ground to tight tolerances and has a silvery appearance. It has no connection with stainless steels. Regards, Andrew |
| Nicholas Farr | 24/10/2010 22:41:03 |
 3988 forum posts 1799 photos | Hi Wolfie, Siver Steel is not sainless steel, it is a hardenable tool steel and will rust, unlike stainless steel which doesn't, although it will stain. As far as your lump of cast Iron, you can hacksaw it to a more managable size, if it's a nice bit it souldn't be to difficult.
Regards Nick. |
| Wolfie | 24/10/2010 22:43:30 |
502 forum posts | Cheers for that. I'm curious in general about the various materials used. Bushes are brass. I find that odd, surely brass will wear quicker than steel? All the rods are mild steel except the piston rod which is stainless. Why? And why cast iron for the cylinder? Why not steel like the rest of it? I told you lol I'm starting from scratch here!  Hacksaw through 12 square inches?? eeeek Edited By Wolfie on 24/10/2010 22:45:30 |
| Nicholas Farr | 24/10/2010 22:55:21 |
3988 forum posts 1799 photos | Hi Wolfie, both brass and cast Iron have good wearing properties, but you wouldn't put brass on brass or cast Iron on cast Iron, but you can have brass and bronze. Brass bushes and steel rods are good, prviding there is adiquate lubrication.
Regards Nick. Edited By Nicholas Farr on 24/10/2010 22:57:43 |
| Andrew Johnston | 24/10/2010 23:07:56 |
7061 forum posts 719 photos | Actually cast iron works pretty well against itself, unlike most metals which do not like working against themselves. Regards, Andrew |
| Nicholas Farr | 24/10/2010 23:22:07 |
3988 forum posts 1799 photos | Hi Andrew, I stand corrected on cast iron, I do believe I've come across it before. I do agree that most metals do not like working against themselves.
Regards Nick. |
| John Olsen | 25/10/2010 01:44:58 |
| 1294 forum posts 108 photos 1 articles | I have acquired and built a few Stuart sets from incomplete castings over the years. There are a couple of approaches with the cylinders. One is to make a round part, machine a flat on it for the steam chest, and then braxe on the block for the steam chest. This gives the opportunity to make suitable ports before brazing the parts on. The downside is that cast iron is not terribly easy stuff to braze (Or easiflo) The Tenacity number 6 flux helps, but it is still not easy to be sure that you have got good penetration all the way into the joint. Steel would be easier, and I would think that a steel cylinder and a cast iron piston should be very satisfactory. Another approach is to simply carve the whole thing out of solid. This tends to be easiest when you have a vertical mill and some gear like a dividing head and a rotary table. I have made the cylinder blocks for a Stuart Triple that way, successfully enough that a number of people have thought it was the castings. (The triple has two castings that bolt together.) With a machined from solid cylinder, you will generally have to drill the ports, which is a tricky job requiring careful seting up and a drill that does not wander too much. Your lump of cast iron does sound very useful, other than the Armstrong approach (Hand hacksaw), you should consider being nice to people with bandsaws, perhaps take them a few beers or similar. The usual thing with bearings is to run a hard shaft in a soft material, and funnily enough it is not always the soft one that wears the most. For steam engines the shaft does not need to be all that hard, mild steel running in brass or better, bronze, is perfectly good. The ends of the cylinder are called covers on a steam engine. That gland would be the piston rod gland, later there will be a valve rod gland. A good trick with glands is to modify the design to allow the use of an O ring. This does not need to be compressed like soft packing would, so the design is arranged to provide the right sized groove for the ring, and the gland itself just screws up to a shoulder. You can also use O rings for piston rings, although you want a good finish on the bore for this. Other than O rings, the usual packing is graphited cotton, which at a pinch could be made from ordinary cotton cloth teased apart and graphite grease. Piston rods are ideally made from stas steel rod of the right size, which does not need turning on the outside, althoug polishing it wouldn't hurt. It is actually usually a good plan to bore the cylinder before making the piston, because it is easier to turn the piston the match the bore than the other way round. Gaskets are not too critical, brown paper as used for parcels in the good old days is fine. Any good quality heavy paper would do in fact. regards John |
| Wolfie | 25/10/2010 07:43:27 |
502 forum posts | Some very informative posts there  "Another approach is to simply carve the whole thing out of solid." I thought about this, but once I have my piece of cast iron down to a managable size, this cylinder has 2 round sides and 2 flat so I can't cut it into a rectangle and I can't turn it cos whichever I do I will lose 2 sides. "One is to make a round part, machine a flat on it for the steam chest,
and then braxe on the block for the steam chest. This gives the
opportunity to make suitable ports before brazing the parts on. The
downside is that cast iron is not terribly easy stuff to braze (Or
easiflo)" Whats brazing and easiflow? Ports? Are they the steam holes? Brown paper for gaskets? Won't they get wet?? What are the tolerances like on a steam engine? Packing aside, my 1/8" drill has made a hole that my (bought) 1/8" piece of stainless isn't exactly snug in. I'll get some photos when I go back up to my workshop, photography is my other hobby! |
| JasonB | 25/10/2010 08:03:46 |
 25215 forum posts 3105 photos 1 articles | How small is your lathe, if it's very small then trying to mill a cylinder from solid on it is not going to be possible. So a fabricated one will be the better option.
EDIT. I see its a mini lathe so the chances of getting a vertical slide and rotary table onto it are low so a built up job will be the way to go.
The term Braze in the UK is really too hot for this type of fabrication though it will join cast iron if done well. Easyflow is a trade name for silver solder (silver braze in the USA) this is a hard solder not to be confused with silver coloured plumbers solder, it has a higher melting point than the plumbers stuff soi won't be affected by steam
Paper gaskets will be fine or you can use one of the liquid silicon types sold in car shops like Halfords
Ports are the slots on the valve face, passages are the channels that the steam flows through.
Ideally the piston wants to be a good fit and the hole should really be reamed, failing that try drilling with a one size smaller hole first then opening up to finished size Edited By JasonB on 25/10/2010 08:06:55 |
| Stub Mandrel | 25/10/2010 19:25:03 |
 4318 forum posts 291 photos 1 articles | Did anyone answer the gland packing question? i've given up on traditional packings and use an O-ring. If you had a rotary table a mini lathe would be up to milling a cylinder using the approach in this thread: Neil |
| Wolfie | 25/10/2010 22:32:17 |
502 forum posts | Thats a superb tutorial. I just wish I understood all of it. How you get the milling cutters to the thing while its in the lathe chuck? |
| AES | 25/10/2010 22:36:03 |
 85 forum posts 1 photos | Hullo Wolfie,
QUOTE: Hacksaw through 12 square inches?? eeeek UNQUOTE:
I'm very much a beginner myself myself when it comes to lathe work, but as you've already experienced, there are many people on this site who are not only very knowledgeable but who are delighted to help.
When it comes to hacksawing though, I DO have more than a bit of experience. While the above suggestions of bribing your way onto someone's bandsaw, or fabricationg a cylinder are a good "way out" of your understandable dread of attacking a big lump of cast iron with a hacksaw, if circumstances do finally lead you in that direction, do NOT despair. Here are some tips:
1. Hacksaw blades are not all alike! Ideally, if you have already had some experience of sawing and can keep the hacksaw frame/blade combination reasonably square to the cut then you need 12 inch long HSS blades. Good brands to look for are Eclipse, Starrett, Sandvik - please NOT cheapo unmarked blades off a market stall, etc.
2. As you'll be cutting a hefty chunk of metal, not thin sheet, then you need the coarsest blades you can get - i.e. 14 TPI (teeth per inch).
3. Make sure that you have a decent hacksaw frame which is capable of fully tensioning your blade without distorting. Again the above brands won't let you down. BTW, the teeth have a distinct "slope" and this slope should be facing forwrd when mounted in the hacksaw frame.
4. If you haven't done much hacksawing before you'll probably have problems with "wandering" (we all of us do at the start) so instead of the "plain" HSS blades as per item 1 above, get "bi-metal" instead. Same brands, same 12 inch x 14 TPI, but with bi-metal blades you get the actual cutting teeth made of HSS (which is pretty brittle) then vacuum-welded to a much "softer" steel backing. This allows much more flex than a "plain" HSS blade will allow.
5. OK, we've now got the metal sucurely fastened in the vice, at a comfortable height (when standing against the vice the elbow of your bent arm should be able to rest on the top of the jaws), and having already marked the job we now need a couple of strokes with a triangular file as a start for the blade. The first stroke should be forward - i.e. start off somewhere in the middle of the blade.
6. SLOW & STEADY strokes are the answer (NOT bang, bang, bang, rapid jerking to & fro), and after that first cutting stroke, make sure that you use as much of the full 12 inch length of the blade as is possible.
7. It's going to feel strange at first, but try VERY hard to always "push downwards on the forward (cutting) stroke and release virtually all your pressure on the reverse stroke. As I say, this is going to feel strange at first but stick with it - it's a knack that is well worth learning and it soon comes. IMHO it's the real "secret" to efficient hand sawing (in both metal and wood BTW).
8. Most important is not to look at this "huge" lump of meatl and think "Oh my Gawd, this is going to take weeks". Apply all the above and I promise you you'll be making cuts through your cast iron in minutes, NOT hours!
Wolfie, I do hope the above is not teaching Granny to suck eggs.
All the best with it.
AES |
| John Olsen | 25/10/2010 22:45:37 |
| 1294 forum posts 108 photos 1 articles | The carving out of solid approach does require milling equipment with say a rotary table, so isn't very likely to be your first choice. I did a pair for a Stuart double 10 with the brazed on approach. The machining wa all done on Unimat 3 with the vertical milling attachment to do the flat for the block to braze on. Ports...the Stuart casting come with cast in ports, which saves some tricky work. The flat face is where the slide valve works. This face has three slots in it. The middle one connects to the exhaust hole on the outside face of the cylinder. The other two each connect to their end of the cylinder. In the original Stuart design, this is a bent hole, so you can't drill one the same. For a carved from solid cylinder what you have to do is set the cylinder up on a slight angle, carefully , and make a small angled flat at the edge of the cylinder bore. Then you drill a hole down from that flat to meet the bottom of the portmilled into the valve face. This really needs a picture or diagram...I will see what I can find. Don't let it put you off, it needs careful work but it can be done. If you are doing one with the block brazed on, you can proceed like this: The block has the three ports milled in the middle of it. the two outside ones go right through, and a channel is milled from each of them to the end of the block. This communicates with a hole through the main piece into the cylinder bore. When you braze/easifo the block in place, you end up with a port that connects from the valve face to the cylinder bore. You must not overdo the amount of silver solder as you don't want it to fill up the port. For a hole for a rod to work in, you really should drill undersize, then use a reamer to bring to the right size. Having said that, if you don't have a reamer you can sometimes get away with a drilled hole, but the drill must be in brand new condition, and you will still tend to get a looser fit. I have just put a couple of pictures that might help you to visualise this in my photo album. 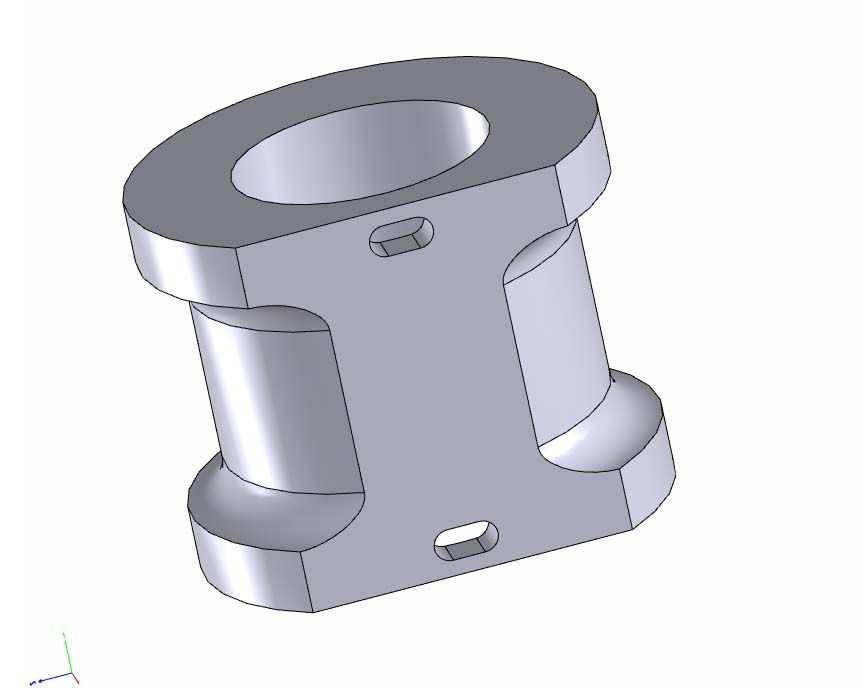 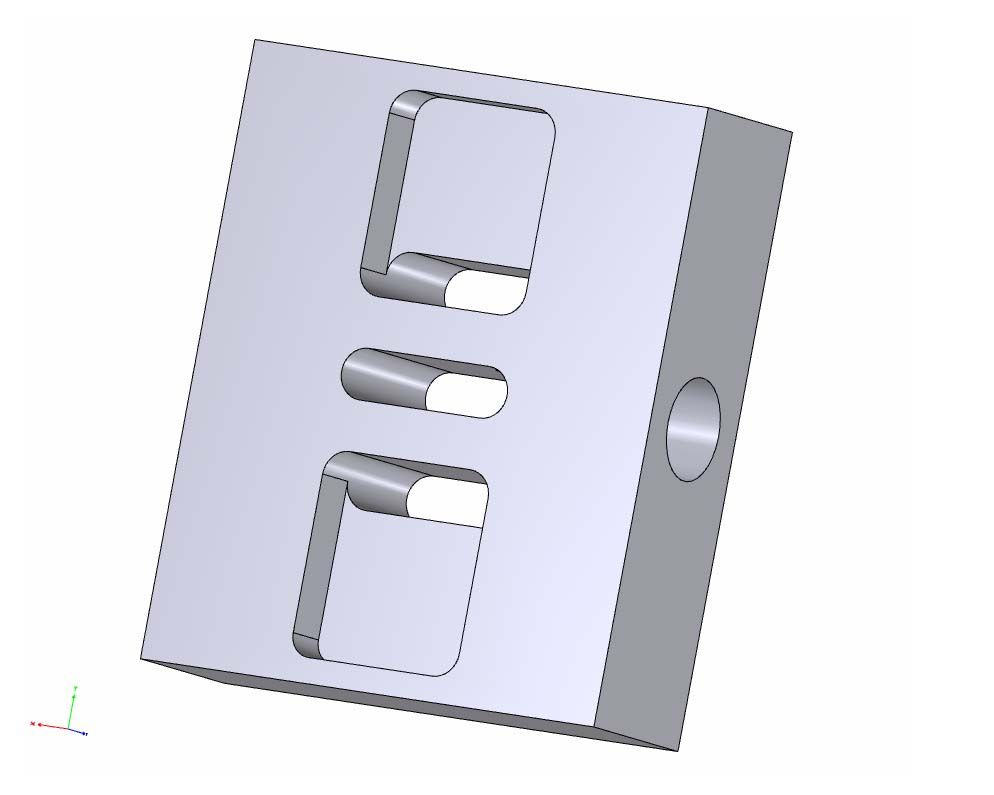 regards John Edited By John Olsen on 25/10/2010 23:15:39 |
| David Clark 1 | 26/10/2010 08:21:54 |
 3357 forum posts 112 photos 10 articles | Hi There
Surely the slope should run to the back of the blade, not forward? Front I/ I/ I/ I/ I/ Back
regards David |
| AES | 26/10/2010 08:47:26 |
85 forum posts 1 photos | Hullo David, That's not what I was taught, sorry. The cutting action is on the forward stroke, the back stroke does not cut. I have attached a scan of a Sandvik 24 TPI “general purpose” blade (I couldn’t quickly find a 14 TPI blade, which would have been clearer). The front of the blade is on the left, and Sandvik (and I think the others I mentioned too) mark the manufacturers name, length (12 inches) and the blade pitch on this end in a different colour. This end definitely always goes to the front of the blade, so that the cutting is done on the forward stroke. |
85 forum posts 1 photos | Sorry, I tried to attach the blade scan to the message - it didn't work! I'll try to post it in albums.
Krgds
AES |
| Wolfie | 26/10/2010 08:49:59 |
502 forum posts | "Surely the slope should run to the back of the blade, not forward? Front I/ I/ I/ I/ I/ Back" Sorry you lost me here EDIT: Ah I see hacksaw blade. I'm OK with hacksaws thanks. But the recommendations have been taken on board. I do need to get a good one, mine won't cut in a straight line! That post with the pics is very handy and expanatory thanks. Does the middle hole, the one for the exhaust have to go all the way through if the exhaust hole is above it? The small metal piece that slides over these ports controls the exhaust then, not the steam in. What controls the steam in then? Where do I learn to braze? Difference between a drill and a reamer?? Edited By Wolfie on 26/10/2010 08:51:50 Edited By Wolfie on 26/10/2010 08:52:55 |
| John Olsen | 26/10/2010 09:54:53 |
| 1294 forum posts 108 photos 1 articles | Hi Wolfie, No, the exhaust does not need to go all the way through, and it would be better if it did not. It would make it more likely that you would not have any awkward leaks. ..It is just a quick sketch, the other two ports had to go through so I did them all the same. OK the slide valve is like a small block of metal with a recess on the face side. Think of it as a small box shape. The size of the recess is such that it will bridge over two of the ports, eg exhaust and one cylinder port. OK, now, the whole of the valve area is covered by another larger box shape The steam supply is connected to this. The pressure pushes the valve against the valve face, which gives us a seal. The valve rod comes through a gland in the enclosing box. (which we call the steam chest.) When it moves the valve one way, the recess bridges one cylinder port and the exhaust port, so that end of the cylinder is exhausting. At the same time, the cylinder port at the other end is uncovered, so steam from the valve chest can enter the cylinder, pushing the pston towards the other end. At the right moment the valve gear moves the valve the other way, so that roles are reversed and the piston moves back. There is of course a lot of refinement that we are not going to talk about just yet.... If you can find the (free) Dockstadter valve gear program and load it on your machine, you can see live animations of how this all works Brazing...well, you need a source of heat, like a reasonably substantial propane torch, some firebricks to sit the job on, a well ventilated place to work away from anything inflammable, some flux, and some easiflo. You probably want to practice on some small jobs before trying anything too substantial. I wonder if any of the recent magazines have any good articles on this, or if there is one on the website somewhere, as a decent explanation is probably more than i can fit into the margin of this post. regards John |
| John Olsen | 26/10/2010 10:06:42 |
| 1294 forum posts 108 photos 1 articles | Reamers and drills: A drill is for making a hole where none exists. (they can also enlarge an existing hole of course) Because of this it has a point designed to guide it though the metal and cutting lips to remove all of the hole. A reamer (or rimer to some) is not designed to create a new hole, it is designed to enlarge an existing hole by a small amount to bring it to an exact size. (Well, nearly exact...) So it can only take a very small amount off the hole. So they are more expensive than drills, but if looked after should last a very long time. You tend to only need a few standard sizes, eg for Imperial you might want 1/8, 5/32, 3/16 for small engines. (3, 4, 5mm for metric sizes.) You should match them to the stock you are going to use rather than the sytem you normally work with, eg if you find you can get only 1/8 inch stainless for your piston rod, get a reamer to match even if everything else is metric. You will probably only want to buy them as you need them. Whereas for drills you should buy a good set from say 1/6 to 1/4 by 1/32 steps, or 1mm to 6mm by 0.5 mm steps. (Better if you can to have a set that goes to at least 3/8 or 10mm of course. ) regards John |
Please login to post a reply.
Magazine Locator
Want the latest issue of Model Engineer or Model Engineers' Workshop? Use our magazine locator links to find your nearest stockist!
Sign up to our Newsletter
Sign up to our newsletter and get a free digital issue.
You can unsubscribe at anytime. View our privacy policy at www.mortons.co.uk/privacy
Latest Forum Posts
- *Oct 2023: FORUM MIGRATION TIMELINE*
05/10/2023 07:57:11 - Making ER11 collet chuck
05/10/2023 07:56:24 - What did you do today? 2023
05/10/2023 07:25:01 - Orrery
05/10/2023 06:00:41 - Wera hand-tools
05/10/2023 05:47:07 - New member
05/10/2023 04:40:11 - Problems with external pot on at1 vfd
05/10/2023 00:06:32 - Drain plug
04/10/2023 23:36:17 - digi phase converter for 10 machines.....
04/10/2023 23:13:48 - Winter Storage Of Locomotives
04/10/2023 21:02:11 - More Latest Posts...
- View All Topics
Support Our Partners


Shopping Partners
Subscription Offer

Latest "For Sale" Ads
- Reeves** - Rebuilt Royal Scot by Martin Evans
by John Broughton
£300.00 - BRITANNIA 5" GAUGE James Perrier
by Jon Seabright 1
£2,500.00 - Drill Grinder - for restoration
by Nigel Graham 2
£0.00 - WARCO WM18 MILLING MACHINE
by Alex Chudley
£1,200.00 - MYFORD SUPER 7 LATHE
by Alex Chudley
£2,000.00 - More "For Sale" Ads...
Latest "Wanted" Ads
- D1-3 backplate
by Michael Horley
Price Not Specified - fixed steady for a Colchester bantam mark1 800
by George Jervis
Price Not Specified - lbsc pansy
by JACK SIDEBOTHAM
Price Not Specified - Pratt Burnerd multifit chuck key.
by Tim Riome
Price Not Specified - BANDSAW BLADE WELDER
by HUGH
Price Not Specified - More "Wanted" Ads...
Get In Touch!
Do you want to contact the Model Engineer and Model Engineers' Workshop team?
You can contact us by phone, mail or email about the magazines including becoming a contributor, submitting reader's letters or making queries about articles. You can also get in touch about this website, advertising or other general issues.
Click THIS LINK for full contact details.
For subscription issues please see THIS LINK.
Digital Back Issues


Donate

 Register
 Log-in
Model Engineer Magazine
- Percival Marshall
- M.E. History
- LittleLEC
- M.E. Clock

ME Workshop
- An Adcock
- & Shipley
- Horizontal
- Mill

Subscribe Now
- Great savings
- Delivered to your door

Pre-order your copy!
- Delivered to your doorstep!
- Free UK delivery!
All Forum Topics > Beginners questions > Stuart S50