Forum sponsored by:

Warco WM250 headstock lubrication
| Mark P. | 27/05/2010 16:16:36 |
 634 forum posts 9 photos | Hi all,has anyone fitted a headstock lubrication system to a Warco WM250 lathe? Because the only way to lubricate the two taper rollers is to dismantle the whole spindle assy,which is far from satisfactory.I have a pair of drip feed oilers which I was planning on fitting but..................the way the bearings are fitted seems to preclude this idea.Any thoughts welcome.
Regards Pailo. |
| MoosE | 07/11/2011 23:37:03 |
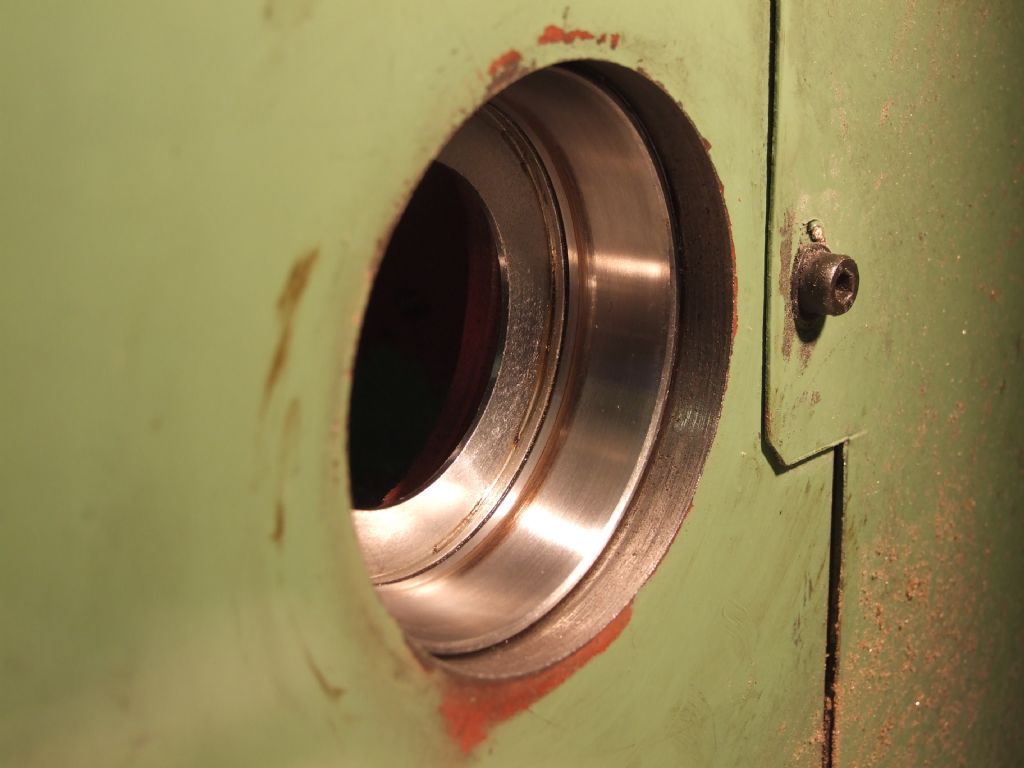
 3 forum posts 2 photos | The WM250 manual leads one to bbelieve that the headstock is lubricated from the gearbox below. Not the case! I agree with Pailo there is no easy way to lubricate the bearings apart from dismantling. Leading on from this: My machine is about 18 months old and recently after working it for about 1/2 hour at full speed, the spindle rapidly decelerated accompanied by an awful noise as the motor struggled. Switched off quick! The whole headstock was very hot and the spindle extremely stiff to turn.
On dismantling, the split spindle adjusting nut was unbelievably tight and its two lock screws had not been tightened sufficiently to properly lock it. There was very little grease on and around the bearings. So, failure caused by excessive pre-load and insufficient lubrication?
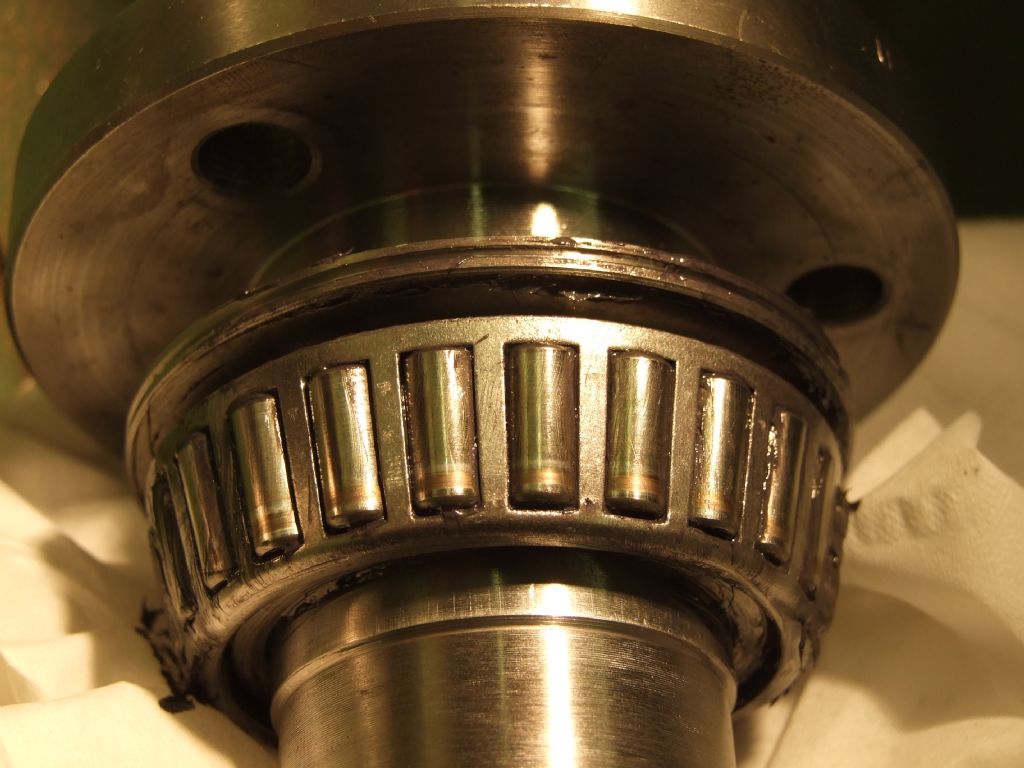
The chuck-side bearing has a wear mark on the outer race (dark ring in photo 1) and a corresponding mark on all the rollers suggesting point contact and an error in the bearing tapers. Anyone else seen this sort of thing before?
Cheers,
MoosE.
  Edited By MoosE on 07/11/2011 23:40:58 Edited By MoosE on 07/11/2011 23:44:56 |
| Chris Trice | 08/11/2011 03:23:30 |
 1376 forum posts 10 photos | Well, I don't think anyone will seriously argue that far eastern bearings are a match for good quality branded bearings. You can feel the difference. You get what you pay for. |
| ady | 08/11/2011 05:56:56 |
| 612 forum posts 50 photos | All these new units need to be stripped and checked before use. Some of the overseas places have...um variable quality control. And after saying that...I must admit that as a newbie the last thing I would want to mess with is tapered roller bearings. |
| Terryd | 08/11/2011 06:11:05 |
 1946 forum posts 179 photos | Posted by Chris Trice on 08/11/2011 03:23:30: Well, I don't think anyone will seriously argue that far eastern bearings are a match for good quality branded bearings. You can feel the difference. You get what you pay for. Hi Chris, I thought that Japanese stuff was considered high quality and they are from the 'Far East'. Am I mistaken in either of those thoughts? Regards Terry |
| Chris Trice | 08/11/2011 10:36:55 |
1376 forum posts 10 photos | Yes, very good. You got me there. Fortunately, everyone else knows what I mean. |
| Chris Courtney | 08/11/2011 12:14:32 |
| 31 forum posts | I believe that all (or at least most of) the major bearing companies have manufacturing factories in China (not to mention India and Brazil), so that good quality branded bearing may well have been made in China.
By buying a branded bearing, you are getting a bearing manufactured to a known standard and quality, backed by the reputation of the company. In this day and age, where it is manufactured doesn't necessarily tell you much about the quality.
Chris
|
| Chris Trice | 08/11/2011 18:41:17 |
1376 forum posts 10 photos | True but in general terms, the meaning of my statement is understood. SKF's plant could be anywhere but I'll wager the bearings aren't made out old railway rails and go through a proper hardening process. I bet their taper bearings don't contact on just one narrow band either. |
| KMP | 08/11/2011 19:36:16 |
| 73 forum posts 2 photos | Moose Hi.
Difficult
to be precise without actually seeing the bearing but I doubt it is
poor manufacture, rather it appears to be a classic “smearing” failure
from your pictures. Obviously could be caused by a simple contamination
problem but is mostly caused by poor assembly technique, particularly as
it has run for 18 months or so. Basically the bearing is assembled with
the two races slightly (very) misaligned. The excessive pre-load is
applied without rotating the bearing causing the races to fail to align
correctly and the rollers to be extremely tight at one point and fairly
loose on the opposite side. The rollers then constantly slow down (loose
area) and rapidly accelerate and skid (tight area) leading to the type
of failure you have. The problem is quickly exacerbated by lack of
lubrication. It is sometimes noticeable by a slight tightening as you
rotate the shaft by hand but not always as it is easily hidden by the
drag of other parts of the drive system.
Best regards Keith |
| MoosE | 09/11/2011 20:57:15 |
3 forum posts 2 photos | Hi Keith,
Thanks for the detailed explanation.
MoosE |
| Gunnar M | 10/04/2012 18:50:49 |
| 8 forum posts 1 photos | Hi MoosE! I have a problem simelar to yours. I have removed the spindle from the headstock, but the rear bearing is so tight on the spindle. So i haven't any possibillity to know how mutch force i put on the bearing when tighten the nut. Was this similar on yours? Gunnar |
| MoosE | 11/04/2012 00:12:12 |
3 forum posts 2 photos | Hi Gunnar, I had exactly the same difficulty. The drive-side bearing inner race was so tight on the shaft it was impossible to "feel" for it tightening and consequent risk of further damaging the bearings. I carefully eased the shaft down with a strip of fine abrasive cloth, cleaned and oiled the shaft and re-assembled. Much better! Did your bearing race and rollers look like those in the picture above? I couldn't figure out how to remove the outer races without damaging the headstock casting so had to put the original bearings back. Used molybdenum disulphide grease (Castrol MS3) and the machine has since done a considerable amount of good work.
Cheers, MoosE |
| JasonB | 11/04/2012 07:26:55 |
 25215 forum posts 3105 photos 1 articles | I had a very hard job getting my 280 spindle bearings out when they suffered the same fate. Managed it in teh end and did get the outer races out of the head. Fitted FAG bearings and it runs so much smoother now but still could not easily judge the load needed to tighten the bearings. J |
| Doddy | 11/04/2012 08:43:34 |
 72 forum posts 103 photos | How easy was it to remove the bearing outer race from the headstock casting ?
|
| JasonB | 11/04/2012 15:06:35 |
25215 forum posts 3105 photos 1 articles | Easier than getting the spindle out and the bearing off the chuck end but still not easy. I cut a bit of 1/2x1" to bear against the back of teh bearing shell, drilled the middle for M12 clearance and then used another bar against the outside of the head casting and then would it out with a M12 stud down the middle, still needed a lot of effort. Anyone thinking of changing the bearings on one of these type of lathes would do well to have a look at this article on Arc Euro's site, there is a sketch of how to make up a puller to get the spindle out J |
| Gunnar M | 11/04/2012 15:30:11 |
| 8 forum posts 1 photos | Hi MoosE! My bearing wasn't damage like your. I get more and more scattering when i use the lathe. So i tighten the nut on the drive side. It was realy difficult to tight it, use a lot of power before i get any change on the bearing. So when i start again it go well for about 30min. Then the bearing get a littel heat and i get a biggere resitens when turning the spindle. To loosen the bearing again it was so hard that i made a ters. It then get to loose so i was forced to remove it complete. I then do it same way as you, used a abrasive cloth. So i will mount it tonight and try again. Tank you for advice. Gunnar |
| KWIL | 11/04/2012 16:51:28 |
| 3681 forum posts 70 photos | Just to put this all in context, I used a 5Ton hydraulic ram in a specially made jig to remove and refit simlar (larger) bearings. The final set up was done by measuring the rotational torque once the bearing was up to running temperature. I left the bearing fit on the spindle as per manufacturer. (damn tight). |
| JasonB | 11/04/2012 17:01:57 |
25215 forum posts 3105 photos 1 articles |
Thanks KWIL, I'll know where to come if I have to do it again
J |
| KWIL | 11/04/2012 18:47:21 |
| 3681 forum posts 70 photos | Jason, there is a photo added for your dilectation. |
| JasonB | 11/04/2012 20:16:21 |
25215 forum posts 3105 photos 1 articles | A very elegant solution, good job I didn't take any pictures when I did mine as the design was based on that of Mr Robinson.
You have also saved me some money, I had always fancied a M300 but if the bearings still need replacing like the far eastern lathes I'll stick with what I've got for now J |
Please login to post a reply.
Magazine Locator
Want the latest issue of Model Engineer or Model Engineers' Workshop? Use our magazine locator links to find your nearest stockist!
Sign up to our Newsletter
Sign up to our newsletter and get a free digital issue.
You can unsubscribe at anytime. View our privacy policy at www.mortons.co.uk/privacy
Latest Forum Posts
- *Oct 2023: FORUM MIGRATION TIMELINE*
05/10/2023 07:57:11 - Making ER11 collet chuck
05/10/2023 07:56:24 - What did you do today? 2023
05/10/2023 07:25:01 - Orrery
05/10/2023 06:00:41 - Wera hand-tools
05/10/2023 05:47:07 - New member
05/10/2023 04:40:11 - Problems with external pot on at1 vfd
05/10/2023 00:06:32 - Drain plug
04/10/2023 23:36:17 - digi phase converter for 10 machines.....
04/10/2023 23:13:48 - Winter Storage Of Locomotives
04/10/2023 21:02:11 - More Latest Posts...
- View All Topics
Support Our Partners


Shopping Partners
Subscription Offer

Latest "For Sale" Ads
- Reeves** - Rebuilt Royal Scot by Martin Evans
by John Broughton
£300.00 - BRITANNIA 5" GAUGE James Perrier
by Jon Seabright 1
£2,500.00 - Drill Grinder - for restoration
by Nigel Graham 2
£0.00 - WARCO WM18 MILLING MACHINE
by Alex Chudley
£1,200.00 - MYFORD SUPER 7 LATHE
by Alex Chudley
£2,000.00 - More "For Sale" Ads...
Latest "Wanted" Ads
- D1-3 backplate
by Michael Horley
Price Not Specified - fixed steady for a Colchester bantam mark1 800
by George Jervis
Price Not Specified - lbsc pansy
by JACK SIDEBOTHAM
Price Not Specified - Pratt Burnerd multifit chuck key.
by Tim Riome
Price Not Specified - BANDSAW BLADE WELDER
by HUGH
Price Not Specified - More "Wanted" Ads...
Get In Touch!
Do you want to contact the Model Engineer and Model Engineers' Workshop team?
You can contact us by phone, mail or email about the magazines including becoming a contributor, submitting reader's letters or making queries about articles. You can also get in touch about this website, advertising or other general issues.
Click THIS LINK for full contact details.
For subscription issues please see THIS LINK.
Digital Back Issues


Donate

 Register
 Log-in
Model Engineer Magazine
- Percival Marshall
- M.E. History
- LittleLEC
- M.E. Clock

ME Workshop
- An Adcock
- & Shipley
- Horizontal
- Mill

Subscribe Now
- Great savings
- Delivered to your door

Pre-order your copy!
- Delivered to your doorstep!
- Free UK delivery!
All Forum Topics > Manual machine tools > Warco WM250 headstock lubrication