Headstock alignment
| UncouthJ | 10/10/2022 17:52:48 |
| 143 forum posts 39 photos | Hey folks... Anyone got any best practice methods for lathe headstock alignment please? I've got 50um per inch runout from the spindle. Measured with a 3MT test bar from RDG... Cheers, Jay |
| Tony Pratt 1 | 10/10/2022 17:57:18 |
| 2319 forum posts 13 photos | To mind 'runout' means rotational eccentricity but I'm thinking that is not what you mean, you might need to elaborate with more details. Just for fun I Googled 'best practice methods for lathe headstock alignment', plenty of reading to wade through. Maybe start with LPR Toolmakers. Tony Edited By Tony Pratt 1 on 10/10/2022 18:00:15 |
| Brian G | 10/10/2022 18:01:21 |
| 912 forum posts 40 photos | I can't offer any advice Jay, but I think those who can would need to know something about the machine, ideally make and model and whether it is a flat, round or prismatic bed. Brian G |
| UncouthJ | 10/10/2022 18:09:10 |
| 143 forum posts 39 photos | It's a 1941 Logan 10" (Montgomery Wards 700). Yes rotational eccentricity is what I mean (At least I think that's what I mean...) I have a test bar in the spindle and getting and additional 0.05mm rotational deviation for every inch I move the DTI away from the head stock... Jay |
| Journeyman | 10/10/2022 18:33:27 |
1257 forum posts 264 photos | Before moving the headstock it may be wise to first eliminate any other possible cause of run-out.
Moving the headstock should be a last resort this is 'Here Be Dragons' territory. Move slowly and carefully, eliminate all other possibilities before unbolting the headstock. John Edited By Journeyman on 10/10/2022 18:34:31 |
| UncouthJ | 10/10/2022 18:37:19 |
| 143 forum posts 39 photos | It's ok, I'm a prat! Read the LPR article... Thought "yep yep yep..." Read it again and realised my error! I'd just inserted the bar by hand. Took it out gave it and the socket a wipe and gave it a clump home with the wooden mallet. Now I've got 0.03 runout registering along the whole bar. Which although still needs dialing in, isn't near as dire as it appeared earlier. Leaving the post up for others to learn from my shame! Jay |
| Michael Gilligan | 10/10/2022 19:59:58 |
23121 forum posts 1360 photos | Posted by UncouthJ on 10/10/2022 18:37:19:
[…] Leaving the post up for others to learn from my shame! Jay . Very honourable, Jay MichaelG. |
| Chris Mate | 10/10/2022 20:15:10 |
| 325 forum posts 52 photos | After I mod my 3-Jaw chuck to adjust precice at various diameters, I quickly learn I must remember to clean the jaws and scroll before attempting to dial it in, patience is a good thing. |
| Hopper | 11/10/2022 03:49:44 |
7881 forum posts 397 photos | Posted by UncouthJ on 10/10/2022 18:37:19:
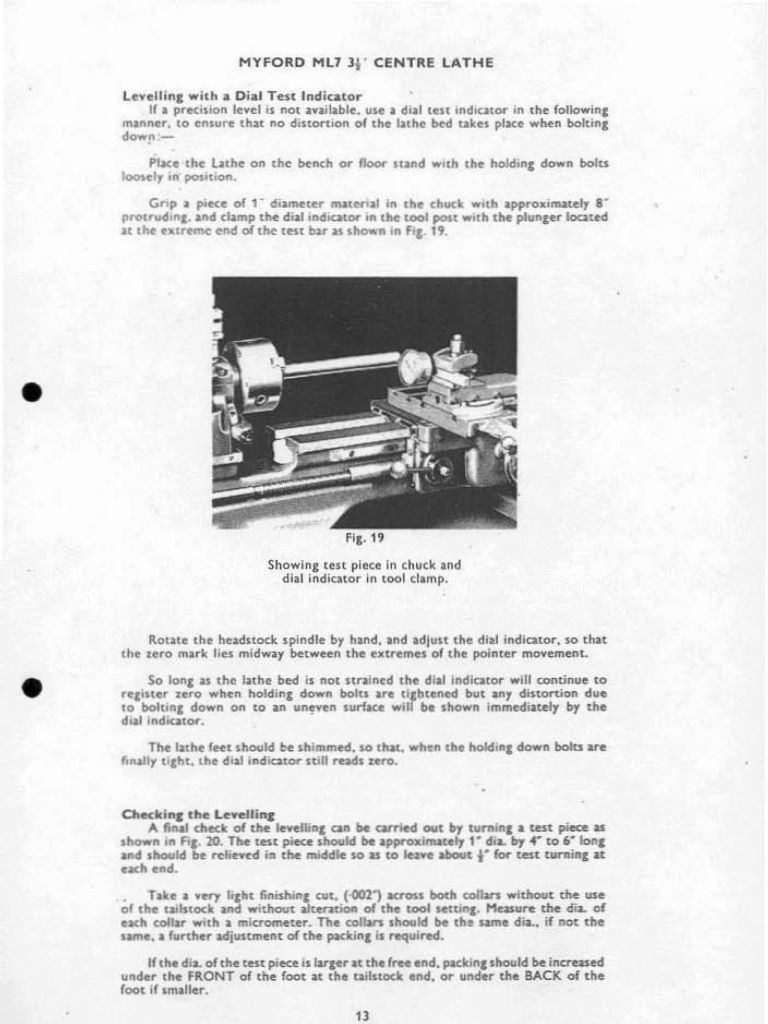
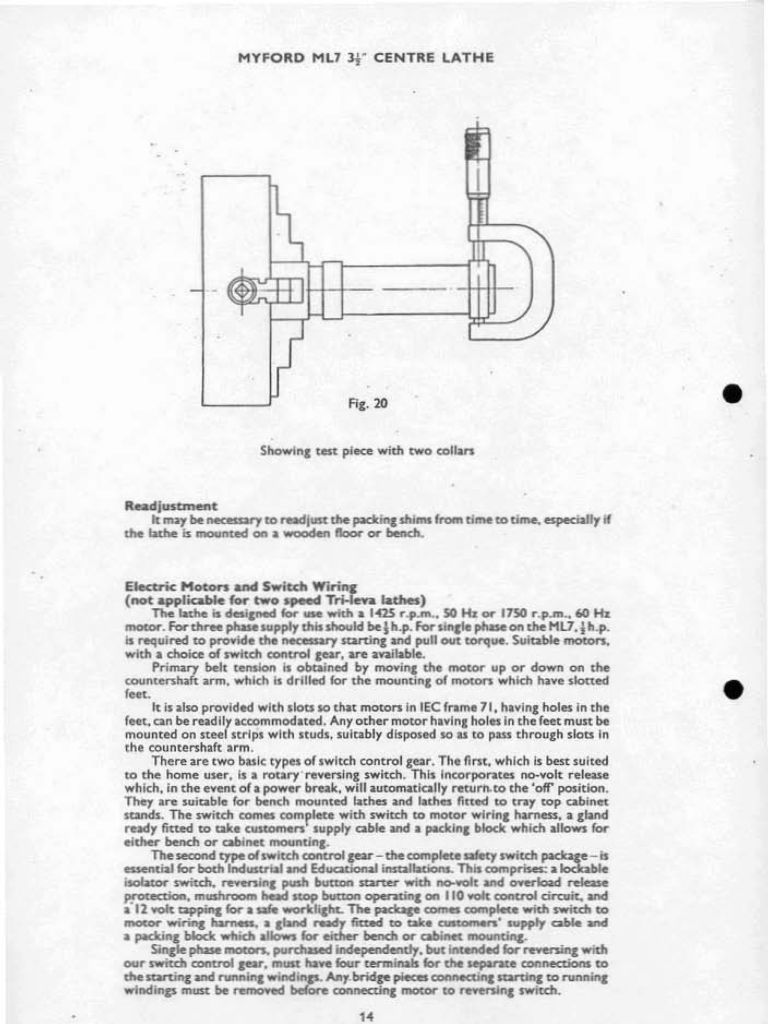
It's ok, I'm a prat! Read the LPR article... Thought "yep yep yep..." Read it again and realised my error! I'd just inserted the bar by hand. Took it out gave it and the socket a wipe and gave it a clump home with the wooden mallet. Now I've got 0.03 runout registering along the whole bar. Which although still needs dialing in, isn't near as dire as it appeared earlier. Leaving the post up for others to learn from my shame! Jay Headstock alignment will have no influence at all over eccentric runout of a test bar as the lathe spindle is rotated. Your .03mm runout is most likely due to either burrs or bruises or other distortion on the 50 year old tapered hole in the middle of your spindle. (Even reaming the hole will not guarantee it is concentric with the outer spindle diameter. The reamer follows the existing hole) Or a small piece of grit between the tapers. Or it's not being seated exactly evenly. Or, and this is quite likely, due to very poor manufacturing standards of hobby grade test bars by low cost far-eastern suppliers. The best thing you can do with your test bar is toss it away. If you want to measure spindle runout, run a dial indicator directly on the spindle collar where the chuck mounts and rotate the spindle. If you want to check and adjust headstock to bed alignment, the best method for old lathes is detailed in the Myford ML7 Users Manual. This method works best because it measures what the lathe is actually doing under real world circumstances. It takes into account bed wear (which can throw a sensitive level off kilter) and cutting forces etc (which can provide a different result from a perfect reading with test bar like yours in a static test.).
|
| Martin Johnson 1 | 11/10/2022 12:52:10 |
| 320 forum posts 1 photos | If you are trying to determine if the headstock axis is parallel to the bed, first check the test bar is not tapered. A tenth thou clock set up as a comparator on a surface plate would be a good weapon for that. Next, any test you do must be repeated at (say) 4 rotational positions of the spindle (eg 12,3,6&9 oclock). That will eliminate much of the possible errors due to dirty, wonky, bent spindles. Martin
|
| UncouthJ | 11/10/2022 13:32:37 |
| 143 forum posts 39 photos | Thanks for the input folks. I'll make a proper test bar once I know I'm in the ball park, which is all the RDG bar is for. I've done a full rebuild so thought it was as good a way as any to line everything up initially. It was the initial reading that gave me a bit of a panic. Brain just went straight to catastrophic consequence before thinking to check the validity of the measurement... Such is the learning curve. So nice to have patient and knowledgeable folks here for a sanity check! Jay Edited By UncouthJ on 11/10/2022 13:33:37 |
| old mart | 11/10/2022 18:32:45 |
| 4655 forum posts 304 photos | Notice that the tightening of the headstock bolts might affect the alignment and if so, you might have to set the headstock very slightly off before tightening them. Patience is very important when carrying out these adjustments, never give in if it is difficult. The other check is having the DTI tip on top of the headstock, hopefully it will be ok without any bother. |
| Phil Whitley | 12/10/2022 10:04:21 |
1533 forum posts 147 photos | Put your test bar between centres and check it for run out, I have one of the much maligned Indian test bars which came from RDG if I remember correctly, and it is well within its claimed tolerance. Blue up the taper on the test bar and rotate it in the headstock to see if you can mark up any high spots, ease them down with a hand scraper and keep bluing till you get good all round contact. I did this on my Mk1 colchester student, and it made a huge difference. To check headstock alignment put the DTI in the toolpost, and run it along the front centre of the test bar, reading should be constant when the headstock is in alignment, but also appreciate that this is subject to bed/carriage conditioin and you may see some jitters along the way. The overall reading from chuck to the end of the test bar is what is important. Repeat on the top centre of the test bar to check for any "nod" of the headstock, and please remember that all machine tools have a tolerance, and the further you go down the scale in initial cost and purpose of the machine, the greater the tolerance will be! The object of the excercise is not to get the machine bang on, it is to get it as close as you reasonably can, and then make parts! If the parts are good enough for purpose, you have won!! Phil |
Please login to post a reply.
Want the latest issue of Model Engineer or Model Engineers' Workshop? Use our magazine locator links to find your nearest stockist!
Sign up to our newsletter and get a free digital issue.
You can unsubscribe at anytime. View our privacy policy at www.mortons.co.uk/privacy
- *Oct 2023: FORUM MIGRATION TIMELINE*
05/10/2023 07:57:11 - Making ER11 collet chuck
05/10/2023 07:56:24 - What did you do today? 2023
05/10/2023 07:25:01 - Orrery
05/10/2023 06:00:41 - Wera hand-tools
05/10/2023 05:47:07 - New member
05/10/2023 04:40:11 - Problems with external pot on at1 vfd
05/10/2023 00:06:32 - Drain plug
04/10/2023 23:36:17 - digi phase converter for 10 machines.....
04/10/2023 23:13:48 - Winter Storage Of Locomotives
04/10/2023 21:02:11 - More Latest Posts...
- View All Topics
- Reeves** - Rebuilt Royal Scot by Martin Evans
by John Broughton
£300.00 - BRITANNIA 5" GAUGE James Perrier
by Jon Seabright 1
£2,500.00 - Drill Grinder - for restoration
by Nigel Graham 2
£0.00 - WARCO WM18 MILLING MACHINE
by Alex Chudley
£1,200.00 - MYFORD SUPER 7 LATHE
by Alex Chudley
£2,000.00 - More "For Sale" Ads...
- D1-3 backplate
by Michael Horley
Price Not Specified - fixed steady for a Colchester bantam mark1 800
by George Jervis
Price Not Specified - lbsc pansy
by JACK SIDEBOTHAM
Price Not Specified - Pratt Burnerd multifit chuck key.
by Tim Riome
Price Not Specified - BANDSAW BLADE WELDER
by HUGH
Price Not Specified - More "Wanted" Ads...
Do you want to contact the Model Engineer and Model Engineers' Workshop team?
You can contact us by phone, mail or email about the magazines including becoming a contributor, submitting reader's letters or making queries about articles. You can also get in touch about this website, advertising or other general issues.
Click THIS LINK for full contact details.
For subscription issues please see THIS LINK.
Model Engineer Magazine
- Percival Marshall
- M.E. History
- LittleLEC
- M.E. Clock
ME Workshop
- An Adcock
- & Shipley
- Horizontal
- Mill
Subscribe Now
- Great savings
- Delivered to your door
Pre-order your copy!
- Delivered to your doorstep!
- Free UK delivery!


 Register
 Log-in


