Forum sponsored by:

Is this any good
Half nut
| Haydn Callow | 27/09/2022 12:25:25 |
 64 forum posts 37 photos |
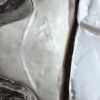
new to all this, bought a Drummond M type in a basket……I now have it built and I know it has been attacked with a hacksaw in the past…..however it is mostly there and it will do what I want. I have stripped most parts and cleaned and oiled reassembled. I have just stripped the saddle and in doing discovered what a half nut is. my question is having never having seen one before :- what do folks think of it ? Worn out, o.k, or good. if worn out what can I do about it ?
|
| Martin Johnson 1 | 27/09/2022 12:50:55 |
| 320 forum posts 1 photos | Life expired. It will slip a thread at the most inopportune moment, so replace if you have any intention to do screwcutting. Awkward to make, but you might be able to silver solder new nut halves into the old remains. Sorry to bring bad news, don't shoot the messenger, Martin |
| Thor 🇳🇴 | 27/09/2022 12:53:30 |
 1766 forum posts 46 photos | Hi Haydn, From your photos the half-nut looks worn, especially on the side where there is hardly any thread left. Thor |
| Haydn Callow | 27/09/2022 13:09:00 |
64 forum posts 37 photos | So my next question :- can it be repaired ( beyond my ability ) or could I get a replacement ? |
| Clive Foster | 27/09/2022 13:28:03 |
| 3630 forum posts 128 photos | The technical term is basically "well knackered". As you aren't equipped to screwcut a new one and finding a decent used replacement is likely to be challenging an unorthodox repair will be needed. Hot moulding two half circle bored pieces of delrin around an unworn part of the leadscrew is known to work well. The difficult bit generally being attaching the new delrin halfnuts to the mechanism. There are several write-ups of the technique on the internet. Most workers elect to bore out the halfnut casting and arrange flanges on the delrin half cylinders to keep them in place under screwcutting loads. Adhesive, pins or teeny screws being enough for retention when not in use. In your position I'd be inclined to try a modern metal loaded filler. Put a couple of small holes through the thread remains to help the excess filler squidge out, coat the chosen part of the leadscrew with a release agent and squeeze the two half nuts together around the screw to form a thread. Soot was a common release agent when babbit bearings were poured, I imagine silicone spray, PTFE loaded lubricant spray or one of the thinner, retentive oils would also work. Hardest part is going to be making sure that both halves of the nut align. May have to be done on with the apron partially assembled leaving little room to work. But many machines eg Colchester, Kerry et al get on just fine with only one side of a half nut. So doing only one side might well suffice. I imagine you have no plans for vast amounts of screwcutting so even an, objectively, insufficiently strong repair might last for several years. Some experimentation on disposable things is usually advisable before committing to a unorthodox repair on hard to replace parts. Clive |
| not done it yet | 27/09/2022 13:36:22 |
| 7517 forum posts 20 photos | As per MJ. You only need to look at offerings on an suction site to make a simple assessment of what you have. Buy new, buy second hand, make yourself, or repair are the options. I would likely go the repair route, if possible, but ymmv. A question might be re the lead screw condition, too. Edited By not done it yet on 27/09/2022 13:37:53 |
| Ady1 | 27/09/2022 13:36:45 |
 6137 forum posts 893 photos | Easiest route I can think of is a babbit pour, I will dig an article out asap https://www.model-engineer.co.uk/albums/member_album.asp?a=58501 Just adapt your nut job to the situation
Edited By Ady1 on 27/09/2022 14:08:25 |
| old mart | 27/09/2022 14:09:26 |
| 4655 forum posts 304 photos | Could you measure the pitch and size of the leadscrew? It might be possible to get a nut made and cut in half, then attached to the arms. |
| Ady1 | 27/09/2022 14:11:19 |
6137 forum posts 893 photos | You can get a lifetimes supply here Edit: I did as old mart suggested a long time ago, its a very fiddly solution, I used aluminium Now I'd just go for the pour Edited By Ady1 on 27/09/2022 14:14:01 |
| old mart | 27/09/2022 14:17:17 |
| 4655 forum posts 304 photos | Casting babbit is only the start, how would you attach strong enough arms to the nuts? |
| Ady1 | 27/09/2022 14:24:03 |
6137 forum posts 893 photos | You drill holes for the pour to grab, the pour goes into the hollowed nut. Did you read the article? That's the best thing about the babbit route, you can fix your original LS nut forever I burned through two perfect ones in 12 months when I first got my Drummond, Its the weakest technical part of owning those lathes Edited By Ady1 on 27/09/2022 14:38:59 |
| Lee Rogers | 27/09/2022 16:37:45 |
 203 forum posts | I think everyone is wide of the mark here . One of those is only a pressure pad and doesn't need a thread at all the other is not too bad and in my experience with 4 Drummond restorations it will probably be OK as it is. Try it , if it works then it's ok.
|
| Bazyle | 27/09/2022 16:55:41 |
 6956 forum posts 229 photos | A 'get you home' trick that will last a few years: You now have a bit of screw thread at full depth. Repeat for the other half nut and possibly if you enjoy the process the left hand end of the nuts. The RH end is more effective as it takes the thrust under compression of the joint. Obviously not full strength and will wear faster than a full nut but will last long enough for you to learn enough screwcutting to make a complete new nut next year. |
| Haydn Callow | 27/09/2022 17:14:20 |
64 forum posts 37 photos | Hi, thanks for all the reply’s…I have now discovered that the shiny top half should in fact not have any thread, what you see is where the lead screw over time has worn into it….it’s supposed to be a pressure pad….the lower half is the only part that has a ‘half’ thread. In view of this should I smooth out the top pressure pad and adjust it down a bit.. the lead screw looks to be pretty good. thanks
|
| Haydn Callow | 27/09/2022 17:17:08 |
64 forum posts 37 photos | Lee Roger’s….I think you are spot on once again….thanks. Should I get the pressure pad half back to smooth ? |
| David George 1 | 27/09/2022 17:20:41 |
 2110 forum posts 565 photos | Hi the top of the leadscrew nut should be smooth with no thread as it is just to support the thread and should be filed and or scraped this will allow the saddle to traverse with the handwheel. The top piece should be adjusted till it rests on top of the leadsrew and locked there.The bottom nut can be repaired by screw cutting a phosfor bronze full nut with a round outside. This should be cut in two go make two halves one which could be sold as a spare. The arm will need boring on a mill to take the replacement half nut and silver soldered in its place. David |
| SillyOldDuffer | 27/09/2022 17:33:35 |
| 10668 forum posts 2415 photos | Posted by Lee Rogers on 27/09/2022 16:37:45:
I think everyone is wide of the mark here . One of those is only a pressure pad and doesn't need a thread at all the other is not too bad and in my experience with 4 Drummond restorations it will probably be OK as it is. Try it , if it works then it's ok.
The picture looks awful to me but lathes.co.uk supports Lee's opinion: The nut (being of the "half" type and likely to be pushed out of engagement) was assisted by an upper thrust pad - a plain, half-round bronze unit retained by a massive bronze nut against the inside face of the apron; this thrust pad often has, due to years of work, the appearance of a thread cut into it - but it should be plain and smooth. So I'd put it back together and see how well it works. Hopefully it will be fine. Spares for a lathe that went out of production in 1952 aren't easy to find and making a half-nut isn't a job for a complete beginner. Best to get a feel for metalwork generally and build up the workshop before tackling a repair like this. A new nut can be made, but not in half an hour with a few basic tools and no experience. Dave |
| Ady1 | 27/09/2022 17:46:27 |
6137 forum posts 893 photos | Yes I saw what I wanted to see, a knackered nut, but it was the top half, which is an unthreaded pressure pad Your current nut looks ok for the moment, try to use the rack as much as possible to save wear and tear as you position the saddle up and down the bed, only use the nut for useful work purposes as much as possible I'm actually having a go at a couple of babbit leadscrew nuts in the near future so will "report back" on how it goes |
| Haydn Callow | 27/09/2022 18:11:14 |
64 forum posts 37 photos | Would there be any point in cleaning up the pressure pad half so it is smooth ? thoughts please. in the meantime I’ve cleaned everything up and lowered the pressure pad a bit and it does seem o.k. |
| Ady1 | 27/09/2022 18:16:47 |
6137 forum posts 893 photos | It's meant to be smooth so that would be fine Saves it "catching" by accident if the main half nut is disengaged It does actually help slightly if it's threaded because the leadscrew bends and twists under load, so it grips more under load and actually helps Which is why its worn those partial threads I would actually fiddle about until it's happy under load instead of removing those threads, but that's just me Edited By Ady1 on 27/09/2022 18:21:47 |


 . I think I could with the correct width of cutting disc deepen the thread a little…..of course I could end up with a nackered half nut……
Please login to post a reply.
Magazine Locator
Want the latest issue of Model Engineer or Model Engineers' Workshop? Use our magazine locator links to find your nearest stockist!
Sign up to our Newsletter
Sign up to our newsletter and get a free digital issue.
You can unsubscribe at anytime. View our privacy policy at www.mortons.co.uk/privacy
Latest Forum Posts
- *Oct 2023: FORUM MIGRATION TIMELINE*
05/10/2023 07:57:11 - Making ER11 collet chuck
05/10/2023 07:56:24 - What did you do today? 2023
05/10/2023 07:25:01 - Orrery
05/10/2023 06:00:41 - Wera hand-tools
05/10/2023 05:47:07 - New member
05/10/2023 04:40:11 - Problems with external pot on at1 vfd
05/10/2023 00:06:32 - Drain plug
04/10/2023 23:36:17 - digi phase converter for 10 machines.....
04/10/2023 23:13:48 - Winter Storage Of Locomotives
04/10/2023 21:02:11 - More Latest Posts...
- View All Topics
Support Our Partners


Shopping Partners
Subscription Offer

Latest "For Sale" Ads
- Reeves** - Rebuilt Royal Scot by Martin Evans
by John Broughton
£300.00 - BRITANNIA 5" GAUGE James Perrier
by Jon Seabright 1
£2,500.00 - Drill Grinder - for restoration
by Nigel Graham 2
£0.00 - WARCO WM18 MILLING MACHINE
by Alex Chudley
£1,200.00 - MYFORD SUPER 7 LATHE
by Alex Chudley
£2,000.00 - More "For Sale" Ads...
Latest "Wanted" Ads
- D1-3 backplate
by Michael Horley
Price Not Specified - fixed steady for a Colchester bantam mark1 800
by George Jervis
Price Not Specified - lbsc pansy
by JACK SIDEBOTHAM
Price Not Specified - Pratt Burnerd multifit chuck key.
by Tim Riome
Price Not Specified - BANDSAW BLADE WELDER
by HUGH
Price Not Specified - More "Wanted" Ads...
Get In Touch!
Do you want to contact the Model Engineer and Model Engineers' Workshop team?
You can contact us by phone, mail or email about the magazines including becoming a contributor, submitting reader's letters or making queries about articles. You can also get in touch about this website, advertising or other general issues.
Click THIS LINK for full contact details.
For subscription issues please see THIS LINK.
Digital Back Issues


Donate

 Register
 Log-in
Model Engineer Magazine
- Percival Marshall
- M.E. History
- LittleLEC
- M.E. Clock

ME Workshop
- An Adcock
- & Shipley
- Horizontal
- Mill

Subscribe Now
- Great savings
- Delivered to your door

Pre-order your copy!
- Delivered to your doorstep!
- Free UK delivery!
All Forum Topics > Beginners questions > Is this any good