Advice on Cluttered Dimensions in Drawings
| SillyOldDuffer | 20/03/2022 14:44:02 |
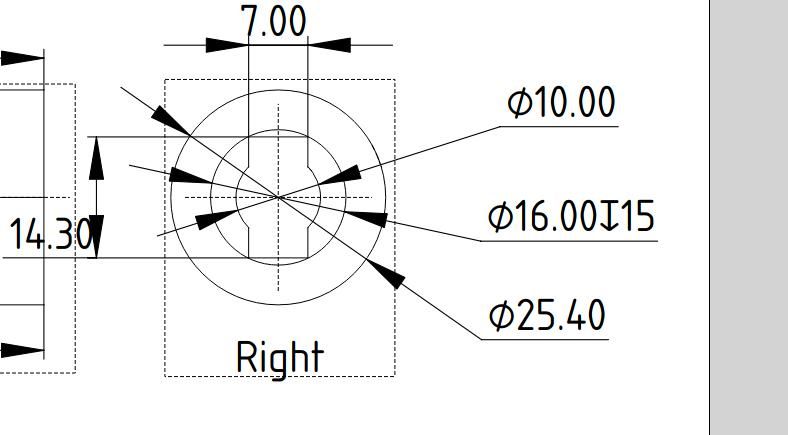
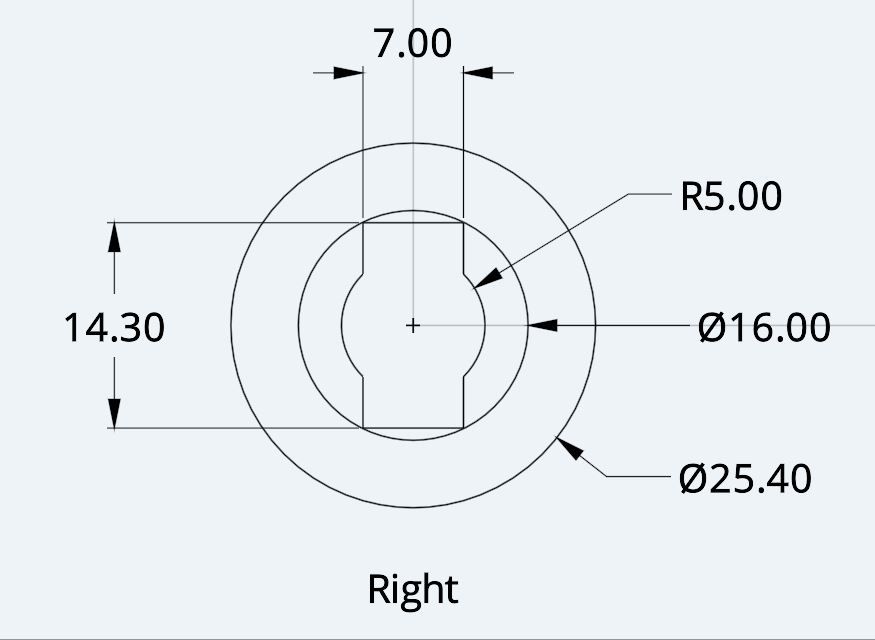
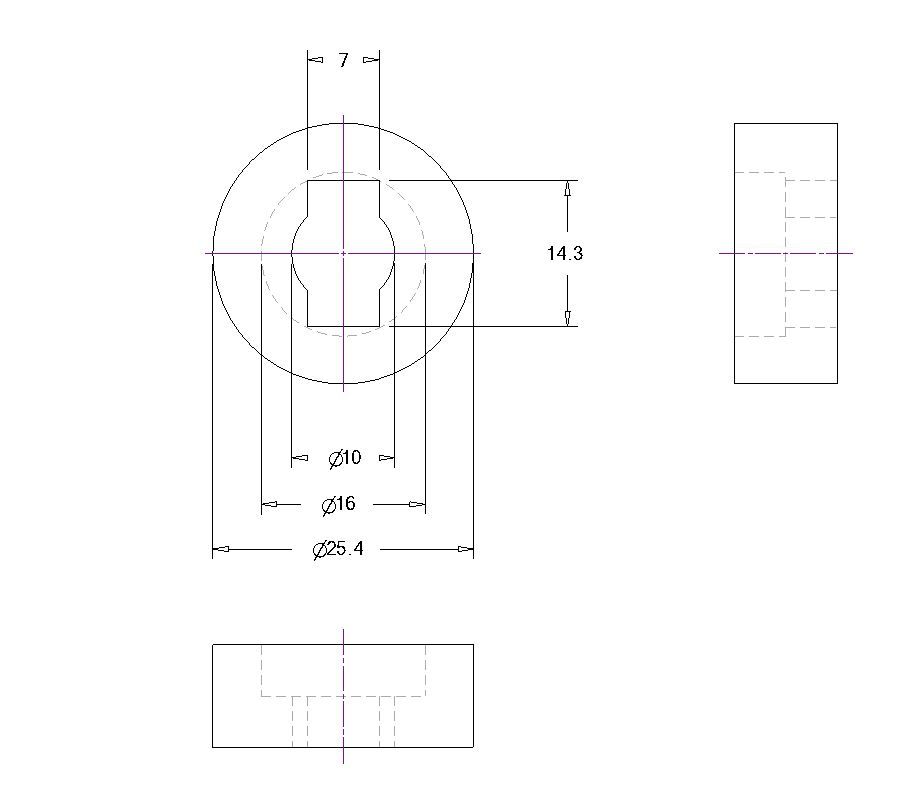
| 10668 forum posts 2415 photos | I've modelled a coupler in FreeCAD and am experimenting with the TechDraw workbench. TechDraw renders a 3D model into 2D drawings to various standards and projections, as chosen by the user. I chose Third Angle ISO. TechDraw doesn't add dimensions automatically. Instead the designer clicks on what he wants dimensioned, and dimension leaders arrows and whatnot are added. My problem isn't specifically FreeCAD: it's what's the best way of dimensioning a 2D drawing when lots of dimensions cluster together? My example: The drawing is quite cluttered and there's not much room to manoeuvrer. The three diameters on the right are perilously close to edge of the paper. The Right View of the coupler is full of arrows and it's vertical dimension overlaps the clipped off drawing of the Front View on the left. Messier than I like, and it would be worse if I turned on the hidden lines showing the threaded holes. Is there a better way of organising dimensions? I have several Technical Drawing Books but their examples are all too simple. Dave |
| Nigel Bennett | 20/03/2022 14:49:27 |
500 forum posts 31 photos | I'd create a cross-section and dimension the diameters on that. If they're external turned dimensions, then a side view would be used to put them on. The 7,00 dim you have would be best in the right view as you have it. |
| HOWARDT | 20/03/2022 14:55:31 |
| 1081 forum posts 39 photos | Having completed all my working life draughting in one way or another I understand where you are coming from. One way is to create more views, adding diameter dimensions to a section view can be clearer to the reader. Looking at your view one thing I would do is reduce the arrow head size slightly, they look about 5mm, reduce down to 4 or 3, and maybe the test size. Whist standards may dictate the size in a working environment if it is just for hobby use you can reduce things so long as you can read it. Standards were mainly created so drawings could be digitised in one way or another, microfilm needed a good original drawing to be readable. |
| blowlamp | 20/03/2022 15:55:06 |
1885 forum posts 111 photos | Reduce text & arrow size. See if your CAD will dispense with the arrows on the other side of circles.
Martin.
|
| Peter Greene | 20/03/2022 16:22:33 |
| 865 forum posts 12 photos | Posted by SillyOldDuffer on 20/03/2022 14:44:02:
The drawing is quite cluttered and there's not much room to manoeuvrer. The three diameters on the right are perilously close to edge of the paper.
Not familiar with the programs you used but the obvious thing in general terms with CAD drawings (**) is to not locate views close to the edge of the sheet. Then you can pull the dimensions away from the view and give them a bit of space. (or manual drawings if it comes to that). |
| JasonB | 20/03/2022 16:29:52 |
25215 forum posts 3105 photos 1 articles | I'm not keen on showing diameters with the diagonal lines at all sorts of angles, I prefer to select "linear" dimensions for diameters which puts them as shown. Does the program not allow you to space the elevations further apart? Alibre does and I can also alter text and arrow size and style. Edited By JasonB on 20/03/2022 16:31:47 |
| JA | 20/03/2022 16:57:38 |
1605 forum posts 83 photos | Agreed. I hate cluttered drawings. Where I worked you never had more than one part on a detail (working) drawing. Easy, use a larger sheet of paper. However most of us have only got A4 printers. One can always crop a large drawing into bits that can then be printed or have an old computer in the workshop. JA |
| duncan webster | 20/03/2022 18:18:40 |
| 5307 forum posts 83 photos | Does your system allow viewports? If so you can have dimension parameters to suit the paper size, but scale up the item. It's easier to put dimensions on something drawn twice full size. Once you've got the dimension parameters as you want them, save it as a template, or even as a blank drawing so you don't have to do it again. |
| PatJ | 20/03/2022 18:23:11 |
613 forum posts 817 photos | Posted by JasonB on 20/03/2022 16:29:52:
I'm not keen on showing diameters with the diagonal lines at all sorts of angles, I prefer to select "linear" dimensions for diameters which puts them as shown. Does the program not allow you to space the elevations further apart? Alibre does and I can also alter text and arrow size and style. Edited By JasonB on 20/03/2022 16:31:47 I am glad someone else prefers this method. I have always used diameter rather than radius. Using a radius causes you to have to have a calculator during a build, and is prone to error. Using a diameter also gives you am immediate reference, for comparison with other parts/dimensison. Diameter is the only way to fly in my opinion. |
| blowlamp | 20/03/2022 20:00:58 |
1885 forum posts 111 photos | Posted by PatJ on 20/03/2022 18:23:11:
Posted by JasonB on 20/03/2022 16:29:52:
I'm not keen on showing diameters with the diagonal lines at all sorts of angles, I prefer to select "linear" dimensions for diameters which puts them as shown. Does the program not allow you to space the elevations further apart? Alibre does and I can also alter text and arrow size and style. Edited By JasonB on 20/03/2022 16:31:47 I am glad someone else prefers this method. I have always used diameter rather than radius. Using a radius causes you to have to have a calculator during a build, and is prone to error. Using a diameter also gives you am immediate reference, for comparison with other parts/dimensison. Diameter is the only way to fly in my opinion.
I think a radius is used to dimension arcs, rather than circles. |
| JasonB | 20/03/2022 20:09:57 |
25215 forum posts 3105 photos 1 articles | Yes I was not saying I don't likethings dimensioned by radius when it's a full circle (which I don't), its the way the diameter is dimension, I don't like that angled lines with the dimension at the end |
| JA | 20/03/2022 20:17:15 |
1605 forum posts 83 photos | You should be able to measure the dimensions shown on a drawing. If you can measure the diameter it should be shown as a diameter. If not, it is a radius. If you cannot measure it, it should not be dimensioned. Dimensions SHOULD NOT BE CHAINED, an almost universal fault on model engineering drawings. They should be taken from a single datum. JA |
| Peter Greene | 21/03/2022 00:22:58 |
| 865 forum posts 12 photos | Is it just me or has this thread totally lost sight of the original question? |
| DMB | 21/03/2022 07:55:56 |
| 1585 forum posts 1 photos | I think that the various posters above are just trying to be as helpful as possible with advice on drawing layouts, being basically what the OP asked for. |
| JasonB | 21/03/2022 08:00:09 |
25215 forum posts 3105 photos 1 articles | Yes, still quite close to topic for a thread on here. But now there are three posts that aren't about the original question! |
| Nigel Bennett | 21/03/2022 08:36:26 |
500 forum posts 31 photos | Posted by JA on 20/03/2022 20:17:15:
Dimensions SHOULD NOT BE CHAINED, an almost universal fault on model engineering drawings. They should be taken from a single datum. JA I disagree; you cannot make a bald statement that you "should not chain dimensions". If you have an important centre-to-centre dimension that must be held to within a tolerance, then using a common datum would double the permissible variation between your important centres. What is wanted is a copy of the good old BS308, (now sadly obsolete). That tells you all about dimensioning! |
| Circlip | 21/03/2022 08:37:56 |
| 1723 forum posts | Strangely enough, layout was one of the skills taught when I was "Promoted" into the D/O fifty odd years ago. Unfortunately thanks to the advent of cheap drawing programmes, everyone can become an instant draughtsman which is fine for drawing straight and parallel lines and true circles but not basic principles. With a sheet of paper, the O/Ps problem never occurred and for large items, a scale rule came into operation. Important when items are constrained by A4,3.2.1 and 0 sized sheets to put them on. Only got an A4 printer? Go to a print shop. Regards Ian. |
| JA | 21/03/2022 08:48:48 |
1605 forum posts 83 photos | Posted by Nigel Bennett on 21/03/2022 08:36:26:
Posted by JA on 20/03/2022 20:17:15:
Dimensions SHOULD NOT BE CHAINED, an almost universal fault on model engineering drawings. They should be taken from a single datum. JA I disagree; you cannot make a bald statement that you "should not chain dimensions". If you have an important centre-to-centre dimension that must be held to within a tolerance, then using a common datum would double the permissible variation between your important centres. What is wanted is a copy of the good old BS308, (now sadly obsolete). That tells you all about dimensioning! Nigel I stand by what I wrote. In your case one of the centres becomes a datum. For those who think this is outside the topic chained dimensions take up less room on the paper so, seemingly, produce a less cluttered drawing. Which comes back to use a larger sheet or more sheets of paper. JA Edited By JA on 21/03/2022 08:49:26 |
| Circlip | 21/03/2022 08:49:29 |
| 1723 forum posts | Just read the garbage about NOT chaining dimensions. RUBBISH. Even our lowly toys refute that. Try using a common datum when trying to locate a cylinder with eight mounting holes and forget all your fancy measuring systems. One hole is datum and the rest are chained from it. Straight line dimensions would work but what about an angled cylinder? Try the one datum rule on tooling to produce more than a thousand holes in a printed circuit board with metric AND imperial pitched components.
Regards Ian. Edited By Circlip on 21/03/2022 08:52:32 |
| JasonB | 21/03/2022 13:01:31 |
25215 forum posts 3105 photos 1 articles | Unchained dimensions are far more useful these days with the vast majority having a DRO on their mill which makes it easy to work from a datum be that a corner or ctr of a part. Centred pairs or hole son a PCD are easily handles with the absolute and incremental settings by using absolute to get the ctr of the pair or group and then incremental from there. Those still marking out by hand and using handwheels are better off dimensioning from a corner datum so all positions are positive so less faffing about allowing for backlash if a ctr datum is used. I'd happily do the 1000 holes from one datum with the DRO on the manual mill or better still the CNC which only needs the one datum. This is probably about the most I have done from one point, a lot easier than all the chained fractional inches that were on the drawing.
Edited By JasonB on 21/03/2022 13:01:47 |
Please login to post a reply.
Want the latest issue of Model Engineer or Model Engineers' Workshop? Use our magazine locator links to find your nearest stockist!
Sign up to our newsletter and get a free digital issue.
You can unsubscribe at anytime. View our privacy policy at www.mortons.co.uk/privacy
- *Oct 2023: FORUM MIGRATION TIMELINE*
05/10/2023 07:57:11 - Making ER11 collet chuck
05/10/2023 07:56:24 - What did you do today? 2023
05/10/2023 07:25:01 - Orrery
05/10/2023 06:00:41 - Wera hand-tools
05/10/2023 05:47:07 - New member
05/10/2023 04:40:11 - Problems with external pot on at1 vfd
05/10/2023 00:06:32 - Drain plug
04/10/2023 23:36:17 - digi phase converter for 10 machines.....
04/10/2023 23:13:48 - Winter Storage Of Locomotives
04/10/2023 21:02:11 - More Latest Posts...
- View All Topics
- Reeves** - Rebuilt Royal Scot by Martin Evans
by John Broughton
£300.00 - BRITANNIA 5" GAUGE James Perrier
by Jon Seabright 1
£2,500.00 - Drill Grinder - for restoration
by Nigel Graham 2
£0.00 - WARCO WM18 MILLING MACHINE
by Alex Chudley
£1,200.00 - MYFORD SUPER 7 LATHE
by Alex Chudley
£2,000.00 - More "For Sale" Ads...
- D1-3 backplate
by Michael Horley
Price Not Specified - fixed steady for a Colchester bantam mark1 800
by George Jervis
Price Not Specified - lbsc pansy
by JACK SIDEBOTHAM
Price Not Specified - Pratt Burnerd multifit chuck key.
by Tim Riome
Price Not Specified - BANDSAW BLADE WELDER
by HUGH
Price Not Specified - More "Wanted" Ads...
Do you want to contact the Model Engineer and Model Engineers' Workshop team?
You can contact us by phone, mail or email about the magazines including becoming a contributor, submitting reader's letters or making queries about articles. You can also get in touch about this website, advertising or other general issues.
Click THIS LINK for full contact details.
For subscription issues please see THIS LINK.
Model Engineer Magazine
- Percival Marshall
- M.E. History
- LittleLEC
- M.E. Clock
ME Workshop
- An Adcock
- & Shipley
- Horizontal
- Mill
Subscribe Now
- Great savings
- Delivered to your door
Pre-order your copy!
- Delivered to your doorstep!
- Free UK delivery!


 Register
 Log-in


