Forum sponsored by:

Horizontal hit and miss engine
| Andy_G | 26/09/2020 22:06:29 |
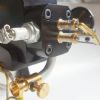 260 forum posts | I asked a question about cylinder oilers on here a few days ago that JasonB was good enough to answer. Here's the engine that I've been working on. It is my own design, and scratch built from bar stock using my 7 x 14 Chinese lathe. Thank you. Edited By Andy Gray 3 on 26/09/2020 22:08:01 |
| Emgee | 26/09/2020 22:12:31 |
| 2610 forum posts 312 photos | Hi Andy That looks good and runs exceptionally well, is it just on fuel vapour ? Emgee |
| Henry Brown | 26/09/2020 22:48:17 |
 618 forum posts 122 photos | Very nice Andy, well done! Did you make the fuel tank? I have a similar task imminent and would be obliged for any tips. |
| Andy_G | 26/09/2020 23:17:30 |
260 forum posts | Posted by Emgee on 26/09/2020 22:12:31:
That looks good and runs exceptionally well, is it just on fuel vapour ? Thank you! It has a fixed choke carburettor (fuel mixer?) with a simple spray bar and needle valve that draws liquid fuel (Coleman fuel) from the tank.
Edited By Andy Gray 3 on 26/09/2020 23:19:27 |
| Andy_G | 26/09/2020 23:39:57 |
260 forum posts | Posted by Henry Brown on 26/09/2020 22:48:17:
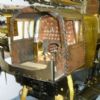
Did you make the fuel tank? I have a similar task imminent and would be obliged for any tips. Thank you also! The tank body is chromed brass bathroom waste pipe. (I had an off-cut). I wanted a brass bodied tank, but the price of brass tube seemed horrific - more expensive than solid bar of the same size. I tried all sorts to strip the chrome off the bit of pipe I had and failed, so ended up just using it as it was - it turned out OK! The ends of the tank were cut out of ~2.5mm brass sheet and both faces of each end were turned. prior to assembly, using superglue to hold them to a piece of faced-off aluminium bar in the manner of the Clickspring Youtube channel:
These were a nice, tight fit in the tube, and I just soft soldered them on (one at a time) by laying a ring of 0.5mm multi-core solder inside the tank and gently heating until it flowed into the joint, The second end had to be done 'blind', but it worked OK. (The bosses for the filler and fuel off-take fit through holes drilled in the tube and were soldered on from the inside with plumbers solder before fitting the ends. I hope that makes some sense! Another edit for a photo:
Edited By Andy Gray 3 on 26/09/2020 23:41:26 Edited By Andy Gray 3 on 26/09/2020 23:45:01 Edited By Andy Gray 3 on 26/09/2020 23:48:48 |
| JasonB | 27/09/2020 07:07:38 |
 25215 forum posts 3105 photos 1 articles | Now that is a good runner and looker too, usually I'm not keen on the barstock and cap screw look but you have executed it very nicely particularly with those recessed heads.. I also like the easy way that the lever over rides the governor latch while the engine is running. |
| Brian Baker 1 | 27/09/2020 07:54:53 |
 229 forum posts 40 photos | Very good Andy, could that be written up, with drawings, for publication in Model Engineer? Regards Brian |
| Henry Brown | 27/09/2020 08:09:52 |
618 forum posts 122 photos | Thanks for such a detailed description about the fuel tank Andy, I'll be using a similar method! I plan to roll a sheet of brass to make the tube and then solder the ends in. Still not sure how to make the log joint between the ends yet so a bit of experimentation before I start I guess. I just re-watched the video and it really is a credit to you, you must be very pleased with the end result... |
| Baz | 27/09/2020 09:34:18 |
| 1033 forum posts 2 photos | +1 for seeing it written up in Model Engineer, I am sure quite a few people would like to make one, a very nice looking engine, well done Andy. |
| Andy_G | 27/09/2020 11:41:46 |
260 forum posts | Thank you all very much! I'm not sure what would be involved in writing it up - I have (rudimentary) drawings for ~90% of it, but didn't take many photos during the build. (I hesitate to confess that I haven't looked at the Model Engineering magazine since my father dabbled in model engineering in the early 1980s - there were plans for a shuttle valve engine from a small traction engine that my father and I started building at night school.) |
| Ron Laden | 27/09/2020 12:11:54 |
 2320 forum posts 452 photos | Excellent and such a sweet runner, it also speaks volumes for what can be achieved on a Chinese Mlini Lathe. Great stuff. Ron |
| Jim Nic | 27/09/2020 13:25:22 |
 406 forum posts 235 photos | That's really nice, well done. Jim |
| Andy_G | 27/09/2020 22:06:30 |
260 forum posts | Thank you! |
| Mike Poole | 27/09/2020 22:19:16 |
 3676 forum posts 82 photos | A very attractive engine, not everything needs to look as though it was built by the Victorians. I like it.
Mike |
| Simon Birt | 14/11/2020 15:31:16 |
| 9 forum posts 5 photos | Very nice and runs well. What have you used for the ignition? I am building a Farmboy and am starting to think about making sparks. Simon |
| Andy_G | 14/11/2020 18:42:12 |
260 forum posts | Posted by Simon Birt on 14/11/2020 15:31:16:
Very nice and runs well. What have you used for the ignition? I am building a Farmboy and am starting to think about making sparks. Simon Thank you
I used a "Replacement Complete Ignition Set for Single Cylinder Gas Engines" module from Hobby King: https://hobbyking.com/en_us/replacement-complete-ignition-set-for-single-cylinder-gas-engines.html Unfortunately seems to be on back-order now It needed some careful shaving down in order to hide it inside the engine pedestal.
Edited By Andy Gray 3 on 14/11/2020 18:47:18 |
| PatJ | 15/11/2020 16:25:58 |
 613 forum posts 817 photos | That is a nice looking engine. And runs very well too ! Well done. |
| Andy_G | 15/11/2020 21:48:05 |
260 forum posts | Thank you! |


Please login to post a reply.
Magazine Locator
Want the latest issue of Model Engineer or Model Engineers' Workshop? Use our magazine locator links to find your nearest stockist!
Sign up to our Newsletter
Sign up to our newsletter and get a free digital issue.
You can unsubscribe at anytime. View our privacy policy at www.mortons.co.uk/privacy
Latest Forum Posts
- *Oct 2023: FORUM MIGRATION TIMELINE*
05/10/2023 07:57:11 - Making ER11 collet chuck
05/10/2023 07:56:24 - What did you do today? 2023
05/10/2023 07:25:01 - Orrery
05/10/2023 06:00:41 - Wera hand-tools
05/10/2023 05:47:07 - New member
05/10/2023 04:40:11 - Problems with external pot on at1 vfd
05/10/2023 00:06:32 - Drain plug
04/10/2023 23:36:17 - digi phase converter for 10 machines.....
04/10/2023 23:13:48 - Winter Storage Of Locomotives
04/10/2023 21:02:11 - More Latest Posts...
- View All Topics
Support Our Partners


Shopping Partners
Subscription Offer

Latest "For Sale" Ads
- Reeves** - Rebuilt Royal Scot by Martin Evans
by John Broughton
£300.00 - BRITANNIA 5" GAUGE James Perrier
by Jon Seabright 1
£2,500.00 - Drill Grinder - for restoration
by Nigel Graham 2
£0.00 - WARCO WM18 MILLING MACHINE
by Alex Chudley
£1,200.00 - MYFORD SUPER 7 LATHE
by Alex Chudley
£2,000.00 - More "For Sale" Ads...
Latest "Wanted" Ads
- D1-3 backplate
by Michael Horley
Price Not Specified - fixed steady for a Colchester bantam mark1 800
by George Jervis
Price Not Specified - lbsc pansy
by JACK SIDEBOTHAM
Price Not Specified - Pratt Burnerd multifit chuck key.
by Tim Riome
Price Not Specified - BANDSAW BLADE WELDER
by HUGH
Price Not Specified - More "Wanted" Ads...
Get In Touch!
Do you want to contact the Model Engineer and Model Engineers' Workshop team?
You can contact us by phone, mail or email about the magazines including becoming a contributor, submitting reader's letters or making queries about articles. You can also get in touch about this website, advertising or other general issues.
Click THIS LINK for full contact details.
For subscription issues please see THIS LINK.
Digital Back Issues


Donate

 Register
 Log-in
Model Engineer Magazine
- Percival Marshall
- M.E. History
- LittleLEC
- M.E. Clock

ME Workshop
- An Adcock
- & Shipley
- Horizontal
- Mill

Subscribe Now
- Great savings
- Delivered to your door

Pre-order your copy!
- Delivered to your doorstep!
- Free UK delivery!
All Forum Topics > Work In Progress and completed items > Horizontal hit and miss engine