Lathe rigidity
And collet wobble
| Iain Downs | 19/08/2019 20:42:05 |
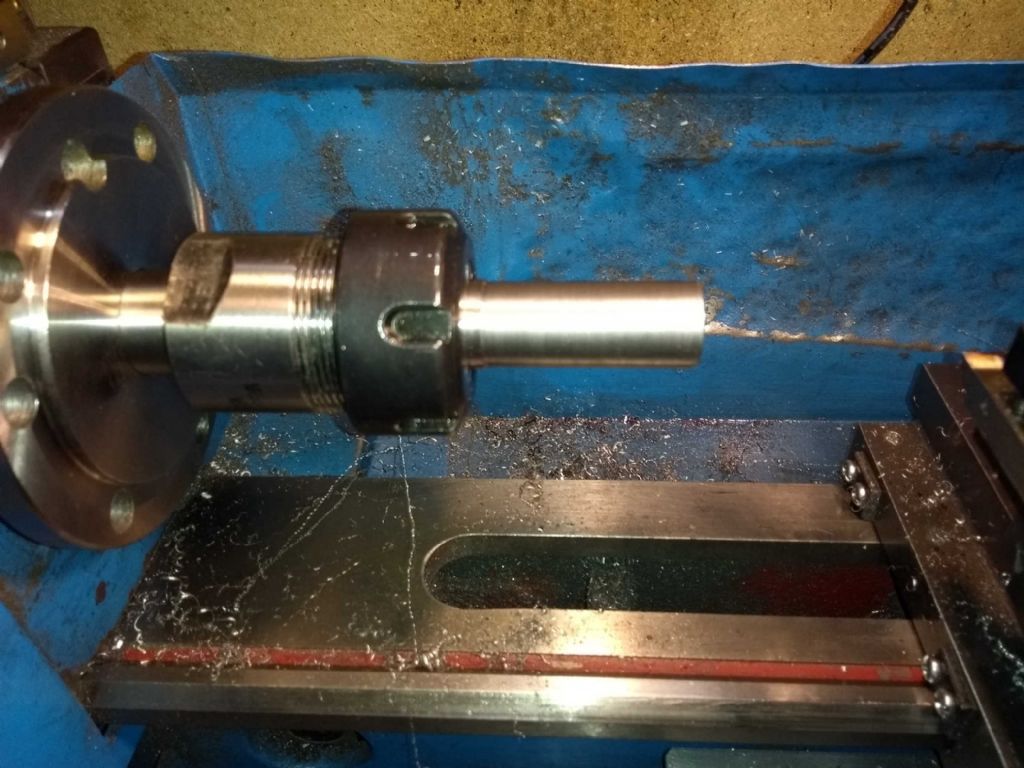
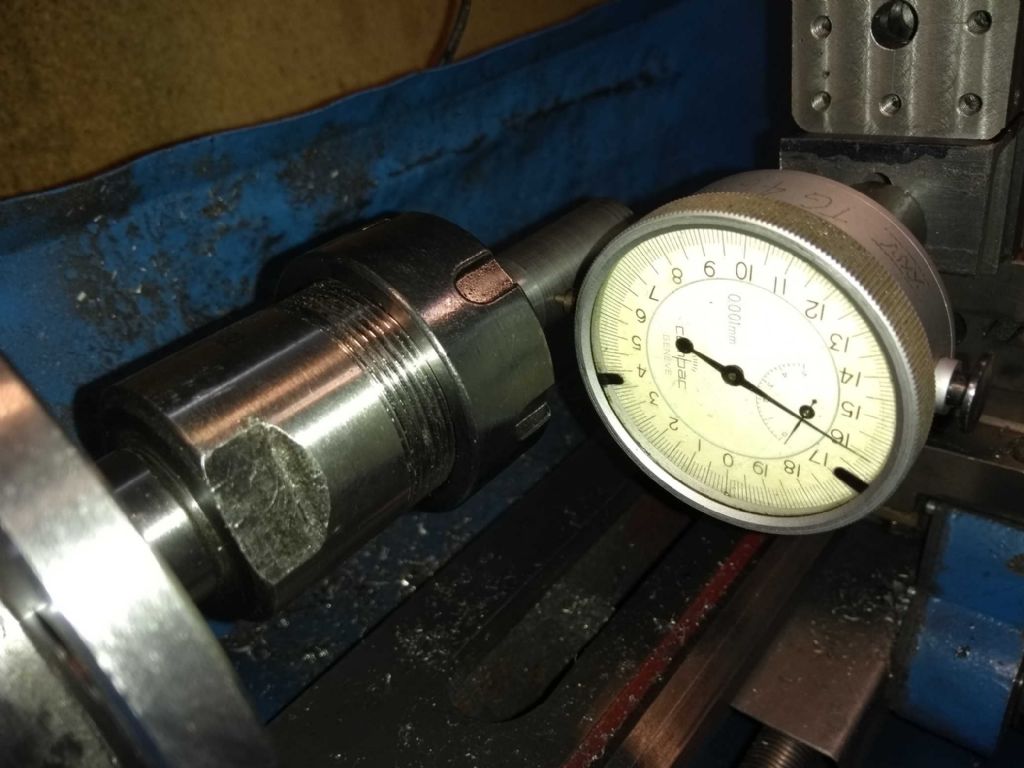
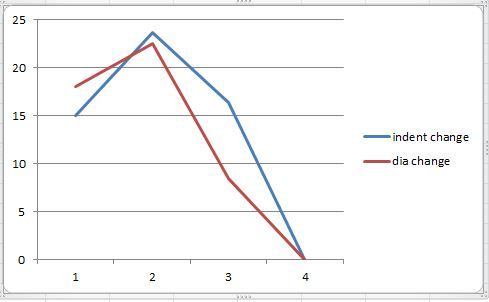
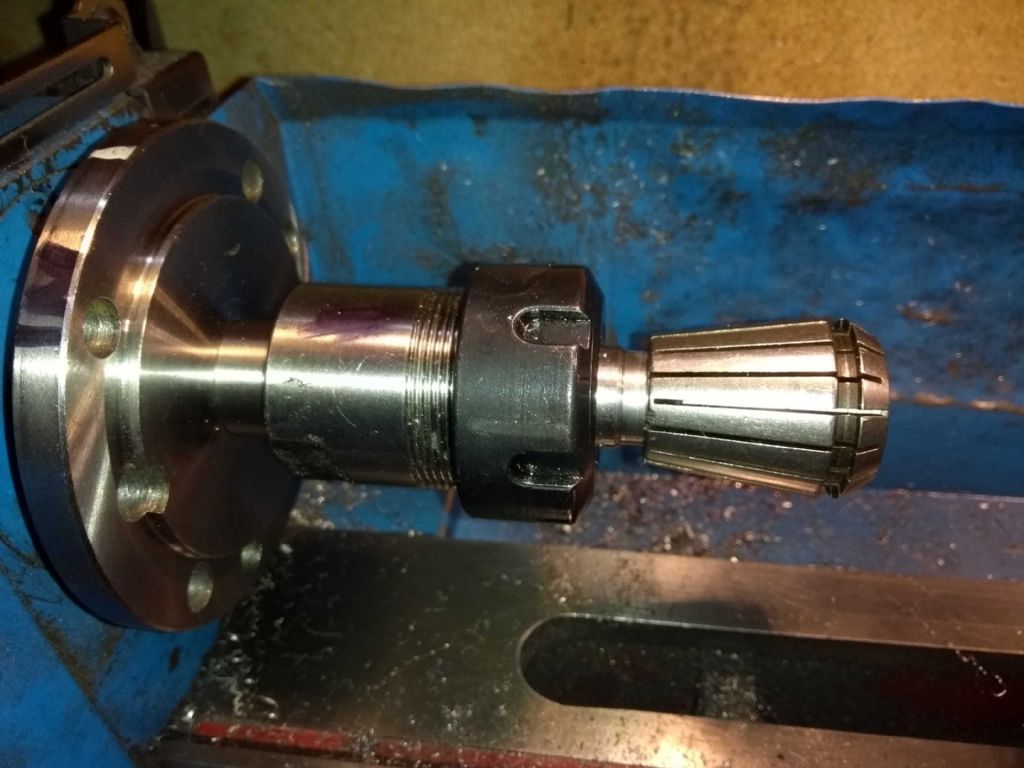
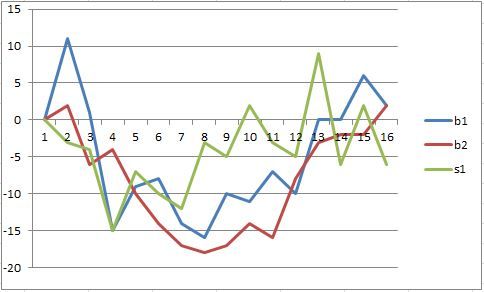
| 976 forum posts 805 photos | IN another post, I complained of my new (cheap) ER32 collets not being accurate. The usual good advice was received and I decided to do some measurements. As practice I decided to use my micron indicator with a slide I've made to ensure alignment was spot on. The original intent of the exercise was to see if I could use the outside of the collets to align the topslide to skim the collet chuck spindle. I've not quite got there, but some interesting results along the way. This is the set up with a 20mm silver steel bar mounted in the collet chuck and then turned down to 18mm. The first thing I checked was the straightness of the bar. To do this, I set up my indicator and adjusted the height to get the centre of the bar. This isn't a good photo actually as it shows a cylinder connecting the indicator to the slide. This reduced rigidity and I removed it for the actual measurements. I measured the 'indent' (the depth the indicator was measuring) at 5mm intervals along the bar with the indicator and also took measurements of the diameter with a micron precision digital Micrometer. Naturally, I took several sets of readings and found them to be surprisingly consistent (3 sets of indents, with a maximum spread of 8 microns, the micrometer was consistent within 2). Here is a graph of the delta along the bar (the end of the bar at the start of the graph) I think that the initial rise is because I took an extra cut on the first section of the bar, but for the rest it shows the bar being narrower near the chuck. What's less clear is why the indent and the diameter are about the same. I would expect the diameter to have twice the variance of the indent. I have no explanation for this. The bar was pretty round. Hard to tell how round because the roughness was significant, but to within a few microns (say 5). Next I set up the collet and measure the indent between each slit at the inner and outer edge of the taper. Incidentally, when I took a measurement, I would pull the lever out with the button on the indicator, move the piece and gently allow the lever to touch down. If I wasn't careful, I would move the cross slide which has about 0.1mm of backlash, rather ruining the accuracy! In this case, pleasingly, the 16th reading was close to the first - within a few microns, so I reckon I wasn't jarring it too much. This is a graph of my findings. B1 and B2 were the thick end and S1 the thin end. Again relative movements in microns. What this seems to show is that the collet is offset from the centre by something like 15 - 20 microns ( a bit under a thou), but that there is a skew on it - that is the peaks for the thin end don't coincide with the peaks at the thick end. I'd attempted to deburr the collet prior to the measurements. What I did notice though is that even a small pressure on the bar caused quite a bit of deflection. I put the indicator near the end of the bar and a luggage weigher next to it. Applying 1kg of force would generate a 20 micron deflection and 2kg around twice that. Beyond 2kg there wasn't much more movement. This led me to wonder if I've not settled the spindle in correctly. I replaced it a while back with Tapered roller bearings and a great deal of trouble with pressing the bearings into place. They were VERY VERY stiff fits in the headstock. My thinking is that the deflection could be a cause for the taper on the mandrel. if it was being pushed off by a thou at the far end by the force of the cutter, that would create a taper. Can any one comment on this? Also, if this is likely to be the case, how can I improve it? I have tried to tighten up the nuts on the back end of the spindle, but they really are tight and I guess I'm afraid to provide too much force. Finally, I had some good news. I put in my MT3 test bar which gave pleasingly good results. I measure the indent (with the micron indicator) at 0, 90, 180, 270, 360 degree angles at 25, 20, 15, 10 and 5 cm from the spindle face. The maximum variation was about 55 microns (two thou) across the entire set of readings. Naturally this happened at the far end. As a practical pointer, if you try this at home make sure to tap the test par home with a soft mallet. My original set of readings were depressingly bad because the test bar was loose. So a slightly floppy spindle. What should I do?
Iain
|
| JasonB | 19/08/2019 20:50:57 |
25215 forum posts 3105 photos 1 articles | Check the bearing preload if you have not done it since fitting the new bearings and carry out the test on a warmed up machine. Also take a consistant depth cut along the whole bar to eliminate changes in work, tool and spindle deflection |
| Iain Downs | 25/08/2019 19:04:58 |
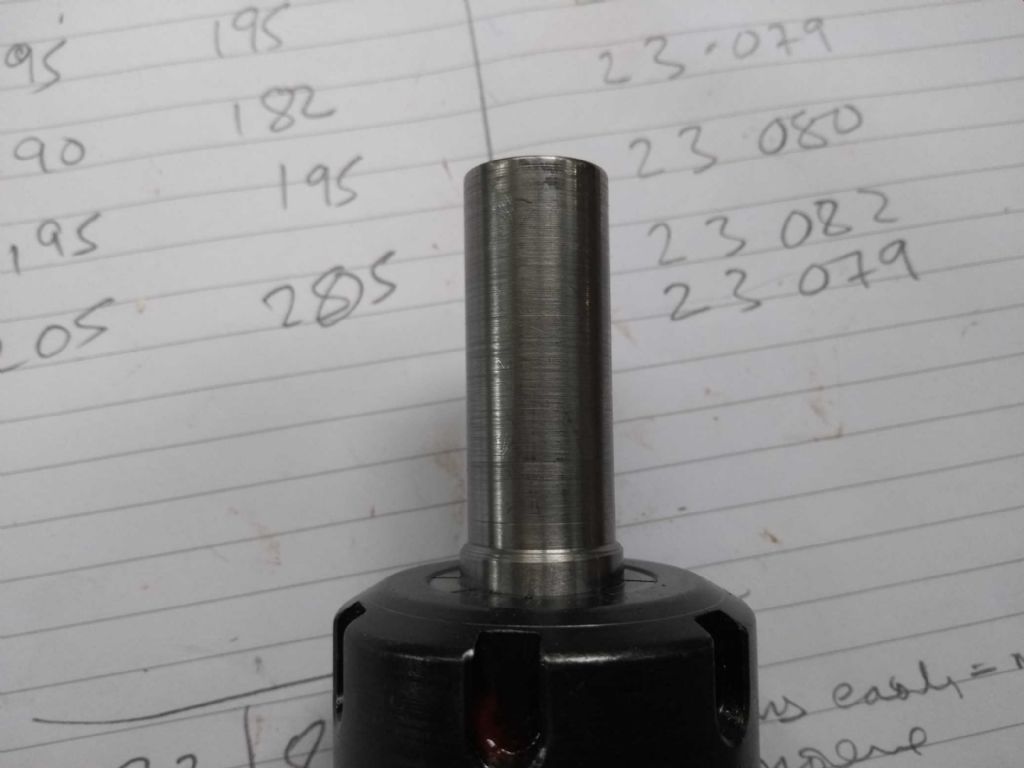
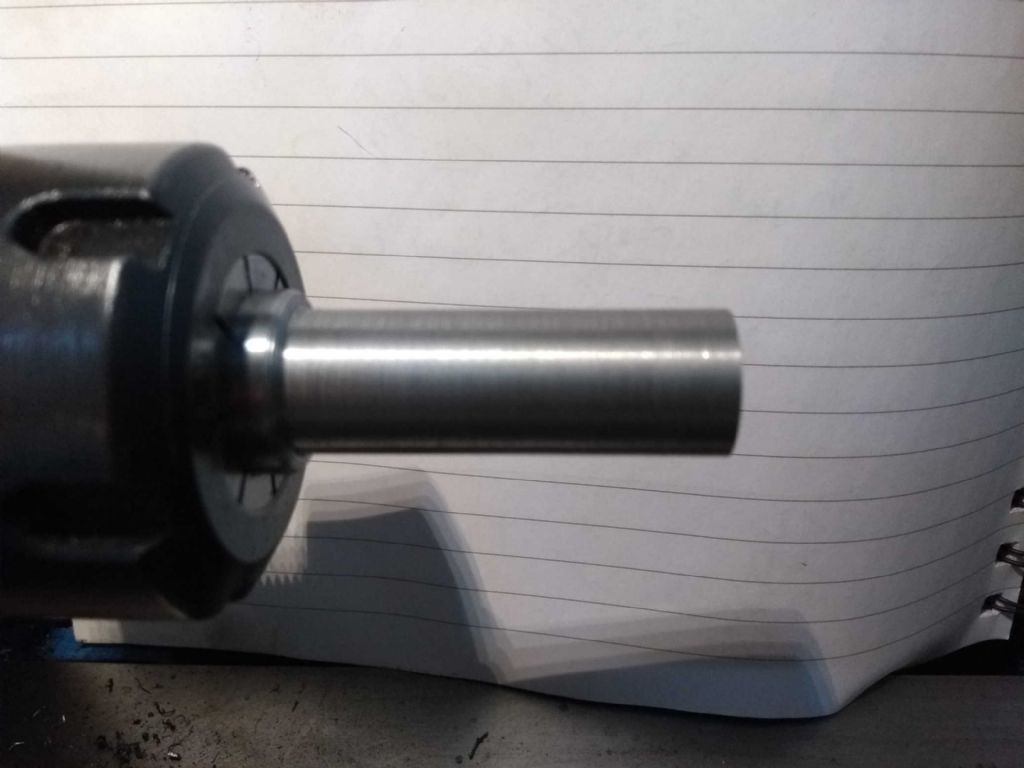
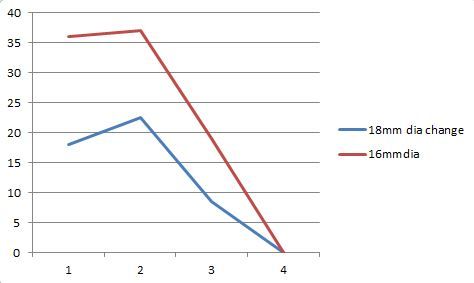
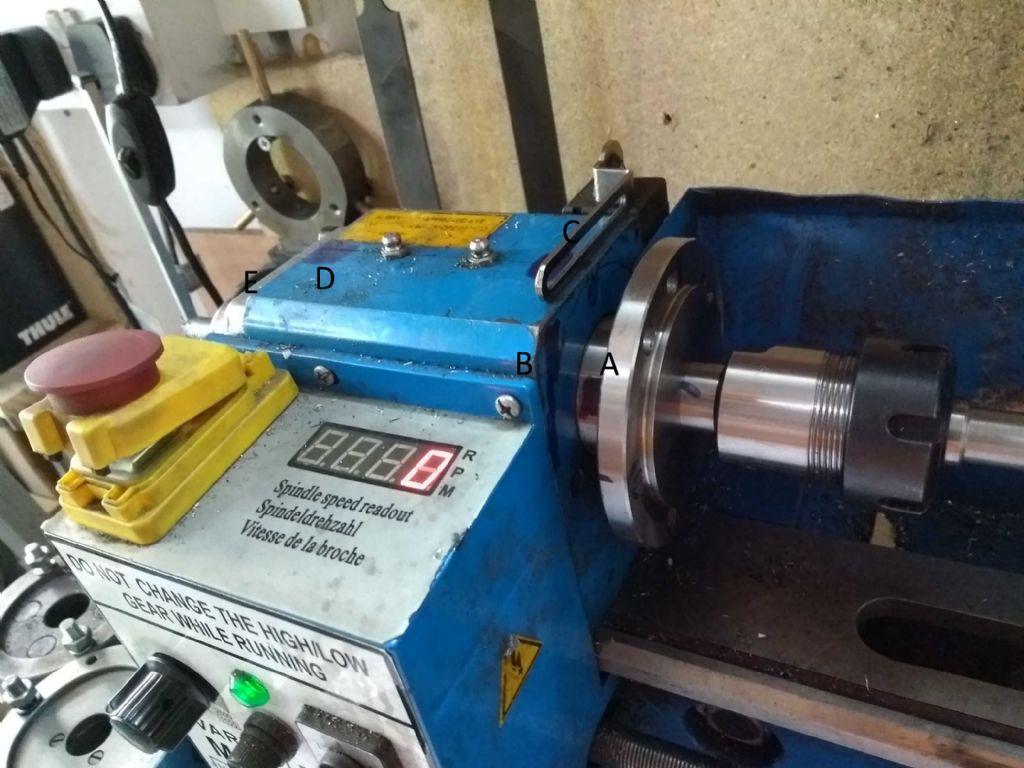
| 976 forum posts 805 photos | Thanks, Jason. I looked into pre-load and good found the most useful information on my doorstep - here in the forum! My particular concern about pre-load is that my spindle is an over-tight fit in the headstock. No only the outside of the bearings needs a lot of force to push home, but so does the inside (which should be a sliding fit). This makes the adjustment difficult and frankly I'm a bit scared to be too rough. Lacking an appropriate thermometer I attempted to use mother natures thermometer and did as follows. I tried to tighten the nut at the back of the spindle, ran the lather for a while (with chuck on) and felt the headstock. the first attempt probably moved the nut by 10 minutes (in Ketan's parlance) or about 30 degrees. I ran the lathe for about 10 mins, first at 500 and then at 2000 rpm. The headstock was barely warm. Next another 5 minutes and after that the headstock was definately warm to the touch (but not hot). Here's the issue. The only way I could tighten the nut was with blows from a mallet (rubber in this case) on the spanner which seems to me to be not great. I think turned my test piece (back to the bar in the ER32 collet) down to about 16mm (2mm reduction). in this case I was careful to do full passes from the end to the headstock, particularly with the final cut. I required 4 passes for the tool to stop removing material. The good news is that the finish was better this time, though I can't be sure it wasn't me being better. Quality at 18mm (before adjustment) Quality at 16mm after adjustment I was still seeing a lot of movement (1 - 2 thou) on the bar or on a chuck with moderate pressure - this didn't seem to have got better. Also, I still see the same decrease in diameter towards the chuck - this time even more, which surprised me. In frustration I decided to get some more scientific results so asked Mr Amazon to deliver one to me. £17 and reads up to 750 C! So today I ran some temperature tests. I measured them at 5 points on the lather. The black marks show a location on the spindle, 3 on the headstock and there's one on the rear of the spindly you can't see (E). I only measured these last two later on in the test. Broadly, they all started off around 27 degrees (nice day, wasn't it!). I ran at 500 for five mins, 1500 for 10 mins and 2000 for 15 mins. By the end I had A - Spindle: 33 B - front of headstock 40 C - front top of headstock 39 D - rear top of headstock 44 E - rear spindle 41 From what I've read in the link I should be able to see 10 - 15 degrees more than this without unduly worrying about the temprature. what concerns me is that the rear bearing seems to be hotter than the front one. This supports my concern that the inner race isn't moving freely on the spindle so isn't getting the pre-load. I really don't know what to do next. I've made an extension to my spanner so I now have 2 feet of leverage not 4 inches, but this won't do any good if the front bearing isn't benefiting. Any advice or experiences welcome.
Iain |
| Vic | 25/08/2019 19:20:32 |
| 3453 forum posts 23 photos | I’m sorry if this has been asked before but is there any particular reason why you aren’t using a lathe chuck rather than one on a Morse taper? |
| David Standing 1 | 25/08/2019 19:52:12 |
| 1297 forum posts 50 photos | I agree, and to to reinforce Vic's comment, if you have a 'slightly sloppy spindle' and poor finish, why is the collet chuck so far from the headstock? |
| Paul Kemp | 25/08/2019 20:04:49 |
| 798 forum posts 27 photos | I am not sure what you are trying to achieve or prove here? First off I would be doing your tests using a four jaw direct on the spindle flange and verifying diameter over about 4" length from the chuck that you can turn parallel. That will tell you your headstock / bed alignment is good. Once you have confidence that is correct you can then revert to testing your collets. As others have said the overhang on the collet chuck is not ideal. On your other point re the bearing fits and preload I would polish the spindle to get an acceptable sliding fit. With bearing inners and outers tight in their locations achieving an accurate preload is going to be impossible. Finally trying to achieve micron accuracy from such a machine is I think beyond reasonable expectations. If you want to maintain those sorts of figures then the lathe needs to be in a temperature controlled environment and the surface to which it is mounted be free from any possible effects of humidity (wooden bench will move with differing humidity and water absorption) Paul. |
| Neil Lickfold | 25/08/2019 20:06:50 |
| 1025 forum posts 204 photos | One issue is that the collet is being supported by a Mt2 or MT3 shaft. If the collet chuck was more solid, so like a plate that connected to the spindle with the collet int, would be more rigid. What you have is basically like turning a part at the end of a 60mm extension that is only 20 mm or so diameter. Another separate issue is the bearings of the spindle itself and their influence as well.. So check the inside of the er chuck , and then see how little pressure is needed to move it 2um. It won't be as much as you might think. Next do the same but on the spndle directly, same again, the amount of pressure to move 2um. This time it should be considerably more. If it is about the same, there is something not quite right with the front bearing of the spindle. Neil |
| Iain Downs | 25/08/2019 20:26:50 |
| 976 forum posts 805 photos | MY apologies. I have been mixing units which I should not. I want to work in metric, but my brain was wired in inches a long time ago. For clarity. I am seeing around 0.04 mm deflection (40 microns, one to two thou). Working to micron level accuracy is well beyond any dreams of mine. thousandths of an inch may be within my grasp on a good day! I see the same level of deflection on my 3 jaw chuck when mounted. so I don't think it's the collett chuck that's the issue. I agree I should re-do the experiment with a similar bar mounted in a 3 jaw, and perhaps with a wider bar as well. I wasn't aware of the spindle flange based collett chucks. Many thanks for the link! I understand the idea of polishing the spindle. I guess I just mount the spindle on a lathe (probably between centres or something) and apply some very fine emery paper to it. I wouldn't expect to be able to do this with accuracy by hand. Herein lies my problem. Only one lathe! It would be kind of fun to build some kind of jig to do this, but also time-consuming. Any ideas on how to do the polishing without building another lathe would be most welcome...
Iain
|
| Iain Downs | 25/08/2019 20:28:38 |
| 976 forum posts 805 photos | As an aside, stripping down and re-building the headstock the last time I did it (it's a long story, but I needed to change the spindle), was very time-consuming and frustrating. I'm trying to avoid that, but recognise that it may not be possible.
Iain |
| Iain Downs | 26/08/2019 12:31:00 |
| 976 forum posts 805 photos | I'm thinking I might try and make a spindle polisher with my micro mill. I have a 4 jaw non-independant chuck on an MT2 spindle which will hold the back end of the spindle and I'm thinking of making a very short centre to slot into the other end of the spindle. That will engage in a centre drilled hole in a shallow bar on the mill bed. I have the old spindle and with a bit of luck it might just fit. he idea was to turn a spindle on the end of a short piece of bar which would exactly fit in the spindle, together with a threaded hole. Turn it round, put the spigot in the spindle, tighten in place with the bar and turn a center on it. The idea is to have no more than a bout 10mm from the spindle face to the point of the centre. My first attempt at this has not been too grand. I cut a spigot in a piece of 50mm bar which very nicely fitted in the end of the old spindle. The new spindle unfortunately has a narrower aperture, so back on with the chuck and cut. Unfortunately too much, so the damned thing rattles and is easily offset with an over firm cut. So I think I will have to start again and be a bit more patient with the cutting and chuck swapping. Needless to say if I if I take the piece out of the chuck, the chuck off and replace the chuck and piece, the chance of it being centred is slim. I will consider my 4 jaw for this, though I can see a certain amount of frustration ahead of me. In the meantime, it's time for a cuppa and some dinner. Not sure if I'll get back to it this afternoon - we're off out for tea a bit later - and there's only so far my patience will stretch in a given day!. Iain |
| Iain Downs | 01/09/2019 17:37:28 |
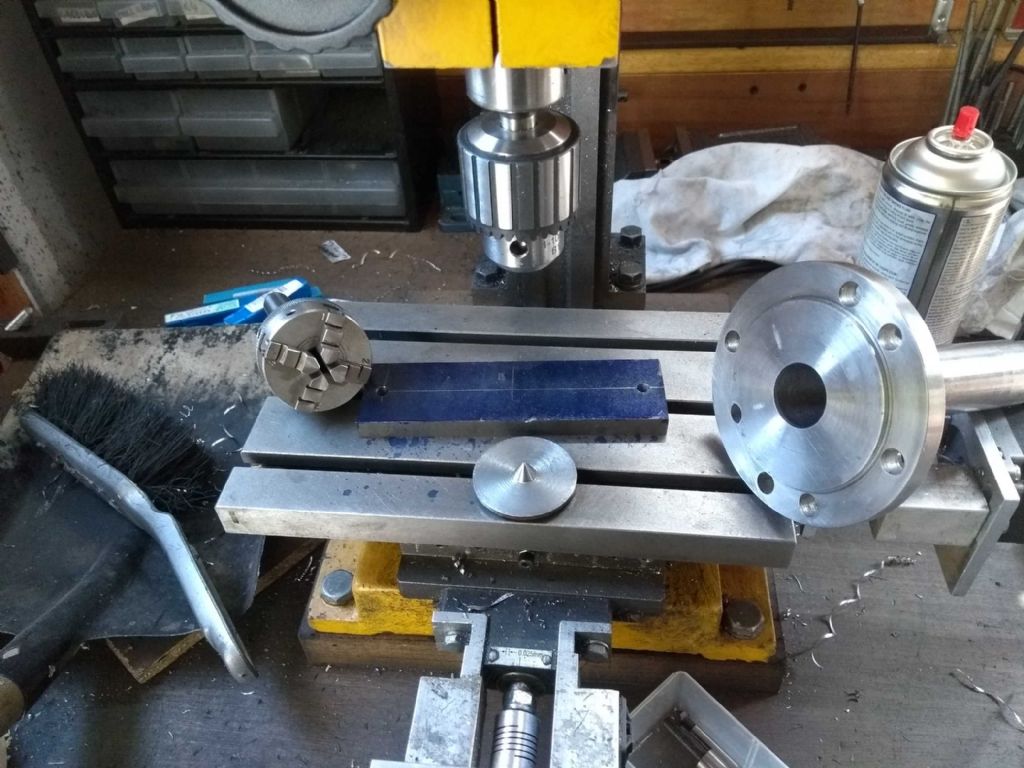
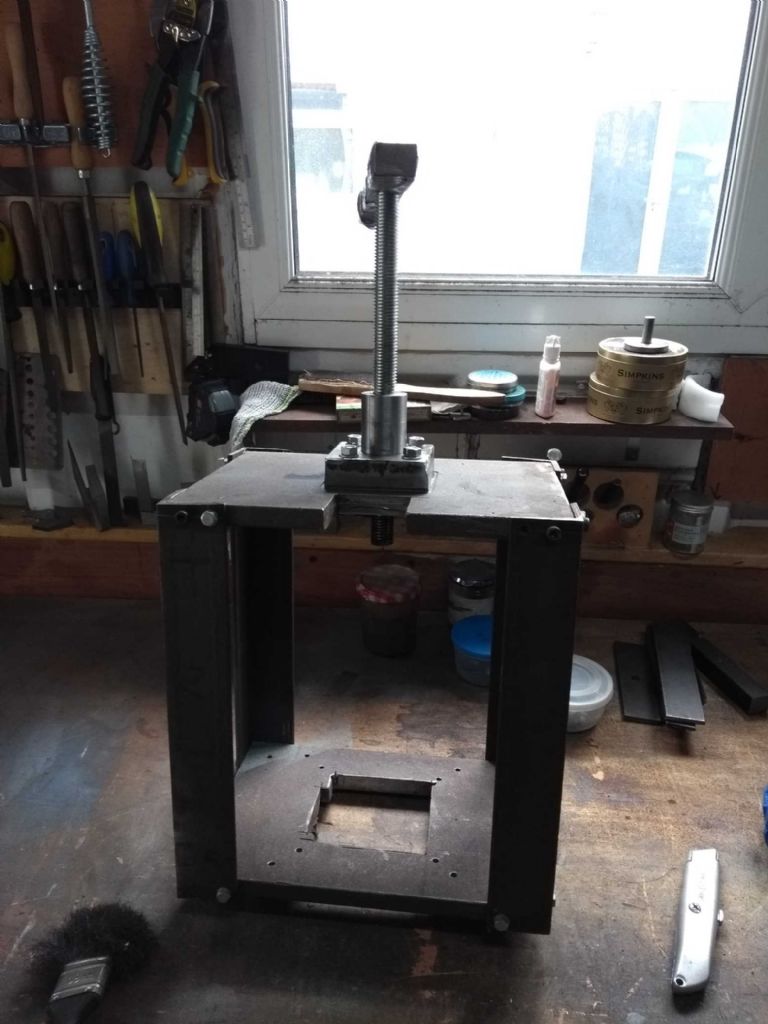
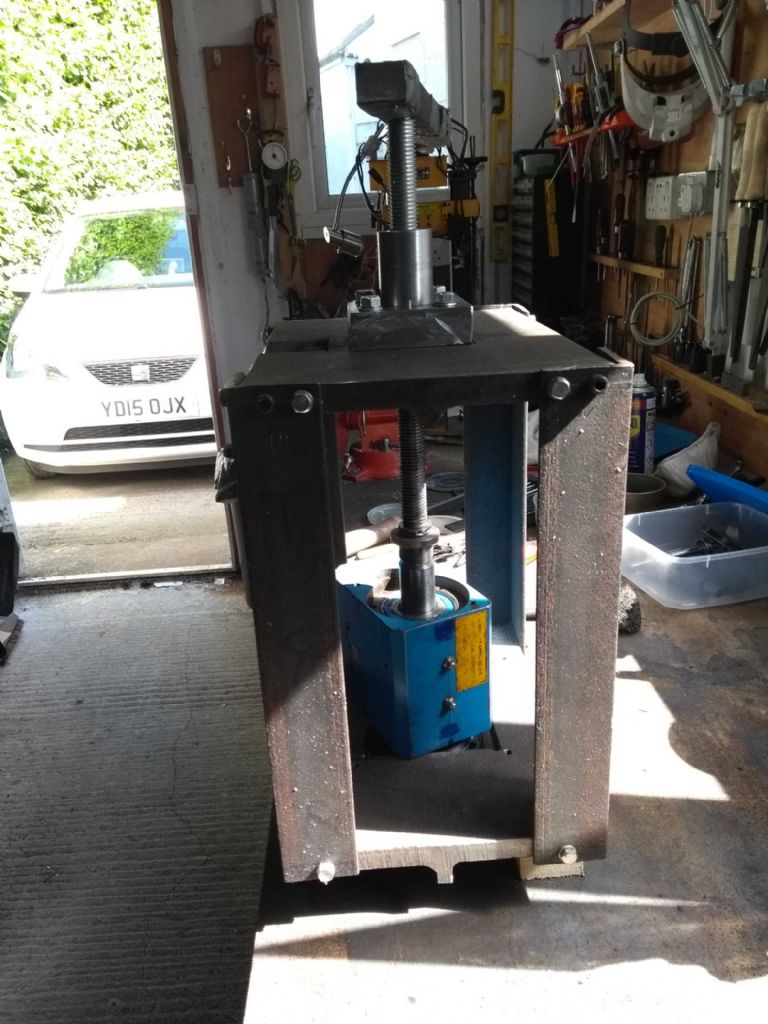
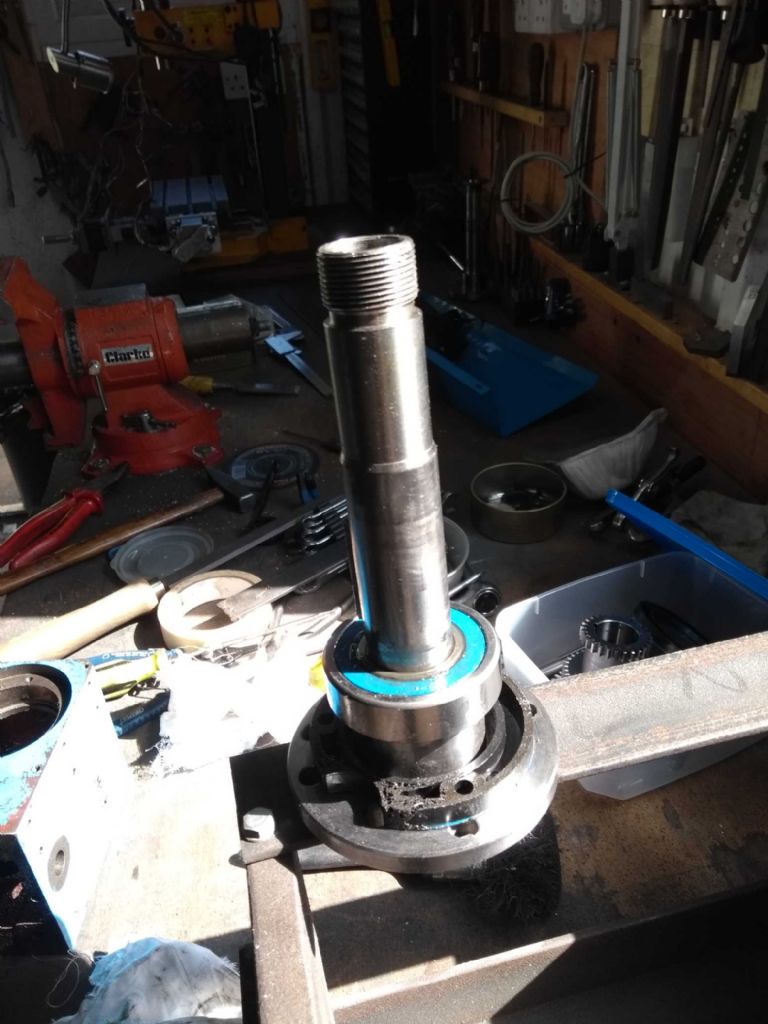
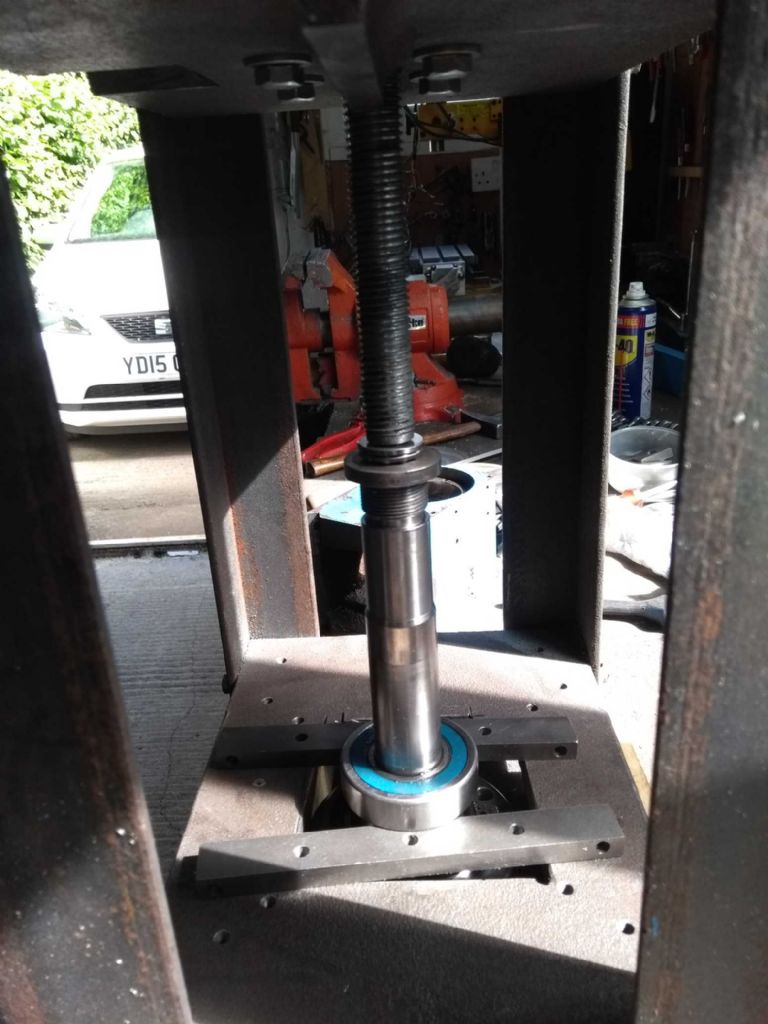
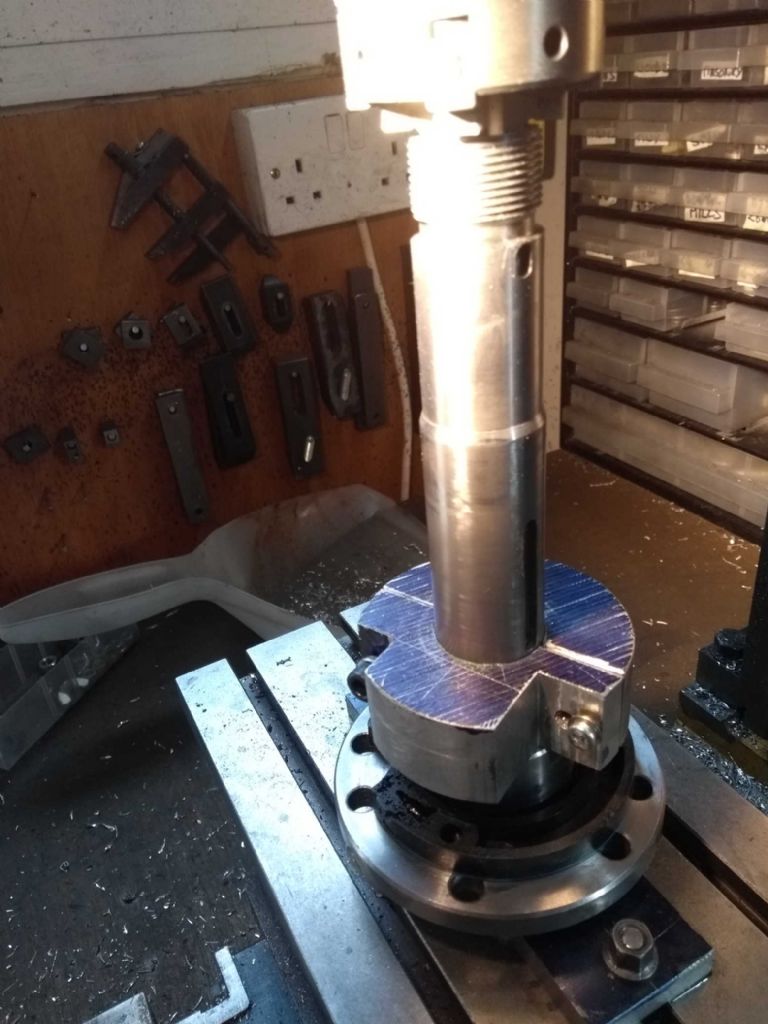
| 976 forum posts 805 photos | Rightio. The plan was to remove the spindle from the lathe and mount it in the mill with the unholy collection of components shown below. Underneath the bit at the front with the cone is a spigot which fits nicely into the spindle throat. The top end of the spindle gets gripped by the 4 jaw in the mill spindle. the bottom end slots into the coney thing and the cone sits in a centre drilled hole in the marked up plate which is bolted to the mill. Once I drill the centre it's going to be difficult to do anything else with the mill until the work is finished so that's the last thing to do. As the spindle rotates some (probably) 1000 grit will take a little bit of the surface enabling a better fit. So, next was to strip down the lathe and press the spindle out. The stripping down went fine. I'd made a press out of scrapyard junk for the last time I had the spindle out. Whilst I just about got the job done there were some design issues. Mainly that the screw wobbled terribly which made the work piece move. The solution was to add a support column to the above the screw. A 2 inch steel bar with an exact inside diameter and slotted (and glued - green loctite, so nothing's moving it) into a recess bored in the top. That's made a big difference. Next to press out the spindle The results of that were quite interesting. From earlier comments the outside of the bearing should be an interference fit and the inside a slide fit. As you can see below, even with the creaking from the press, the outer bearing fit proved weaker than the inner bearing - that is the bearing stayed on. This wasn't ideal news. However, it did provide evidence for my theory that I wasn't able to correctly pre-load because the inner bearings was jammed. How to get the bearing off? Press to the rescue. I thought things were going OK until the bearing got to the rear bearing position. At which point the damn thing burst open! Bearings all over the shed... I was able to get the bearing off, but I think I will need to to get a replacement bearing(s - might get the pair), I don't feel that it will ever be the same even if I do find all the balls! Thank God for the Internet, eh? OH - if anyone can provide more detail guidance about how to do this polishing and fitting, I'd appreciate it. I guess it's just a strip of wet and dry and keep trying the bearing. but I'm not sure what a slide fit consists of - and if I should lubricate to get it on.
Iain |
| old mart | 01/09/2019 17:54:56 |
| 4655 forum posts 304 photos | When you have pressed the remains of the bearing inner off the shaft, you may find that the burnishing of the shaft has made the rear bearing to be an easier fit when it is replaced. When fitting the new bearings, there must be a way of applying pressure to both inner and outer races simultaneously to avoid damaging them. |
| Michael Gilligan | 01/09/2019 22:07:06 |
23121 forum posts 1360 photos | Posted by Iain Downs on 01/09/2019 17:37:28: [ ... ] OH - if anyone can provide more detail guidance about how to do this polishing and fitting, I'd appreciate it. I guess it's just a strip of wet and dry and keep trying the bearing. but I'm not sure what a slide fit consists of - and if I should lubricate to get it on. . I'm waiting to be shot-down for this; but let me tell you how I did a very similar 'fitting' job [ it's the quality of the grinding that's the problem ] When the bearing was eventually removed from the spindle, there were several quite clear longitudinal scuff marks on the spindle [not scratches as such]: It was evident that the spindle was not exactly round, but slightly lobate. I sat quietly in the sunshine with a fairly worn fine-grade Diamond hone [*], and gently removed a little more from those scuffed high-spots ... then tried the bearing for fit ... and repeated this cycle until it felt right. All this was done by hand, with the spindle resting on my knees. The correct fit is usually that the bearing can [just] be slid by hand onto the spindle. [no white-knuckle stuff please] . Those with all the right tools, in tip-top condition, would do it differently ... but it was a satisfying way to spend a sunny afternoon. MichaelG. . [*] https://uk.knivesandtools.eu/en/pt/-eze-lap-diamond-hone-stone-diamond-files-set-of-3-lpak.htm Edited By Michael Gilligan on 01/09/2019 22:09:06 |
| John Olsen | 02/09/2019 06:23:40 |
| 1294 forum posts 108 photos 1 articles | You could make a split lap to polish the shaft. The lap needs to be made of something softish, brass or aluminium for instance, bored to an easy fit on the shaft, and then split with a saw cut and drilled and tapped for a screw that can be used to close it up slightly. Then you can lap the spindle, using a bit of fine valve grinding paste. You can work the lap by hand since the lathe will be out of action. This is quite a slow way of removing material so gives quite good control. The spindle wants a good clean afterwards of course. John |
| Iain Downs | 02/09/2019 07:40:35 |
| 976 forum posts 805 photos | Thanks for the comments. It occurred to me in the early hours of the morning, that the front bearing doesn't really need to slide as long as the back bearing slides freely. If the inner shell is jammed a little bit before the end of the shaft, then it is still firmly in place. It's the back bearking that certainly needs to slide to pull both bearings together. Is this right/ If so I need only concentrate on the back part of the shaft. Also, I don't think it's possible to support both inner and outer shells for all the operations. I think the order of operation is probably to press home the bearings in the headstock and then press the shaft through with the rear bearing fully supported. That leaves the inner shell of the front bearing pressed on the shaft. Of course if the shaft is a slide fit then this puts less stress on the bearing. Hmmm.
Iain |
| Michael Gilligan | 02/09/2019 07:42:46 |
23121 forum posts 1360 photos | Posted by Michael Gilligan on 01/09/2019 22:07:06: [ ... ] When the bearing was eventually removed from the spindle, there were several quite clear longitudinal scuff marks on the spindle [not scratches as such]: It was evident that the spindle was not exactly round, but slightly lobate. I sat quietly in the sunshine with a fairly worn fine-grade Diamond hone [*], and gently removed a little more from those scuffed high-spots ... then tried the bearing for fit ... and repeated this cycle until it felt right.. [ ... ] . Just for clarity; The scuffs were [as as stated] longitudinal; so the 'treatment' was circumferential ... each time taking-off only sufficent material to remove the visible scuff. The 'furrows' from the original grinding marks remained quite evident when I had finished. ... I didn't even try to measure the dimensional change, but it must have been very little. MichaelG. |
| Michael Gilligan | 02/09/2019 07:45:26 |
23121 forum posts 1360 photos | Posted by Iain Downs on 02/09/2019 07:40:35:
[ ... ] Of course if the shaft is a slide fit then this puts less stress on the bearing. Hmmm. .
|
| Howard Lewis | 02/09/2019 12:11:06 |
| 7227 forum posts 21 photos | As an aside re fitting bearings, if the inner race is to be fitted to the shaft, the "dolly" used to fit it should only bear on the inner race. In this way the bearing as an assembly will not be subjected to forces which might cause Brinelling, or worse damage to the rolling elements or the outer race. By the same logic, when fitting the outer race, to the housing, the "dolly" used should only bear on the outer race, not the inner race. This applies whether the bearings are being fitted by drive, press, or puller fitting methods. Howard |
| Iain Downs | 08/09/2019 18:51:24 |
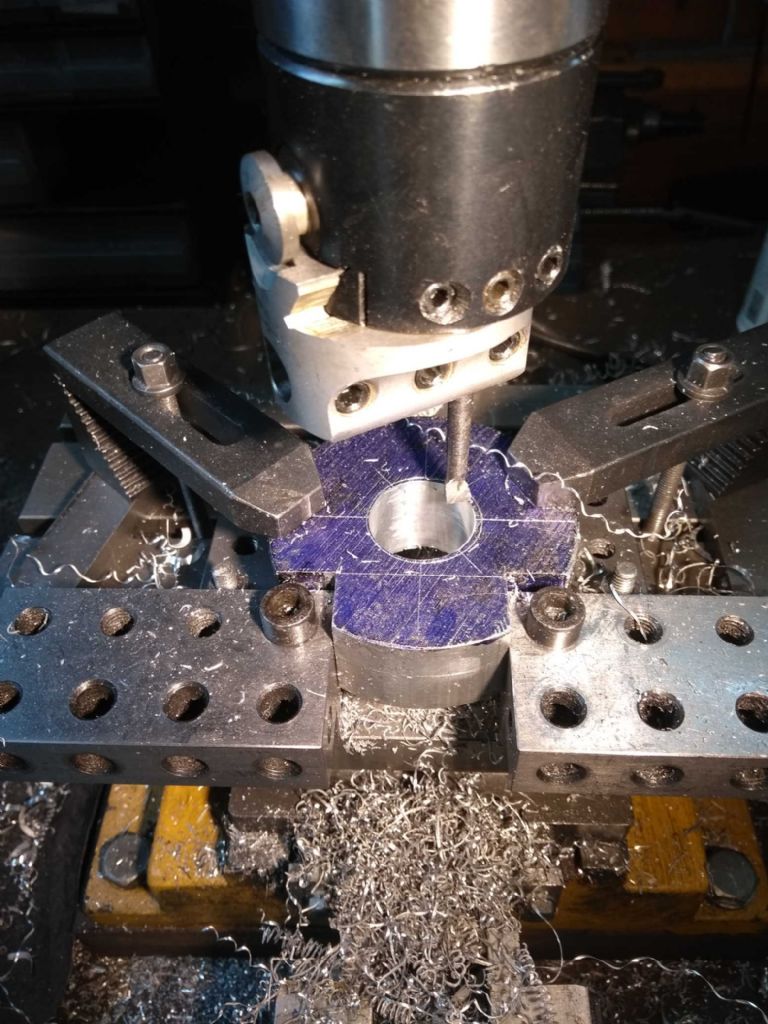
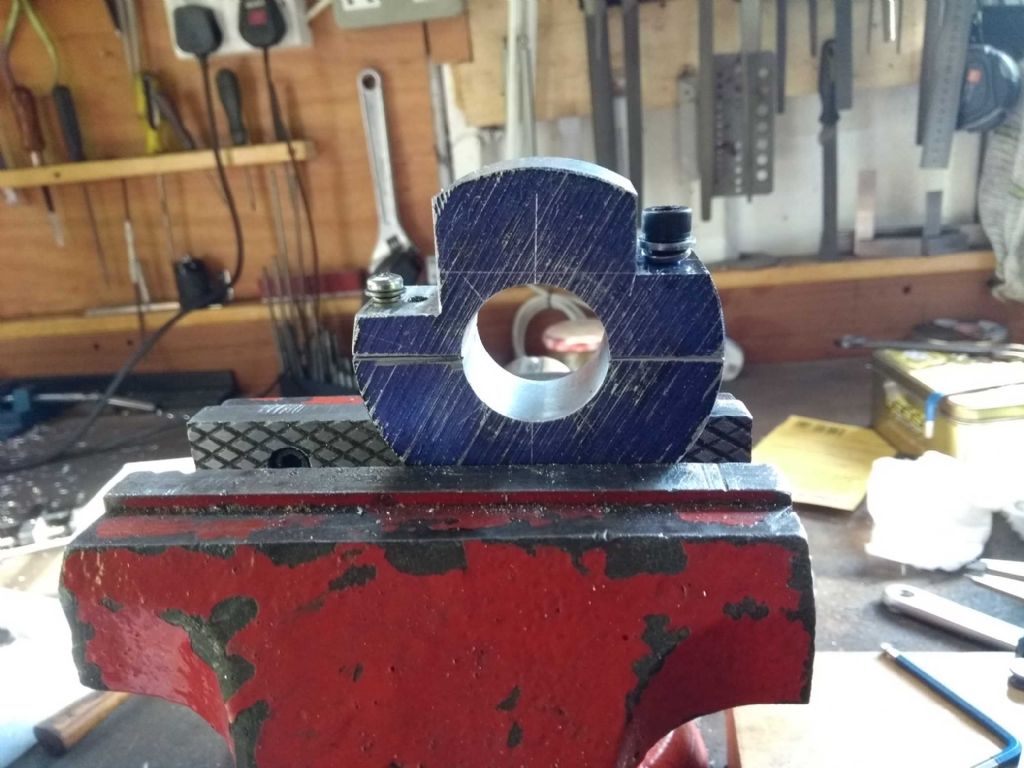
| 976 forum posts 805 photos | Hi, All. Some time has been spent working on the spindle. John - I took your advice about a split lap. I had a handy piece of 1 inch wide 3 inch aluminium bar which I cut some shoulders on, drilled, and bored out. With this being the 'finished' product The offset shoulders is not some clever attempt to apply differential pressure, but as a result of my 6mm tap breaking off in the left had hole. This was most annoying, partularly as it was my favourite spiral tap. Finished the other hole off with my traditional set and hten drilled and tapped to 4 mm on the left having reduced the shoulder as you can see. Although the original advice was for valve grinding paste, I actually don't have any of that, but I do have a set of diamond grinding paste. I started off with what I think is 5micron (green) and after 10 or 15 mins I didn't see much change I upped to 10 micron (gray). I'm testing this by attempting to press the bearing home with my fingers after wiping the paste away. As I was getting bored turning the lap by hand, I finished of my polishing machine. Which seems to work rather well. Thankfully, there's enough throat to be able to take the spindle off without moving the lower plate so it stays nice centred. I would like to ask if 10 micron grit is about right - and how long I should expect this to take. The last thing I want to do is to take to much off! The other thing which I found was that the bore in the split lap was not round. it's a thou ish different across different axes. When you're boring on my little mill there is a good deal of vibration and I think that the head is more rigid in one direction than the other hence less movement and more cut. I don't think this invalidates the lap, mind you, just something to think on in future.
Iain |
| old mart | 08/09/2019 18:58:33 |
| 4655 forum posts 304 photos | Don't go overboard with relieving the fit of the bearings, they weren't designed to be sliding fits. You could easily end up with a scrap spindle. |
Please login to post a reply.
Want the latest issue of Model Engineer or Model Engineers' Workshop? Use our magazine locator links to find your nearest stockist!
Sign up to our newsletter and get a free digital issue.
You can unsubscribe at anytime. View our privacy policy at www.mortons.co.uk/privacy
- hemingway ball turner
04/07/2025 14:40:26 - *Oct 2023: FORUM MIGRATION TIMELINE*
05/10/2023 07:57:11 - Making ER11 collet chuck
05/10/2023 07:56:24 - What did you do today? 2023
05/10/2023 07:25:01 - Orrery
05/10/2023 06:00:41 - Wera hand-tools
05/10/2023 05:47:07 - New member
05/10/2023 04:40:11 - Problems with external pot on at1 vfd
05/10/2023 00:06:32 - Drain plug
04/10/2023 23:36:17 - digi phase converter for 10 machines.....
04/10/2023 23:13:48 - More Latest Posts...
- View All Topics
- Reeves** - Rebuilt Royal Scot by Martin Evans
by John Broughton
£300.00 - BRITANNIA 5" GAUGE James Perrier
by Jon Seabright 1
£2,500.00 - Drill Grinder - for restoration
by Nigel Graham 2
£0.00 - WARCO WM18 MILLING MACHINE
by Alex Chudley
£1,200.00 - MYFORD SUPER 7 LATHE
by Alex Chudley
£2,000.00 - More "For Sale" Ads...
- D1-3 backplate
by Michael Horley
Price Not Specified - fixed steady for a Colchester bantam mark1 800
by George Jervis
Price Not Specified - lbsc pansy
by JACK SIDEBOTHAM
Price Not Specified - Pratt Burnerd multifit chuck key.
by Tim Riome
Price Not Specified - BANDSAW BLADE WELDER
by HUGH
Price Not Specified - More "Wanted" Ads...
Do you want to contact the Model Engineer and Model Engineers' Workshop team?
You can contact us by phone, mail or email about the magazines including becoming a contributor, submitting reader's letters or making queries about articles. You can also get in touch about this website, advertising or other general issues.
Click THIS LINK for full contact details.
For subscription issues please see THIS LINK.
Model Engineer Magazine
- Percival Marshall
- M.E. History
- LittleLEC
- M.E. Clock
ME Workshop
- An Adcock
- & Shipley
- Horizontal
- Mill
Subscribe Now
- Great savings
- Delivered to your door
Pre-order your copy!
- Delivered to your doorstep!
- Free UK delivery!



 Register
 Log-in


