Understanding plans.
Help for absolute beginners.
| Alastair Ham | 01/09/2018 13:59:58 |
| 11 forum posts 1 photos | Hi there! This is my first time on a forum like this and only my second month of owning a mini lathe. I’ve been reading lots of articles and books on techniques or pointers for beginners, however I can’t find anything useful to help me read a simple set of plans. I have bought a kit for a Elmer 25 Wobbler and found the original plans with the written instructions but it still is not in plain enough English for a beginner, the technical drawings are also basically a mystery as well. I imagine it’s like a non musician attempting to read sheet music with no instruction! Is there a book or website that caters for absolute beginners, the Wobbler is described as a good first model but I can’t see tackling it until I’ve acquired a lot more knowledge, and then applied that knowledge into practical experience. Alternatively are there instructions for projects written in plain English that help beginners get going? Any help would be hugely appreciated. Thanks. |
| Neil Wyatt | 01/09/2018 16:52:54 |
19226 forum posts 749 photos 86 articles | Hello Alastair, Welcome to the forum. You might find this thread useful: www.model-engineer.co.uk/forums/postings.asp?th=73695&p=8 Do you have any specific questions about the drawings? Neil |
| JasonB | 01/09/2018 17:00:55 |
25215 forum posts 3105 photos 1 articles | May be easier to look at some pictures on one being made rather than wade through that thread Quite a good build thread here on MEM |
| JohnF | 01/09/2018 17:43:08 |
1243 forum posts 202 photos | I think some of the info on Neils link are very good and this youtube one in particular is a good representation of the two projections **LINK** Another way to train your self to read a drawing is to make a drawing --- once you understand the projections, it can be a vey simple drawing but it will help you to then understand more complicated drawings. May be worth adding your location to a post or your profile then there may be someone close willing to "walk" you through the process. John Edited By JohnF on 01/09/2018 17:44:14 |
| Alastair Ham | 01/09/2018 18:04:32 |
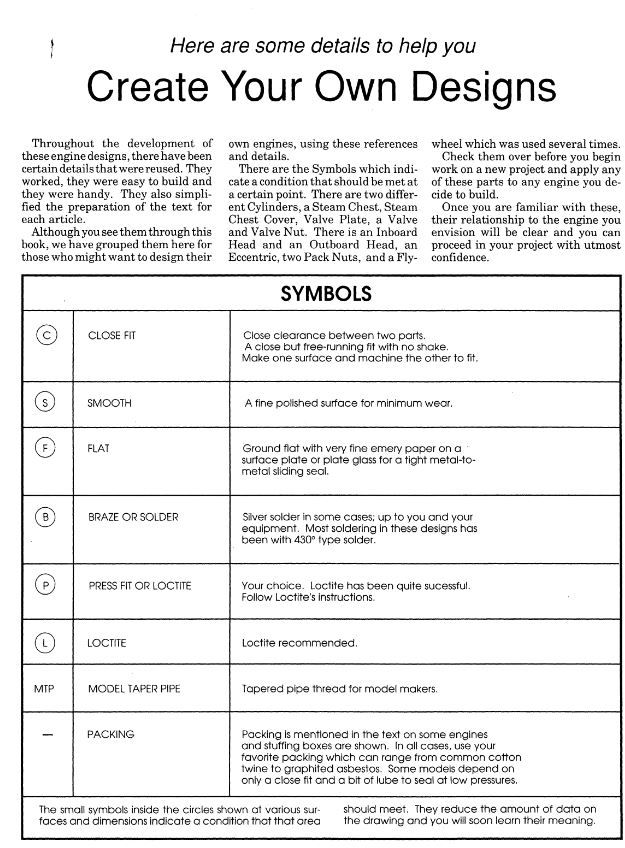
| 11 forum posts 1 photos | Hello, thank you for the welcome! I’m afraid most of the plans don’t make much sense to me, a starting point though would be the letters in circles and what they denote? The step by step link is definitely going to be a help thanks. There’s also pieces that I don’t know how to machine, I guess using the mill (it’s the crank plate I think) but I don’t know at this stage how one would go about it. Thanks for the quick help so far I really appreciate it. If I can I’ll attach a pick of the plans. |
| JasonB | 01/09/2018 18:09:09 |
25215 forum posts 3105 photos 1 articles | You'll be wanting this page |
| Nick Clarke 3 | 01/09/2018 18:55:27 |
1607 forum posts 69 photos | If in doubt ask here. There are a lot of very experienced people here (not me!!) who seem happy to help. Remember that sometimes there is the odd piece of information left to 'experience' and not clearly drawn on a plan so ask if you are not clear. No 13 in the 'Workshop Practice' books is 'Workshop Drawing' by Tubal Cain (Google for availability online) which is clear and comprehensive. Nick Edited By Nick Clarke 3 on 01/09/2018 18:59:35 |
| Mick B1 | 01/09/2018 19:20:18 |
| 2444 forum posts 139 photos | Just remember, if you're looking at a first angle projection drawing of a ship, and you want to look at the propellers, you gotta walk along to the pointy end - and if you want to look at the thwarts in the lifeboats, you gotta squat down to look beneath the keel. It's mad, but it's ISO standard. The Septics have it more logical with their third angle projection. The drawing should tell you which projection it uses, usually with a truncated cone drawn in side and end view. If the tolerances aren't specified in the dimensions, there should be a panel somewhere declaring general tolerances determined by how the dimension is expressed - but that's Production Engineering; in Model Engineering you often have to work out tolerances for yourself. |
| thomas oliver 2 | 01/09/2018 21:06:18 |
| 110 forum posts | I don;t know if drawing standards have changed, but all drawings used to be done according to British Standard 308, of the Brtish Standards Institute at least they were generally. There used to be available a cheap Students copy which condensed it all into a very clear reference Booklet. I have no Idea if this still exists or whether the booklet is available but you never know. There were 2 systems of viewing and drawing the views - 1st Angle and 3rd Angle, the first being used the most, In first angle there were 4 views 1, the view from the front put in the middle.called the Front elevation 2. The view from the right drawn to the left called an end elevation 3. The view from the left drawn to the right and called an end elevation. 4 The view from above drawn below the front elevation and called the plan view. Dimensioning and all other information added were all strictly laid down but alas not always followed to the letter. Understanding and remembering it is not difficult. It was the production of neatly spaced and projected views and neat dimensioning which was the problem facing students. Tomol. |
| JasonB | 02/09/2018 06:59:00 |
25215 forum posts 3105 photos 1 articles | Well Elmer's drawings are from America so won't be to any British Standard. Also as they were being published in a book it was not possible to lay them all out and neatly space everything, more a case of getting one engine onto a page or two if a larger design. Also you have part and assembly drawings as one to again keep space down. Then again thousands of engines must have been built to his designs over time so with a bit of help for the beginner they can be made without getting bogged down in the finer points of drawing standards etc. Alastair, can you say what equipment you have available as they will affect how you can go about making this engine, maybe post just the part of the drawing that shows the first piece you don't know how to go about machining and then members can say how they would tackle it. |
| Thor 🇳🇴 | 02/09/2018 10:10:49 |
1766 forum posts 46 photos | Hi Alastair, May be this can be of some help? Thor |
| HOWARDT | 02/09/2018 11:27:35 |
| 1081 forum posts 39 photos | I think Alastair would be better finding someone close to him who could show him a drawing and associated parts. This would be by far the simplest way to explain the basic principles. The details of drawing content can be then explained as no two drawings will be the same. As a life long designer both on the board and computer I know the problems people can have interpreting a drawing to visualise a three dimensional part. Reference to standards is OK but most drawings don't. Standards can be company, country, international or do what you think best in the circumstances. An hour spent expelling in person will save a lot of time wasted typing suggestions. |
| SillyOldDuffer | 02/09/2018 12:17:42 |
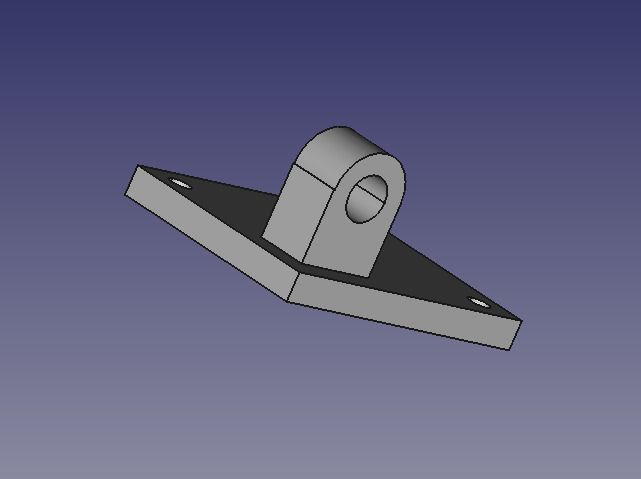
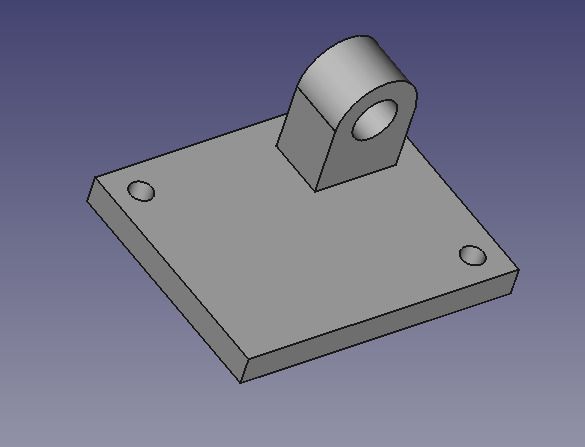
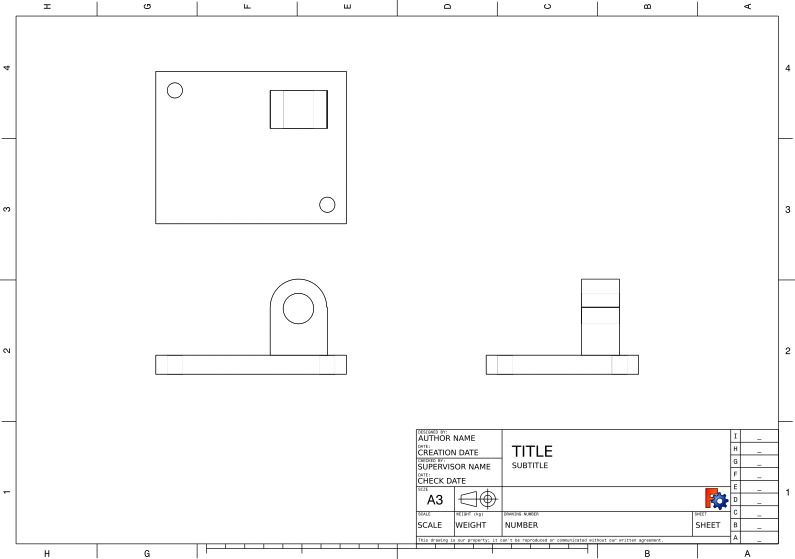
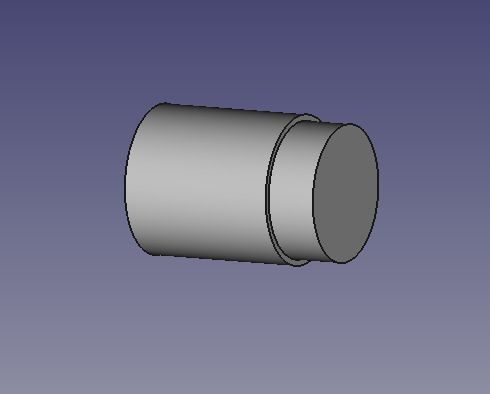
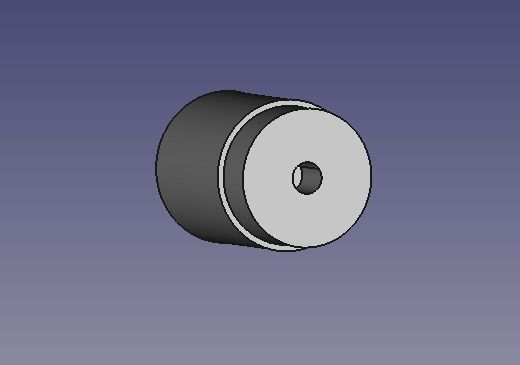
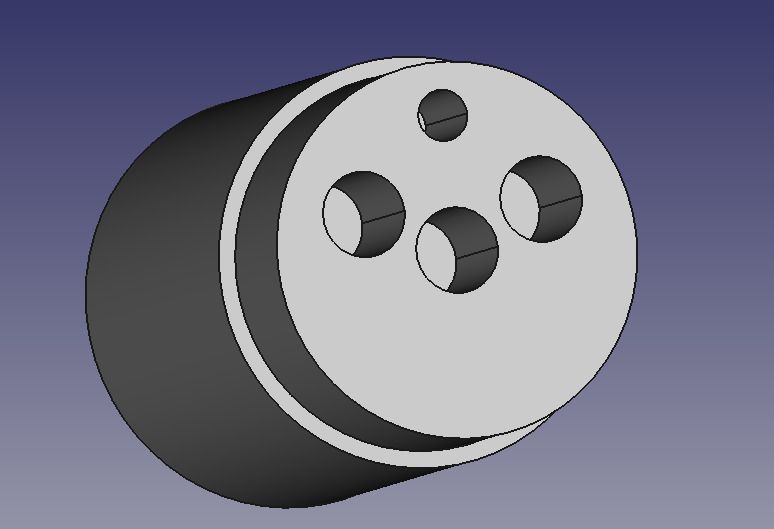
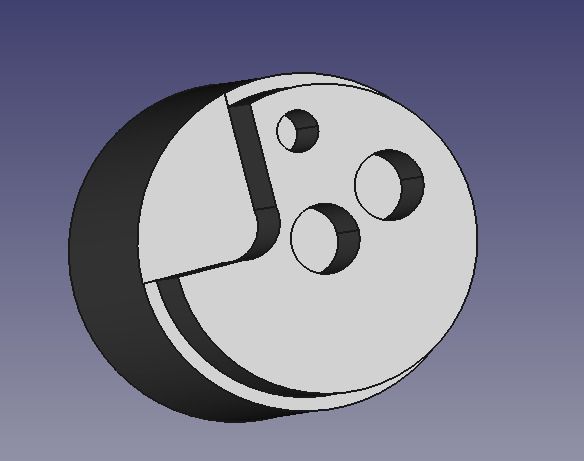
| 10668 forum posts 2415 photos | I agree with Howard, dropping poor Alastair straight into details may not be helpful. How about this for a starter for ten. Consider being asked to make this object: Houston, we have a problem. Although the shape is defined, there are at least two ambiguities: does the large hole go all the way through, and, is there a third corner hole hidden behind the boss? Looking at the object from another angle clears one point up (no third corner hole), but the large hole isn't quite nailed down - is it a single through hole, or is it two holes that don't meet in the middle? A drawing that will be used to make an object should provide all the information needed. The designer / draughtsman should not leave the builder in the dark. At a basic level, an engineering drawing will provide three views of the same object. What it looks like from the front, what it looks like from the side, and what it looks like in plan view. This drawing shows that the large hole goes clear through the boss. Dotted lines (not very clear in the picture) show hidden detail. The example drawing is still incomplete; no dimensions are shown, nor are we told what the object is to be made from. The way dimensions and construction lines are shown and the way the drawing is identified, perhaps with version control, follow a standard. As there are a number of differences, and changes over time, it's best to approach drawings with suspicion. Amateur drawings tend to bend the rules, perhaps mixing different standards in the same drawing. When faced with an unknown drawing, I redraw it 'my way' to make sure I've understood it. Some objects are 'back of an envelope' simple, others call for 3D CAD. Finally, 'What it looks like from the front, what it looks like from the side, and what it looks like in plan view.' is itself multi-choice - for example, is plan view from above or underneath? Older British and European practice was to draw plans 'First Angle'. The Americans spotted advantages in drawing plans in 'Third Angle', and this is now the preferred method world-wide. (The advantage mainly appears in complex drawings.) In my experience, the difference between First and Third Angle is rarely a problem. However, getting First Angle and Third Angle confused might mean certain features are made as mirror images of the designers true intent. Dave |
| Alastair Ham | 02/09/2018 14:11:56 |
| 11 forum posts 1 photos | Wow thank you so much for the responses, it’s really nice that so many people are willing to spend time helping. Ok I have a Unimat SL with a few attachments including the column for milling and a machine vice so I believe I should be able to do this project...in theory. |
| Alastair Ham | 02/09/2018 14:21:26 |
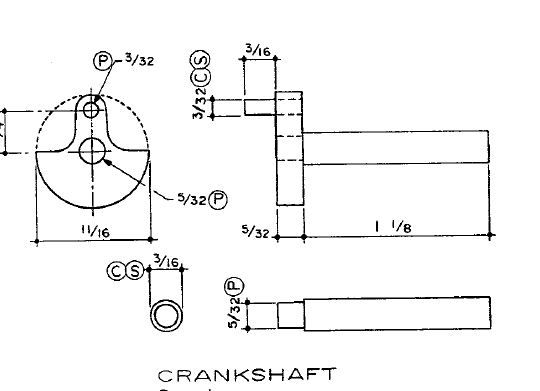
| 11 forum posts 1 photos | How would I machine the disc into the shape required for the crankshaft? The letters SF CF C P etc also are not clear to me, I keep looking through the plans and reading the instructions provided hoping to find one bit that I fully understand how to do but it’s all quite overwhelming and I get bogged down by the overall thing.
Edited By JasonB on 02/09/2018 14:30:30 |
| JasonB | 02/09/2018 14:35:33 |
25215 forum posts 3105 photos 1 articles | P - the 5/32" dia end of the shaft is a Press fit into the 5/32" hole in the web though you could also use a suitable loctite. S - the 3/16" dia shaft and the 3/32" pin want a good Smooth finish as these have other parts that rotate against them. C - As well as the above two parts needing a smooth finish they need to be a Close fit in the mating parts otherwise your crankshaft will wobble about and the conrod will knock on the pin. I'll give someone else a chance to suggest a machining method, if not takers I'll come back later.
J |
| Mick B1 | 02/09/2018 15:48:41 |
| 2444 forum posts 139 photos | Drawings are supposed to be a formal document fully specifying what's to be made, but they often fall short of this. For example, Alastair's end view of the crankshaft assembly doesn't specify the radii at the bottom of the cutouts or around the crankpin hole at the top. I think I might want to make the throw with the 3/32" hole in it 1/4" wide, although it scales at more like 3/16". With that uncertainty, I might draw it out by hand at 2 or 3:1 to see what looked most like the drawing as printed. Many drawings carry the legend 'Do Not Scale', to indicate that using a ruler to settle an unspecified dimension is at own risk. Could you clamp a piece of 11/16" diameter material in your vice with the flat end facing your mill spindle and mill out the pockets to a depth of a bit more than 5/32" prior to parting off in the lathe chuck? You'd need a length of at least 5/32 + part off tool width + enough to grip in the chuck. It would be simplest to file the radius around the crankpin hole, or grind it with a bench grinder if you can be cute enough. |
| SillyOldDuffer | 02/09/2018 15:58:52 |
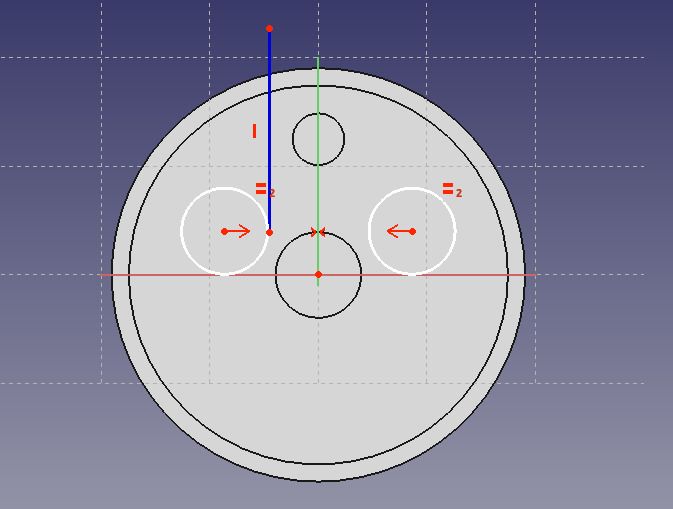
| 10668 forum posts 2415 photos | This is how I'd do it. 1. In the lathe 3-jaw, turn a 3/4" rod down to 11/16" for about 1/2" and face-off. 2. Drill the 5/32" hole for the axle, about 1/2" deep. 3. Remove from the lathe and mark out and centre-punch the position of the 3/32" hole for the crank-pin. The position must be accurate. By eye, because the position isn't important mark out and centre-punch the two 5/32" holes that will form the cheeks. 4. In the milling attachment or a drill press, drill two 5/32" holes, and one 3/32" hole, all about 1/2" deep. 5. Mill off the unwanted metal in each quadrant, one side only done in picture: 6. Saw or part off the crank disk, reverse it in the 3-jaw making sure the rear face is flat to the chuck, and then face-off the rough side leaving the required thickness (3/32" 7. Round off the sharp edges on the crankpin radius with a file until it looks OK. None of the machining need be accurate apart from the 3/32" crank-pin hole, and the 5/32" axle hole, and that their centres are the right distance apart. (I guessed because the dimension got chopped off!) I like to keep parts attached to the mother metal for as long as possible because it often makes work holding easier. Depending on the exact shape and equipment used, it may be more convenient to cut off the 3/4" rod and clamp the semi-finished part instead. Don't be afraid to experiment with different approaches, and don't be put off by a few failures! The crank-pin and axle parts are both turned in the lathe very slightly oversize (say a thou) to be a 'has to be tapped in with a hammer' fit to the holes in the disc. Or as Jason says, Locktite will secure looser parts perfectly well. If anyone has a better way, please suggest it. I still have a lot to learn... Dave |
| Tim Stevens | 02/09/2018 16:19:53 |
1779 forum posts 1 photos | I think we all need to step back two or three paces. What I find most difficult in starting a new project (of any sort) is really understanding the language used. So, what I find most useful is some sort of compendium of terms - perhaps a page of cutting tools, and named (with alternatives) and sketches to show what they can do. Its no use knowing a tool is used to make counterbores until you can recognise a counterbore. Perhaps it would be very useful (are you reading this, Neil?) if each issue could include a centre spread illustrating a particular aspect of our hobbies? Start with nuts and bolts - the wide range of head shapes and drive socket shapes, old and new, for an example. Many of the illustrations needed already exist in eg Machinery's Handbook, Kemps, Kents, etc. and go back far enough to be out of copyright (surely?) This would also be helpful to anyone dealing with drawings (etc) or enquiries from a different country. Do we all know that what is a set screw in the US is a grub screw in the UK? And how about the terms used in other outposts of what we were proud (but wrong) to call an empire? Not a full answer to our poster's problem, but a start? Regards, Tim |
| JasonB | 02/09/2018 16:27:11 |
25215 forum posts 3105 photos 1 articles | Well the first 5 parts of my Milling for beginners series shows most of the common tooling (including counterbores) and a brief description of what they are all used for, later installments will deal with their actual use. Neil's lathework series is similar. So thats about 50 pages given over to beginners, anymore and the old hands will start moaning |
Please login to post a reply.
Want the latest issue of Model Engineer or Model Engineers' Workshop? Use our magazine locator links to find your nearest stockist!
Sign up to our newsletter and get a free digital issue.
You can unsubscribe at anytime. View our privacy policy at www.mortons.co.uk/privacy
- *Oct 2023: FORUM MIGRATION TIMELINE*
05/10/2023 07:57:11 - Making ER11 collet chuck
05/10/2023 07:56:24 - What did you do today? 2023
05/10/2023 07:25:01 - Orrery
05/10/2023 06:00:41 - Wera hand-tools
05/10/2023 05:47:07 - New member
05/10/2023 04:40:11 - Problems with external pot on at1 vfd
05/10/2023 00:06:32 - Drain plug
04/10/2023 23:36:17 - digi phase converter for 10 machines.....
04/10/2023 23:13:48 - Winter Storage Of Locomotives
04/10/2023 21:02:11 - More Latest Posts...
- View All Topics
- Reeves** - Rebuilt Royal Scot by Martin Evans
by John Broughton
£300.00 - BRITANNIA 5" GAUGE James Perrier
by Jon Seabright 1
£2,500.00 - Drill Grinder - for restoration
by Nigel Graham 2
£0.00 - WARCO WM18 MILLING MACHINE
by Alex Chudley
£1,200.00 - MYFORD SUPER 7 LATHE
by Alex Chudley
£2,000.00 - More "For Sale" Ads...
- D1-3 backplate
by Michael Horley
Price Not Specified - fixed steady for a Colchester bantam mark1 800
by George Jervis
Price Not Specified - lbsc pansy
by JACK SIDEBOTHAM
Price Not Specified - Pratt Burnerd multifit chuck key.
by Tim Riome
Price Not Specified - BANDSAW BLADE WELDER
by HUGH
Price Not Specified - More "Wanted" Ads...
Do you want to contact the Model Engineer and Model Engineers' Workshop team?
You can contact us by phone, mail or email about the magazines including becoming a contributor, submitting reader's letters or making queries about articles. You can also get in touch about this website, advertising or other general issues.
Click THIS LINK for full contact details.
For subscription issues please see THIS LINK.
Model Engineer Magazine
- Percival Marshall
- M.E. History
- LittleLEC
- M.E. Clock
ME Workshop
- An Adcock
- & Shipley
- Horizontal
- Mill
Subscribe Now
- Great savings
- Delivered to your door
Pre-order your copy!
- Delivered to your doorstep!
- Free UK delivery!



 Register
 Log-in


