Forum sponsored by:

Key ways
| Kenneth Deighton | 27/05/2016 19:37:51 |
| 69 forum posts | I have to cut a 6mm wide key way through a 20mm dia hole in a chain sprocket, the length of the key way will be 25mm. The only machines that I have are a Myford S7 and a Warco mill drill, I have thought of using the M/Drill as a vertical slotting m/c by fitting a 6mm wide cutting tool bit cross ways into a found bar mounted in the chuck and then manually operating the chuck up and down hopefully removing a few thou's at a time, does this sound possible ?, any advice would be appreciated. Thanks, Ken.
|
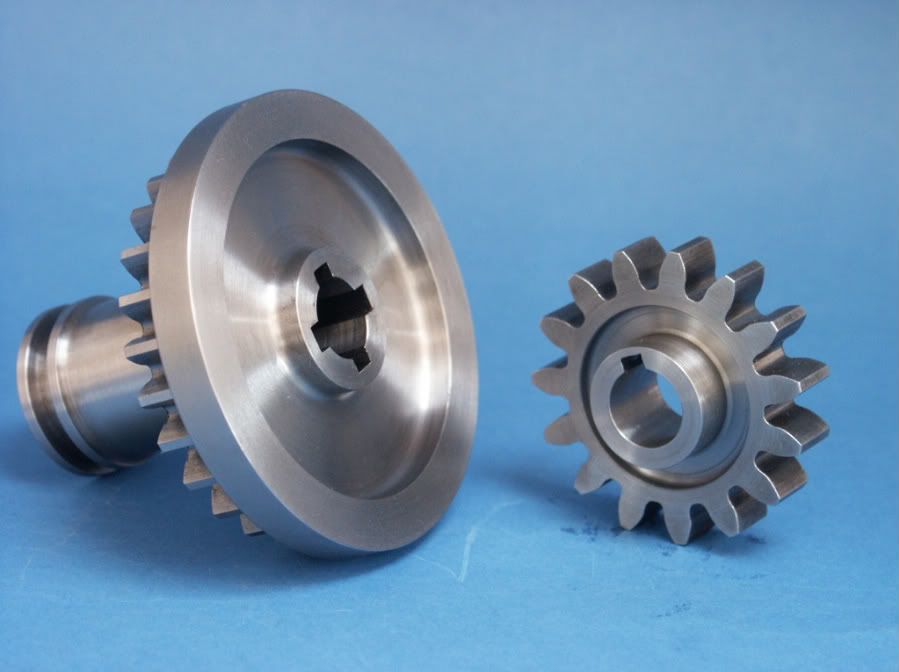
| JasonB | 27/05/2016 20:04:16 |
 25215 forum posts 3105 photos 1 articles | I have done similar on the lathe upto 3/16" wide and it takes a lot of force to push the tool through. If doing it on a mill I would suggest doing it first with a 4mm wide tool and then again with a 6mm tool to final width. I have also used a drill press to frive keyway broaches and 1/8" width is the most load I would want to subject the rack to. These four are 3/16" wide, 1" long through steel done one thou at a time on the lathe
|
| Speedy Builder5 | 27/05/2016 20:23:25 |
| 2878 forum posts 248 photos | Perhaps make a tool for a wood morticer (remove the chisel) as these have a heavy duty rack normally. |
| Clive Foster | 27/05/2016 23:21:34 |
| 3630 forum posts 128 photos | Reduce the cutting loads by fitting a bore filling spigot so the bulk of the metal can be drilled out. 5 mm would be a good start. I'd probably go 5.5 but having done this a time or three have a reasonable handle on how to get close without going over. Take out the round corners with a file. A few strokes down the side too won't hurt. Finish with the slotting tool in lathe or mill drill according to preference. Most of the cuts will just be nibbling down the sides. Ideally there will only be three or five full width ones as you get to the bottom. if there is a significant amount of material left to remove a file is faster and kinder to the machines. Your slotting tool is finisher to get the shape right and direction straight not a bulk remover. Recieved wisdom is that a lathe is stronger and more accurate at this sort of job but I suspect there isn't that much in it between your Myford and Mill Drill. My machines are much heftier so I don't have feel for the strength of yours. If you anticipate doing much more of this sort of work take time out to make a proper slotting tool. In the early days of MEW a sound design for such was published which I considered making but rejected the idea as I didn't have materials to hand and anyway very rarely cut a keyway slot so probably would have got the use to justify the making. How wrong can you be. Over a couple of decades very rarely has still added up to more than enough to justify the making. Clive |
| John Olsen | 28/05/2016 09:33:26 |
| 1294 forum posts 108 photos 1 articles | I would second Clives suggestion of fitting a spigot to fill the hole and then drilling out the bulk of the material. The material you fill the hole with should be similar to the sprocket. You can use loctite to retain it while you work. A drill will then remove nearly 80% of the material A file used carefully can then remove the rest. Done with care this process can produce a keyway that is accurate enough for all purposes. This is how the old timers used to do it. I have done the odd keyway this way despite owning several shapers, since for a one off this would probably be faster than setting things up in the shaper and making a tool the right size for the hole. John |
| IanT | 28/05/2016 10:20:08 |
| 2147 forum posts 222 photos | Given your machinery - then the drill and file route may be a good one for you to explore Kenneth. however I also thik your idea of using the tool side ways in the lathe is also well worth considering. As to the force required,, whilst I don't disagree that the force required could be quite large with a 6mm tool but why not use a thinner tool and rotate the work slightly to either side to get near the required width and then finish to size with the 6mm tool. I've not tried this but I don't see why it wouldn't work..? Like John I also have Shaper but personally I could set one up and do this work a lot quicker than the drill and file route - but then unlike the old timers my filing is pretty rubbish. So everyone has their own preferences and available skills. So several solutions open to you and if this is a once in a blue moon need - then a bit of extra time here or there is not that important. Do it the ay you feel most comforatable with and that gets the result you want. Regards,
IanT Edited By IanT on 28/05/2016 10:20:25 |
| Andrew Johnston | 28/05/2016 10:45:21 |
 7061 forum posts 719 photos | A 1/8" broach is the biggest I've used with the quill on my Bridgeport, and that felt uncomfortable. So I think one would be pushing ones luck with 6mm. If I was using the quill I'd make a tool 2mm wide and do three passes. However, I won't be using the quill as I have slotting head and a recently acquired arbor press. Even with the slotting head I've found that the tool doesn't like shallow cuts, it just deflects away from the work. Andrew |
| peak4 | 28/05/2016 10:53:22 |
 2207 forum posts 210 photos | The last time I had any slotting to do, was to make a couple of externally splined shafts for a gear shift on the Ducati. It was a pointed tool, so less loading than your 6mm slot, but there are suggestions above to reduce the forces involved. In my case I cut the splines from the top slide, rather than risking damaging anything connected with the saddle. I removed the top slide's feed screw, complete with end plate (Super 7). I then replaced it with a double lever arrangement, on a home made end plate, pivoting on a stub, bolted to the Tee slots on the cross slide. The saddle was locked in the normal way for parting off. This way I could use the top slide as a lever actuated slotting attachment, with a cutting tool horizontally in the toolpost without risking the rack or half nuts. It's much the same arrangement as a lever operated tailstock drilling conversion, but on the topslide. From memory, I ground the tool with lots of top rake, and angled it to the shaft, such that if I took too deep a cut, it would push the tool out of the way, rather than digging in to the workpiece. Indexing was done via another quick lash up. A basic gear train from the spindle, a detent, and a length of twine wrapped round the chuck with a bob weight hanging off it. Doing it this way also allows splines or slots to be cut on a tapered workpiece. If I were to have this to do on a regular basis, I might even buy a spare top slide to use as a ready made slotting attachment. The gizmo I made was quite crude, but worked well enough for a one off job, as the precision bits had already been made by Myford.
Edited By peak4 on 28/05/2016 10:55:39 |
| John Fielding | 28/05/2016 14:35:54 |
| 235 forum posts 15 photos | I wonder how many folks have come across the Polyangular key way cutter. It fits in a normal pillar drill and cuts key ways like magic. It has a miniature milling cutter poking out of the side of the spigot and it is driven by the drill chuck. One pass to make a key way takes only a few seconds. There is a video on the net you can look at to see how the thing works.
|
| Clive Foster | 28/05/2016 18:19:01 |
| 3630 forum posts 128 photos |
John Did you mean the Polikey system from Poliangolar. Not a milling cutter. Still a basic square section shaping / slotting tool. Clever part is that its arranged to pivot out from the side of a relatively slender shaft by turning a handwheel. A bobbin the same diameter as the parent hole fits on the side of the main shaft to provide support directly under the cutter. Looks to be a neat idea but probably more for 12" to the foot scale work than models. Looking at the video I get the impression a tool capable of 1/8" keyway in 3/8" bore is about as small as could be made. Not easy and not something I'd care to do, 1/4" keyway in 1" bore or bigger being more my speed. I seem to recall something covering a similar principle in either ME or MEW some years back. As I recall it that article looked at providing an adjustable cutter in a rather larger shaft to reduce spring. Don't recall anything about a support bobbin tho'. Idea seemed to be about using the largest possible shaft althoug obviously it would be supported if the shaft filled the parent bore. I've often wondered if there is any way of making an expanding sleeve or simple pivoting arm support to fit onto a simple round boring bar to support the tool. In principle it could be screw driven so the expansion matched successive cuts. In practical I never saw any sensible way of making something useable. Especially given that it needed to be small. Clive PS Tried a different search and turned up the rotary system John was talking about. Impressive but the cutter is clearly pretty special and the whole system looks expensive. Fundamentaly, like rotary broaching, yet another offsping of the wobble drill process used to drill square and polygon holes. First time round Google cleary got confused as the compay is Poliangolar and the make both the Poliangolar rotary system and the simpler Polikey broacing system. Edited By Clive Foster on 28/05/2016 18:25:58 |
| Kenneth Deighton | 30/05/2016 20:00:51 |
| 69 forum posts | Thank you gentlemen for all the advice on cutting a 6mm key way, I have now completed the job using the system/advice given by Clive Foster. Thanks again, Ken. |
| John Fielding | 01/06/2016 09:11:37 |
| 235 forum posts 15 photos | Hi Clive, After I posted the poliangolar (SP?) idea I went and looked again at the url I had stored and it was no longer active. The new Poliangolar system is completely different, more of an eccentric broaching system. The one I saw, they even had a video of a guy sitting at a drill press cutting keyways in change gears!, it was a round spigot with a tiny side and face cutter poking out of the side. The drill chuck drove the cutter by a helical shaft, like a worm wheel, and it cut pretty quickly. No idea where the link is now but it was a very clever beast. Seems they had been around a long time and it was an American company. Another mystery!
|
| John Fielding | 01/06/2016 09:22:17 |
| 235 forum posts 15 photos | OK I found a similar keyway cutter, not the same company but the method is the same. Have a look at the video to see how it works. https://www.youtube.com/watch?v=XrFEN9veUfU
Edited By JasonB on 01/06/2016 09:32:02 |
| Michael Gilligan | 01/06/2016 09:33:36 |
 23121 forum posts 1360 photos | Was this the one, John ? ... Looks promising MichaelG. |
| IanT | 01/06/2016 10:41:25 |
| 2147 forum posts 222 photos | I'm pretty certain a very similar device has been published in ME some time ago Michael but unfortunately I don't have access to my archive/data base at the moment. From memory, a simple screwed adjuster pushed a tapered cutting tool forward (and up) in the holder to put on the cut. When my son (eventually) recovers my files, I'll see if I can find the reference to it. Regards, IanT
|
| Clive Foster | 01/06/2016 13:31:25 |
| 3630 forum posts 128 photos | IanT's recollection of a published design for similar adjustable, single tooth, key-way broach pretty much accords with my own. I think the author wanted to use a normal multi-tooth push broach on component having an internal shoulder (?) preventing the broach from being pushed right through. The adjustable device let him cut the keyway up to the shoulder. My recollection is that he started out trying to adjust the depth of cut by stacking shims in the slotted bore filler normally used to support multi-tooth broaches which didn't turn out too well so he figured out an adjustable one still running in the support bush. One wonders if its practical to make a similar system doing without the slotted bush having a support finger opposite the cutter and moved by the same adjuster. I imagine the ends and sides of the support finger would need to be cunningly curved to give smooth operation over a reasonable size range. Probably more practical if the bore is plugged and a starter hole drilled first. Especially in smaller sizes. Tricky part appears to be devising an adjustment system that doesn't rely on a small screw right at the business end. Clive. |
| john carruthers | 02/06/2016 08:36:45 |
 617 forum posts 180 photos | I bodged up a file in a drill post to keep it square and just worked it up and down to put a key way in a pulley. Took a long time but it worked. |
| JasonB | 02/06/2016 08:49:52 |
25215 forum posts 3105 photos 1 articles | IanT is this what you are thinking of, Its come up a couple of times on teh forum before |
| Clive Foster | 02/06/2016 10:35:51 |
| 3630 forum posts 128 photos | Jason Thats neat but not quite what I recall. But there is no gaurantee that my memory is right! Disadvantage and advantage is that its a one size only system. Disadvantage is that you hafta make whole new carrier if you need to do a different size hole but at least cutter can be shared. Fortunately it reasonably simple to make. Advantage is that the carrier can be made a really nice fit in the bore so cutter is properly supported. I often wonder if we Home Shop and Model Engineer types expect too much versatility when putting effrot into making a decent job of a special tool. I, and I guess plenty of other folk, seem wedded to the idea that if I'm going to do a nice job of the tool it needs to be versatile or its not worth the effort. See Quorn for an extreme example! Clive.
|
| JasonB | 02/06/2016 11:18:59 |
25215 forum posts 3105 photos 1 articles | Could use a round bush with an off center round hole if you need to use in a larger hole |
Please login to post a reply.
Magazine Locator
Want the latest issue of Model Engineer or Model Engineers' Workshop? Use our magazine locator links to find your nearest stockist!
Sign up to our Newsletter
Sign up to our newsletter and get a free digital issue.
You can unsubscribe at anytime. View our privacy policy at www.mortons.co.uk/privacy
Latest Forum Posts
- *Oct 2023: FORUM MIGRATION TIMELINE*
05/10/2023 07:57:11 - Making ER11 collet chuck
05/10/2023 07:56:24 - What did you do today? 2023
05/10/2023 07:25:01 - Orrery
05/10/2023 06:00:41 - Wera hand-tools
05/10/2023 05:47:07 - New member
05/10/2023 04:40:11 - Problems with external pot on at1 vfd
05/10/2023 00:06:32 - Drain plug
04/10/2023 23:36:17 - digi phase converter for 10 machines.....
04/10/2023 23:13:48 - Winter Storage Of Locomotives
04/10/2023 21:02:11 - More Latest Posts...
- View All Topics
Support Our Partners


Shopping Partners
Subscription Offer

Latest "For Sale" Ads
- Reeves** - Rebuilt Royal Scot by Martin Evans
by John Broughton
£300.00 - BRITANNIA 5" GAUGE James Perrier
by Jon Seabright 1
£2,500.00 - Drill Grinder - for restoration
by Nigel Graham 2
£0.00 - WARCO WM18 MILLING MACHINE
by Alex Chudley
£1,200.00 - MYFORD SUPER 7 LATHE
by Alex Chudley
£2,000.00 - More "For Sale" Ads...
Latest "Wanted" Ads
- D1-3 backplate
by Michael Horley
Price Not Specified - fixed steady for a Colchester bantam mark1 800
by George Jervis
Price Not Specified - lbsc pansy
by JACK SIDEBOTHAM
Price Not Specified - Pratt Burnerd multifit chuck key.
by Tim Riome
Price Not Specified - BANDSAW BLADE WELDER
by HUGH
Price Not Specified - More "Wanted" Ads...
Get In Touch!
Do you want to contact the Model Engineer and Model Engineers' Workshop team?
You can contact us by phone, mail or email about the magazines including becoming a contributor, submitting reader's letters or making queries about articles. You can also get in touch about this website, advertising or other general issues.
Click THIS LINK for full contact details.
For subscription issues please see THIS LINK.
Digital Back Issues


Donate

 Register
 Log-in
Model Engineer Magazine
- Percival Marshall
- M.E. History
- LittleLEC
- M.E. Clock

ME Workshop
- An Adcock
- & Shipley
- Horizontal
- Mill

Subscribe Now
- Great savings
- Delivered to your door

Pre-order your copy!
- Delivered to your doorstep!
- Free UK delivery!
All Forum Topics > Help and Assistance! (Offered or Wanted) > Key ways