Grinding lathe chuck jaws
| Martin Peck | 06/11/2014 21:53:51 |
20 forum posts | Hi everyone I have just bought a cochester bantam mk1 but the three jaw chuck needs truing up on the jaws. Anyone got any tips on doing this? |
| Ian Parkin | 06/11/2014 22:01:17 |
1174 forum posts 303 photos | I recently have done this on a pratt chuck which was in fantastic condition BUT one jaw was of a different set so after measuring i gently ground off a little of the offending jaw (with a powerfile ) till the whole chuck was running true To less than 1 thou now rather than 15thou before... this on a 30mm shaft of silver steel...very pleased with the outcome. I probably ground and tested 10 times so very gently does it
Ian |
| Chris Trice | 07/11/2014 01:57:39 |
1376 forum posts 10 photos | I've done this. You need to grip a flanged tube with three slots milled in the tubular bit so the the inner angled faces of the jaw are bearing on the top hat and the edges that normally grip the workpiece are exposed for grinding. Using a top hat takes into account any wear in the chuck and any bell mouthing. I then used a 1/2" cylindrical grinding wheel mounted on the toolpost while the chuck was turning at the same time and sent it back and forth into the chuck removing the smallest amount of metal to get them true. |
| chris stephens | 07/11/2014 02:28:52 |
| 1049 forum posts 1 photos | Hi Martin, I have a Bantam and trued up the 3 jaw with just a boring bar and a large washer. Grip the washer (about 1" OD) as far in the chuck as possible, doing the tightening with the master keyhole(very important to do this), then using a quality insert boring bar, bore till all the jaws are cleaned up. You should now have true jaws except where the washer was, this can be diamond filed or ground away. chriStephens |
| Sam Stones | 07/11/2014 03:04:46 |
922 forum posts 332 photos | Gentlemen, Having had access to a lathe fitted with a Bernard Grip-True chuck, I discovered that the three-jaw chuck on my own second hand Myford (bought in the mid 60’s) was running slightly out of true. Rightly or wrongly, on that one and only occasion, I tried truing it. I chose to lap the jaws using a ½” dia brass bar held in the tailstock. Applying lapping compound, I slid the tailstock backwards and forwards, gradually applying gentle closure of the jaws onto the bar. It did the job BUT . . . Years later, I noticed that any imprint on a workpiece had a peculiar pattern. It turned out that the jaws had actually been case hardened, and that continual use had pressed the now exposed (softer) core inwards. Regards, Sam Edited By Sam Stones on 07/11/2014 03:06:15 |
| Thor 🇳🇴 | 07/11/2014 05:55:57 |
1766 forum posts 46 photos | Hi Martin, I have done this on one of my SC 3-jaw chucks, it improved runout. Here I think is a description of the device Chris talks about, it loads the jaws in the same way as they would be loaded when gripping a bar. For a small chuck it may be enough to just spin it at the lathes highest speed, this may force the jaws out against the scroll. Thor |
| Hopper | 07/11/2014 06:46:40 |
7881 forum posts 397 photos | I used one of those clover leaf plates like Thor linked to above. Made it out of a piece of scrap ally. Combined with a bracket to hold my Dremel grinding tool. Then ran on back gear slow speed and ran the grinding wheel in and out until got nice even shower of sparks all round. (Used newspaper and tinfoil to cover the ways and carriage etc to keep the grit out.)
On my old Drummond's Crown chuck, there is a "0" marked on the one chuck key hole which was used to tighten up the chuck when it was originally trued at the factory in 1937. The bevel gear on that one seemed more worn than the others from years of use as the reference key hole. So I used the next key hole around to tighten the chuck down on my clover leaf plate and made my own mark on it. Then did the grinding part. Now I always use that same marked key hole to tighten the chuck on a job. Been using it for quite a while now and am real pleased with the results. Runout is well within .001" TIR. Grip is much improved. Bellmouthing and resultant chattering is all gone. And it seems to work well at all diameters, not just the position where it was ground -- which the naysayers warn against. To calculate the layout of the plate for your chuck, you just need to place the jaws in position so they are just protruding into the ID of the chuck body. Then make the inner hole in the plate just that little bigger than diamter of the jaw tips. Drilling the three smaller holes to clear the jaws is a little tricker. Size is whatever you like that clears the jaws. But position is critical. If one hole is off position, the metal remaining will not contact the jaw in that place. Best way is to put the plate in the chuck, use a change gear on the mandrel to index three equal spacings (or use a block between the lathe bed way and the chuck jaw. On a three jaw chuck this gives three equal spacings). Then use your Dremel mounted to the toolpost to spot drill the hole centre position. Or, to save that faffing about, as I would if I were doing it again, instead of one round plate, make three plates out of a bit of flat bar, approximating the inner parts of the one-piece plate. As all three will be the same size, cut from the same bar, they will fit nice and evenly. Like this:
Whichever way you go, the three hacksaw slots and holes provide a little bit of "spring" to take up any slack from the old worn chuck (or not quite identically sized plate/s) and still give a good outward preload on the jaws while allowing clearance for the grinder. It's a bit of mucking about, but much cheaper, and more satisfying, than buying a new chuck.
Edited By Hopper on 07/11/2014 06:59:20 |
| Martin Peck | 21/11/2014 20:46:22 |
20 forum posts | Thanks to all for the advice. I went for the clover leaf plate and have now got 0.002" run out at the first try. I am happy with that for now, but may do it again later to see if i can get better! |
| Joseph Noci 1 | 29/05/2017 22:15:56 |
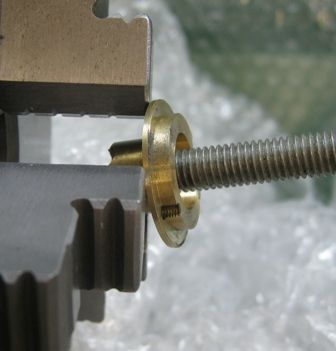
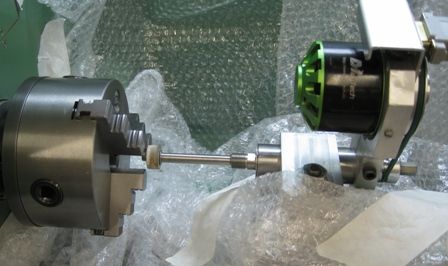
| 1323 forum posts 1431 photos | Have recently completed a refurbishment of my V10 Lathe, after aligning the lathe axis and surfaces using an accurate spindle morse taper test bar, I then tested the EMCO 3 jaw chuck for alignment and runout performance. Since the chuck is now about 25 years old, I did not expect good results and found that the jaws were slightly bell mouthed and the chuck showed 0.11mm runout on a 20mm test bar, and 0.13mm on a 35mm test bar. I decide to grind the jaws to see if I could improve this. First I stripped and cleaned the chuck, and then on the lathe tested for runout again. 0.11mm on a 20 mm test bar, with the low point midway between jaws 1 and 3, using the key in the socket between jaws 1@3 - this gave best runout. I then set up for grinding: I made a flanged insert, with an M8 thread through. This was inserted into the rear of the jaws, with the flange square up against the jaw rear face. The jaws were then tightened up firmly on the 2mm wide part of the flange, which was 22mm diameter. The threaded bolt was used as an aid the fitting the flange in the rear of the chuck. The bolt was the unthreaded and removed.
The grinder with a 20mm diameter wheel was then used to grind the jaws, with the chuck rotating at around 50RPM.
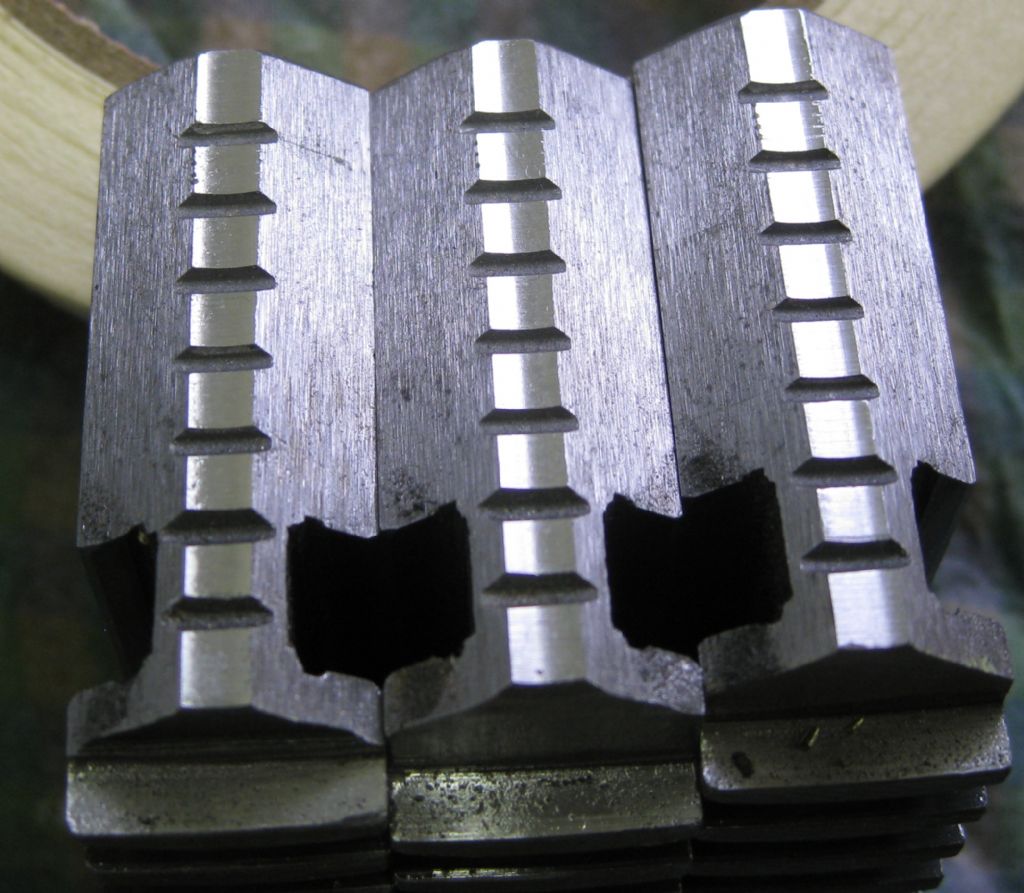
At first only jaws 1 and 3 made contact and slowly as depth was achieved, jaw 2 came into play. The process continued until all three jaws barely sparked, and the job was done. The chuck was then stripped and cleaned, and reassembled on the spindle again. The jaws after grinding:
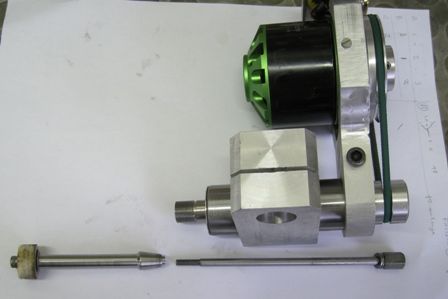
The 20mm test bar was then used to check runout again. Runout was found to be 0.08mm using the key socket between jaws 1 @ 3 ( a in the first test). This was not a huge improvement.. I then tested ( as before) using the other two key sockets( as before) , and the socket between 1@2 gave 0.015 runout, directly in line with jaw 1! I then loosened the chuck to backplate mounting cap screws slightly and gave the chuck a firm tap with a rubber mallet at jaw 1 position, tightened up and measured again - 0.008mm!! The sweet chuck position moved because cleaning the chuck required that it be removed from the backplate, and that registration probably is to within 0.005 mm, maybe slightly worse. The using the 35mm test bar I measured 0.006mm. I have a nice ( Chinese) dial indicator that reads microns... I think that was a worthwhile effort! The grinder - using an RC brushless motor, a home made ER11 spindle and matching ER11 grindstone spindle, with drawbar. Spins @ 15,000 RPM Joe
|
| Roger Williams 2 | 29/05/2017 22:43:26 |
| 368 forum posts 7 photos | Nice job on the chuck Joe, youve inspired me to have a go at one of mine !. Does the brass top hat become gripped on the jaw scroll "teeth" ?. Edited By Roger Williams 2 on 29/05/2017 22:49:47 |
| Thor 🇳🇴 | 30/05/2017 08:02:10 |
1766 forum posts 46 photos | Hi Joe, As Roger says, a nice job and very good results, better than I achieved. It seems that Emco made good chucks for their small lathes. Thor |
| Joseph Noci 1 | 30/05/2017 08:16:17 |
| 1323 forum posts 1431 photos | Hi Roger, Thanks for the kind words! Roger, not sure I understand what you have asked. The top hat is about 4mm thick, with a 2mm section of around 26mm diameter and a gripping part 2mm wide and 22mm diameter. The M8 hole is to facilitate inserting at the rear of the chuck jaws by means of a threading bolt long enough the grip onto. The jaws are then closed onto the 22mm diameter section, while holding the hats brim ( the flange) firmly and squarely up against the rear face of the back of the jaws. And nip up neatly on the key and you are ready. The trickery in the end result is getting the chuck body back to its original concentricity on the mounting backplate, after removing it all to strip and clean the grinding dust out..but if you allow a small gap tween chuck body and mounting plate locating rebate, then you can tap it into submission - although you do not want the chuck body running out so much that the balance is upset at speed - maybe 0.01mm max? I was lucky in that the scroll is very good and Iso obtain equally good results between 15mm and 35mm - much better than 0.01mm over that range. Joe |
| Neil Wyatt | 30/05/2017 13:41:39 |
19226 forum posts 749 photos 86 articles | Posted by Hopper on 07/11/2014 06:46:40:
That wins the 'Most Gratuitous Example of Engine Turning Award 2017. |
| Michael Gilligan | 30/05/2017 13:53:52 |
23121 forum posts 1360 photos | Posted by Neil Wyatt on 30/05/2017 13:41:39:
Posted by Hopper on 07/11/2014 06:46:40:
That wins the 'Most Gratuitous Example of Engine Turning Award 2017. .
It must be a contender ... But surely there's still more than seven months to go. MichaelG. |
Please login to post a reply.
Want the latest issue of Model Engineer or Model Engineers' Workshop? Use our magazine locator links to find your nearest stockist!
Sign up to our newsletter and get a free digital issue.
You can unsubscribe at anytime. View our privacy policy at www.mortons.co.uk/privacy
- hemingway ball turner
04/07/2025 14:40:26 - *Oct 2023: FORUM MIGRATION TIMELINE*
05/10/2023 07:57:11 - Making ER11 collet chuck
05/10/2023 07:56:24 - What did you do today? 2023
05/10/2023 07:25:01 - Orrery
05/10/2023 06:00:41 - Wera hand-tools
05/10/2023 05:47:07 - New member
05/10/2023 04:40:11 - Problems with external pot on at1 vfd
05/10/2023 00:06:32 - Drain plug
04/10/2023 23:36:17 - digi phase converter for 10 machines.....
04/10/2023 23:13:48 - More Latest Posts...
- View All Topics
- Reeves** - Rebuilt Royal Scot by Martin Evans
by John Broughton
£300.00 - BRITANNIA 5" GAUGE James Perrier
by Jon Seabright 1
£2,500.00 - Drill Grinder - for restoration
by Nigel Graham 2
£0.00 - WARCO WM18 MILLING MACHINE
by Alex Chudley
£1,200.00 - MYFORD SUPER 7 LATHE
by Alex Chudley
£2,000.00 - More "For Sale" Ads...
- D1-3 backplate
by Michael Horley
Price Not Specified - fixed steady for a Colchester bantam mark1 800
by George Jervis
Price Not Specified - lbsc pansy
by JACK SIDEBOTHAM
Price Not Specified - Pratt Burnerd multifit chuck key.
by Tim Riome
Price Not Specified - BANDSAW BLADE WELDER
by HUGH
Price Not Specified - More "Wanted" Ads...
Do you want to contact the Model Engineer and Model Engineers' Workshop team?
You can contact us by phone, mail or email about the magazines including becoming a contributor, submitting reader's letters or making queries about articles. You can also get in touch about this website, advertising or other general issues.
Click THIS LINK for full contact details.
For subscription issues please see THIS LINK.
Model Engineer Magazine
- Percival Marshall
- M.E. History
- LittleLEC
- M.E. Clock
ME Workshop
- An Adcock
- & Shipley
- Horizontal
- Mill
Subscribe Now
- Great savings
- Delivered to your door
Pre-order your copy!
- Delivered to your doorstep!
- Free UK delivery!


 Register
 Log-in


