Forum sponsored by:

PGK's 1" Minnie
working through the book
| pgk pgk | 03/01/2017 22:58:13 |
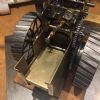
| 2661 forum posts 294 photos | For a lot of reasons i finally decided to solder the backhead and steam block before drilling the stays after all. It should have been simple enough. I seated the bushes, wrapped them with some solder wire, screwed the steamblock down with a piece of solder film fluxed beneath it and fluxed and layed solder rod around the edges and round the firehole - so a simple heat and go... Oh, yeah?
Well it didnt go quite to plan. Somehow the screw holding the steamblock snapped during cook-up so the steam block fell off and somehow the firehole ring solder ran everywhere except into the gap. I think part of that was because heat went too much from the top and not enough into the firebox and out the hole. Recovering the steam block was a mare. I drilled out the broken screw from that OK and got lucky with the boiler part because at least the solder had run around the threads so i could retap. A second cook-up got that but I failed to fill the firehole ring fully on that cookup too.
I called an end to that session and cleaned up again. I figured since i was cooking that end again that i might as well do the backhead stays at the same time so drilled an tapped those.. then found that the new batch of stays i had threaded didn't fit.. my new die for 4BA needs to be cranked fully closed to cut deep enough and I hadn't test checked it.. so another bunch of useless stays.... Anyhoo.. today the new stays went in and everything fluxed again and thoroughly round the firehole. I poured the heat in via the upper part of the firebox more than over the top and spent longer lower down to get even heat into the whole part. I thought it went well...
Until i cleaned up and found that i still hadn't done the job around the firehole ring well enough and had to cook yet again.. But got it this time. I thought I;d manage to do the inside end of the stays but failed miserably with the thing repositioned with the bottom of the firebox uppermost.. flux just ran down the 'walls' cos the first lot was exhausted. It looks like I'll have to do that as I do the throatplate stays then the side stays as two cooks more. For all that I feel i'm learning and getting better at judging temps and colour changes and flux quantities - well stuck shed-loads on there anyway.
The final pic is before a full clean up- I'd had enough for this session again. As an aside - i really dont know why Mason designed that stay just under the firehole.. it's so close to the firering it ought to be unnecessary and it would make more sense for them both to be lower down.. but it's the book dimensions.
|
| Ian S C | 04/01/2017 10:25:55 |
 7468 forum posts 230 photos | That screw that snapped, was it per chance a brass one? Ian S C |
| pgk pgk | 04/01/2017 11:18:33 |
| 2661 forum posts 294 photos | Posted by Ian S C on 04/01/2017 10:25:55:
That screw that snapped, was it per chance a brass one? Ian S C Indeed.. as specified. Worse the specified threaded hole above it into which it seated wasn't wide enough for the full head diameter so it had suffered some stress in being turned down 0.7mm in diameter (collet and very sharp HSS over 4 light passes) Hence my BMA acronym for boiler-makers angst |
| pgk pgk | 09/01/2017 22:08:50 |
| 2661 forum posts 294 photos | Just an update. I decided to place the throat-plate stays next and then cook those up along with the insides of the backhead stays.. but then decided (after fluxing it all) to do the side stays as well and indeed plan on the foundation ring and see how i get with a cookup on the lot. the known issue with the throat-plate drilling is the need for a drill extension. Mine was simply a length of 15mm bar with a hole in the end and 2 grubscrews. It worked well enough until I failed to spot the drill loosening and as it wobbled one hole ended up oversize and I ended up having to redrill and tap it m4. the other issue is that the copper is so well annealed that however gentle the drill/tapping went it did deform the throatplate and that needed some correction after. And the blowdown bush hole got done too.
Meanwhile some discussion on another thread is relevant here for completeness :**LINK** As a result of that I spent a session sawing up some thermalite blocks for next session and I also made some wooden formers to fit within the firebox and between firebox and wrapper. I'd hate to think how much the side wrapper faces might have got deformed without them but this way the drilling/tapping was straighforward - just slow. Laying out the work for that was even slower...first magic marker and height gauge to establish a horizontal for the template to work from.. 3mm below the wrapper end so it'd be a clear straight line.. and then trimming the template by 3mm. Since I had a slight angle on the throatplate i decided to use the back edge of the wrapper as the other reference marking that with the height gauge and boiler sat on it's front end. Once the holes were marked drilled trhough teh template they were enlarged as needed.
The second side will have to wait for the next session
Edited By pgk pgk on 09/01/2017 22:09:17 |
| julian atkins | 09/01/2017 23:33:16 |
 1285 forum posts 353 photos | And just how do you propose to silver solder up the front foundation ring section which is a great mass of copper, after having done the throatplate stays etc? Sorry, but you are doing all this in the wrong order. Cheers, Julian |
| Simon Collier | 10/01/2017 02:40:03 |
 525 forum posts 65 photos | There is only one way to learn boiler making, and that is by making boilers. I admire you for doing it. All the theory in the world tends to go out the window as soon as you light that big, scary torch. The block falling off is a classic example. I had a top fitting block not fall of, but rotate slightly because the screw was a bit loose. I make bronze 5 BA screws from Colphos 5/32 hex. I avoid rivets mostly. This allows me to assemble and disassemble the parts to check and adjust fits etc.. As mentioned, don't use brass screws or rivets; you want copper or bronze. Some things are really important to get right the first time, the foundation ring being the obvious one. If you don't get penetration the first time when the joint is clean and fluxed throughout (HT5 type, not Easyflow type), it is near impossible to get penetration later. You end up relying on a coating of SS "painted" on the bottom of the ring and wrappers. You can fix a specific leak by drilling a hole for a 1/16 rivet which you then flux and drop in and solder up, but I would say that you need oxy for foundation ring "repairs". Just last week I helped a friend fix his badly soldered foundation ring, using oxy propane with a big heating tip, not a little brazing tip. We got it pressure tight in the end and it passed it's hydro, but it was a horrible job. It is important to go to any amount of trouble when the job is cold, to help things got smoothly when the job is hot. You need the right heating equipment (with excess capacity, not barely enough), the right firebricks, the right flux, spare flux, gas and silver solder on hand, etc., etc.. This is after you have read everything you can on the subject and made practise joints and got comfortable with your equipment. You need gravity working for you, so you need to be able to move the boiler while hot. Practise this when cold with two pairs of molegrips, tongs, whatever but not gloved hands! Even two pairs of welding gloves won't save you (how do I know this?). Be mindful of damaging the annealed copper with the jaws of the grips:- wrap a bit of copper round them or something. If at all possible, have an experienced friend to help. A second person of any sort helps enormously, to hand you things, pick up lengths of solder you drop, etc.. Wives can sometimes be persuaded! Unless you are happy to pickle overnight after every heat, you really want reasonably strong sulphuric acid. Mine is 2 molar, but 1 molar would be OK. I bought a couple of winchesters of conc from a chemical company. It is not restricted here (Oz) but people assume it is or don't know that you can simply order it. I was a laboratory based medical scientist so I am very comfortable, but suitably careful, with strong acid. The great thing about silver soldered copper boilers is that they are so forgiving. That is why beginners can manage it, and I am not aware of a boiler under construction having to be scrapped at my club. |
| pgk pgk | 10/01/2017 07:47:58 |
| 2661 forum posts 294 photos | Simon, Indeed it has been a learning curve, it still is. I prefit with temporary bolts before rivetting. I did also make some PB bolts/nuts when i had problems rivetting the crown stays - sadly only after i'd dented the crown of the wrapper a bit Julian. If you read my last post properly you'ld see that I had decided to do the stays and foundation ring in one cookup (for the very reason that the foundation ring heating is going to need lots). I haven't documented the order but starting with the foundation ring then doing the stays I hope will work but I can always go back a second time on the stays if flux exhaustion happens on them? The book describes doing the foundation ring then drilling for the stays and my point is that if I'd left the stay drilling until after the foundation ring was finshed that any drilling distorsions woudn't be easy to prevent or straighten. How do you do them? It is also my intention and hope that I'll be able to prewrap each side of the stays with 0.5mm wire in their flux so that they solder while i pour heat/pay attention to the foundation ring. Also if you recall my stays are threaded so they can't slip, fall out or loosen. I appreciate your advice and experience but not your tone. Instead of 'your doing this wrong' how about 'it'd be better if you did it as follows...' pgk
|
| Brian Abbott | 10/01/2017 10:13:34 |
 523 forum posts 95 photos | Morning Pgk. If whilst soldering you have a problem with lets say the flux exhausts and you need to abandon the joint, what do you do about cleaning the joint so you can have another go ? |
| AndyA | 10/01/2017 10:30:29 |
| 38 forum posts | Hi Pgk, Here is the advice I gave someone else building a boiler a few years ago. It's a tried and tested method I start with the barrel, then solder the dome bush and front feed bushes followed by front tube plate with any attendant bushes. Soldering in this order allows me to see the reverse side of the join and check for full penetration. |
| pgk pgk | 10/01/2017 21:56:59 |
| 2661 forum posts 294 photos | Brian, So far I've been dropping the hot boiler in my sulphuric acid bath.. but that's getting a bit nastier to do now that it's become a bigger chunk of hot copper, That along cleans it pretty well.. then rinse in clean water. If necessary scrub residues off and rinse again or back in acid again. It's been very effective at shifting flux residues. Of course i also have flux on standby to apply more during the initial cookup AndyA, Thanks for your order list.. the first part is as in the book I'm following and the rest much as I originally planned although the book suggested doing the whole foundation ring in one go and then the stays last. I figured that if I'm going to cook the ring hot enough for that then hopefully there'll be enough heat to get stays with solder wire wrappings done as a by-product.... or at least worth a shot. I was also wondering about starting with some heat from the smoke box end before re-insulating it to get a warming start without flaming at the flux directly..... |
| julian atkins | 10/01/2017 22:45:18 |
1285 forum posts 353 photos | Hi pgk pgk, I read your previous posts but didnt see any any reference to front foundation ring silver soldering. If I have missed this please do quote me what you had previously posted. In context this is quite a small plain round topped boiler and ought not to beyond the whit of most model engineers. Traction engine boilers are relatively straight forward. They do not have the complications of most miniature loco boilers, which are also larger andif of tapered barrel and belpaire firebox considerably more complicated to make and to silver solder. I reckon I could do this boiler in 3 weekends of time off. My second to last boiler was done in 6 weeks (a medium sized 5" g loco boiler) but I was working variable shifts on the fullsize railways at the time. Cheers, Julian |
| pgk pgk | 10/01/2017 23:24:46 |
| 2661 forum posts 294 photos | Julian, I think we're at cross purposes here. Mr Mason's book has the foundation ring cooked up in total at this stage of boiler build and then the stay holes drilled and stays soldered. My point was that drilling the stays like that in soft copper distorts the wrappers. I guess your thnking in terms of Andy's order of progression.. which makes sense.. but as a novice I was faithfully following the build book until that point. You're quite right that soldering what i fluxed last would be a mistake. something I recognised and didn't do. Instead i chose to make wood supports for the side stay drilling. With the stays in but unsoldered I'll then fit the foundation ring. I don't question your competence and speed at doing these things. I'm slow and every stage causes me much thought and my nature is to worry at stuff. Put me in my comfort zone and you'ld see a scalpel fly. |
| julian atkins | 11/01/2017 00:27:20 |
1285 forum posts 353 photos | The principle problem is that the Minnie boiler was described in the early 1970s when considerably more ductile grades of silver solder were available such as C4 allowing easy step silver soldering. It is an old design and the boiler was not described for silver soldered stays. In the last 40 or so years things have changed quite a bit. The boiler regs have been tightened up, and test procedures are much more demanding in clubs. Inspections also are required by the club boiler inspector at each stage of silver soldering. I always do the front foundation ring to the throatplate with high melting point stuff such as 24 silverflo or sifbronze. It is the first joint I silver solder. That is of little help to you now. I did my first miniature loco boiler throughout with the old Easyflo 2. That was in 1985. The boiler has passed successfully every test since completion, and is still in ticket and the loco running around, despite having been sold some 15 years ago. There is no reason why your boiler should not be completed with silverflo 55, but it will I suggest require threaded and nutted comsoled firebox stays. Cheers, Julian |
| pgk pgk | 20/03/2017 14:17:29 |
| 2661 forum posts 294 photos | An update. I did finish the boiler but had a small foundation ring leak... fixed that but created a leak by one firebox stay.. fixed that and got 2 leaks on the wrapper seams.. fixed those and created a leak by the firehole. Fixed that and 2 new leaks by the foundation ring (repeat that sort of thing 2-3 times more).... So I accept this is a combination of a lack of accuracy and hvaing gone about things the wrong way. Delays due to my very aged mum finally passing and all the estate stuff to sort and now coming up to planting season. For the moment I'm off boiler making .. but do intend to start again.. differently and with way more formers and probably a few more rivets than the book description. I don't regret any of this (apart from hating spending money).. it's been a learning curve and i did start by admitting I was up for three boilers before giving up. For the moment I intend to have a play at making minnie gears via making my own cutters.. also a new challenge for me. |
| Henry Ruiter | 29/07/2018 06:15:07 |
| 69 forum posts 2 photos | I made water/oil contaner from 3mm copper sheet I first soft solder that didn't work so I silver soldered and I think I got good pen with it for my first try I was using LPG from a 9 KG gas bottle |
| Ian S C | 29/07/2018 12:55:03 |
7468 forum posts 230 photos | I hope you got ALL of the soft solder off the job before you silver soldered, the joints may look ok now, but if contaminated there is a good chance of failure in the future. Ian S C |
| Henry Ruiter | 29/07/2018 22:18:14 |
| 69 forum posts 2 photos | I'm pretty sure I got it all off before I silver soldered it and wasn't stuck very so just scraped off with I craft knife.It was quite strong afterwards. Thanks Henry |
| Henry Ruiter | 29/07/2018 22:21:32 |
| 69 forum posts 2 photos | You can see it in my first photo in my gallery. Thanks Henry |
| Jon Cameron | 11/11/2019 21:27:52 |
| 368 forum posts 122 photos | I have just read this thread through from start to finish, (works been quiet today). My thanks to PKG for posting all his failed attempts as well as his triumphs, I believe there's much more to be learned from those mistakes. As for his posting earlier as to someone else been able to learn something, you have certainly succeeded on that count. Having got the book (quite cheap compared to some copies I've seen), ive been reading through the pages and searching websites on builds. This is by far the most helpful I've read, thanks also to those that have offered advice along the way. I will post progress of my build when it begins. |
| pgk pgk | 12/11/2019 04:54:54 |
| 2661 forum posts 294 photos | Wow - 3 years... That boiler still sits on my shed table mocking me with it's leaks and the weight of silver solder rattling inside it and my constant 'must get around to having another go'... ..and then something else crops up...
pgk |


Please login to post a reply.
Magazine Locator
Want the latest issue of Model Engineer or Model Engineers' Workshop? Use our magazine locator links to find your nearest stockist!
Sign up to our Newsletter
Sign up to our newsletter and get a free digital issue.
You can unsubscribe at anytime. View our privacy policy at www.mortons.co.uk/privacy
Latest Forum Posts
- hemingway ball turner
04/07/2025 14:40:26 - *Oct 2023: FORUM MIGRATION TIMELINE*
05/10/2023 07:57:11 - Making ER11 collet chuck
05/10/2023 07:56:24 - What did you do today? 2023
05/10/2023 07:25:01 - Orrery
05/10/2023 06:00:41 - Wera hand-tools
05/10/2023 05:47:07 - New member
05/10/2023 04:40:11 - Problems with external pot on at1 vfd
05/10/2023 00:06:32 - Drain plug
04/10/2023 23:36:17 - digi phase converter for 10 machines.....
04/10/2023 23:13:48 - More Latest Posts...
- View All Topics
Support Our Partners


Shopping Partners
Subscription Offer

Latest "For Sale" Ads
- Reeves** - Rebuilt Royal Scot by Martin Evans
by John Broughton
£300.00 - BRITANNIA 5" GAUGE James Perrier
by Jon Seabright 1
£2,500.00 - Drill Grinder - for restoration
by Nigel Graham 2
£0.00 - WARCO WM18 MILLING MACHINE
by Alex Chudley
£1,200.00 - MYFORD SUPER 7 LATHE
by Alex Chudley
£2,000.00 - More "For Sale" Ads...
Latest "Wanted" Ads
- D1-3 backplate
by Michael Horley
Price Not Specified - fixed steady for a Colchester bantam mark1 800
by George Jervis
Price Not Specified - lbsc pansy
by JACK SIDEBOTHAM
Price Not Specified - Pratt Burnerd multifit chuck key.
by Tim Riome
Price Not Specified - BANDSAW BLADE WELDER
by HUGH
Price Not Specified - More "Wanted" Ads...
Get In Touch!
Do you want to contact the Model Engineer and Model Engineers' Workshop team?
You can contact us by phone, mail or email about the magazines including becoming a contributor, submitting reader's letters or making queries about articles. You can also get in touch about this website, advertising or other general issues.
Click THIS LINK for full contact details.
For subscription issues please see THIS LINK.
Digital Back Issues


Donate

 Register
 Log-in
Model Engineer Magazine
- Percival Marshall
- M.E. History
- LittleLEC
- M.E. Clock

ME Workshop
- An Adcock
- & Shipley
- Horizontal
- Mill

Subscribe Now
- Great savings
- Delivered to your door

Pre-order your copy!
- Delivered to your doorstep!
- Free UK delivery!
All Forum Topics > Traction engines > PGK's 1" Minnie