Forum sponsored by:

The Post Man Cometh.
James Coombes Engine
| Nick_G | 11/03/2015 13:01:29 |
 1808 forum posts 744 photos | Posted by Nick Grant on 10/03/2015 15:03:58:
that shade of red really sets it off
It's Humbrol Crimson No.20 if you are interested. I wanted something different from Brunswick green. It's a great colour but it seems 95% of Stuart engines get painted with it.
Nick |
| Nick_G | 21/03/2015 20:43:44 |
1808 forum posts 744 photos | . Last weekend I started the Y shaped conrod. Did not get as far as I would have liked. But what I did manage to get done I was happy with. Managed to get a bit more done today and it's progressing. I first made the center / cross piece of the conrod. (with the center 'beefed' up a bit from the drawing) The ends have to be dropped to 1/4" to locate into the rods risers.
Next was the 2 risers. These are made from 1/2 x 5/16 bar. The center section of each is turned round and then a 'fish belly' taper to each end. A short video of the interrupted cut can be seen here :- **LINK** (sounds like an old motorboat)
As recommended by the ever informative Jason the holes at each end of the bar was done before the turning.
Then the 'fish bellies' were done with the compound set at 1 degree and blended in with a file and emery paper.
Ends were trimmed to remove the center drill and live center pockets and milled on each side.
A bit of dressing with a file and they are starting to look the part. I also decided to add a small brass bushing that has the 1/8th hole in to the top.
So just some polishing and the bottom center riser made and I will then be close to blast off. Unless we have a Houston type 'problem'.!
Nick
|
| Michael Gilligan | 21/03/2015 20:52:56 |
 23121 forum posts 1360 photos | Looking Good, Nick MichaelG. |
| JasonB | 21/03/2015 21:01:41 |
 25215 forum posts 3105 photos 1 articles | Have you deviated from the drawing re the bottom ends for a good reason or chickened out of making them round Look good all the same and the fish bellies turned out well
J |
| Nick_G | 21/03/2015 21:08:23 |
1808 forum posts 744 photos | Posted by JasonB on 21/03/2015 21:01:41:
or chickened out of making them round
I think Moused out would be a better description.
Nick |
| Michael Gilligan | 21/03/2015 21:14:52 |
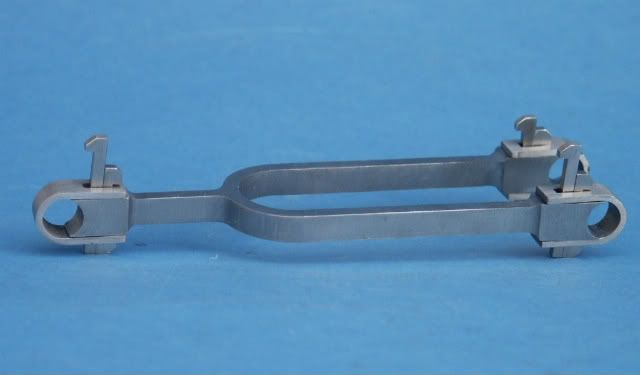
23121 forum posts 1360 photos | I hadn't even noticed ... presumably they should look like the ones pictured here. MichaelG. |
| Nick_G | 21/03/2015 21:30:36 |
1808 forum posts 744 photos | Posted by Michael Gilligan on 21/03/2015 21:14:52:
... presumably they should look like the ones pictured here. MichaelG.
It's an optical illusion. Mine are right. - Even the drawing is wrong.!!!!
Nick |
| Jeff Dayman | 21/03/2015 23:37:56 |
| 2356 forum posts 47 photos | Great work Nick, well done. JD |
| JasonB | 22/03/2015 07:32:55 |
25215 forum posts 3105 photos 1 articles | Actually thats a nice little feature on the one Michael linked to, the oil cup and through bolt to make it look a bit more like a split bearing with strap, wedge and cotter which would only have been on teh ends where there is rotation, the goint to the cross piece being static Now if you would like me to tell you how to make ends like this just ask
|
| Nick_G | 22/03/2015 10:19:42 |
1808 forum posts 744 photos | Posted by JasonB on 22/03/2015 07:32:55:
That's a very interesting part Jason and beautifully fabricated and constructed. What is it from.? I would imagine very innovative for its day and you can see how this would have been produced in a Blacksmiths shop of the era. Nick |
| JasonB | 22/03/2015 10:37:46 |
25215 forum posts 3105 photos 1 articles | Scaled up and fabricated version of Anthony Mounts Benson Engine, few pics here does a similar job to your part but up the other way. |
| Neil Wyatt | 22/03/2015 12:02:21 |
 19226 forum posts 749 photos 86 articles | It's looking very good Nick, > very innovative for its day Pretty much standard practice, actually. The challenge is making the narrow key-sots in the rod ends. One trick is to drill the ends hollow so you only have to slot two thin walls, not right through. Neil Not quite as pretty as Jason's:
Here oneI made earlier:
|
| Nick_G | 29/03/2015 17:22:19 |
1808 forum posts 744 photos | . The conrod Was assembled with loctite and pinned through the joints with silver steel.
Getting serious now! Gaskets were made and the ones for the cylinder ends were assisted with the use of the PCD function of the mill DRO.
The crank pin was made out of EN24 - The last piece.!
Final assembly began.
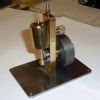
. And here she is. ................. Finito.!!!!!!!!
So that's my first build done. Need to put it on a nice base and build or buy a boiler so that it is actually a steam engine and not a compressed air engine. What to build next.???? Decisions, decisions, decisions eh. I would also like to thank the members of this forum that have assisted me in getting this far. Both those that have contributed directly to this thread and other information that I have picked up elsewhere on this site made by others. I would not have been at this stage without you. .......... Cheers guy's.!
Best regards, Nick
|
| JasonB | 29/03/2015 17:46:02 |
25215 forum posts 3105 photos 1 articles | Very nicely done Nick, look forward to the video of it running on air. Nice touch adding the oiler and extended bearing to the big end |
| Nick_G | 29/03/2015 18:11:32 |
1808 forum posts 744 photos | Posted by JasonB on 29/03/2015 17:46:02:
look forward to the video of it running on air.
Oooops. Forgot to post that bit. Here you go. :- **LINK**
Nick |
| Neil Wyatt | 29/03/2015 18:21:24 |
19226 forum posts 749 photos 86 articles | Lovely job, Nick. Neil |
| paul rayner | 29/03/2015 19:55:21 |
| 187 forum posts 46 photos | fantastic job paul |
| ChrisH | 29/03/2015 23:21:02 |
| 1023 forum posts 30 photos | Just watched the video - booootiful! Well done Nick, lovely model, you've done yourself proud. Chris |
| Michael Gilligan | 30/03/2015 07:55:32 |
23121 forum posts 1360 photos | Nick, Sweet slow-running, on a whiff of Air = Evidence of a very nice job. Well done, Sir !! MichaelG. |
| GaryM | 30/03/2015 10:09:24 |
 314 forum posts 44 photos | Great work Nick. Runs very well. Even though I've not posted much in the last few months, I've been following your build with interest. Gary |


Please login to post a reply.
Magazine Locator
Want the latest issue of Model Engineer or Model Engineers' Workshop? Use our magazine locator links to find your nearest stockist!
Sign up to our Newsletter
Sign up to our newsletter and get a free digital issue.
You can unsubscribe at anytime. View our privacy policy at www.mortons.co.uk/privacy
Latest Forum Posts
- hemingway ball turner
04/07/2025 14:40:26 - *Oct 2023: FORUM MIGRATION TIMELINE*
05/10/2023 07:57:11 - Making ER11 collet chuck
05/10/2023 07:56:24 - What did you do today? 2023
05/10/2023 07:25:01 - Orrery
05/10/2023 06:00:41 - Wera hand-tools
05/10/2023 05:47:07 - New member
05/10/2023 04:40:11 - Problems with external pot on at1 vfd
05/10/2023 00:06:32 - Drain plug
04/10/2023 23:36:17 - digi phase converter for 10 machines.....
04/10/2023 23:13:48 - More Latest Posts...
- View All Topics
Support Our Partners


Shopping Partners
Subscription Offer

Latest "For Sale" Ads
- Reeves** - Rebuilt Royal Scot by Martin Evans
by John Broughton
£300.00 - BRITANNIA 5" GAUGE James Perrier
by Jon Seabright 1
£2,500.00 - Drill Grinder - for restoration
by Nigel Graham 2
£0.00 - WARCO WM18 MILLING MACHINE
by Alex Chudley
£1,200.00 - MYFORD SUPER 7 LATHE
by Alex Chudley
£2,000.00 - More "For Sale" Ads...
Latest "Wanted" Ads
- D1-3 backplate
by Michael Horley
Price Not Specified - fixed steady for a Colchester bantam mark1 800
by George Jervis
Price Not Specified - lbsc pansy
by JACK SIDEBOTHAM
Price Not Specified - Pratt Burnerd multifit chuck key.
by Tim Riome
Price Not Specified - BANDSAW BLADE WELDER
by HUGH
Price Not Specified - More "Wanted" Ads...
Get In Touch!
Do you want to contact the Model Engineer and Model Engineers' Workshop team?
You can contact us by phone, mail or email about the magazines including becoming a contributor, submitting reader's letters or making queries about articles. You can also get in touch about this website, advertising or other general issues.
Click THIS LINK for full contact details.
For subscription issues please see THIS LINK.
Digital Back Issues


Donate

 Register
 Log-in
Model Engineer Magazine
- Percival Marshall
- M.E. History
- LittleLEC
- M.E. Clock

ME Workshop
- An Adcock
- & Shipley
- Horizontal
- Mill

Subscribe Now
- Great savings
- Delivered to your door

Pre-order your copy!
- Delivered to your doorstep!
- Free UK delivery!
All Forum Topics > Work In Progress and completed items > The Post Man Cometh.