Forum sponsored by:

Novice beginner
advice
| Sam Stones | 11/08/2010 04:42:36 |
 922 forum posts 332 photos |
Hello kerbtrawler,
I haven’t seen these drawings, nor have I read the whole thread, but did someone say that the drawings were to scale, or did I miss something?
One thing’s for sure, "DO NOT SCALE" should be printed at the top of every drawing! Or has that statement gone out of the window for some reason? Irrespective of any draughting errors, unless its drawn to scale on Mylar and then printed on Mylar, there’s a really good chance that not only will the print be out of scale, but the aspect ratio of the printing paper may have changed during printing. There is also the possibility that the original drawing can skid or creep with respect to the printing paper during their passage through the print machine. May I suggest that years spent in DO’s, has taught me to `never scale a drawing’.
Good luck,
Sam |
| JasonB | 11/08/2010 07:26:58 |
 25215 forum posts 3105 photos 1 articles | The other thing is that a dimension may get changed but the actual part won't get redrawn so may still be the wrong size.
J |
| Trevorh | 14/08/2010 19:37:45 |
 316 forum posts 89 photos | Great thanks Jason, Sam, So basically what your saying is I cannot trust the scale, drawing information or the measurements (when given), so my question is this WHAT IS THE POINT OF THE DRAWINGS OTHER THAN TO GIVE AN IDEA OF WHAT THE PARTS LOOK LIKE!!!! Why isn't there a warning about these drawings, its not as though they are cheap..... Oh well thats got that off my chest, Back to the drawing board - in more ways than one LOL I am now resigned to reproduce each part on Autocad to check the various assemblies which I suppose is not a bad thing, helps keep me upto speed with my cad Have nearly finished replacing the parts that were wrong Hope to post better news soon on the progression |
| Trevorh | 16/08/2010 10:42:40 |
316 forum posts 89 photos | Well as previously mentioned Good news, I have started to assemble the spokes onto the wheel and hub assembly, What I have done is to clamp the assembly together and drill just the middle hole and secure it with a 3mm screw and nut. my next issue is what is the best way to secure the other end of the spoke, do I rely on epoxy resin or do I drill/tap/countersink with screws on all of the spokes Also how many screws are used to secure the cover plates over the spokes?, I have seen that 3 are used to secure the Brass outer cap. Still pushing to have something to bring to the show..... cheers all |
| JasonB | 16/08/2010 13:49:46 |
25215 forum posts 3105 photos 1 articles | Yes use a CSK screw in each spoke end.
3 or 4 CSK screws will do for the inner & outer hubs depending on the number of spokes you have so they fall between spokes, the inside ones can be filled with JB Weld or similar, the fronts can go under the hubcap flange is there is room if not put them towards the outside and fill.
Not long until you will be riviting!!!
Jason |
| Weldsol | 27/08/2010 16:56:26 |
| 74 forum posts | Hi Kerbcrawler
I have some Burrell parts left over from my build if your interested or want to chat about Burrells send me a PM
Paul
also you can see my Burrell at http://modeleng.proboards.com/index.cgi?board=tractiongeneral&action=display&thread=5360&page=1 |
| Trevorh | 07/02/2011 10:13:13 |
316 forum posts 89 photos | Hi everyone, Sorry I haven't posted for quite a while but my work load has been crazy these last couple of months, So an Update I have finished the front axal and the hub for the front wheel, the spokes are all ready for final fitting as are the cover and locating pin, BUT I still cannot master this Bl***dy riveting It really is driving me crazy, so tonight I am modifying a battery hammer drill along with a spare rivet snap to see what results I can achieve, I have also recently obtained an oxy/acet 1/4 size bottle set so my intention is to preheat the rivets and them use the hammer action to see if I can get a somewhere half descent result. I will of course keep you posted, and thanks to Weldsol i know have a whole load of castings to fall back on |
| JasonB | 07/02/2011 20:05:56 |
25215 forum posts 3105 photos 1 articles | I don't think a cordless will have the weight behind it, I have seen several people use SDS+ drills which pack more of a punch, they can be set to hammer only and the chisels can be machined into a snap.
Heating is not very effective on the smaller sizes, the heat just gets sucked away by the mass of the wheel or snap. You may have more luck using copper rivits, thats what I used on the Fowler due to the alloy rims, about 4-5 blows and the head is formed.
If all else fails have a look at Julia's latest few posts on TT for an alternative to rivit bashin'
J |
| mgj | 07/02/2011 22:38:08 |
| 1017 forum posts 14 photos | I think you are right Jason - the mass of the rivet is so tiny compared to fullsize that you are not going to gain anything except inconvenience going that route. - and hot fingers. Do you have, or can you borrow a compressor - in which case the air hammer, which is about the size of a smallish hand held drill, solves all problems. I've just done chunks of the chassis of my Metre Maid in preference to bolting as per the drawings, precisely because it is just so easy, fast and painless, and you get a good double headed rivet every time. Above all it only requires 2 hands.. There is a problem with copper rivets in ali and iron, however convenient they are to bash. 2 reactive dissimilar metals equals electrolytic corrosion over time. Be ok if its kept well painted I daresay, but it is something to watch for. Edited By mgj on 07/02/2011 22:38:34 |
| Ian S C | 08/02/2011 10:50:01 |
 7468 forum posts 230 photos | Why not use aluminium rivits? you then only have two dissimilar metals rather than three. The copper would be OK, the aluminium surounding it would corrode. ian S C |
| JasonB | 08/02/2011 17:07:15 |
25215 forum posts 3105 photos 1 articles | The reason for using copper is that the rims are alloy castings and the Tees get too distorted or even split if you try and use iron rivits. Copper is also whats suggested in the build manuals of the alloy rimmed engines such as Minnie, Fowler A7 and I think the Z7S ploughing engines.
Alloy would be a possibility though they are likely to be a bit weaker, I did use alloy ones for the dummy tie plates.
J |
| Trevorh | 08/02/2011 17:37:52 |
316 forum posts 89 photos | Ok I tried with the copper rivets and had reasonable results, first heating, then used the dolly, finally finished off with the hammer drill, quite time consuming but definatelty on the right track Because of the amount of dissimilar metal contact, I'm not that concerned with the electrolytic reaction, if it becomes an issue it can always be cancelled out by placing a small charge through the body, but to be fair its the least of my concerns for now. By Mistake I made a rivet with a flat head on 1 side and domed on the other - is this acceptable or is it more likley to shear under stress? I will see if I can improve on the results and shorten the process again tonight cheers and thanks for your supportive comments |
| JasonB | 08/02/2011 17:54:56 |
25215 forum posts 3105 photos 1 articles | Its unlikely to fail but if its bugging you leave it until last and then drill it out and redo this time making sure it does not jump out of the dolly.
J |
| Terryd | 09/02/2011 11:34:27 |
 1946 forum posts 179 photos | Hi KerbT, This may be a silly question, please don't be offended, but are you using the correct riveting methods? when cold riveting with any type of rivet but especially with soft iron rivets there are three essentials: One - the rivet must be cut to the correct length; two - the the rivet should be clenched and the head formed roughly by peening with the ball peen of an engineers hammer (leaving a planished effect) before using the 'snap' (what you term a dolly); and finally the head is neatened by use of the snap, usually a single blow is enough. Of courst the rivet must be supported as well by a second snap! If you are trying to close the rivet and form the head with the snap (dolly) on it's own you will almost always tend to bend the rivet before the head is formed. I taught many young students to successfully cold rivet and it should be quick and simple once the technique is learned. Hi Sam, Hope you are ok? When I worked in the DO all of our drawings carried the legends "DO NOT SCALE" and "IF IN DOUBT ASK" as a warning to all. It was impressed on us that it was the written dimensions that were the important part of the drawing and that sometimes it needed a bit of adding or subtraction and the use of simple logic to arrive at certain ones. Regards to all, Terry Edited By Terryd on 09/02/2011 11:54:49 |
| JasonB | 09/02/2011 17:03:38 |
25215 forum posts 3105 photos 1 articles | Terry when doing traction engine wheels you can't get at the rivits with a ball pein hammer you have to use a snap and even then they often need turning down to reduce the diameter.
On larget engines it often necassary to use intermediate snaps with a conical recess before going to the full rounded snap.
And you should also "set" the rivit before forming the head.
J |
| Terryd | 09/02/2011 21:58:37 |
1946 forum posts 179 photos | Hi Jason, Of course I should have mentioned the use of accurate holes and the use of a set, but I'm guilty of taking things for granted again. I must admit that I was thinking of the larger scales where the use of even a modified 2oz ball peen can make all the difference to proper riveting. Best regards terry |
| JasonB | 10/02/2011 07:28:35 |
25215 forum posts 3105 photos 1 articles | I think you would be there for ever with a 2oz hammer and still would not get at the rivit and you could work harden it with lots of little blows. Take a look at these snaps, they originally had tapered ends which I have turned parallel and I even had to grind down one side to avoild the strake & tie plate rivits. You would only get to one side of the rivit with a hammer which would just fold it over.
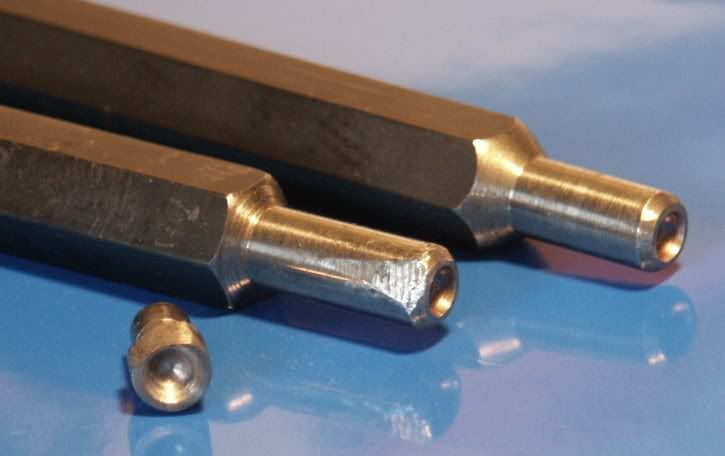 J |
| Trevorh | 10/02/2011 09:09:20 |
316 forum posts 89 photos | Many thanks for all of the input, What I will do is this weekend experiment with a combination of using a drift to start the profile of the rivet and then use the dolly to finish it off after first profiling the dolly as per your phot's jason I will let you guys know what happens cheers |
| Terryd | 10/02/2011 09:39:53 |
1946 forum posts 179 photos | Hi Jason, I did a lot of riveting in my 25+ years of workshop teaching and never had a problem with work hardening of soft iron rivets. I can confirm that even with a 20z hammer it doesn't take many blows to shape the head of a 3/32 rivet. It is a matter of skilful use rather than brute force. It's much the same as watching a skilled carpenter hammer in a 6" nail, he will do with 3 or 4 skilful blows whereas a do-it-yourselfer will take many more tentative blows (and often bend it). Regards Terry Edited By Terryd on 10/02/2011 10:02:08 |
| JasonB | 10/02/2011 17:33:45 |
25215 forum posts 3105 photos 1 articles | Was the 2oz hammer a typo then Terry? I see you are now talking about a 20oz which is not a toffy hammer.
I would think Kerbt is using 5/32 or even 3/16 rivits on a 3" engine, on these and 4" its more a case of a 2 1/2lbs lump hammer. Buy the time Hes done one wheel the others will seem easy as if its the same as my Fowler there are 244 rivits in each back wheel, 280 in the tender and 260 in the hornplates
And being a joiner/cabinet maker I can hit a nail OK, though thend to use a nail gun for first fix now.
J Edited By JasonB on 10/02/2011 17:39:28 |
Please login to post a reply.
Magazine Locator
Want the latest issue of Model Engineer or Model Engineers' Workshop? Use our magazine locator links to find your nearest stockist!
Sign up to our Newsletter
Sign up to our newsletter and get a free digital issue.
You can unsubscribe at anytime. View our privacy policy at www.mortons.co.uk/privacy
Latest Forum Posts
- hemingway ball turner
04/07/2025 14:40:26 - *Oct 2023: FORUM MIGRATION TIMELINE*
05/10/2023 07:57:11 - Making ER11 collet chuck
05/10/2023 07:56:24 - What did you do today? 2023
05/10/2023 07:25:01 - Orrery
05/10/2023 06:00:41 - Wera hand-tools
05/10/2023 05:47:07 - New member
05/10/2023 04:40:11 - Problems with external pot on at1 vfd
05/10/2023 00:06:32 - Drain plug
04/10/2023 23:36:17 - digi phase converter for 10 machines.....
04/10/2023 23:13:48 - More Latest Posts...
- View All Topics
Support Our Partners


Shopping Partners
Subscription Offer

Latest "For Sale" Ads
- Reeves** - Rebuilt Royal Scot by Martin Evans
by John Broughton
£300.00 - BRITANNIA 5" GAUGE James Perrier
by Jon Seabright 1
£2,500.00 - Drill Grinder - for restoration
by Nigel Graham 2
£0.00 - WARCO WM18 MILLING MACHINE
by Alex Chudley
£1,200.00 - MYFORD SUPER 7 LATHE
by Alex Chudley
£2,000.00 - More "For Sale" Ads...
Latest "Wanted" Ads
- D1-3 backplate
by Michael Horley
Price Not Specified - fixed steady for a Colchester bantam mark1 800
by George Jervis
Price Not Specified - lbsc pansy
by JACK SIDEBOTHAM
Price Not Specified - Pratt Burnerd multifit chuck key.
by Tim Riome
Price Not Specified - BANDSAW BLADE WELDER
by HUGH
Price Not Specified - More "Wanted" Ads...
Get In Touch!
Do you want to contact the Model Engineer and Model Engineers' Workshop team?
You can contact us by phone, mail or email about the magazines including becoming a contributor, submitting reader's letters or making queries about articles. You can also get in touch about this website, advertising or other general issues.
Click THIS LINK for full contact details.
For subscription issues please see THIS LINK.
Digital Back Issues


Donate

 Register
 Log-in
Model Engineer Magazine
- Percival Marshall
- M.E. History
- LittleLEC
- M.E. Clock

ME Workshop
- An Adcock
- & Shipley
- Horizontal
- Mill

Subscribe Now
- Great savings
- Delivered to your door

Pre-order your copy!
- Delivered to your doorstep!
- Free UK delivery!
All Forum Topics > Traction engines > Novice beginner