Forum sponsored by:

Anodising
| Terryd | 06/05/2010 06:48:08 |
 1946 forum posts 179 photos | Hi Ramon, At least you will have the experience and some expertise i anodising and have the kit to do more in future, which would not be the case had you visited the 'guy up the road'. At very least you have something to sell if needs be. I have every confidence in your success  Best regards Terry |
| Ramon Wilson | 14/05/2010 23:09:32 |
 1655 forum posts 617 photos | Hi again,
Had another go today with the new set up but still using the original acid in the ano tank. This time the tank is placed in a larger one filled with water which is heated with an aquarium heater (24 C). The ano tank has an 'agitator' made from an ali tube drilled with smallholes and fed by a small aquarium air pump and the test piece was suspended on a piece of titanium strip. A milli-ampmeter really needs to be in circuit as the amp meter on the unit is too 'coarse' to get a reading on - back to the test meter then though if the parts get larger or the part count goes up then the current will need to increase relative to the surface area
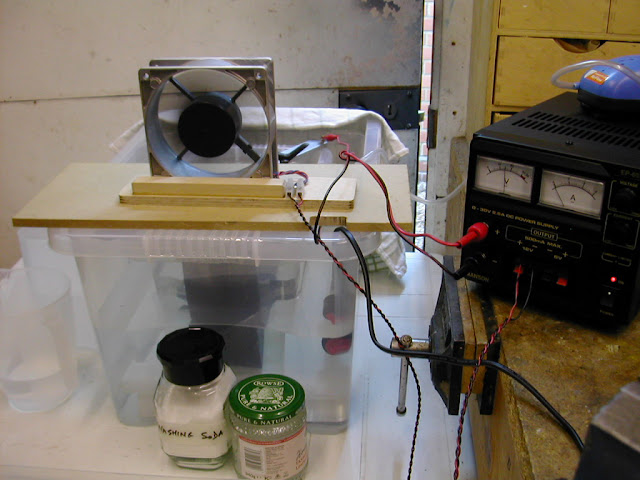 A 50 min dose at 15 volts followed by a lengthy soak in the dye (I confess I forgot about it for an hour or more) - correct anodising dye that is, from the ebay link you posted Terry - saw this result.
 Not anything to write home about I agree and nowhere near as good as hoped for but you have to agree it is green
 At this stage it has not been sealed in a steam bath and is much shinier than the pic suggests but importantly, no, it doesn't rub off At this stage it has not been sealed in a steam bath and is much shinier than the pic suggests but importantly, no, it doesn't rub off The dye is a very drab green. This is from the correct dilution though I did keep a small amount at twice the strength but it's not really the shade wanted. However it is helping to show that the system is working. The more 'correct' (and more expensive) green can be got later. I intend to change the acid out for 4 to 1 for the next attempt and see if that improves matters.
Assembly of the 'Racers' is now awaiting a successful outcome of this - I'll keep you posted.
Regards - Ramon
Edited By Ramon Wilson on 14/05/2010 23:11:07 |
| Terryd | 15/05/2010 06:14:46 |
1946 forum posts 179 photos | Hi Ramon, it's good to see some progress. It may be a mucky green but at least you now know that your process works and the only major problem is the dye colour. I think that's the real achievement, that you made the process work. Glad to be of help with the link.  Well done Terry (with admiration) |
| Ian S C | 15/05/2010 12:36:59 |
 7468 forum posts 230 photos | Just been doing some reading up, if you can't get the dye to take increase the currentthat increases the size of the pores in the surface alowing penetration of the dye. Ian S C |
| Ramon Wilson | 15/05/2010 13:37:21 |
1655 forum posts 617 photos | Thanks Ian,
Yes from what I have read too that and an increase in di-electric strength is what is probably required. I shall do one step at a time - acid strength first then increase the amperage.
Electrics are not my strong point I'm afraid - I do know how to wire a plug - that kind but I think I'm learning
 I noticed however that to increase the current that the volts needed to increase - the ammeter on the unit not registering such a small amount. There are varying recommendations from 3 to 6 amps a square foot - the part shown worked out to 27 milliamps though it was not possible to check the actual current on this one.
It's a garden day today but I hope to get back on to it tomorrow - thanks again
Regards - Ramon
Edited By Ramon Wilson on 15/05/2010 13:40:34 |
| Les Jones 1 | 15/05/2010 20:49:19 |
| 2292 forum posts 159 photos | Hi Ramon, I seem to remember in the distant past reading that to get the anodising thick the voltage had to be increased during the process. This is because the anodising is a partial insulator so as it builds up the voltage required needs to be increased to keep the current constant. You should be able to verify this by watching the current as the anodising progresses. If it decreases (With the voltage constant.) then my memory is correct. If it does not decrease I must be talking rubbish. Les. |
| Ian S C | 16/05/2010 04:31:17 |
7468 forum posts 230 photos | One thing that increases current is to move the electrodes closer, and or enlarge it. Hook up an ammeter in the line, and have good heavy cables- if they start to get warm a bit more copper won't hurt, just don't over load the power supply, I,v done that. Ian S C |
| Ramon Wilson | 16/05/2010 23:05:35 |
1655 forum posts 617 photos | Thanks Ian and Les for your continuing input. I have had a little further success today which bears relation to your suggestions. I began as said by changing the electrolyte. The 4 to1 that I had in store was not quite enough so had to add some of the 10 to 1 - at a rough calculation it worked out about 6 to 1 so I added a bit more neat acid and this new mix appears to have done the trick.
I also added the test meter in circuit and this was a big improvement in being able to monitor the current . I noticed this did not drop at all as the time increased though this did happen on that initial jury rig set up. I think that this is probably due to the better and constant contact of the Ti hanger strip as opposed to the ali ones used previously which were obviously anodising at the same rate and probably reducing the contact area. The second test then was at 12 volts and a consistent 30 ma for a 50min duration. Using the ano dye as for the previous test the take up of colour began immediately though quite faint, the result below (centre piece) was after 20 mins in 'hand hot' dye - a much better colour take up and nowhere near as drab as expected.
 The third piece on the right was done exactly the same but was dipped into Parker green ink. The take up of colour was virtually instantaneous and the result you see was no more than five seconds exposure! I sealed this one in steam but notice this has caused very faint blotching however the parts look much better 'in the hand' than the pics allude to.
I must admit that despite the green actually being closer to a blue I was really surprised with the colour absorbtion of the ink. This was neat ink and I think perhaps too strong so will try diluting it and see if a longer soak provides a more deeper and uniform finish.
The big thing is that the process now appears to be working quite well and just needs tweaking. I shall do several more test pieces to be certain before any of the Racer parts but must admit with the bottom ends of them all assembled I'm itching to get the tops done and try them out - "ahh patience laddie"
Regards for now - Ramon |
| Ramon Wilson | 19/05/2010 23:40:02 |
1655 forum posts 617 photos | Hi again,
Well after a few more test pieces I finally bit the bullet and did what I set out to do and have to say am very pleased with the results.
 I did the smaller 'DC Rapier' head first using the initial green dye from Terry's ebay link. As you can see the previous test piece gave a different hue. I think this was due to when transfering the dye into a glass jar I noticed there was quite a bit of sediment in the bottom of the bottle so gave it a real good shake. Typically the shade of the test piece is more the shade I was after however the finished item looks okay in situ on it's crankcase.
The cylinder off the Racer was done in 'Parker' green ink and has this lovely bluey green shade. However despite using the same current and very careful timing both in the ano bath and the dye the second cylinder came out a lighter shade. It was put back in the dye for a further 15 mins but no increase in colour occured. I'm surmising that this is due to the gradual depletion of the dye as each part is done. Though it did not occur to do so at the time, the amount of dye available was insufficient to do two parts at once but that is how I would do it the next time if I wanted to get two parts or more the same shade.
Whatever I have had an enjoyable time learning how to carry out this process and it has added another dimension to the making of small I/C motors and bodes well for the future. That OPS marine can now finally have a red head!
I would like to thank all who posted on this thread either in reply to my questions or to ensure I was armed with the right information. Your input has not only kept me motivated but ensured a safe and successful outcome. Thanks indeed.
Tomorrow then sees the final assembly of the Racers and hopefully a test run (or two!)
Regards - Ramon
|
| Terryd | 20/05/2010 05:11:14 |
1946 forum posts 179 photos | Lovely work Ramon! Well done. Regards Terry |
| ZigFire | 20/05/2010 11:35:34 |
| 32 forum posts | Well done Ramon, Practice makes perfect eh!. Cheers Michael |
| Ian S C | 20/05/2010 12:01:07 |
7468 forum posts 230 photos | Went into town today, and after I had done all the important things I started looking around the second hand shops, and what I found made me think of you, about twenty 1lb packets of Brunswick Green dye, don't know its condition and I didn't buy it. Don't know if it was metal or fabric dye, and by the look of the packages it would be at least 50yrs old, but interesting what you find when you'r not looking for it. Ian S C |
| Circlip | 20/05/2010 12:56:08 |
| 1723 forum posts | Would also like to know how close in chemistry "Parkers Green Ink" is to the inkjet printer inks??
Regards Ian. |
| Terryd | 20/05/2010 14:15:09 |
1946 forum posts 179 photos |
Some information about inkjet inks |
| Terryd | 20/05/2010 14:17:25 |
1946 forum posts 179 photos |
and here |
| Terryd | 20/05/2010 14:26:48 |
1946 forum posts 179 photos | Apparently pen inks become long lasting and permanent when combining with the cellulose in paper (or cotton shirt. See here:
Oe of eh best ink sites I have come across. |
| Martin | 09/12/2012 13:09:58 |
| 25 forum posts 10 photos | I'm just completing the Hemmingway Centering Microscope and would like to anodise the parts once completed. However I have made the male and female threads to a really good fit, I'm concerned that after anodising the treads will be too tight. When anodising, is there a process whereby curtain areas of a component can be protected from being anodised ie. close fitting parts?
Martin |
| Ramon Wilson | 09/12/2012 13:58:44 |
1655 forum posts 617 photos | Hi Martin, I have not had to worry about this situation and as such cannot tell you if dimensions grow slightly or indeed reduce some. I would hazard a guess that if it does it will be microscopic but that may be enough if your fits are that close. You could mask the external threaded area using tape possibly PTFE thread tape so that the tape forms to the thread but what you could use for the internal I'm not sure - possibly silcone grease or a layer of silicone sealant allowed to cure - that would certainly be easy enough to remove. Watercolourists masking fluid may do the trick too but these are suggestions - nothing positive based on past experience. Perhaps others may be able to help. Whatever perhaps you would be good enough to report back on the method you use - successful or not as that way we all get some benefit Regards - Ramon |
| jason udall | 09/12/2012 13:59:50 |
| 2032 forum posts 41 photos |
Martin |
| The Merry Miller | 09/12/2012 14:13:39 |
 484 forum posts 97 photos |
If components are "hard anodised" then you you will finish with an increase in dimension on outside surfaces. Eg. If you want .002" hard anodising you will get approx. .001" growth and .001" penetration. This is not an exact science and the figures can vary usually between 50-60% Len. P.
Edited By The Merry Miller on 09/12/2012 14:26:45 |
Please login to post a reply.
Magazine Locator
Want the latest issue of Model Engineer or Model Engineers' Workshop? Use our magazine locator links to find your nearest stockist!
Sign up to our Newsletter
Sign up to our newsletter and get a free digital issue.
You can unsubscribe at anytime. View our privacy policy at www.mortons.co.uk/privacy
Latest Forum Posts
- hemingway ball turner
04/07/2025 14:40:26 - *Oct 2023: FORUM MIGRATION TIMELINE*
05/10/2023 07:57:11 - Making ER11 collet chuck
05/10/2023 07:56:24 - What did you do today? 2023
05/10/2023 07:25:01 - Orrery
05/10/2023 06:00:41 - Wera hand-tools
05/10/2023 05:47:07 - New member
05/10/2023 04:40:11 - Problems with external pot on at1 vfd
05/10/2023 00:06:32 - Drain plug
04/10/2023 23:36:17 - digi phase converter for 10 machines.....
04/10/2023 23:13:48 - More Latest Posts...
- View All Topics
Support Our Partners


Shopping Partners
Subscription Offer

Latest "For Sale" Ads
- Reeves** - Rebuilt Royal Scot by Martin Evans
by John Broughton
£300.00 - BRITANNIA 5" GAUGE James Perrier
by Jon Seabright 1
£2,500.00 - Drill Grinder - for restoration
by Nigel Graham 2
£0.00 - WARCO WM18 MILLING MACHINE
by Alex Chudley
£1,200.00 - MYFORD SUPER 7 LATHE
by Alex Chudley
£2,000.00 - More "For Sale" Ads...
Latest "Wanted" Ads
- D1-3 backplate
by Michael Horley
Price Not Specified - fixed steady for a Colchester bantam mark1 800
by George Jervis
Price Not Specified - lbsc pansy
by JACK SIDEBOTHAM
Price Not Specified - Pratt Burnerd multifit chuck key.
by Tim Riome
Price Not Specified - BANDSAW BLADE WELDER
by HUGH
Price Not Specified - More "Wanted" Ads...
Get In Touch!
Do you want to contact the Model Engineer and Model Engineers' Workshop team?
You can contact us by phone, mail or email about the magazines including becoming a contributor, submitting reader's letters or making queries about articles. You can also get in touch about this website, advertising or other general issues.
Click THIS LINK for full contact details.
For subscription issues please see THIS LINK.
Digital Back Issues


Donate

 Register
 Log-in
Model Engineer Magazine
- Percival Marshall
- M.E. History
- LittleLEC
- M.E. Clock

ME Workshop
- An Adcock
- & Shipley
- Horizontal
- Mill

Subscribe Now
- Great savings
- Delivered to your door

Pre-order your copy!
- Delivered to your doorstep!
- Free UK delivery!
All Forum Topics > I/C Engines > Anodising