Forum sponsored by:

Marking out / drilling holes in precisley the correct place !
| Nicholas Farr | 03/06/2012 14:06:47 |
 3988 forum posts 1799 photos | Hi John, couldn't agree with more. Thanks for the link on spot drills, may just invest in a few. Regards Nick. |
| Dinosaur Engineer | 17/02/2016 22:36:56 |
| 147 forum posts 4 photos | I'm surprised that the method of "boxing in " the hole positions with a height gauge hasn't been mentioned. This entails the marking out with a height gauge ( with a sharp scriber) on a surface plate. The hole position is marked out with a square "box" around the central position . A plate with the required hole size is then positioned over the "box" so that that the mid point of each "box" sides can just be seen and the hole plate adjusted so that the hole plate hole is accurately positioned over the "box" and clamped into position with toolmakers clamps. The hole may then be drilled thro' the hole . The hole plate should be of sufficient thickness to guide the drill before the drill point contacts the plate to be drilled and ideally should have the hole reamed. Also the hole plate should have burrs ( no chamfers) removed on it's underside and may be hardened ( & ground on underside) if it likely to be used a large number of times. This was a common method of marking out holes used in the days of "yore" when access to milling machines/jig borers/ lathe was limited (and before DROs were invented !) & only drilling M/Cs were available. Most of the old toolmakers had a number of hardened drill plates for this purpose & in addition a set of toolmakers "buttons" for use in the lathe or drill press. With practice "hole boxing" would give hole positions within 0.003" & was quicker than the more accurate use of toolmakers buttons.
Edited By Dinosaur Engineer on 17/02/2016 22:37:56 |
| MW | 17/02/2016 23:12:19 |
 2052 forum posts 56 photos | what you need sir, is an automatic center punch, use a standard punch to deepen them if you wish. Michael W |
| julian atkins | 17/02/2016 23:35:56 |
 1285 forum posts 353 photos | for the OP i would suggest Commander W.T. Barker's article in ME 9th april 1953 if available. well worth close study! for those of us of the 'old school'! cheers, julian |
| Nobby | 17/02/2016 23:49:36 |
 587 forum posts 113 photos | Having marked the job out. On a drill or mill you can line up the lines using a sticky pin running true in the drill chuck then center drill etc On the drill when lined up clamp in place then center drill On the mill job should already clamped down as you can move the tables and use the micrometer dials . this is for home shop not in the tool room |
| John Reese | 18/02/2016 00:21:08 |
 1071 forum posts | I usually dial in my hole locations using the DRO. I spot drill, then drill an undersized hole. I use an endmill like a jig bore reamer to correct any drift of the hole, then drill to the finished size. If I am using a boring head to finish the hole, I skip the end mill.
|
| julian atkins | 18/02/2016 00:27:49 |
1285 forum posts 353 photos | in miniature loco work, the only time i clamp the vice on the pillar drill is when drilling big holes in steel which is the coupling and big end conn rod holes. in every other case i let the vice float and the drill find the centre popped hole. this was what i was taught many moons ago by a toolmaker. cheers, julian |
| Tendor | 18/02/2016 02:15:02 |
| 39 forum posts 5 photos | Here is a good book that covers the topic. Holes, Contours and Surfaces Richard F. Moore, 1955 Predates DROs etc. The second book at the link is also highly recommended. |
| Danny M2Z | 18/02/2016 05:49:48 |
 963 forum posts 2 photos | Posted by Michael Walters on 17/02/2016 23:12:19:
what you need sir, is an automatic center punch, use a standard punch to deepen them if you wish. Michael W How is that going to make the hole location more accurate? The method taught to me was to lightly slide a prick punch along one line until the intersection was reached (it will 'click' into position) and then gently tap the head of the punch. Inspect the depression and slip the tip of a sharp 90° punch into the hole (if all is square) and give it a tap to deepen the hole enough to give a drill bit a decent start. Actually, for really precise location over marked lines I sometimes use my "CentreCam' which was manufactured about 8 years ago from the MEW article - It's accurate to about 1 thou (pixel) and great for centering over pre-existing holes. * Danny M * |
| Neil Lickfold | 18/02/2016 05:56:29 |
| 1025 forum posts 204 photos | Years ago, in toolmaking, we had a bunch of drill and reamer guides. These took drill bushes and reamer bushes and were made to a nominal outside diameter. There centre spacing was set with length rods and trig. These were clamped into place and used on the drill press or mill, these were quite large for the clamp to be secured. We also used buttons, also spaced with length rods and trig. But a smaller hole was drilled and tapped, a small screw to hold in place, then an indicator to indicate the position. Lock the machine in place, then removed the button, and used a milling cutter as a drill/boring bar to remove the thread. Then drill to the size, another milling cutter used as a boring bar, then the reamer. We used this method until we had mills with digi readouts and of course a lot better quality mill. At home here I made some small buttons with a hole in them. I then made a tool to go into the drill chuck that sits over the button. I then clamp after the tool locates the part for me. Remove the button and drill ream etc Neil |
| Emgee | 18/02/2016 09:19:33 |
| 2610 forum posts 312 photos | Hi Danny M Can you please post a picture of the "Centre Cam" tool ? Emgee |
| MW | 18/02/2016 09:48:48 |
2052 forum posts 56 photos | Posted by Danny M2Z on 18/02/2016 05:49:48:
Posted by Michael Walters on 17/02/2016 23:12:19:
what you need sir, is an automatic center punch, use a standard punch to deepen them if you wish. Michael W How is that going to make the hole location more accurate? The method taught to me was to lightly slide a prick punch along one line until the intersection was reached (it will 'click' into position) and then gently tap the head of the punch. Inspect the depression and slip the tip of a sharp 90° punch into the hole (if all is square) and give it a tap to deepen the hole enough to give a drill bit a decent start. Actually, for really precise location over marked lines I sometimes use my "CentreCam' which was manufactured about 8 years ago from the MEW article - It's accurate to about 1 thou (pixel) and great for centering over pre-existing holes. * Danny M * Well, i found at college, that it was actually alot harder than you think to hit a small punch in an accurate manner using a hammer, so it would make it more accurate if you found that this was your problem too. Btw, if you're worried about using a camera to find the position of scribed lines, more than likely marked out using a ruler, then maybe you shouldnt be scribing your lines at all. Michael W |
| Roderick Jenkins | 18/02/2016 10:19:39 |
 2376 forum posts 800 photos | Posted by Michael Walters on 18/02/2016 09:48:48:
Well, i found at college, that it was actually alot harder than you think to hit a small punch in an accurate manner using a hammer Tubal Cain recommended using a little archimedes drill to find the intersection of the scribed lines and start the indent. Rod |
| Danny M2Z | 18/02/2016 11:21:55 |
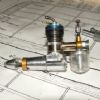
963 forum posts 2 photos | Posted by Emgee on 18/02/2016 09:19:33:
Hi Danny M Can you please post a picture of the "Centre Cam" tool ? Emgee Here is a photo of my minilathe tailstock centre taken when I was calibrating my CentreCam a few years ago. One had to rotate the spindle 180° and count the pixels to offset the centre of the webcam software. Webcam distance was tweaked such that scribed lines 0.640" apart on a test piece were 640 pixels wide. I then made a block to set the height. I shall set it up tomorrow and take a few more photos, it was a brilliant article. Well, i found at college, that it was actually alot harder than you think to hit a small punch in an accurate manner using a hammer, so it would make it more accurate if you found that this was your problem too. Michael, my reference lines were marked out using a Mitutoyo height gauge on a surface plate. One of the first projects that I made as a student was a small brass headed hammer to tap small punches and stuff so no problemo. Btw, if you're worried about using a camera to find the position of scribed lines, more than likely marked out using a ruler, then maybe you shouldnt be scribing your lines at all. 'Scribe a Line' is actually one of my favourite topics in MEW and it is quite presumptious to assume that everybody uses a ruler, despite what you learned in college. * Danny M *
Edited By Danny M2Z on 18/02/2016 11:24:29 |
| Speedy Builder5 | 18/02/2016 13:01:59 |
| 2878 forum posts 248 photos | have we all gone 'soft' ? As already mentioned, mark the holes out using rule, height gauge etc, dot or centre punch and if you want, scribe a square box around the outline of each hole, then use a sharp spot or centre drill before opening up progressively with sharp quality drills etc. The hole should fit inside the scribed square box. If your drills are not accurately sharpened, they will drill off centre and unfortunately some new drills are not accurately ground. There should be no need to resort to using the mill for co-ordinates. 20 or more years ago, many MEs didn't even possess a mill. This sort of stuff is the sort of thing apprentices had to learn before being released onto the shop floor, and for newcomers to our hobby, it is just something you have to learn and get better at. There is no substitute for practice before you have a go at an important and expensive piece of metal etc.
|
| Andrew Johnston | 18/02/2016 15:22:08 |
 7061 forum posts 719 photos | Posted by Speedy Builder5 on 18/02/2016 13:01:59:
have we all gone 'soft' ? No, I don't think so, we've just moved into the 21st century where marking out and centre popping is no longer a necessity. Andrew |
| Jon | 18/02/2016 15:26:56 |
| 1001 forum posts 49 photos | Believe the OP stated used centre punch or the like and drilling off. Will have to settle for the bodgers way reliant on a ruler, centre punch with mark 1 eye ball. Usually centre punching raises the edge often a burr. If holding freehand or even in a vice your limited to getting the angle right and hope it starts cutting where desired and correcting. Mill and a dro straight in no centre drills etc just the drill used, get a feel for whats happening and look for deflection. Accurate to size drill undersize then open up, drill or reamer will self centre. |
| Andy Ash | 20/02/2016 10:26:21 |
| 159 forum posts 36 photos | I'm surprised no-one has mentioned about the light. My workshop is by no means bad for light, but I still find that the act of making an accurate centre punch to a scribed line depends greatly on the quality of the light. By the time you have your hand over the top of the punch, it blocks the light and you can't see properly. I simply have an automatic punch set to the weakest setting, with a sharp pointy end. I also have one of those cheap pencil style LED torches. I just use one in each hand, and it eliminates any doubt. The torch lives in the drawer with the punch. Once you have the dot in the right place, as long as the point cone on your ordinary punch is nice and round, getting a big welt with the hammer on target will be no problem at all. HTH Edited By Andy Ash on 20/02/2016 10:28:51 |

Please login to post a reply.
Magazine Locator
Want the latest issue of Model Engineer or Model Engineers' Workshop? Use our magazine locator links to find your nearest stockist!
Sign up to our Newsletter
Sign up to our newsletter and get a free digital issue.
You can unsubscribe at anytime. View our privacy policy at www.mortons.co.uk/privacy
Latest Forum Posts
- *Oct 2023: FORUM MIGRATION TIMELINE*
05/10/2023 07:57:11 - Making ER11 collet chuck
05/10/2023 07:56:24 - What did you do today? 2023
05/10/2023 07:25:01 - Orrery
05/10/2023 06:00:41 - Wera hand-tools
05/10/2023 05:47:07 - New member
05/10/2023 04:40:11 - Problems with external pot on at1 vfd
05/10/2023 00:06:32 - Drain plug
04/10/2023 23:36:17 - digi phase converter for 10 machines.....
04/10/2023 23:13:48 - Winter Storage Of Locomotives
04/10/2023 21:02:11 - More Latest Posts...
- View All Topics
Support Our Partners


Shopping Partners
Subscription Offer

Latest "For Sale" Ads
- Reeves** - Rebuilt Royal Scot by Martin Evans
by John Broughton
£300.00 - BRITANNIA 5" GAUGE James Perrier
by Jon Seabright 1
£2,500.00 - Drill Grinder - for restoration
by Nigel Graham 2
£0.00 - WARCO WM18 MILLING MACHINE
by Alex Chudley
£1,200.00 - MYFORD SUPER 7 LATHE
by Alex Chudley
£2,000.00 - More "For Sale" Ads...
Latest "Wanted" Ads
- D1-3 backplate
by Michael Horley
Price Not Specified - fixed steady for a Colchester bantam mark1 800
by George Jervis
Price Not Specified - lbsc pansy
by JACK SIDEBOTHAM
Price Not Specified - Pratt Burnerd multifit chuck key.
by Tim Riome
Price Not Specified - BANDSAW BLADE WELDER
by HUGH
Price Not Specified - More "Wanted" Ads...
Get In Touch!
Do you want to contact the Model Engineer and Model Engineers' Workshop team?
You can contact us by phone, mail or email about the magazines including becoming a contributor, submitting reader's letters or making queries about articles. You can also get in touch about this website, advertising or other general issues.
Click THIS LINK for full contact details.
For subscription issues please see THIS LINK.
Digital Back Issues


Donate

 Register
 Log-in
Model Engineer Magazine
- Percival Marshall
- M.E. History
- LittleLEC
- M.E. Clock

ME Workshop
- An Adcock
- & Shipley
- Horizontal
- Mill

Subscribe Now
- Great savings
- Delivered to your door

Pre-order your copy!
- Delivered to your doorstep!
- Free UK delivery!
All Forum Topics > Beginners questions > Marking out / drilling holes in precisley the correct place !