Run out on bar
| Howard Lewis | 11/11/2021 15:59:36 |
| 7227 forum posts 21 photos | VERY few 3 jaw chucks will hold anything absolutely concentric, even if very accurately matched to a backplate that has been finish turned and face on the lathe in question. Expect something of the order of 0.075mm eccentricity for a good one, when new.. The concentricity will vary according to the diameter being held. You are depending upon: the accuracy of the scroll location within the chuck body, the accuracy of pitch the scroll, and the accuracy of the jaw face relative to the "teeth" that engage the scroll, not to mention all the clearances.involved Start adding up clearances, of say 0.012 mm, at each interface, and the tolerances on the dimensions of each part. You should be agreeably surprised at what you have found for concentricity! (I have only ever seen one 3 jaw that held work truly concentric ). A chuck that has seen a lot of use / abuse, may well have jaws that are bell mouthed and gripping less well. or accurately. Bar may well not be truly round. It is not unknown for centreless ground bar to be trilobular, rather than absolutely round. Check some with a DTI when resting in a Vee block If it has been ground between centres you stand a much better chance. If you hold the work in a 4 jaw, independent, chuck the eccentricity will depend on the operator; on how much trouble and time they are prepared to devote to bringing the work to run concentric. Generally, if it is within 0.012 mm near the chuck jaws, I am satisfied. Also, remember that most of us have hobby, abused ex college, or worn ex Industry lathes, rather than a well cared for toolroom machine. Howard |
| SillyOldDuffer | 11/11/2021 16:00:48 |
| 10668 forum posts 2415 photos | Posted by larry phelan 1 on 11/11/2021 13:37:35:
As with Speedy Builder5, I too "open with one, tighten with three", lathe or drill chuck. Why ? no idea, except I was told to many moons ago. ... I think a perfect chuck would open and close satisfactorily on one key, but real chucks are always slightly slack. Going round the clock takes out the slack and allows the chuck to be fully tightened. When tightened on one adjuster, the tiny misalignments in the mechanism tend to wedge and stick the chuck. Shifting to another turning point breaks the wedge and the chuck gets slightly tighter before wedging again. Moving to the third adjuster shifts the wedge again, allowing another squeeze to be applied, and it should be all good. Dave |
| Chris Mate | 11/11/2021 16:26:34 |
| 325 forum posts 52 photos | I was in a similar position with 3 Jaw chuck. After reading up on it, and thought about the options done by others, I decided not to: Edited By Chris Mate on 11/11/2021 16:31:34 |
| Howard Lewis | 11/11/2021 16:40:04 |
| 7227 forum posts 21 photos | If you MUST have concentricity with a 3 jaw chuck, then make a collet to fit in it, by boring to the size of the work that you want to hold. It may be worth leaving a short flange on the outer end tom prevent it slipping through the chuck jaws when in use. Before removing it from the chuck, clearly mark it adjacent to one jaw, so that it can be replaced in the same position. Remove the embryo collet, and slit it lengthways, so that when in the chuck and the jaws are tightened it collapses to grip the work, and deburr.. Replace the collet in the chuck with the mark against the original jaw, and insert This should give minimum eccentricity of the workpiece. Howard |
| not done it yet | 11/11/2021 16:46:04 |
| 7517 forum posts 20 photos | As per most, accept what you have, if within sensible limits, accept that self-centring chucks are not perfect, don’t buy spot-on material sizes if that dimension is critical and don’t remove the item until all concentric machining is completed. I actually have enough chucks (160mm down to about 70mm) to be able to swap them out, with the work still in situ if necessary - refitting the chuck is sufficiently precise as the lathe accepts screw-on chucks. But I often use my 4 jaw independent anyway - it can be almost as good as a self-centring chuck by eye (close enough for many operations) and is there, ready to accurately mount most things that come up. |
| Salvie Cudlip | 11/11/2021 23:09:20 |
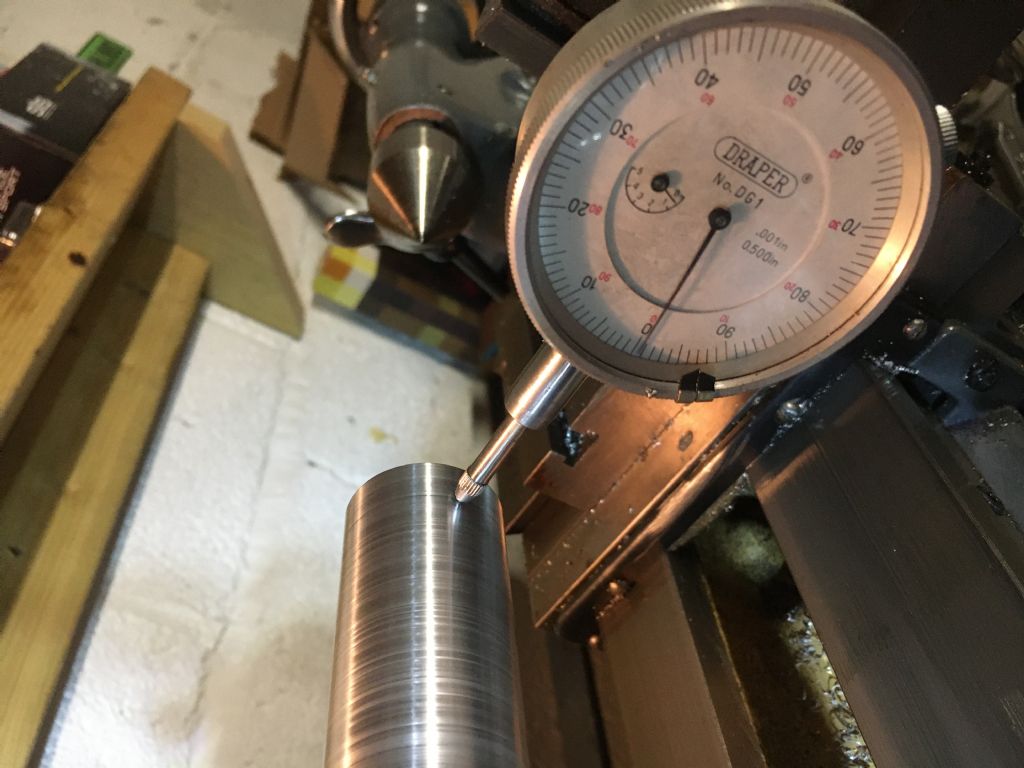
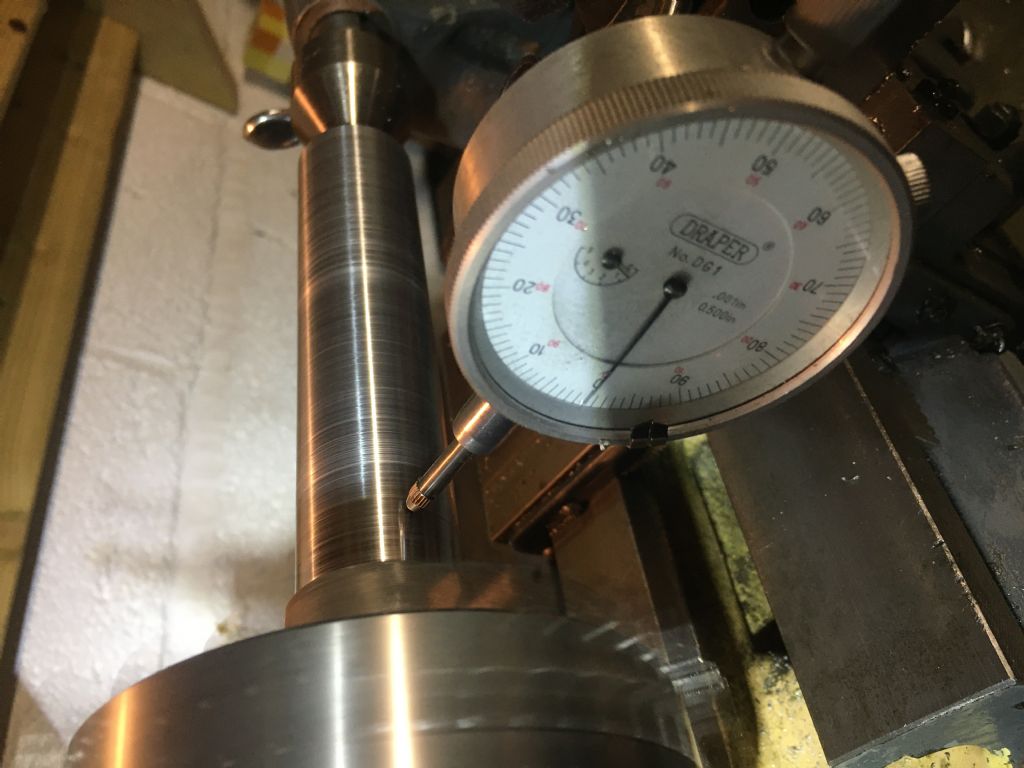
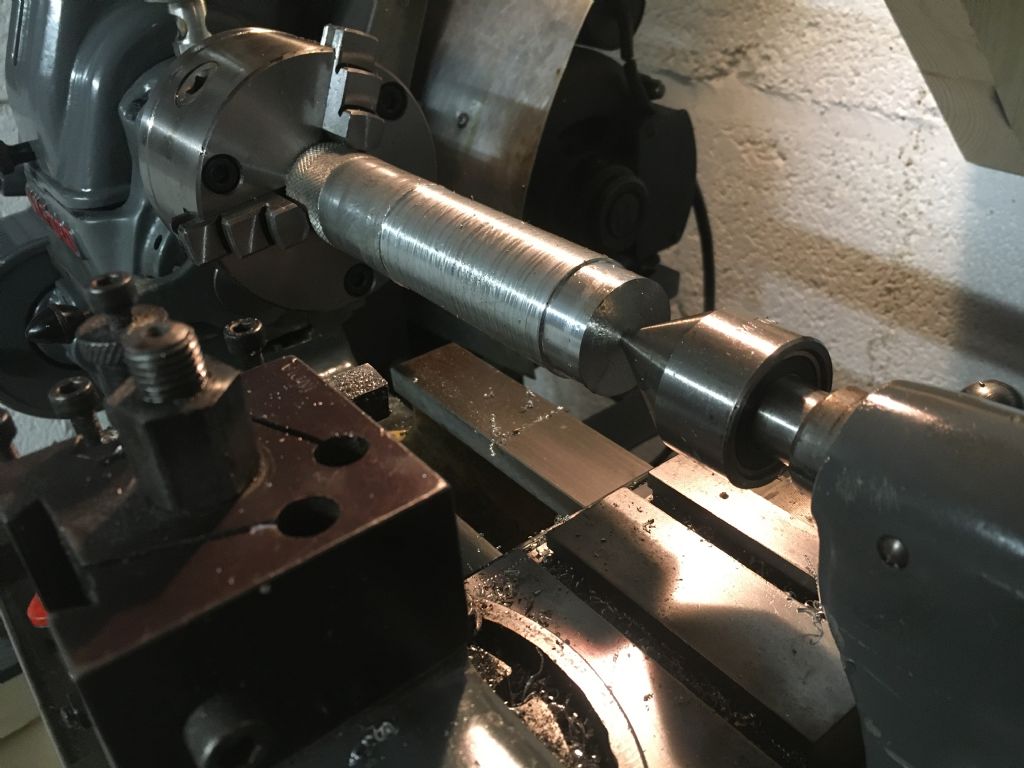
| 15 forum posts 6 photos | Cheers for the reply’s guys. I managed to get a couple thou out by tightening the Chuck up several times! That seemed to work well! I managed to turn a bit of bar down! Probably a terrible cut. Wasn’t sure on the angle of the tool relative to the bar. Probably should of looked that up before I started! 🤦♂️
|
| Salvie Cudlip | 11/11/2021 23:11:05 |
| 15 forum posts 6 photos | |
| Salvie Cudlip | 11/11/2021 23:11:44 |
| 15 forum posts 6 photos | |
| Salvie Cudlip | 11/11/2021 23:12:32 |
| 15 forum posts 6 photos | |
| Martin Connelly | 12/11/2021 08:36:18 |
2549 forum posts 235 photos | I think most of the answers on here were not related to the stated problem of "run out at the end of the bar", not at the chuck. Martin C |
| Versaboss | 12/11/2021 10:10:28 |
| 512 forum posts 77 photos | Hmm ... when you use a DTI in the same position as the tool which was used before to turn the bar, then it is no wonder that it shows nothing! You have to measure the diameters at both ends with a micrometer. It wonders me some times that none of our experienced members immediately jumps up on such a blatant error. Regards, |
| Salvie Cudlip | 12/11/2021 10:39:41 |
| 15 forum posts 6 photos | This was after I turned the bar down! Wouldn’t 0 indicated that the bar is now straight in the Chuck? Used a micrometer and reading same values either end! |
| Graham Meek | 12/11/2021 11:09:28 |
| 714 forum posts 414 photos | Putting any bar in the chuck without first establishing if that bar is straight, or not, will not prove the chuck to be sound. Further like all things in engineering the Chuck is made to a set of standards. Manufacturers give "Run-out" figures for their chucks and one of those is for a stated size bar, (usually ground, and not bright drawn), at a stated distance from the chuck jaws. Thus putting a new chuck on a machine is not going to solve any run-out problems, unless a) the bar is known to be straight, and b) the test is not done to the manufacturers specification. Even then with a 3 jaw chuck the run-out is likely to be about 0.03mm or 0.001" about an 25mm or 1" from the jaws, unless the chuck is a Precision grade chuck. Lastly the bar above has been machined in-situ, the lathe is doing what it is supposed to do. That is turn a true cylinder. This has no bearing on the accuracy of the chuck I am afraid. Regards Gray, |
| Andrew Johnston | 12/11/2021 11:10:06 |
7061 forum posts 719 photos | Posted by Salvie Cudlip on 12/11/2021 10:39:41:
Wouldn’t 0 indicated that the bar is now straight in the Chuck? Unfortunately it doesn't tell one anything of the sort. The fact that micrometer measurements are the same at each end implies that the lathe is turning parallel (probably, although the bar could be barrel shaped). The turned part of the work will be parallel to the axis of rotation. But nothing can be inferred about how the chuck is holding the work. If the bar is removed and replaced it is highly unlikely to still have zero runout. It is very difficult to make measurements that highlight one, and only one, parameter. Assumptions about what is being measured are often incorrect. It helps to visualise the geometry and what is being measured beforehand. Andrew |
| Dave Halford | 12/11/2021 12:21:04 |
| 2536 forum posts 24 photos | Posted by Salvie Cudlip on 12/11/2021 10:39:41:
This was after I turned the bar down! Wouldn’t 0 indicated that the bar is now straight in the Chuck? Used a micrometer and reading same values either end! Halfway there Salvie. Now you have a straight and parallel turned bar. Take the bar out of the chuck and turn it round to hold it in the jaws by your turned section, then see how much the bar wobbles if at all. BTW some old worn chucks have been used mainly for small size work and will be bad at those sizes, but they are fine on the unused sections. For example I have a 5" chuck with 15thou runout for sizes under 1", opening the jaws further the chuck key goes noticeably stiffer and the chuck holds like a new one. |
| JasonB | 12/11/2021 12:58:58 |
25215 forum posts 3105 photos 1 articles | Posted by Andrew Johnston on 12/11/2021 11:10:06:
Posted by Salvie Cudlip on 12/11/2021 10:39:41:
Wouldn’t 0 indicated that the bar is now straight in the Chuck? Unfortunately it doesn't tell one anything of the sort. The fact that micrometer measurements are the same at each end implies that the lathe is turning parallel (probably, although the bar could be barrel shaped). The turned part of the work will be parallel to the axis of rotation. But nothing can be inferred about how the chuck is holding the work. If the bar is removed and replaced it is highly unlikely to still have zero runout. Andrew Surely one would get the same reading on a tapered part that had just been turned. Just because the DTI reads zero on the side facing you the back could be tapered, all the dti is doing is confirming that the tool just moved in the same plane as the dti has now done. As Han's said without measuring the diameter at each end who knows if it is parallel or tapered or even which direction the taper may go. Edited By JasonB on 12/11/2021 13:01:27 |
| Dave Halford | 12/11/2021 14:46:50 |
| 2536 forum posts 24 photos | Posted by Salvie Cudlip on 12/11/2021 10:39:41:
This was after I turned the bar down! Wouldn’t 0 indicated that the bar is now straight in the Chuck? Used a micrometer and reading same values either end! He has |
| JasonB | 12/11/2021 15:44:28 |
25215 forum posts 3105 photos 1 articles | Missed that bit |
Please login to post a reply.
Want the latest issue of Model Engineer or Model Engineers' Workshop? Use our magazine locator links to find your nearest stockist!
Sign up to our newsletter and get a free digital issue.
You can unsubscribe at anytime. View our privacy policy at www.mortons.co.uk/privacy
- *Oct 2023: FORUM MIGRATION TIMELINE*
05/10/2023 07:57:11 - Making ER11 collet chuck
05/10/2023 07:56:24 - What did you do today? 2023
05/10/2023 07:25:01 - Orrery
05/10/2023 06:00:41 - Wera hand-tools
05/10/2023 05:47:07 - New member
05/10/2023 04:40:11 - Problems with external pot on at1 vfd
05/10/2023 00:06:32 - Drain plug
04/10/2023 23:36:17 - digi phase converter for 10 machines.....
04/10/2023 23:13:48 - Winter Storage Of Locomotives
04/10/2023 21:02:11 - More Latest Posts...
- View All Topics
- Reeves** - Rebuilt Royal Scot by Martin Evans
by John Broughton
£300.00 - BRITANNIA 5" GAUGE James Perrier
by Jon Seabright 1
£2,500.00 - Drill Grinder - for restoration
by Nigel Graham 2
£0.00 - WARCO WM18 MILLING MACHINE
by Alex Chudley
£1,200.00 - MYFORD SUPER 7 LATHE
by Alex Chudley
£2,000.00 - More "For Sale" Ads...
- D1-3 backplate
by Michael Horley
Price Not Specified - fixed steady for a Colchester bantam mark1 800
by George Jervis
Price Not Specified - lbsc pansy
by JACK SIDEBOTHAM
Price Not Specified - Pratt Burnerd multifit chuck key.
by Tim Riome
Price Not Specified - BANDSAW BLADE WELDER
by HUGH
Price Not Specified - More "Wanted" Ads...
Do you want to contact the Model Engineer and Model Engineers' Workshop team?
You can contact us by phone, mail or email about the magazines including becoming a contributor, submitting reader's letters or making queries about articles. You can also get in touch about this website, advertising or other general issues.
Click THIS LINK for full contact details.
For subscription issues please see THIS LINK.
Model Engineer Magazine
- Percival Marshall
- M.E. History
- LittleLEC
- M.E. Clock
ME Workshop
- An Adcock
- & Shipley
- Horizontal
- Mill
Subscribe Now
- Great savings
- Delivered to your door
Pre-order your copy!
- Delivered to your doorstep!
- Free UK delivery!


 Register
 Log-in


