Forum sponsored by:

Myford rear toolpost
| Nick Wheeler | 13/12/2015 14:14:53 |
| 1227 forum posts 101 photos | Posted by old Al on 13/12/2015 12:51:31:
Why send anything back. Their is no manufacturing fault in either the toolpost or the parting tool. It is the bringing together of the two parts that has created the problem. Engineering is all about bringing bit together.
I agree, although it's three parts as you have to include the lathe in all this. It seems daft to me to expect to buy something like this and have it be exactly on height. After all, shimming ordinary toolbits is SOP.
And is it really that difficult to do? A lick on a belt sander for the bottom of the parting tool, and a quick file of the equivalent area and base of the toolpost should get it really close and take about as much time as you'd spend reading these posts. |
| roy entwistle | 13/12/2015 15:30:57 |
| 1716 forum posts | I wouldn't touch the tool post I would modify the tool every time Roy |
| Bazyle | 13/12/2015 17:07:29 |
 6956 forum posts 229 photos | Is there an alternative make of inserted bit parting tool that is at the same level as the top of the tool? |
| paul 1950 | 13/12/2015 18:13:15 |
| 143 forum posts 32 photos | send it back and make your own simples |
| Grotto | 13/12/2015 21:47:41 |
| 151 forum posts 93 photos | Thanks for all the helpful comments. The parting tool, inserts, and toolpost were a package deal, so I don't think that changing the parting tool will fix the issue. Unfortunately I couldn't find a supplier here in NZ to get the item from, otherwise it would be easy to fix. I'll ask around and see if I can find someone local with a mill who can have a crack at it. I've been meaning to go along to the Model Engineering club for ages, so this is a good incentive. Supplier has offered a refund or exchange, but wants the toolpost back to see if it's out of spec., so can't really complain too much about service. It works very well despite being 2mm high, which surprised me, as 2mm off centre on the front tool post would not work at all. |
| Hopper | 14/12/2015 04:22:55 |
 7881 forum posts 397 photos | Have you tried using the other end of the parting tool holder? The notch may be in a slightly different position. Or a different carbide insert? |
| Jon Gibbs | 14/12/2015 09:41:01 |
| 750 forum posts | It looks to be the same rear toolpost they use for their HSS parting blades so it's clear the fault is with the parting blade/tip. I would buy a HSS blade locally and send them the parting blade holder and tip back for replacement at their cost or if you're determined to keep it all, I'd grind/draw-file the bottom 2mm off the told holder and make a fixture similar to the one in the above post to make up the missing 2mm of height in the holder. If you go the HSS route then I can thoroughly recommend the mod I made in the above post. I've parted 2" on the narrower 3/32" blade without any trouble at all and never put the old 5/32" blade back in. HTH Jon |
| Ian Hewson | 14/12/2015 10:15:37 |
| 354 forum posts 33 photos | Hi IanT Never said it was the wrong tool for the job, just wrong tool for the toolholder. The holder is not designed for that particular tool, not the fault of the seller unless they said it would fit. |
| IanT | 14/12/2015 11:44:52 |
| 2147 forum posts 222 photos | You might be right Ian In Grotto's photos it does look as if his tool holder is sitting further back in the slot than (I think) mine does - which suggests that his slot is a bit deeper than mine (sorry I can't measure mine at the moment). So maybe this particular block was made for a different type/style of parting tool. It's hard to tell. However, I do have a block & tool holder set that looks pretty much exactly the same as this one and it works very well on my old Super 7. So usable versions of this design do exist and hopefully Grotto's problem is not a common one. I hope you find a workable solution to the problem Grotto - good luck.. Regards,
IanT |
| Howard Lewis | 14/12/2015 12:59:04 |
| 7227 forum posts 21 photos | What you seem to have here is an EXTREME example of Tolerance build up. The arguments about who / what is to blame do not solve the O P problem., and returns/replacement look to be costly and time consuming. It is unlkely that every toolpost / tool combination would set the tool tip exactly on the centreline of every Myford 7. If everything could be made that precisely, there would be no need for adjusting screws on Q C Ts would there? For what my advice is worth, hoping that you will only need to do it once for your lathe, this is my suggested way of dealing with the problem: 1)Measure the height from the face of the Cross Slide to the Centre. 2)Measure the height from the Cross Slide to the tip of the Parting Tool. 3)Note the difference. 4)Turn two dowels to snug fit in the T slot in the Cross Slide. 5)On the centreline of the key in the bottom of the toolpost, drill / tap two holes, as far apart as practicable. Make them deep enough that the outer ends can be drilled / reamed, at the same positions to take the newly made dowels. 6)Alternatively, drill / tap the rear face of the Toolpost., in two places, near to the bottom. 7)Make up a bright M S plate, at least 6mm thick, and drill clearance for the fixings chosen for the above tappings. The plate should be made so that it hangs below the bottom of the Toolpost, to locate against the rear face of the Cross Slide.. 7)Set the toolpost in the four jaw chuck, as near on centre as possible. 8)Face off the key, 9)Turn off the lower face of the toolpost, the dimension noted earlier. 10)After deburring, and cleaning, fit the two dowels, or the locating plate, to the Toolpost, and fit to the Cross Slide. The dowels, or the rear locating plate should bring the tool to the same alignment as the original key. The tip of the insert should now be at the lathe Centre Height. Do not be surprised if subsequent tips, especially if from another manufacturer, differ slightly from this Centre Height. Everything is made to dimension which has a tolerance. Tolerances allow interchangeability, but do not guarantee absolute precision. Heres to trouble free parting off! Howard |
| Neil Wyatt | 14/12/2015 13:46:06 |
 19226 forum posts 749 photos 86 articles | This is just musing, but perhaps altering the parting tool something like this could drop the height by 2mm whilst keeping the fit in the toolholder. I have probably exaggerated the angle, and I realise that it will change the angles at the tooltip, but less work than modifying the holder.
|
| Michael Gilligan | 14/12/2015 14:09:26 |
 23121 forum posts 1360 photos | Posted by Howard Lewis on 14/12/2015 12:59:04:
What you seem to have here is an EXTREME example of Tolerance build up. The arguments about who / what is to blame do not solve the O P problem., and returns/replacement look to be costly and time consuming. It is unlkely that every toolpost / tool combination would set the tool tip exactly on the centreline of every Myford 7. If everything could be made that precisely, there would be no need for adjusting screws on Q C Ts would there? . Well-put, Howard As the old saying goes: "If you can't make it exact, make it adjustable" ... Which leads me to the [possibly contentious*] thought, that we need a design for an adjustable toolholder for inverted, rear-mounted, tools [and not exclusively parting tools]. ... Perhaps someone with experience of 'production' lathes could advise ? MichaelG. . [*] The difficulty, of course, is the risk that adjustablity will compromise stiffness. |
| Neil Wyatt | 14/12/2015 14:54:07 |
19226 forum posts 749 photos 86 articles | > just cut 2mm off the bottom of the blasted parting tool and get on using it. I doubt the design has enough spring to grip the body of a much narrower tool. > a design for an adjustable toolholder for inverted, rear-mounted, tools Slap a QCTP on top of a rear mounted pillar? Neil |
| Swarf, Mostly! | 14/12/2015 16:00:40 |
| 753 forum posts 80 photos | Neil, Do you mean one like this:
Best regards, Swarf, Mostly! |
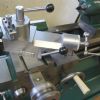
| The Merry Miller | 14/12/2015 16:25:15 |
 484 forum posts 97 photos | Hello Grotto !!! Below you will see some pics of the rear toolpost that fits on to the extended cross slide of my Myford ML7-R It uses the standard Myford boat tool that you can adjust to the centre height without much/any trouble. If you can get hold of one of these all power to your elbow. Len.
|
| Lambton | 14/12/2015 16:41:16 |
 694 forum posts 2 photos | Neil have you "moderated" my recent post? |
| Grotto | 15/12/2015 00:53:04 |
| 151 forum posts 93 photos | Posted by Hopper on 14/12/2015 04:22:55:
Have you tried using the other end of the parting tool holder? The notch may be in a slightly different position. Or a different carbide insert? Both ends give the same height unfortunately |
| Grotto | 15/12/2015 00:56:04 |
| 151 forum posts 93 photos | Posted by Neil Wyatt on 14/12/2015 13:46:06:
This is just musing, but perhaps altering the parting tool something like this could drop the height by 2mm whilst keeping the fit in the toolholder. I have probably exaggerated the angle, and I realise that it will change the angles at the tooltip, but less work than modifying the holder.
I reckon this would be a good solution, but I'm not confident I'd get the angle/width exact enough. Maybe if I had more experience |
| Grotto | 15/12/2015 00:58:49 |
| 151 forum posts 93 photos |
Posted by Ian Hewson on 14/12/2015 10:15:37: Hi IanT Never said it was the wrong tool for the job, just wrong tool for the toolholder. The holder is not designed for that particular tool, not the fault of the seller unless they said it would fit. I'm not blaming/dogging the seller, but the whole unit came as a package specific for the ML7.
|
| Alan Jackson | 15/12/2015 10:23:24 |
 276 forum posts 149 photos | I made a base with a slope so that the upper part can slide to the right height. Alan |


Please login to post a reply.
Magazine Locator
Want the latest issue of Model Engineer or Model Engineers' Workshop? Use our magazine locator links to find your nearest stockist!
Sign up to our Newsletter
Sign up to our newsletter and get a free digital issue.
You can unsubscribe at anytime. View our privacy policy at www.mortons.co.uk/privacy
Latest Forum Posts
- hemingway ball turner
04/07/2025 14:40:26 - *Oct 2023: FORUM MIGRATION TIMELINE*
05/10/2023 07:57:11 - Making ER11 collet chuck
05/10/2023 07:56:24 - What did you do today? 2023
05/10/2023 07:25:01 - Orrery
05/10/2023 06:00:41 - Wera hand-tools
05/10/2023 05:47:07 - New member
05/10/2023 04:40:11 - Problems with external pot on at1 vfd
05/10/2023 00:06:32 - Drain plug
04/10/2023 23:36:17 - digi phase converter for 10 machines.....
04/10/2023 23:13:48 - More Latest Posts...
- View All Topics
Support Our Partners


Shopping Partners
Subscription Offer

Latest "For Sale" Ads
- Reeves** - Rebuilt Royal Scot by Martin Evans
by John Broughton
£300.00 - BRITANNIA 5" GAUGE James Perrier
by Jon Seabright 1
£2,500.00 - Drill Grinder - for restoration
by Nigel Graham 2
£0.00 - WARCO WM18 MILLING MACHINE
by Alex Chudley
£1,200.00 - MYFORD SUPER 7 LATHE
by Alex Chudley
£2,000.00 - More "For Sale" Ads...
Latest "Wanted" Ads
- D1-3 backplate
by Michael Horley
Price Not Specified - fixed steady for a Colchester bantam mark1 800
by George Jervis
Price Not Specified - lbsc pansy
by JACK SIDEBOTHAM
Price Not Specified - Pratt Burnerd multifit chuck key.
by Tim Riome
Price Not Specified - BANDSAW BLADE WELDER
by HUGH
Price Not Specified - More "Wanted" Ads...
Get In Touch!
Do you want to contact the Model Engineer and Model Engineers' Workshop team?
You can contact us by phone, mail or email about the magazines including becoming a contributor, submitting reader's letters or making queries about articles. You can also get in touch about this website, advertising or other general issues.
Click THIS LINK for full contact details.
For subscription issues please see THIS LINK.
Digital Back Issues


Donate

 Register
 Log-in
Model Engineer Magazine
- Percival Marshall
- M.E. History
- LittleLEC
- M.E. Clock

ME Workshop
- An Adcock
- & Shipley
- Horizontal
- Mill

Subscribe Now
- Great savings
- Delivered to your door

Pre-order your copy!
- Delivered to your doorstep!
- Free UK delivery!
All Forum Topics > Beginners questions > Myford rear toolpost