Maintenance and setup checking my mill
| petro1head | 19/03/2023 17:21:51 |
984 forum posts 207 photos | I am on a roll with my workshop so decided to do some maintenance on the mill. (Warco WM18) One thing I never checked when I bought it (yes bit late now but better late then never) was if the column was 90deg to the table. So using my new Dial Gauge I clamped a quality engineers square to the table and ran the dial gauge up and down its edge. Over 230mm the deflection was 0.33mm which is about 0.0822deg. So the top is leaning in Should I rectify or is it within tolerance? If I did rectify I assume just add some shims to the front of the column? |
| Martin Kyte | 19/03/2023 17:45:35 |
3445 forum posts 62 photos | I would forget the square. If you use your dial gauge on the end of an arm which you can swing in the chuck. Take a measurement East and west along the table in line with the chuck. This will establish column tilt in that axis. Once you have that adjusted correctly you can check the nod or forward and back error by setting the dial gauge to zero when to the right and left of the spindle and then rotating to take a reading in front. If the column is upright all readings should be zero. If not you then should decide if you can live with it or start trying to correct it. |
| petro1head | 19/03/2023 18:04:20 |
984 forum posts 207 photos | Posted by Martin Kyte on 19/03/2023 17:45:35:
I would forget the square. If you use your dial gauge on the end of an arm which you can swing in the chuck. Take a measurement East and west along the table in line with the chuck. This will establish column tilt in that axis. Once you have that adjusted correctly you can check the nod or forward and back error by setting the dial gauge to zero when to the right and left of the spindle and then rotating to take a reading in front. If the column is upright all readings should be zero. If not you then should decide if you can live with it or start trying to correct it. Will give that a go thanks |
| mgnbuk | 19/03/2023 18:07:22 |
| 1394 forum posts 103 photos | Should I rectify or is it within tolerance? Not OK. Tolerance for a manual machine is usually better than 0.025 / 300mm (thou per foot in old money). Did you only check in one plane - you only mention "leaning in" ? My former fitting colleagues called this check "front square" (i.e. Y-Z squareness) - there is also the "side square" check (X-Z squareness).. Both these need to be in spec. if you expect the tool point to stay true to your workpiece datum when the head is raised or lowered. The spindle alignment check refered to by Martin is a seperate check carried out after getting the column square to the table in both planes that requires different solutions to rectify should it prove to be in error. Pretty pointless IMO messing up your column to table squareness to fix a spindle alignment issue at, say, the head swivel interface. The notion of shimming the column to sort spindle alignment seems to have its roots in the round column mill drills, where it is not that important to have the head raise & lower truly square to the table, as alignment is inevitably lost due to the lack of an alignment key. On a guided column (keyed round colum or dovetailed), column to table squareness is just as (may be more) important than the "tramell" check with the spindle as described above. Nigel B.
|
| petro1head | 19/03/2023 18:11:01 |
984 forum posts 207 photos | Posted by mgnbuk on 19/03/2023 18:07:22:
Should I rectify or is it within tolerance? Not OK. Tolerance for a manual machine is usually better than 0.025 / 300mm (thou per foot in old money). Did you only check in one plane - you only mention "leaning in" ? My former fitting colleagues called this check "front square" (i.e. Y-Z squareness) - there is also the "side square" check (X-Z squareness).. Both these need to be in spec. if you expect the tool point to stay true to your workpiece datum when the head is raised or lowered. The spindle alignment check refered to by Martin is a seperate check carried out after getting the column square to the table in both planes that requires different solutions to rectify should it prove to be in error. Pretty pointless IMO messing up your column to table squareness to fix a spindle alignment issue at, say, the head swivel interface. The notion of shimming the column to sort spindle alignment seems to have its roots in the round column mill drills, where it is not that important to have the head raise & lower truly square to the table, as alignment is inevitably lost due to the lack of an alignment key. On a guided column (keyed round colum or dovetailed), column to table squareness is just as (may be more) important than the "tramell" check with the spindle as described above. Nigel B.
Sorry a bit confused, are you saying I need to check the Y-Z first? |
| JasonB | 19/03/2023 18:20:37 |
25215 forum posts 3105 photos 1 articles | I suppose you could have upset the way it came out of the factory when you took the column off to get it onto the stand. If it's not caused a problem in the six years that you have had the mill then it is probably not worth doing anything with it now. If you alter the column then you also risk upsetting the travel of the quill relative to the table as well as tram of spindle axis to table. |
| petro1head | 19/03/2023 18:23:15 |
984 forum posts 207 photos | Posted by JasonB on 19/03/2023 18:20:37:
I suppose you could have upset the way it came out of the factory when you took the column off to get it onto the stand. If it's not caused a problem in the six years that you have had the mill then it is probably not worth doing anything with it now. If you alter the column then you also risk upsetting the travel of the quill relative to the table as well as tram of spindle axis to table. To be honest I have not noticed a problem in those years and its not like I make precision engineering parts. |
| Martin Kyte | 19/03/2023 18:51:44 |
3445 forum posts 62 photos | The reason I suggested doing it the way I did is because it eliminates the engineers square which I would not trust to be accurate enough. The Spindle should be true to the column. regards Martin |
| mgnbuk | 19/03/2023 19:32:34 |
| 1394 forum posts 103 photos | Sorry a bit confused, are you saying I need to check the Y-Z first? Check both X-Z and Y-Z. Only doing half the job of checking how your column lies relative to the table otherwise. Alignments are one of those things that, to be done right, have to be done completely and in the correct order - "pick'n'mix" choosing of which bits of the alignment suite you want to check / rectify risks making other areas worse. The Schelsinger & MTB checks for machines are not just a number of checks of particluar alignments, they also specify the order in which the checks are completed. - a former colleague summed it up as "build 'em right from the base upwards". Taken to extremes - if you use an edge finder directly mounted in a collet to set a datum on the corner of a job (head close to the table) then raise the head to get a 13mm jobber drill mounted in a keyless chuck in the spindle (say, raise the head 180mm ) would you want the tip of the drill to still be relevant to your set datum ? Your measured 0.33 / 250mm would mean that it would not be, to the tune of around 0.25mm in one plane alone - you don't know what the error is in the other plane without measuring it. Might just as well have one of the much-derided (in some quarters) un-key round column mill drills if the head alignment isn't maintained along the column traverse. Square accuracy could be confimed by turning the square 180 degrees & re-doing the measurement - result stays the same = square OK, otherwise split the difference ? A square out by 0.33 / 250mm isn't really much of a "square" ? The Spindle should be true to the column. But only after the column is perpendicular to the table which, in turn, is parallel to the base. Nigel B. |
| not done it yet | 19/03/2023 20:18:19 |
| 7517 forum posts 20 photos | Posted by Martin Kyte on 19/03/2023 18:51:44:
The reason I suggested doing it the way I did is because it eliminates the engineers square which I would not trust to be accurate enough. The Spindle should be true to the column. regards Martin Could turn a cylinder on his lathe and use that? Should be square - ad long ad hiix lathe doesn’t face convex.🙂 |
| Martin Kyte | 19/03/2023 21:31:52 |
3445 forum posts 62 photos | I shall clarify. The spindle should be parallel to the front face of the column as manufactured. It is irrelevant what the relationship of the column to the base is. The spindle axis should be parallel to the Z axis front plane even if the column were lying on a bench. regards Martin Edited By Martin Kyte on 19/03/2023 21:35:28 |
| petro1head | 19/03/2023 22:38:43 |
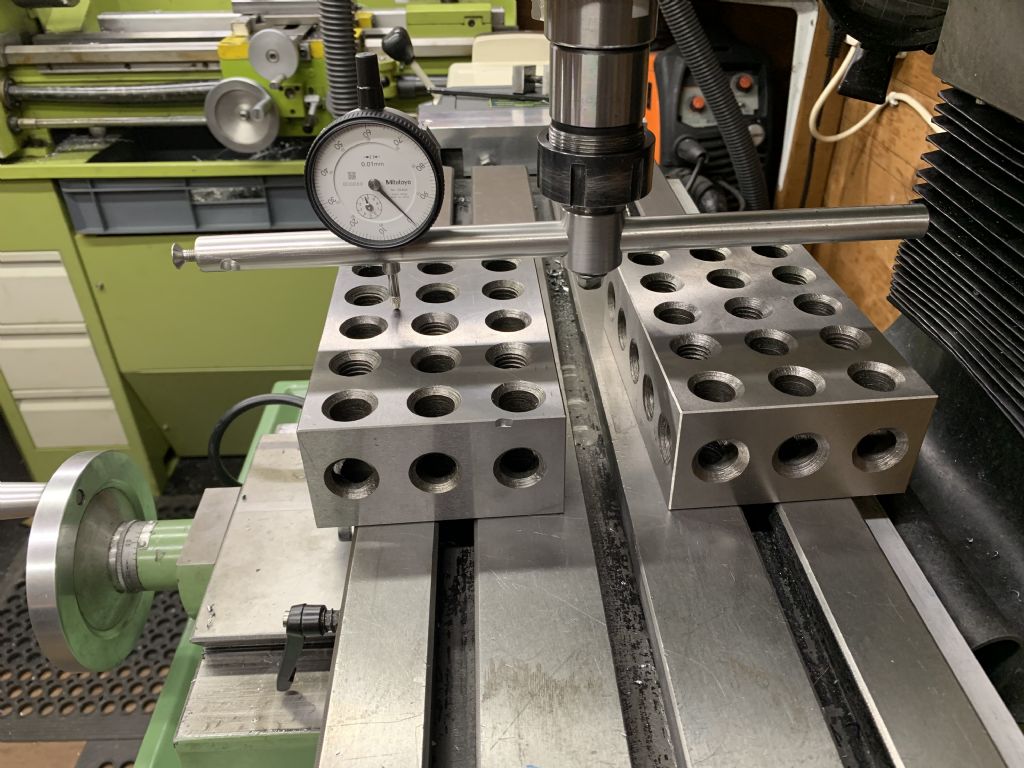
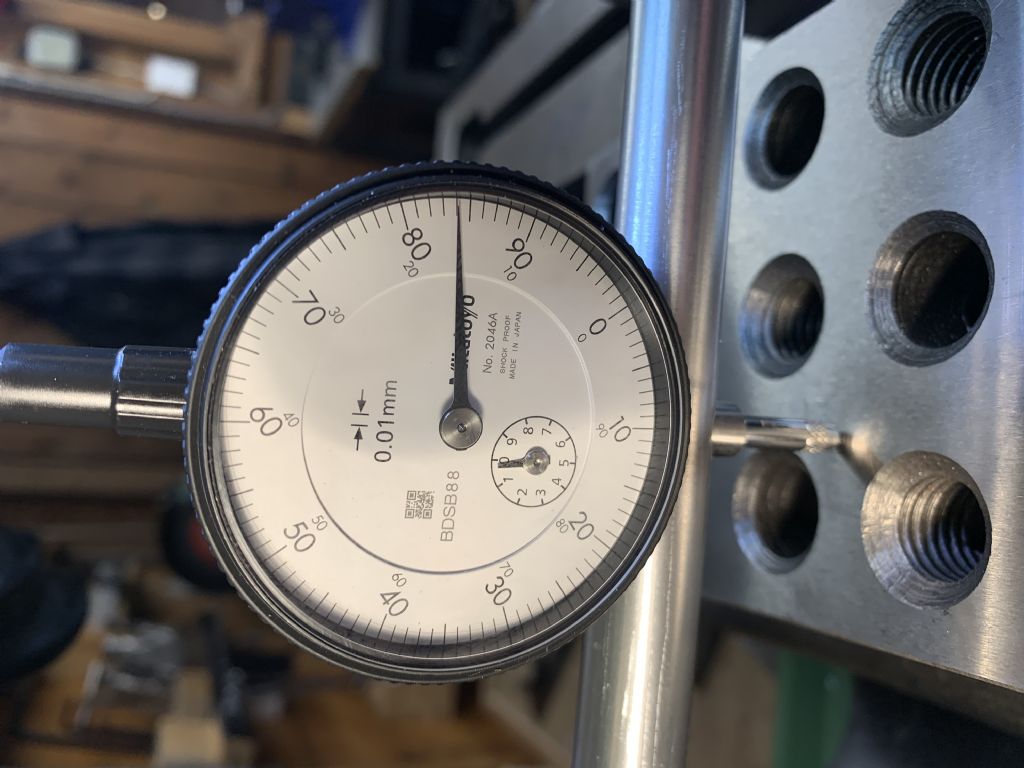
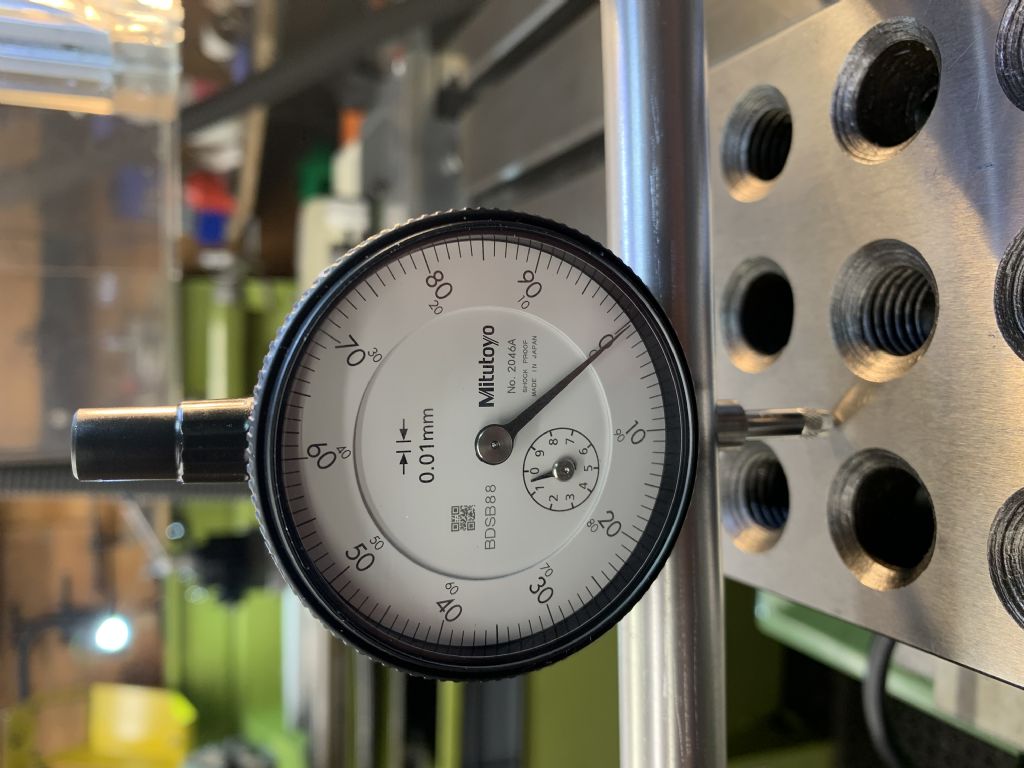
984 forum posts 207 photos | Ok, i have made a rig to measure north (back) to south (front) and east (right) to west (left) so far i have check north vs south North: South: As you can see noth is 0.15mm higher than south over a distance of 185mm. This equates to an angle forward 0.0465 deg So now i need to figure out what size shim i will need at the back of the column to tilt it forward.- edit... would the shim needed be half 0.15mm so 0.075mm (3 thou) Once sorted i will then check east vs west Edited By petro1head on 19/03/2023 22:43:19 |
| Martin Kyte | 19/03/2023 23:04:19 |
3445 forum posts 62 photos | Bearing in mind that very often the misalignment is down to burrs on the mating faces of the base and the column. If you do take your mill apart do a very close inspection of those faces taking special attention to the tapped and through holes where the column is bolted to the base. Also to the edges of the areas. Clean well before reassembly. Why did you use the blocks rather than go direct on the table? tegards Martin Edited By Martin Kyte on 19/03/2023 23:04:59 |
| Bill Phinn | 20/03/2023 01:16:54 |
| 1076 forum posts 129 photos | Yes, not sure why the blocks are there. Have you tried doing the test [directly on the table preferably] at various points along the table and compared readings?
|
| petro1head | 20/03/2023 05:08:04 |
984 forum posts 207 photos | The head if the mill does not go low enough. Hence the blocks I will not be dismantling the mill |
| Hopper | 20/03/2023 05:58:46 |
7881 forum posts 397 photos | Before you go setting your column square to the top surface of the table, you really should make sure the top surface of the table is parallel to the bed ways and dovetails the table slides on, in both directions. To do that you would mount your dial indicator's magnetic base on the column, with the plunger of the dial indicator bearing on the table top. You then run the table through its full movement in both X and Y directions. It should return a 0-0 reading in both axes, or near enough, within say .025mm or so. It is not unheard of for some "low cost hobby mills" to not be machined quite parallel in this area and that can throw your readings out when setting the column square to the base and when tramming the spindle. Or sometimes the table may be riding up on poorly machined dovetails or poorly fitted gib strips, or burrs on the same, etc. It is a can o' worms once you start doing machine tool alignment. |
| petro1head | 20/03/2023 06:10:04 |
984 forum posts 207 photos | Posted by Hopper on 20/03/2023 05:58:46:
Before you go setting your column square to the top surface of the table, you really should make sure the top surface of the table is parallel to the bed ways and dovetails the table slides on, in both directions. To do that you would mount your dial indicator's magnetic base on the column, with the plunger of the dial indicator bearing on the table top. You then run the table through its full movement in both X and Y directions. It should return a 0-0 reading in both axes, or near enough, within say .025mm or so. It is not unheard of for some "low cost hobby mills" to not be machined quite parallel in this area and that can throw your readings out when setting the column square to the base and when tramming the spindle. Or sometimes the table may be riding up on poorly machined dovetails or poorly fitted gib strips, or burrs on the same, etc. It is a can o' worms once you start doing machine tool alignment. Tell me about it. |
| JasonB | 20/03/2023 07:12:01 |
25215 forum posts 3105 photos 1 articles | Should go without saying but the z-axis should have it's lock applied when doing that test and gibs well adjusted otherwise the head can droop From those readings I would say the column needs to go back not forwards as your dial gauge is being pushed further in on the front reading . If you are not sure measuring the error and not sure how to correct it then as you have not noticed a problem in six years of use is it worth fiddling? |
| petro1head | 20/03/2023 07:41:58 |
984 forum posts 207 photos | just checked x and y axis and they are spot on. jason, yeh my error |
| Paul M | 20/03/2023 08:59:04 |
| 86 forum posts 4 photos | I have a WM16 and came to the conclusion that aiming for perfection is not worth the effort. Have you tested the runout along the spindle when locked, as it would be for milling, and unlocked as it would be for a drilling or boring operation. If it's like mine there is at least .002 difference. Apart from tramming the X axis I have left mine well alone and achieve good accuracy for my model engineering tasks. |
Please login to post a reply.
Want the latest issue of Model Engineer or Model Engineers' Workshop? Use our magazine locator links to find your nearest stockist!
Sign up to our newsletter and get a free digital issue.
You can unsubscribe at anytime. View our privacy policy at www.mortons.co.uk/privacy
- *Oct 2023: FORUM MIGRATION TIMELINE*
05/10/2023 07:57:11 - Making ER11 collet chuck
05/10/2023 07:56:24 - What did you do today? 2023
05/10/2023 07:25:01 - Orrery
05/10/2023 06:00:41 - Wera hand-tools
05/10/2023 05:47:07 - New member
05/10/2023 04:40:11 - Problems with external pot on at1 vfd
05/10/2023 00:06:32 - Drain plug
04/10/2023 23:36:17 - digi phase converter for 10 machines.....
04/10/2023 23:13:48 - Winter Storage Of Locomotives
04/10/2023 21:02:11 - More Latest Posts...
- View All Topics
- Reeves** - Rebuilt Royal Scot by Martin Evans
by John Broughton
£300.00 - BRITANNIA 5" GAUGE James Perrier
by Jon Seabright 1
£2,500.00 - Drill Grinder - for restoration
by Nigel Graham 2
£0.00 - WARCO WM18 MILLING MACHINE
by Alex Chudley
£1,200.00 - MYFORD SUPER 7 LATHE
by Alex Chudley
£2,000.00 - More "For Sale" Ads...
- D1-3 backplate
by Michael Horley
Price Not Specified - fixed steady for a Colchester bantam mark1 800
by George Jervis
Price Not Specified - lbsc pansy
by JACK SIDEBOTHAM
Price Not Specified - Pratt Burnerd multifit chuck key.
by Tim Riome
Price Not Specified - BANDSAW BLADE WELDER
by HUGH
Price Not Specified - More "Wanted" Ads...
Do you want to contact the Model Engineer and Model Engineers' Workshop team?
You can contact us by phone, mail or email about the magazines including becoming a contributor, submitting reader's letters or making queries about articles. You can also get in touch about this website, advertising or other general issues.
Click THIS LINK for full contact details.
For subscription issues please see THIS LINK.
Model Engineer Magazine
- Percival Marshall
- M.E. History
- LittleLEC
- M.E. Clock
ME Workshop
- An Adcock
- & Shipley
- Horizontal
- Mill
Subscribe Now
- Great savings
- Delivered to your door
Pre-order your copy!
- Delivered to your doorstep!
- Free UK delivery!


 Register
 Log-in


