Forum sponsored by:

Using a Morse taper reamer - advice please
Using an MT2 reamer to make a socket
| Simon Williams 3 | 27/01/2023 14:51:20 |
| 728 forum posts 90 photos | Just to pass the time between wishing the in-laws bah-humbug, I've been converting the tailstock of my S7 to be rack operated. Thus:
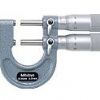
Excuse the paint job (lack thereof) - it is 70 years old. Almost the last operation was to cut a no 2 morse taper socket in the inboard end of the new tailstock barrel. I drilled a 14 mm hole to clear out most of the material, then bored an undersize taper of very nearly the correct angle to make sure the socket would be true to the OD of the barrel. So far so good. I then introduced my one and only MT2 reamer into the mix. I've tried to bore MT2 sockets before using the compound slide, but found it is very difficult to get a truly linearly tapered surface. Here's a picture of the reamer. It's far from new, but I thought I'd give it a try.
As you can hopefully see it's the type with a solid MT2 shank, and with serrated flutes. I'd assumed this is to make it cut more freely. I was surprised how quickly the gullets filled up with swarf. Am I expecting too much to use this as a metal removal tool rather than a shaping/smoothing/trimming tool? By the way the barrel material is EN32, so mild steel but with no free cutting properties worthy of the name. It cut a successful socket, scored near the mouth which I took to be me being clumsy with my swarf management regime, but the taper size and fit are pretty good. For the amount I shall use it I'd call it a success. Shame I cut one of the rack teeth out of position (simple typo in my list of dial settings). So I am planning to remake the barrel, but before I do I would appreciate some advice about how to cut an internal taper. My initial question - is this reamer a metal gross removal device - is one such, also what is the difference between this reamer and a straight flute hand held one with a square butt for use with a tap wrench? Why is one on a Morse taper shank and the other one hand-held? Do I need both? Should I get much nearer the final socket dimensions before using the reamer? Can I sharpen my serrated flute reamer by grinding the face of the flutes? Any thoughts? Thanks as ever Simon P.S. I'd rather not get involved in grinding the finished taper if I can avoid it, it will only be used for light occasional duties and I don't have the technology. By the same token I'm happy to leave it soft. The real imperative in remaking the barrel is that I mis-designed the anti-rotation slot to take the tang of a MT2 drill but my reworked barrel will have a tang slot and an ejector. |
| Ian Parkin | 27/01/2023 15:09:18 |
 1174 forum posts 303 photos | When i make them i just drill to the small end diameter and then slowly let the reamer cut the whole taper. lots of cutting oil and very small increments of travel < 1mm the flutes fill rapidly and withdraw and a toothbrush to clean the flutes rinse and repeat |
| Tony Pratt 1 | 27/01/2023 15:11:07 |
| 2319 forum posts 13 photos | The reamer shown is a 'roughing' reamer and yes it can be sharpened as you describe, I personally would just leave the minimum amount of metal for the reamer to bring the socket to size. I will try to find my MT2 finishing reamer last used for the one and only time 40 years ago. Ah looks like there is conflicting advice already. Tony Edited By Tony Pratt 1 on 27/01/2023 15:11:51 |
| ega | 27/01/2023 17:03:22 |
| 2805 forum posts 219 photos | I would aim to bore this taper, with TTA if one is a available, but it can be done with the topslide set round. A sound taper should make the tang slot, etc unnecessary. An impressive project - good luck! Edited By ega on 27/01/2023 17:04:32 |
| old mart | 27/01/2023 18:32:58 |
| 4655 forum posts 304 photos | I have only made a male MT2 and even with the taper turning attachment on the Smart & Brown model A, the exact taper was found by trial and error using a MT2 socket as a gauge. You have to be within a second of arc or so to get a properly matching taper. To get the best female taper, I would rough out the bore as best I can and use the reamer for final perfection. I know that there are roughing and finishing reamers for Morse tapers, but have not ever bought one. The tailstock quill was not very good on the S & B and I found somebody selling them on ebay cheaply NOS and took a chance with one of the same OD. It was not for a model A, but the backlash nuts were the same. There was no extraction slot as this quill was intended for self extraction, a slot was milled to save strain on the nuts and new engraving was done tp suit the lathe. I have kept the original quill and might ream it if a reamer gets bought for another purpose. |
| Martin Kyte | 27/01/2023 20:31:16 |
 3445 forum posts 62 photos | I would suggest making the morse taper socket as the first operation in over diameter material. Once you are happy with the socket mount between centres on a 2 morse mandrel and turn the outside. This will ensure the socket and the Morse taper are concentric and allow you several ‘goes’ at the socket. regards Martin |
| David George 1 | 27/01/2023 20:51:51 |
 2110 forum posts 565 photos |
I recently made a new tailstock quill and the only way to guarantee it to run true was to bore it with the top slide set at the correct angle, supported by the fixed steady and then finnishing it with a Morse taper ream.
David |
| Huub | 27/01/2023 22:27:59 |
| 220 forum posts 20 photos | I have made a lot of tapers but never for the tail stock. Maybe this is a good way to get a better and more accurate tail stock. When I mess up, I can still use the old tail stock. To assure parallelism and centre height and I would put the drill in the chuck to "roughly" step bore the taper using different drill sizes and feed by using the tail stock. If you don't have the right drills, you could use a boring head. Then use the reamer to finish the job. |
| Hopper | 27/01/2023 23:52:21 |
 7881 forum posts 397 photos | A serrated reamer is a roughing reamer, used mostly for production work. You need a plain finishing reamer to finish the job. I would bore the taper to within a couple of thou to ensure concentricity then finish with a finishing reamer. Try it out on a test piece first and see how it goes before doing the real job. |
| David Davies 8 | 28/01/2023 05:55:48 |
 202 forum posts 1 photos | Hi Simon A bit off topic, is your rack system made to a published design, if so which one, or did you blaze your own trail? Also is the pinion housing a casting, fabricated or hewn from the solid. I have often looked at these devices with envy. Cheers Dave |
| Neil Lickfold | 28/01/2023 06:02:06 |
| 1025 forum posts 204 photos | Usually the serrations are offset to each other, so that when the reamer is held at a set position and the reamer has done more than 1 turn at that depth, there will be no serrations or grooves in the finished work piece. Any material taken out before the reamer goes in, is a bonus. It really needs to be all concentric as possible. You can always bore it close and then use the reamer for the last bit to get the taper into the correct MT2 range. Yes those flutes will fill very fast. If you already have a through hole, use a wetvac on the end to draw away the swarf being generated, and it also will draw any coolant through as well. |
| jimmy b | 28/01/2023 06:05:00 |
 857 forum posts 45 photos | As an apprentice we used taper drill, roughing reamer and finally a finishing reamer. Not seen a morse taper reamer for years. Quick google turned up the below
If I remember correctly, they worked pretty well.
Jim |
| Hopper | 28/01/2023 08:13:11 |
7881 forum posts 397 photos |
Goodness. They are not giving them away are they. |
| Simon Williams 3 | 28/01/2023 13:45:54 |
| 728 forum posts 90 photos | Many thanks to all the replies, we seem to have established that my reamer is a roughing one and it's no surprise that the chip clearance needs a whole lot more care. Good stuff and thank you. To answer the question about its origins from David, this was a completely off-piste design albeit a loose copy of something I've seen in a picture. I've never seen one "in the flesh" as it were. Here are the individual components:
The body "casting" is two tubes bronze welded together, so the "bite" out of the side of the bigger one sets the centre distance of the pinion against the rack. Otherwise the bits are fairly simple. I chose the pinion to be 15 teeth and DP20 as this makes a full turn very nearly 60 mm travel.
|
| David Davies 8 | 28/01/2023 17:39:56 |
202 forum posts 1 photos | Simon Thanks for showing the component parts, you have made yourself a very useful bit of kit! Cheers
Dave
|
| Hopper | 28/01/2023 21:19:35 |
7881 forum posts 397 photos | Very nice bit of work there. And a very handy attachment. |


Please login to post a reply.
Magazine Locator
Want the latest issue of Model Engineer or Model Engineers' Workshop? Use our magazine locator links to find your nearest stockist!
Sign up to our Newsletter
Sign up to our newsletter and get a free digital issue.
You can unsubscribe at anytime. View our privacy policy at www.mortons.co.uk/privacy
Latest Forum Posts
- *Oct 2023: FORUM MIGRATION TIMELINE*
05/10/2023 07:57:11 - Making ER11 collet chuck
05/10/2023 07:56:24 - What did you do today? 2023
05/10/2023 07:25:01 - Orrery
05/10/2023 06:00:41 - Wera hand-tools
05/10/2023 05:47:07 - New member
05/10/2023 04:40:11 - Problems with external pot on at1 vfd
05/10/2023 00:06:32 - Drain plug
04/10/2023 23:36:17 - digi phase converter for 10 machines.....
04/10/2023 23:13:48 - Winter Storage Of Locomotives
04/10/2023 21:02:11 - More Latest Posts...
- View All Topics
Support Our Partners


Shopping Partners
Subscription Offer

Latest "For Sale" Ads
- Reeves** - Rebuilt Royal Scot by Martin Evans
by John Broughton
£300.00 - BRITANNIA 5" GAUGE James Perrier
by Jon Seabright 1
£2,500.00 - Drill Grinder - for restoration
by Nigel Graham 2
£0.00 - WARCO WM18 MILLING MACHINE
by Alex Chudley
£1,200.00 - MYFORD SUPER 7 LATHE
by Alex Chudley
£2,000.00 - More "For Sale" Ads...
Latest "Wanted" Ads
- D1-3 backplate
by Michael Horley
Price Not Specified - fixed steady for a Colchester bantam mark1 800
by George Jervis
Price Not Specified - lbsc pansy
by JACK SIDEBOTHAM
Price Not Specified - Pratt Burnerd multifit chuck key.
by Tim Riome
Price Not Specified - BANDSAW BLADE WELDER
by HUGH
Price Not Specified - More "Wanted" Ads...
Get In Touch!
Do you want to contact the Model Engineer and Model Engineers' Workshop team?
You can contact us by phone, mail or email about the magazines including becoming a contributor, submitting reader's letters or making queries about articles. You can also get in touch about this website, advertising or other general issues.
Click THIS LINK for full contact details.
For subscription issues please see THIS LINK.
Digital Back Issues


Donate

 Register
 Log-in
Model Engineer Magazine
- Percival Marshall
- M.E. History
- LittleLEC
- M.E. Clock

ME Workshop
- An Adcock
- & Shipley
- Horizontal
- Mill

Subscribe Now
- Great savings
- Delivered to your door

Pre-order your copy!
- Delivered to your doorstep!
- Free UK delivery!
All Forum Topics > Beginners questions > Using a Morse taper reamer - advice please