Forum sponsored by:

What does your casting setup look like, and results?
Comparison of casting setup and results
| Luker | 03/07/2022 07:46:52 |
 230 forum posts 172 photos | I've been enjoying the discussions on casting recently, and started this thread to compare the various methods and what has been cast. The idea is to match setup with results. I'm curious to see how my 'DIY everything' compares to other setups. Furnace: Crucible (bought A4, furnace designed around this), blower (from a vacuum), atomisation tube, lining monolithic castable. Fuel: Waste oil, gravity feed, (sometimes thin with diesel depending on what I'm casting) Sand: Green sand, (sand from river) and bentonite. (Additives: flour, coal dust, and wood dust depending on what I'm casting) Mould coat: none, but do sometimes dust with flour or graphite. Patterns: Initially wood, currently 3D printed Materials cast: Aluminium (various), a number of bronzes and some development alloys, cast iron of various grades, copper, different brasses. All cast from base metals scrap. Aluminium:
Cast iron and bearing bronze:
Ornamental brass
Copper (one of the more difficult things to cast)
High heat cast iron
A replacement alloy for gunmetal (cylinders)
|
| Philip Rowe | 03/07/2022 11:31:02 |
| 248 forum posts 33 photos | I know less than nothing about casting metal, apart from what I read here but those results are mind blowing. You must be very proud of your achievements. Phil |
| Mark Rand | 03/07/2022 12:25:37 |
| 1505 forum posts 56 photos | I'm very much a beginner, but have a number of things in the to-do list if I ever get around to them. Only poured aluminium thus far and have more learning to do before I advance on to other alloys:-
The furnace is an EBay Amal find that had seen some use but has more life in it. The burner is a home made naturally aspirated venturi propane burner with the mixture controlled by sliding the gas injector in or out of the venturi's throat.
The first operation was to turn a large collection of hard disks, plus a couple of scrap castings into ingots. The ingot moulds are welded up from steel channel with the natural draft of the channel, plus sloped ends. Ingots can be knocked out almost as soon s they've solidified..
This was the result of the first day's operation. 35kg of ingots and a lot of dross. For subsequent pours, I used a drossing flux and the dross was just dross and not mostly aluminium. The ingots are stamped up as to what they came from to allow me a choice of alloys.
The flasks, so far have been made from wood and were about the right size for the desired castings. Sand is EBay Mansbond oil bonded sand.
The first pour. I had a few problems initially but did better with later attempts (that disn't get photographed).
One if my first successful casting, from a small number in total. It's a switch box for my Beaver milling machine, since the replacement switch was much deeper than the original. A building sand and sodium silicate core was used.
|
| Craig Brown | 03/07/2022 12:28:01 |
| 110 forum posts 57 photos | I am very much enjoying all the casting threads of late, from all of the contributors, some beautiful work being done. Although I'm not in a position to try any casting myself now, it's something I would very much like to do in the future and I'm sure all these threads will help. Thanks everyone |
| noel shelley | 03/07/2022 13:21:28 |
| 2308 forum posts 33 photos | Mark, Your furnace is almost certainly a casenit, as used in most schools that did casting ! If it has it's original lining whilst it may do cast iron it is very wasteful of fuel due to it not being a good insulator and for non ferrous you do not need to go to1600c. Reline with a light weight pottery kiln brick and ceramic fibre blanket and it will save you a fortune in gas - more so now ! Glad to see you have 2 gas bottles, join them together, but remember you are dealing with an inflamable gas at up to 200PSI. LPG = Liquid Petroeum Gas, as the liquid eveporates to gas it needs heat, ( latent heat of evaporation ) when the bottle is full it has enough surface area to do this, BUT when the bottle is half empty it will freeze and the bottle pressure will drop below that at which you work = trouble ! I had 2 gauges, the first reading bottle pressure the second reading working pressure, I also had 3 x 47Kg bottles. ALWAYS start with the first bottle, IF part way through you see the bottle pressure dropping, then close No1 and open No2, to finish the melt. Failure to do this used to heat my gas supplies house all winter, with the gas that remained in returned bottles , I told him mine WOULD BE empty, COMPLETLY !. Plan B is to GENTLY heat the bottle, hot water will work, DO NOT LIGHT A FIRE UNDER THE BOTTLE ! Good Luck Noel. Edited By noel shelley on 03/07/2022 13:39:01 |
| PatJ | 03/07/2022 15:20:52 |
 613 forum posts 817 photos | Some great casting work here. Most impressive. I have not gotten into the bronze work yet, but I am headed that way. So far for me it has been mostly aluminum and gray iron, with a few haphazard brass/Naval Brass melts. Furnaces can be relined and/or patched without too much trouble. I will post the latest methods and materials I use in this post. I have a long story going in another thread about methods and materials that should not be used (LOL). I am somewhat of an expert at what NOT to do with a foundry. . |
| thomas oliver 2 | 03/07/2022 15:34:13 |
| 110 forum posts | Just one tip to offer - do not chuck casting sand straight onto pattern. Use a fine seive and seive sand onto pattern until it is covered. Then use the sand to pack the box. This will give a much better finish to the casting. T. Oliver. |
| PatJ | 04/07/2022 17:58:44 |
613 forum posts 817 photos | I am really impressed with what can be cast in a home setting. Those photos posted above by Luker are shockingly good looking castings. Hats off to that work for sure. . |
| Luker | 04/07/2022 19:58:32 |
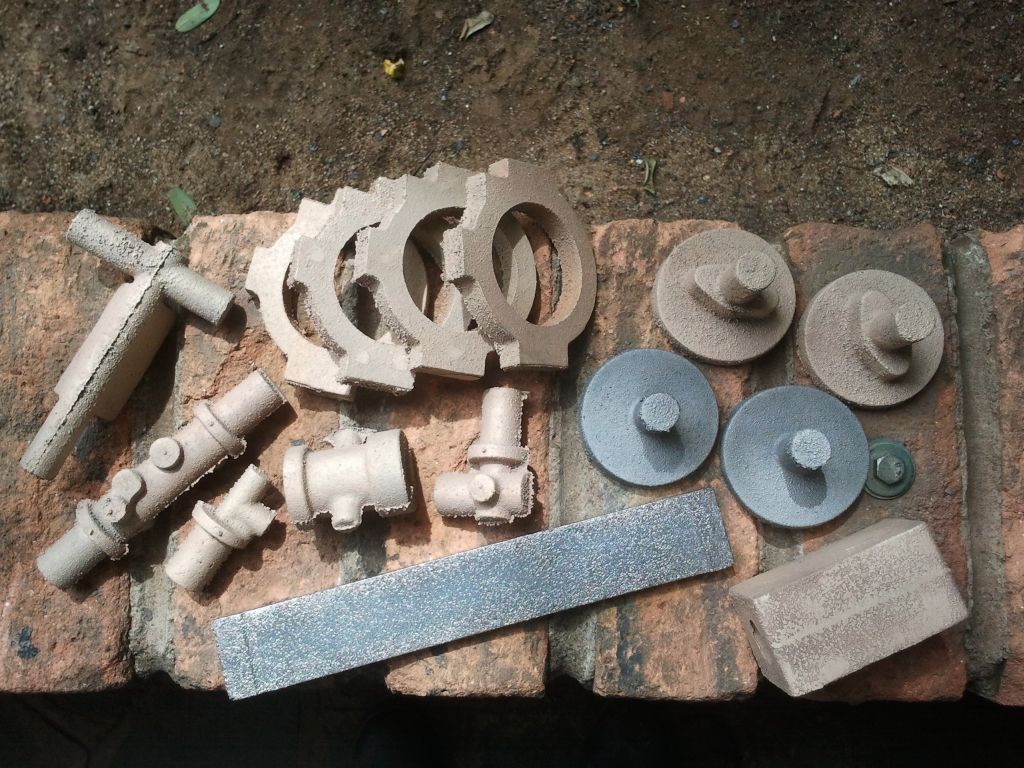
230 forum posts 172 photos | Pat you may like these, some slightly more technical castings: The compensating lever (as cast) on the Wahya, the thickness is 4mm with the ears and middle opened to a 2.5mm wall thickness for the upright levers to go through. Its a ductile iron (mixed from pig iron to get the chemistry correct). This lever is on the suspension and sees a lot of vibration from the track:
The bogie wheels cast for chill on the running surface, by changing the FeSi and (outer) sand composition. The axel boss needed to be softer for a press fit. The outer surface was machined with a tip tool and was much harder than the rest of the casting.
I cast a lot of smaller components for my locos. These get polished in a DIY tumbler.
Here's an interesting component with a zero deg draft on the outside and a 5 deg rammed green sand core all the way to the lip. This was rammed normally (with nails) to keep the core in place when removing the pattern.
Bogie pedistals with a rather thin wall thickness (to scale) that has managed to survive our rough track
|
| Luker | 04/07/2022 20:10:53 |
230 forum posts 172 photos | Cylinders for the Ballaarat:
Cast iron straps and cast iron eccentrics for the Wahya, these worked incredibly well:
And then there's all the special handles for the various builds: These were tricky because they are double sided with a split pattern:
Edited By Luker on 04/07/2022 20:17:43 |
| PatJ | 04/07/2022 20:40:47 |
613 forum posts 817 photos | Luker- That is some beautiful work for sure. How did you get into the casting hobby and how long did it take you to reach this level? . |
| Simon Collier | 04/07/2022 22:44:51 |
 525 forum posts 65 photos | Luker, is there anything that you are really bad at? I ask just so those of us without boundless skill, ingenuity and enthusiasm don’t feel so mediocre. |
| Luker | 05/07/2022 07:29:18 |
230 forum posts 172 photos | Posted by PatJ on 04/07/2022 20:40:47:
Luker- That is some beautiful work for sure. How did you get into the casting hobby and how long did it take you to reach this level? . I took up casting out of necessity, because I couldn't afford castings. I designed and built my furnace from first principles, so that was up and running relatively quickly. Other than the lid mechanism the furnace hasn’t changed much over the years. I’ve only relined once (a few years back). When I started casting I visited a foundry and got some advice and phenolics from the foundry manager. My very first attempt at casting was a failure and I quickly realised the advice was rubbish but the phenolics worked well.
I read a few engineering books on casting and modified the maths and assumptions for the methoding of my smaller moulds. The next time I cast was a success and other than the odd short pour or burnon I don’t have many failures. The initial calculations were all hand calcs but I later wrote an algorithm to calculate the ingate, risers etc.
Incredibly I even managed to cast the firebox hole for the boiler in copper (one of my first pours), a little luck involved here. That boiler is still going strong.
My first cast iron casting was the large wheels for my Stirling 71/4g. Phenolics were not available and I decided to go for green sand, which makes more practical sense if you casting larger moulds more often. I couldn’t include risers and the sprue needed to be smaller due to the size of my cruicible. This was difficult to cast and I had to pull a few tricks to prevent draw. Ironically a rigid mould using phenolics would have worked fine because the expansion phase feeds the mould without the need for a riser.
|
| Luker | 05/07/2022 07:31:19 |
230 forum posts 172 photos | Posted by Simon Collier on 04/07/2022 22:44:51:
Luker, is there anything that you are really bad at? I ask just so those of us without boundless skill, ingenuity and enthusiasm don’t feel so mediocre. Many, many, many things! |
| PatJ | 05/07/2022 13:52:05 |
613 forum posts 817 photos | Luker- That is an interesting story about how you got into casting things. My dad was the maintenance person for the family lumber mill, and when he retired, he needed something to do. He set up a small home shop, and started making small steam engines. He then started making model steam engines like the energizer bunny, ending up with some 38 engines before it was all over, all using bar stock construction. I inherited his shop equipment, and so I decided to try my hand at model building. I was shocked at how difficult and time consuming it was to hog engine parts out of solid blocks of gray iron, and inevitably, I would ruin the part just before I was able to complete the machining on it. Dad's lathe and mill were not expensive, and so not up to the rigors of heavy machining. After many frustrating attempts at making various steam engine parts such as cylinders, flywheels with spokes, etc., and making some really doggy stuff, I exclaimed "There must be a better way to do this!". I had a vague notion of the casting process, having toured the local International Harvester foundry when I was in school. I recalled hot metal, sand, and lots of steam/smoke coming out of the molds. I set up a foundry, but was having a lot of problems with it. The turning point for me was finding a local art-iron group that routinely cast aluminum (in Petrobond molds), and gray iron in resin-bound molds. These folks really brought me up to speed as far as mold materials, techniques, etc. The art-iron folks use cupolas to melt their iron, and I could not find any coke for fuel, so I started looking online for backyard furnace builds. I studied about 10 different furnace/lid designs, and about 5 different burner designs. The internet really helped me be able to find backyard casting material. My first furnace was way too heavy, but my second furnace is a fraction of that mass, and my 2nd furnace works very well, especially with iron. . So basically what the foundry process allows me to do is "machine" my parts initially as patterns in wood. Machining wood is infinitely easier than machining metal, and one can use fillers and such to make fillets. Once a casting is made, the only machining I have do to is a light skim over the surfaces that require machining, and I am done. My relatively lightweight lathe and mill work well with the skimming process. . Another thing that has helped me a lot is learning 3D modeling. That has taken most or all of the guesswork out of engine design, and I can build an engine knowing it will work correctly, because I have already run it virtually in simulation using the 3D modeling program. . And with the advent of relatively inexpensive 3D printers, much of the tedium of hand making patterns has been removed, and my pattern and castings accuracy has gone way up. I often see photos of old engines of all types, and I recall asking as a child "Can we buy one of those engines?", and the response whas always "No, they don't make them anymore". I asked "Well can we make one?", and the response was "No, that is impossible". There are very few phrases that bother me more than being told "That is impossible", especially given the fact that somehow making castings was possible for 1,000 (+) years. The limiting factor as far as casting things is more about how much money you want to spend. You can set up an induction furnace and cast all your parts in stainless steel, if you have enough money, and enough time to learn the process. . Gray iron luckily melts at a low enough temperature that it can be cast with relative ease ("relative" being a relative term) . A told a buddy of mine "You could just build a foundry and cast that engine part", and he said "Yes and I could teach a snake to tapdance, but first I have to get the shoes on him". . Edited By PatJ on 05/07/2022 13:56:36 |
| PatJ | 05/07/2022 14:09:28 |
613 forum posts 817 photos | I have seen some "how to build a foundry" books, but they can be dated, and the methods may not really be the best that are available. Most "how to melt iron" books seem to revolve around the cupola method. Good oil burner designs seem to be especially hard to come by. All too often, a method appears in a book, the book becomes widespread, and then that foundry method, or build method becomes "the backyard building method", to the exclusing of all other ideas. There are many new methods and materials these days, and in many cases, the old greensand method is obsolete. Greensand is the old tried and true method, but bound mold castings are the 21st Century casting method. The secret of Stuart's success in my opinion is their bound molds, which date back quite a while. Pretty much any foundry fabrication work that I do these days is a hybrid of many ideas I have gathered over the last 11 years, which is how long I have been doing casting work. I look for methods and materials that work best for my needs, and then combine those, sometimes in unique ways. Finding a good step-by-step description of the exact process of melting gray iron, and dealing with the slag, was pretty much impossible. Everyone had sort of vague recommendations about how to melt and pour iron, but no two people really agreed on the exact process. The confusing advice about casting gray iron made it very difficuilt to learn the process, and if I had been able to find a clear description of the iron casting method early on, that would have saved me a lot of time, trouble, and money. . |
| PatJ | 05/07/2022 14:18:10 |
613 forum posts 817 photos | I learned that watching other people's videos about how to melt iron was not really very helpful when it came to me actually trying to melt iron. I did not know anyone locally with an iron furnace that I could observe, and some of the iron techniques I learned when I attended a local engine show, and someone was operating an oil-fired furnace, and making iron castings. Being able to stand close to an operating oil furnace, and observe very step, and ask questions was really when I began to succeed at casting iron. And I set up a valve tree for my diesel fuel feed, and ran my 2nd furnace at night in total darkness. The valve tree, along with a combustion air dump valve, allowed me to quickly try an wide range of fuel settings (1-10 gal/hr), and observe the interior of the furnace. This setup finally allowed me to discover the fuel and air flow settings that produced the hottest furnace interior. Basically less is more when it comes to fuel and combustion air introduced into a furnace. The hottest burn for my furnace was between 2.5 and 2.7 gal/hr of diesel, which was far less than I every expected. Any deviation from this fuel and air setting produces a cooler furnace interior. Learning how to correctly tune an oil burner was a "lightbulb-on" moment for me, and this knowledge has allowed me to consistently make quality gray iron castings. . Edited By PatJ on 05/07/2022 14:19:41 |
| Luker | 05/07/2022 14:44:40 |
230 forum posts 172 photos | Posted by PatJ on 05/07/2022 14:18:10:
The hottest burn for my furnace was between 2.5 and 2.7 gal/hr of diesel, which was far less than I every expected. Any deviation from this fuel and air setting produces a cooler furnace interior. Edited By PatJ on 05/07/2022 14:19:41 As a comparison; I typically cast around +20Kg per casting session that’s 5 pours (cast iron), and I plan my moulds to empty the crucible with each pour. It takes around 1½ hours (controlled heat-up) from a cold furnace to the first pour with cast iron and after each charge it takes 40-50min to melt from an empty but still hot crucible. I burn between 15-20l (4,2L/h max, or 1,1USGal/h) waste oil per session but a large portion of that is wasted during start-up. Recently I've averaged at the lower part of that range but this is the total log book average. The furnace will smoke a little for the first 10-15min and after 30min there is no smoke coming from the furnace. When I cast Aluminium and the bronzes I have to run my furnace at a lower efficiency otherwise I can’t keep up with the furnace and I get fuming in the crucible and burn-on in the moulds. |
| PatJ | 05/07/2022 14:53:11 |
613 forum posts 817 photos | I discovered alcohol-based ceramic mold coat (I use it with resin-bound sand), and it totally stops any burn-on of the sand. The castings can be lightly wiped with a dry paintbrush, and that is all that is required to get a clean bright surface. Example of some plaques I cast in iron below, where ceramic mold coat was used. I literally turned the castings over, wiped then with a dry paintbrush, and the result is what you see below. No wire brushing, no buffing, nothing. .
Edited By PatJ on 05/07/2022 14:54:20 |
| PatJ | 05/07/2022 15:17:55 |
613 forum posts 817 photos | I use custom snap flasks, with finger joints, and these work well. I never pour a mold when the flask around the sand. I adhere the two resin-bound mold halves together with foundry adhesive. I have some new adhesive that goes between the mold faces, not around the edges as shown in my photos. For cope/drag alignment, I drill a hole on either side through the wood. Contrary to what I have been told, the alignment holes do not have to be drilled accurately, and do not even have to be vertical. Alignment pins are 1/4" and 3/8" steel rods, often with a dog leg bent on the end to assist in pulling them. I don't use any hardware on the sides of my flasks, and side hardware is totally unnecessary. Side hardware is one of those things you can never get anyone to give up, because "That is the way everyone does it, and that is the way everyone has always done it", as if there can never be a better way. .
Edited By PatJ on 05/07/2022 15:18:56 |


Please login to post a reply.
Magazine Locator
Want the latest issue of Model Engineer or Model Engineers' Workshop? Use our magazine locator links to find your nearest stockist!
Sign up to our Newsletter
Sign up to our newsletter and get a free digital issue.
You can unsubscribe at anytime. View our privacy policy at www.mortons.co.uk/privacy
Latest Forum Posts
- *Oct 2023: FORUM MIGRATION TIMELINE*
05/10/2023 07:57:11 - Making ER11 collet chuck
05/10/2023 07:56:24 - What did you do today? 2023
05/10/2023 07:25:01 - Orrery
05/10/2023 06:00:41 - Wera hand-tools
05/10/2023 05:47:07 - New member
05/10/2023 04:40:11 - Problems with external pot on at1 vfd
05/10/2023 00:06:32 - Drain plug
04/10/2023 23:36:17 - digi phase converter for 10 machines.....
04/10/2023 23:13:48 - Winter Storage Of Locomotives
04/10/2023 21:02:11 - More Latest Posts...
- View All Topics
Support Our Partners


Shopping Partners
Subscription Offer

Latest "For Sale" Ads
- Reeves** - Rebuilt Royal Scot by Martin Evans
by John Broughton
£300.00 - BRITANNIA 5" GAUGE James Perrier
by Jon Seabright 1
£2,500.00 - Drill Grinder - for restoration
by Nigel Graham 2
£0.00 - WARCO WM18 MILLING MACHINE
by Alex Chudley
£1,200.00 - MYFORD SUPER 7 LATHE
by Alex Chudley
£2,000.00 - More "For Sale" Ads...
Latest "Wanted" Ads
- D1-3 backplate
by Michael Horley
Price Not Specified - fixed steady for a Colchester bantam mark1 800
by George Jervis
Price Not Specified - lbsc pansy
by JACK SIDEBOTHAM
Price Not Specified - Pratt Burnerd multifit chuck key.
by Tim Riome
Price Not Specified - BANDSAW BLADE WELDER
by HUGH
Price Not Specified - More "Wanted" Ads...
Get In Touch!
Do you want to contact the Model Engineer and Model Engineers' Workshop team?
You can contact us by phone, mail or email about the magazines including becoming a contributor, submitting reader's letters or making queries about articles. You can also get in touch about this website, advertising or other general issues.
Click THIS LINK for full contact details.
For subscription issues please see THIS LINK.
Digital Back Issues


Donate

 Register
 Log-in
Model Engineer Magazine
- Percival Marshall
- M.E. History
- LittleLEC
- M.E. Clock

ME Workshop
- An Adcock
- & Shipley
- Horizontal
- Mill

Subscribe Now
- Great savings
- Delivered to your door

Pre-order your copy!
- Delivered to your doorstep!
- Free UK delivery!
All Forum Topics > Workshop Techniques > What does your casting setup look like, and results?