Forum sponsored by:

4 facet drill grinding
| andy mulholland | 13/04/2022 13:38:29 |
 36 forum posts 4 photos |
Does anyone use the worden and the jig used with it to grind drill in this fashion.. I've been playing around with it and not getting results I can understand..my previous experience been with a bench grinder and the Harold Hall rest and gig he described.
It seemed to produce fair results.... Ill add photos if I can.. Using the jig with the worden was producing g a triangular shaped primary clearance...I later checked the notes that came with it and it said the table would have to be altered when grinding this primary clearance of 10 degrees..which I hadnt been doing ..but it seemed to be a furthur complication to using it that the simple set up I used before didn't include.. Has anyone modified the worden jig so that the scale on the table can be used to set the drill point angle rather than the angle of the gig... And then use the gig angle to set the clearance angles... Cheers Andy..
|
| andy mulholland | 13/04/2022 13:39:42 |
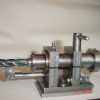
36 forum posts 4 photos | The gig I'm using with the worden
|
| bernard towers | 13/04/2022 16:32:57 |
| 1221 forum posts 161 photos | its possible that the drill orientation is slightly off, to get parallel primary facet the drill face needs to be exactly horizontal. I use a jig on my stent but would imagine its similar. |
| John Hinkley | 13/04/2022 17:32:37 |
 1545 forum posts 484 photos | Andy, I no longer have my Worden grinder, but I made a couple of modifications to the four-facet jig to set the angles more accurately. Instead of the thumb depressions, I set a couple of dowels in the jig and, using my CAD program, measured the required positions to allow a 32mm long dowel to fit between them to obtain that angle. A sort of primitive sine bar arrangement, if you will. A picture probably explains it better:
Other pictures are in the associated album. Link to Worden build album Choose different dowel positions and lengths to get your alternative angles. John
|
| Howard Lewis | 13/04/2022 17:59:38 |
| 7227 forum posts 21 photos | I have a Worden and use one of the accessories to four facet grind drills. The technique is to mount the drill on a 31 degree wedge (118 /2 = 59. 90 - 59 = 31 ) With the table set square to the wheel, and the cutting edge of the drill set vertical, the jig can be swung to the 30 degree position to grind the secondary clearance. The drill should be rotated through 80 degrees, frequently to ensure that the lips are the same length, without abusing the wheel too much. Once the secondary clearance has been ground, the jig is set to 10 degrees for grinding the primary clearance. This will almost certainly require the table to be repositioned to clear the wheel. I unknowingly followed the late Giles Parkes and made up a holder for ER collets (ER20 in my case ) from inch square bar, to hold the drills, rather than an individual collet for each drill. To save space, I turned the back of the clamp nut at 59 degrees so that the face was parallel to the front face of the jig, and gave a more positive location, which helps with accuracy.. With the cutting edge set vertical, turning the block over frequently allows the lips to be kept to the same length without having to take deep cuts, and heat the drill, or wear the wheel. The result is like that shown by Bernard Towers. The drills perform extremely well! By the looks of it, we have all found slightly different means of achieving the same end.. It helps to mark the square, so that you can keep track of where you are! Howard |
| andy mulholland | 13/04/2022 19:10:35 |
36 forum posts 4 photos | Posted by bernard towers on 13/04/2022 16:32:57:
its possible that the drill orientation is slightly off, to get parallel primary facet the drill face needs to be exactly horizontal. I use a jig on my stent but would imagine its similar. Thats a possibility and a difference in the way the drill is set up...depending on what jig I'm using..the Harold Hall jig requires the drill lips to be horizontal to the base of the jig...the worden instructions indicate the drill should have its flute lips at the 5 to the hour position.... That prompted my question of whether anyone had used the worden jig set up with the lips horizontal and using the engraved scale on the table to set the drill point angle rather than the angle set on the jig relative to the base to produce the point angle.. The only problem i found trying it that way was the jig can not be set at low angles relative to its base for the 10 degree clearance with larger drills due to the location of its back stop bar.. It's just using this method seems to me to be a bit more reliable in producing the primary clearance correctly compared with the basic instructions i have on using the worden jig.. Andy.. |
| andy mulholland | 13/04/2022 19:12:58 |
36 forum posts 4 photos | Posted by John Hinkley on 13/04/2022 17:32:37:
Andy, I no longer have my Worden grinder, but I made a couple of modifications to the four-facet jig to set the angles more accurately. Instead of the thumb depressions, I set a couple of dowels in the jig and, using my CAD program, measured the required positions to allow a 32mm long dowel to fit between them to obtain that angle. A sort of primitive sine bar arrangement, if you will. A picture probably explains it better:
Other pictures are in the associated album. Link to Worden build album Choose different dowel positions and lengths to get your alternative angles. John A neat solution to setting the jig angle.. I'm using a little magnetic digital angle gauge.. Andy
|
| andy mulholland | 13/04/2022 19:24:35 |
36 forum posts 4 photos | Posted by Howard Lewis on 13/04/2022 17:59:38:
I have a Worden and use one of the accessories to four facet grind drills. The technique is to mount the drill on a 31 degree wedge (118 /2 = 59. 90 - 59 = 31 ) With the table set square to the wheel, and the cutting edge of the drill set vertical, the jig can be swung to the 30 degree position to grind the secondary clearance. The drill should be rotated through 80 degrees, frequently to ensure that the lips are the same length, without abusing the wheel too much. Once the secondary clearance has been ground, the jig is set to 10 degrees for grinding the primary clearance. This will almost certainly require the table to be repositioned to clear the wheel. I unknowingly followed the late Giles Parkes and made up a holder for ER collets (ER20 in my case ) from inch square bar, to hold the drills, rather than an individual collet for each drill. To save space, I turned the back of the clamp nut at 59 degrees so that the face was parallel to the front face of the jig, and gave a more positive location, which helps with accuracy.. With the cutting edge set vertical, turning the block over frequently allows the lips to be kept to the same length without having to take deep cuts, and heat the drill, or wear the wheel. The result is like that shown by Bernard Towers. The drills perform extremely well! By the looks of it, we have all found slightly different means of achieving the same end.. It helps to mark the square, so that you can keep track of where you are! Howard I follow your instructions and they are similar to the instructions I have..but when it comes to setting the primary clearance of 10 degrees it also states that the table will most probably have to be elevated a few degrees..it states about 4 and a half degrees for a 10mm drill...that is in order to produce a correct secondary clearance..the exact angle is ascertained bt mak8nh sire the whole lip contacts the wheel over its full length.. I was producing triangular faucets on the primary before I read the instructions but still feel it's a bit fiddly compared to the basic jig and bench grinder method I have been using.. The jig I have made employs a shallow V and a setting pin to locate the drill and cater for the 180 degree rotation.. Andy |
| duncan webster | 13/04/2022 19:31:35 |
| 5307 forum posts 83 photos | I have 4 facet set up, problems later, but if you set the cutting edge to be vertical and then grind a bit off, it isn't vertical any more. I find I have to set it a bit off so that once it's sharp it is also vertical. More guess than science. My problem is turning the drill exactly 180 degrees. Tooth rest in the flutes is a bit hit and miss with small drills. I like the square shank collet chuck mentioned by Howard, it's now on the to-do list |
| Howard Lewis | 14/04/2022 09:40:23 |
| 7227 forum posts 21 photos | Duncan, My use of a square block, on the Worden Drill Grinding jig, allows me to rotate the drill 180 degrees. By rotating frequently, only a small amount is removed, and the lips are kept at equal length to give a more accurate hole. The original jig, which used a clamp on each drill s with two slots, which fitted over a rod, proved to be unreliable. Would not clamp tightly enough to prevent movement. The block is 1" square, since that is the size to fit between the rails of the jig. I set it in the 4 jaw, drilled through and then screwcut the 25 x 1.5mm thread for the ER20 Clamp nut, followed by the taper for the ER collets. (8 degree offset of the Top Slide. ) Finished of by carefully polishing with emery around a collet. Carefully, because if you press too hard it grabs! In this way each collet will clamp a Metric, Imperial, Letter or Number drill, within its range. The Worden instructions, for the original drill grinding set up, actually advise a small angular offset to ensure that the cutting edge ends up vertical. Unless a lot has to be taken off the drill, the edge is not far out. If it is a bit out, resettting after the first grind will usually bring things back to be tolerable. Certainly, the drills cut much better after, than before, which is the object of the exzercise! Howard. Edited By Howard Lewis on 14/04/2022 09:41:20 |
| noel shelley | 14/04/2022 10:10:44 |
| 2308 forum posts 33 photos | Has any body tried to replicate the Clarkson or Brierley set ups ? Anybody wishing to try, I can help with sketches and dimensions. Noel. |
| bernard towers | 14/04/2022 12:00:47 |
| 1221 forum posts 161 photos | By the way Andy I'm a little concerned at how shiny your grinding wheel is in the first photo, possibly time to reface. |
| Mark Rand | 14/04/2022 12:13:12 |
| 1505 forum posts 56 photos | Posted by noel shelley on 14/04/2022 10:10:44:
Has any body tried to replicate the Clarkson or Brierley set ups ? Anybody wishing to try, I can help with sketches and dimensions. Noel. I've just about finished a set of drawings, in Alibre, for a 2:1 scale version of the 'Duplex' drill sharpening jig, as detailed in ME during 1951. That's because my Picador jig only just goes up to 3/4" |
| DMB | 14/04/2022 16:13:13 |
| 1585 forum posts 1 photos | Somewhere, along time ago, so can't remember where, I saw a list of drill point angles specifically to suit subject, say, Ali, wood, plastic, etc. The usual 118° was quoted as a general purpose, do anything reasonably well. So it seems that those with the suitable grinding jigs could sharpen one or more to a better angle for a special job. Drilling 'awkward' phos. bronze comes to mind. Any 'specials' should of course, be stored and marked, separately. Still a good idea to drill a big hole in umpteen size stages to lessen heat generation which will affect accuracy. I mention this because I've seen a remark about a large drill with 4facets will do the job in one go. Maybe, but it will still generate a lot of heat. |
| Joseph Noci 1 | 14/04/2022 16:37:45 |
| 1323 forum posts 1431 photos | Just throwing in some alternatives to the process..The jigs above work well for the larger drill I find - 3mm or larger, but I never came right with the small ones - Like Duncan - a hit and miss affair. So I made aup this microscope alignment aid, drill in collet block, which them fits a custom mount on my T&C grinder..Align the drill edges horizontal with a viewing reticle and then the block is just rotated 180deg in the grinder. The Grinder motion tables are simply set to the required drill edge angles and the result is on the nose 99% of the time. A micrometer thimble sets the grind depth.
|
| andy mulholland | 14/04/2022 17:23:09 |
36 forum posts 4 photos | Posted by bernard towers on 14/04/2022 12:00:47:
By the way Andy I'm a little concerned at how shiny your grinding wheel is in the first photo, possibly time to reface. yes I has thought that as well..they do need dressing.. thanks Andy |
| andy mulholland | 14/04/2022 17:23:10 |
36 forum posts 4 photos | Posted by bernard towers on 14/04/2022 12:00:47
deleted
Andy Edited By andy mulholland on 14/04/2022 17:30:57 |
| bernard towers | 14/04/2022 19:08:13 |
| 1221 forum posts 161 photos | I do like that setup jig Joseph. |
| andy mulholland | 14/04/2022 20:02:17 |
36 forum posts 4 photos | Posted by bernard towers on 14/04/2022 19:08:13:
I do like that setup jig Joseph. likewise.. well impressed.. Andy |


Please login to post a reply.
Magazine Locator
Want the latest issue of Model Engineer or Model Engineers' Workshop? Use our magazine locator links to find your nearest stockist!
Sign up to our Newsletter
Sign up to our newsletter and get a free digital issue.
You can unsubscribe at anytime. View our privacy policy at www.mortons.co.uk/privacy
Latest Forum Posts
- hemingway ball turner
04/07/2025 14:40:26 - *Oct 2023: FORUM MIGRATION TIMELINE*
05/10/2023 07:57:11 - Making ER11 collet chuck
05/10/2023 07:56:24 - What did you do today? 2023
05/10/2023 07:25:01 - Orrery
05/10/2023 06:00:41 - Wera hand-tools
05/10/2023 05:47:07 - New member
05/10/2023 04:40:11 - Problems with external pot on at1 vfd
05/10/2023 00:06:32 - Drain plug
04/10/2023 23:36:17 - digi phase converter for 10 machines.....
04/10/2023 23:13:48 - More Latest Posts...
- View All Topics
Support Our Partners


Shopping Partners
Subscription Offer

Latest "For Sale" Ads
- Reeves** - Rebuilt Royal Scot by Martin Evans
by John Broughton
£300.00 - BRITANNIA 5" GAUGE James Perrier
by Jon Seabright 1
£2,500.00 - Drill Grinder - for restoration
by Nigel Graham 2
£0.00 - WARCO WM18 MILLING MACHINE
by Alex Chudley
£1,200.00 - MYFORD SUPER 7 LATHE
by Alex Chudley
£2,000.00 - More "For Sale" Ads...
Latest "Wanted" Ads
- D1-3 backplate
by Michael Horley
Price Not Specified - fixed steady for a Colchester bantam mark1 800
by George Jervis
Price Not Specified - lbsc pansy
by JACK SIDEBOTHAM
Price Not Specified - Pratt Burnerd multifit chuck key.
by Tim Riome
Price Not Specified - BANDSAW BLADE WELDER
by HUGH
Price Not Specified - More "Wanted" Ads...
Get In Touch!
Do you want to contact the Model Engineer and Model Engineers' Workshop team?
You can contact us by phone, mail or email about the magazines including becoming a contributor, submitting reader's letters or making queries about articles. You can also get in touch about this website, advertising or other general issues.
Click THIS LINK for full contact details.
For subscription issues please see THIS LINK.
Digital Back Issues


Donate

 Register
 Log-in
Model Engineer Magazine
- Percival Marshall
- M.E. History
- LittleLEC
- M.E. Clock

ME Workshop
- An Adcock
- & Shipley
- Horizontal
- Mill

Subscribe Now
- Great savings
- Delivered to your door

Pre-order your copy!
- Delivered to your doorstep!
- Free UK delivery!
All Forum Topics > General Questions > 4 facet drill grinding