Forum sponsored by:

Tool identification
| colin hamilton | 17/10/2021 08:01:08 |
| 186 forum posts 94 photos | Ive just got my first set of hss lathe tools and have a couple of very noddy questions.
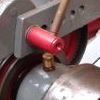
It comes with a right and left handed turning tools. They have a groove ground into them. When mounting the tool does they groove go on the top or leading face? It looks, to me, like they would cut in either orientation. Photos below:
And what is this for?
Thanks Colin |
| Tony Pratt 1 | 17/10/2021 08:33:54 |
| 2319 forum posts 13 photos | Groove to the top, bottom tool is for chamfering. Tony |
| David George 1 | 17/10/2021 08:39:07 |
 2110 forum posts 565 photos | Hi Colin the groove is on the top of the tool on all three tools. I use this style on softer materials aluminium or EN1A steel for instance to get a good finnish and the third style I would use that as a roughing out tool for the same as the top groove acts as a chip breaker as well.
David |
| colin hamilton | 17/10/2021 11:43:22 |
| 186 forum posts 94 photos | Thanks for the replies |
| SillyOldDuffer | 17/10/2021 13:39:10 |
| 10668 forum posts 2415 photos | Might be wrong but I've always assumed the groove to be a chip-breaker. It's purpose is to snap the long spirals of swarf that otherwise get entangled or form clumps. Chips are easier to clear than spirals. A swarf ball catapulted by the chuck once hit me hard enough in the face to draw blood. Since then I wear eye protection and clear swarf before it builds up. Dave |
| colin hamilton | 17/10/2021 14:17:30 |
| 186 forum posts 94 photos | Just back from trying out my new lathe tools. The turning tools in my first picture are ground to a sharp point. Can I put a bit of a round nose on it or does the chipbreaker groove mean this isnt sensible. |
| Brian Morehen | 17/10/2021 14:24:41 |
 191 forum posts 11 photos | I like the look of the groove cut into these tools,, I wonder if one could cut the same with a worn angle grinder disc may be worth a try? Regard Bee.M |
| David George 1 | 17/10/2021 15:23:06 |
2110 forum posts 565 photos | Hi Colin don't try and put a radius on the cutters with the chip breaker as they will rub and you can't get center height correct. Just grind off the end of the tool and a rub with a sharpening stone on the cutting edge. I use the corner of a grinding wheel along the groove and sometimes use a small diamiter grinding point in a dremmel to smooth it out. Don't use on brass, bronze, cast iron or similar materials as they will grab and chatter. David Edited By David George 1 on 17/10/2021 15:41:06 |
| colin hamilton | 17/10/2021 19:15:03 |
| 186 forum posts 94 photos | Posted by David George 1 on 17/10/2021 15:23:06:
Hi Colin don't try and put a radius on the cutters with the chip breaker as they will rub and you can't get center height correct. Just grind off the end of the tool and a rub with a sharpening stone on the cutting edge. I use the corner of a grinding wheel along the groove and sometimes use a small diamiter grinding point in a dremmel to smooth it out. Don't use on brass, bronze, cast iron or similar materials as they will grab and chatter. David Edited By David George 1 on 17/10/2021 15:41:06 David - thanks for the detailed response |
| James Hall 3 | 18/10/2021 19:48:10 |
| 92 forum posts 12 photos | These look remarkably like tools that I bought from our favourite Leicester based supplier and come as a set in a neat wooden box. |
| Howard Lewis | 19/10/2021 11:46:44 |
| 7227 forum posts 21 photos | If a tool is to cut properly, it needs to be mounted so that the cutting edge is on centre height. A slight radius on the cutting edge will improve surface finish, but must extend down the edge to ensure that only the point contacts the work, to prevent the lower part of the tool rubbing. With regard to describing the hand of the tool, when the tool is mounted, if the edge points towards the chuck, to cut, it is a Right Hand Tool A Left hand Tool faces towards the Tailstock. Think of it as if you are looking on the point of the tool from the other side of the lathe. One of my hobby horses is to advise making a Centre Height Gauge, to which tools can be set. If the tool is on centre height, it should cut well and not produce a pip when facing the end of a bar. It is easy to make, a good learning exercise, and a saver of time, and frustration in the future. Somewhere among my albums, there is a picture of the one that I use. The important thing is ensure the column and base are perpendicular to another. Holding the column in the chuck, and just skimming the base is the easy way of achieving this. Howard |
| Howard Lewis | 20/10/2021 11:11:34 |
| 7227 forum posts 21 photos | Failing memory! Forgot to say that my Centre Height Gauge has two blades. The lower one is there to set the parting tool that is mounted, inverted in the rear toolpost. Tools in the front toolpost should be set to the underside of the upper blade. Howard |


Please login to post a reply.
Magazine Locator
Want the latest issue of Model Engineer or Model Engineers' Workshop? Use our magazine locator links to find your nearest stockist!
Sign up to our Newsletter
Sign up to our newsletter and get a free digital issue.
You can unsubscribe at anytime. View our privacy policy at www.mortons.co.uk/privacy
Latest Forum Posts
- hemingway ball turner
04/07/2025 14:40:26 - *Oct 2023: FORUM MIGRATION TIMELINE*
05/10/2023 07:57:11 - Making ER11 collet chuck
05/10/2023 07:56:24 - What did you do today? 2023
05/10/2023 07:25:01 - Orrery
05/10/2023 06:00:41 - Wera hand-tools
05/10/2023 05:47:07 - New member
05/10/2023 04:40:11 - Problems with external pot on at1 vfd
05/10/2023 00:06:32 - Drain plug
04/10/2023 23:36:17 - digi phase converter for 10 machines.....
04/10/2023 23:13:48 - More Latest Posts...
- View All Topics
Support Our Partners


Shopping Partners
Subscription Offer

Latest "For Sale" Ads
- Reeves** - Rebuilt Royal Scot by Martin Evans
by John Broughton
£300.00 - BRITANNIA 5" GAUGE James Perrier
by Jon Seabright 1
£2,500.00 - Drill Grinder - for restoration
by Nigel Graham 2
£0.00 - WARCO WM18 MILLING MACHINE
by Alex Chudley
£1,200.00 - MYFORD SUPER 7 LATHE
by Alex Chudley
£2,000.00 - More "For Sale" Ads...
Latest "Wanted" Ads
- D1-3 backplate
by Michael Horley
Price Not Specified - fixed steady for a Colchester bantam mark1 800
by George Jervis
Price Not Specified - lbsc pansy
by JACK SIDEBOTHAM
Price Not Specified - Pratt Burnerd multifit chuck key.
by Tim Riome
Price Not Specified - BANDSAW BLADE WELDER
by HUGH
Price Not Specified - More "Wanted" Ads...
Get In Touch!
Do you want to contact the Model Engineer and Model Engineers' Workshop team?
You can contact us by phone, mail or email about the magazines including becoming a contributor, submitting reader's letters or making queries about articles. You can also get in touch about this website, advertising or other general issues.
Click THIS LINK for full contact details.
For subscription issues please see THIS LINK.
Digital Back Issues


Donate

 Register
 Log-in
Model Engineer Magazine
- Percival Marshall
- M.E. History
- LittleLEC
- M.E. Clock

ME Workshop
- An Adcock
- & Shipley
- Horizontal
- Mill

Subscribe Now
- Great savings
- Delivered to your door

Pre-order your copy!
- Delivered to your doorstep!
- Free UK delivery!
All Forum Topics > Beginners questions > Tool identification