Forum sponsored by:

3 HP Frisco Standard Stationary Single 4-Stroke IC Engine
| PatJ | 11/01/2021 08:21:33 |
 613 forum posts 817 photos | I have admired the old 4-stroke marine engines for a long time, and finally got a short break from work, so I am taking a few days off and trying to hash out a design for a 3 hp Frisco Standard at about 40% scale, which would give a 12" flywheel, and almost a 2" bore. Lots of tricks and turns in this design, but i really like the side-shaft layout. There is a twin kit available, but it is quite costly, and I really want a single, so I am making up my own 3D models and then 2D drawings, using photos of old Friscos. So far so good with the design. It seems to be coming together.
Edited By PatJ on 11/01/2021 08:38:55 |
| Chris Evans 6 | 11/01/2021 09:23:46 |
 2156 forum posts | That is a great start, will you be making patterns for the castings ? |
| PatJ | 11/01/2021 18:37:53 |
613 forum posts 817 photos | Thanks, yes I will be making my own patterns. In the past I have made many of my patterns by hand in either wood, or metal. More recently, I have started to 3D print my patterns on a Prusa, and so that speeds up the process of pattern making, and adds accuracy too. And another benefit of using 3D to make patterns is that they can be printed at any scale. I prefer grand scale models, because my eyesight is failing, and larger parts are easier to see and machine for me. I intend to cast this engine in iron at a 40% scale, which will produce a 12" flywheel. But as I mentioned, with 3D patterns, any size engine could be built. . |
| PatJ | 27/01/2021 20:24:21 |
613 forum posts 817 photos | I need help with the helical gears for this engine. As with all 4-stroke IC engines I am aware of, the camshaft turns at 1/2 the crankshaft speed. I have verified with videos of running Frisco Standard engines that the vertical camshaft is indeed running at 1/2 of the crankshaft speed. My problem is that the helical gears at the camshaft-crankshaft junction appear to be the same size, both in photos and on the patent drawings. So my question is, how do I get a 2:1 gear ratio using cross helical gears that are the same size? Obviously I am missing somthing. My understanding of gears is not good, so that is hampering things. If I increase the diameter of the camshaft gear to twice that of the crankshaft gear, then the camshaft gear does not fit the engine (it strikes one of the vertical supports). I am stumped on this problem. Is there an obvious solution that I am overlooking? Anyone have any experience with side shaft helical gearing? Thanks in advance. . |
| PatJ | 28/01/2021 09:40:56 |
613 forum posts 817 photos | I am not finding any magic to helical gears. Seems like it is just a spur gear design, and then twist it at whatever angle suits your needs, as long as the sum of the angles of the two gears equals 90 degrees. . |
| JasonB | 28/01/2021 09:56:06 |
 25215 forum posts 3105 photos 1 articles | Pat the angle of the two gears need to be different to get the diameter the same. It's close to 60/30deg for them to be the same diameter but not quite, need to look out the formula. |
| Roderick Jenkins | 28/01/2021 10:28:12 |
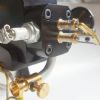
 2376 forum posts 800 photos | Hi Pat, Edgar Westbury's Wyvern engine uses crossed helical (skew) gears of equal sizes for the side shaft drive. I wrote an article on how I made them for my version in ME 4536 June 2016. The "magic" angles for same size gears at 2:1 ratio are 26.6 degrees for the larger gear and 63.4 degrees for the smaller. I expect you could get them made commercially but they are not stock gears. Westbury suggested, somewhat vaguely, that they could be sourced from automobile speedometer drives. Let me know if I can offer further help. These are a test pair I made in aluminium:
HTH, Rod |
| PatJ | 28/01/2021 13:09:22 |
613 forum posts 817 photos | Ahhhhhhhhh................thanks very much Jason and Rod. I knew that knowledge base was here. So it seems there is a bit of magic to this gear arrangement, at least in my mind. I can't quite wrap my head around the speed difference caused by a variation in the angles, but I will take your word for it. My plan for fabricating these gears, which may or may not be viable, is as follows: 1. Draw a standard spur gear in 2D in CAD (or download a profile from a supply house. 2. Pull the profile into Solidworks, and extrude while rotating the necessary degrees. 3. 3D print the gears. 4. Make resin-bound molds around the gears. 5. Heat the 3D printed gears until soft, and carefully extract from the mold. The center of the 3D printed pattern can be mostly left open, such as with the gear on the right in the photo above. 6. Pour the mold (with gray iron), clean up a bit with a file, and then run in the gears with some fine lapping compound. 7. The shrinkage factor will have to be pretty close for the gears to work, but not exact. 8. I use a ceramic mold coat, and so the finish on my iron castings is almost perfectly smooth, and I don't have to wire brush the casting to clean off the sand. 9. The resin-bound sand make a very accurate casting, since unlike greensand, you do not rap the pattern in order to withdraw it from the sand. I could also use a lost-PLA (or a similar filament that is designed to burn out cleanly), and use a ceramic slurry, although I do not have the slurry, and am not set up for that method at the moment. I think the resin-bound sand method would work. The slurry has a fixed shelf life, which is perhaps 1 year?, and so I don't really want to purchase that for just two gears. The lost PLA method is extremely accurate though, assuming your shrinkage factor is correct. The profile on the gear on the right above does not look the same as the one on the right though, so that may be a fly in the ointment. I will ponder this further, but I greatly appreciate this information. . Edited By PatJ on 28/01/2021 13:14:10 |
| PatJ | 28/01/2021 13:23:50 |
613 forum posts 817 photos | Here are a few castings I made for fun last year in gray iron. There is only a slight amount of sand remaining on the castings when they are pulled from the mold, and a light wipe with a paintbrush was all it took to completely clean off the sand. The ceramic mold coat works wonders with surface finish, and basically eliminates virtually all sand adhesion to the casting. The last two photos below show exactly how the castings came out of the mold. They were not wirebrushed or buffed at all, just lightly wiped with a dry paintbrush (2nd to last photo before brushing off with the paintbrush, and the last photo after brushing with the paintbrush).
|
| Roderick Jenkins | 28/01/2021 13:43:57 |
2376 forum posts 800 photos | Nice work! Rod |
| PatJ | 28/01/2021 14:24:59 |
613 forum posts 817 photos | Thanks Rod. It took me a while to figure out how to make decent gray iron castings, but I can do it consistently now, and am not having any defect or machinability problems. The machinability is maintained by using a slight amount of ferrosilicon. I am trying to obtain some additive(s) to make ductile iron, and if I can get that worked out, I will cast my own crankshafts too. I have machined a lot of different metals, and I prefer gray iron to anyt other metal I have machined. Gray iron makes an engine that machines well and wears well too. I never really thought I could figure out how to do iron, but I finally did.
. |
| PatJ | 28/01/2021 14:27:50 |
613 forum posts 817 photos | It seems like for the gears above, I could lay out the profile for the first one, rotate a cut to make the 3D model, and then take a section from an appropriately skewed plane to come up with the section for the other tooth form, and then rotate that. This way, I know the gear profiles would mate correctly. . Edited By PatJ on 28/01/2021 14:28:14 |
| JasonB | 28/01/2021 15:49:12 |
25215 forum posts 3105 photos 1 articles | Posted by PatJ on 28/01/2021 13:09:22:
1. Draw a standard spur gear in 2D in CAD (or download a profile from a supply house. 2. Pull the profile into Solidworks, and extrude while rotating the necessary degrees.
I don't think that will work as you need the tooth shape to be at right angles to the helix otherwise you will get narrower more pointed teeth as the helix angle increases |
| PatJ | 28/01/2021 23:11:08 |
613 forum posts 817 photos | I think that issue is addressed at 9:36 in this video? |
| PatJ | 28/01/2021 23:34:56 |
613 forum posts 817 photos | For the full sized Frisco Standard engine, the distance from the centerline of the camshaft and the centerline of the crankshaft is 2.7625", and so that determines the gear sizes, which I assume forces the gears to be custom sized? My initial approach I guess will be to pull in the profile from CAD files for a commercial helix gear, and then scale two of them to fit the centerline-to-centerline distance. This may or may not fit a standard gear cutter size, but as I mentioned I would 3D print and cast my gears. Alternatively, I could find a commercial gear size that was a close fit to the size of a scaled model, and adjust the model scale slightly so that a standard gear cutter size could be used. I could end up with an odd model scale, but I have always used odd scales anyway, and don't feel the need to adhere to any particular scale. The only scale that is important to me is a scale that allows engine parts that are large enough for me to see and handle while machining. I just can't see the small parts very well, even with reading glasses. . Edited By PatJ on 28/01/2021 23:37:42 |
| PatJ | 29/01/2021 10:35:44 |
613 forum posts 817 photos | I was able to convert a downloaded gear model from a supply house, with teeth at 45 degrees, to a Solidworks part file, and then add two of those into an assembly. The teeth appear to mesh ok. I used that same tooth form to create two new gears, with 30 and 60 degree twists, and those gears do not appear to mesh. I will have to try and find the article that Rod mentioned above, and try to replicate his machining method in Solidworks. .
|
| oldvelo | 30/01/2021 09:13:17 |
| 297 forum posts 56 photos | Hi Pat hope this helps "My problem is that the helical gears at the camshaft-crankshaft junction appear to be the same size, both in photos and on the patent drawings. So my question is, how do I get a 2:1 gear ratio using cross helical gears that are the same size?" Roderick's Photo explains it the driver gear on the right has 8 teeth the driven gear on the left has 16 teeth. Eric
|
| PatJ | 30/01/2021 12:22:09 |
613 forum posts 817 photos | Eric- Thanks for pointing that out. I saw the photo, but did not realize the tooth count varied on each gear. Very interesting. The 3D model for this engine was going along so well, and I was saying to myself "this is not going to be too bad at all". I spoke too soon, and this gear thing has turned out to be rather an iceberg strike. So here is what I am faced with: 1. My machining skills are somewhat limited (improved greatly, but still limited as far as helical gears). It is safe to say I would not be able to make helical gears in a reasonable amount of time, if ever. 2. I would like to be able to cast this engine in more than one size if desired. 3. I would like to be able to download standard gear 3D files from the supply house, and use those in Solidworks. 4. I would like to be able to 3D print the downloaded gears, and make molds from those, using the methods previously described (heat the 3D part just enough to remove it from the resin-bound mold). 5. I don't want to modify the dimensions of the engine 3D model that I have already created. So the only solution I can come up with which would ensure that all the gears would fit and mate correctly is as shown below. The intent is to hide the bevel gears inside the engine base, so that they will not be visible. Sort of a kludge of a solution, and I try really hard to always avoid kludge solutions, but in this case, for me, it is either this layout, or don't build this engine. I know all these gears will mesh correctly because they are commercial gears. The angle on the helical gears is 45 degrees. And one unintended benefit from the layout below is that it gives adjustment between the vertical camshaft and the horizontal crankshaft, ie: the small beveled gear can be slide to the right or left as needed to get a perfect fit. It would otherwise be somewhat difficult to make two gears so exact that they fit the centers of the two shafts exactly and still meshed correctly. The lower helical gear could also be shimmed up or down as required.
Edited By PatJ on 30/01/2021 12:24:49 Edited By PatJ on 30/01/2021 12:27:02 Edited By PatJ on 30/01/2021 12:29:45 |
| Andy_G | 30/01/2021 13:12:50 |
 260 forum posts | As regards making helical gears, have a look here which describes a (relatively) straightforward way to machine them on a lathe. https://www.homemodelenginemachinist.com/threads/helical-gear-cutting-lathe-attachment.9199/
As regards modelling them, I think Jason has already given the answer - the gear profile needs to be constructed normal to the helix angle, not the face of the gear where you have different helix angles meshing. I think it is only possible for gears with different helix angles to mesh if the normal module is the same for each (which means that the projected shape on the face of the gear will be different for each one). I think it should be possible to model this on an oblique plane at the appropriate angle for each gear in your model then project the profile onto the face of the gear before extruding with rotation (but haven't tried it!). Edit to add: Actually it might be easier to calculate the equivalent transverse module for each helix angle and model the gear that way - see equations 2.13 and 2.14 here Edited By Andy_G on 30/01/2021 13:41:04 |
| JasonB | 30/01/2021 15:05:10 |
25215 forum posts 3105 photos 1 articles | As gary says the cutter profile needs to be drawn normal to the helix. This is a quick mock up so cutter size is not quite right but gives the right idea. You can see the pale blue spur gear that I generated first, then I just selected two opposite faces and the root of the tooth and made myself a "cutter" . Drew a plabe at the 26 and a bit degrees and psted the copied "cutter" onto that plane and then did a helical cut followed by a circular feature pattern
Then did a 64deg plane, altered the helix to match and halved the number of teeth
|


Please login to post a reply.
Magazine Locator
Want the latest issue of Model Engineer or Model Engineers' Workshop? Use our magazine locator links to find your nearest stockist!
Sign up to our Newsletter
Sign up to our newsletter and get a free digital issue.
You can unsubscribe at anytime. View our privacy policy at www.mortons.co.uk/privacy
Latest Forum Posts
- *Oct 2023: FORUM MIGRATION TIMELINE*
05/10/2023 07:57:11 - Making ER11 collet chuck
05/10/2023 07:56:24 - What did you do today? 2023
05/10/2023 07:25:01 - Orrery
05/10/2023 06:00:41 - Wera hand-tools
05/10/2023 05:47:07 - New member
05/10/2023 04:40:11 - Problems with external pot on at1 vfd
05/10/2023 00:06:32 - Drain plug
04/10/2023 23:36:17 - digi phase converter for 10 machines.....
04/10/2023 23:13:48 - Winter Storage Of Locomotives
04/10/2023 21:02:11 - More Latest Posts...
- View All Topics
Support Our Partners


Shopping Partners
Subscription Offer

Latest "For Sale" Ads
- Reeves** - Rebuilt Royal Scot by Martin Evans
by John Broughton
£300.00 - BRITANNIA 5" GAUGE James Perrier
by Jon Seabright 1
£2,500.00 - Drill Grinder - for restoration
by Nigel Graham 2
£0.00 - WARCO WM18 MILLING MACHINE
by Alex Chudley
£1,200.00 - MYFORD SUPER 7 LATHE
by Alex Chudley
£2,000.00 - More "For Sale" Ads...
Latest "Wanted" Ads
- D1-3 backplate
by Michael Horley
Price Not Specified - fixed steady for a Colchester bantam mark1 800
by George Jervis
Price Not Specified - lbsc pansy
by JACK SIDEBOTHAM
Price Not Specified - Pratt Burnerd multifit chuck key.
by Tim Riome
Price Not Specified - BANDSAW BLADE WELDER
by HUGH
Price Not Specified - More "Wanted" Ads...
Get In Touch!
Do you want to contact the Model Engineer and Model Engineers' Workshop team?
You can contact us by phone, mail or email about the magazines including becoming a contributor, submitting reader's letters or making queries about articles. You can also get in touch about this website, advertising or other general issues.
Click THIS LINK for full contact details.
For subscription issues please see THIS LINK.
Digital Back Issues


Donate

 Register
 Log-in
Model Engineer Magazine
- Percival Marshall
- M.E. History
- LittleLEC
- M.E. Clock

ME Workshop
- An Adcock
- & Shipley
- Horizontal
- Mill

Subscribe Now
- Great savings
- Delivered to your door

Pre-order your copy!
- Delivered to your doorstep!
- Free UK delivery!
All Forum Topics > CAD - Technical drawing & design > 3 HP Frisco Standard Stationary Single 4-Stroke IC Engine