Forum sponsored by:

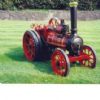
LBSC 3.5" "Maisie" - steam regulator valve assembly
| bogus | 29/05/2020 21:19:20 |
| 31 forum posts 54 photos | Hi, i'm struggling trying to figure out how regulator valve assembly is made and how to take it apart. I'ts kind of slide gate valve as i can see in the steam dome. But i do not know how to diassemble it. There is some backlash in the linkage which connects long stainless steel rod going from the handle in the cabin with sliding element that open steam channel. Pls, see the photos - regulator closed:
Regulator opened:
It looks clean as it is after soda blasting. However i'd love to have better response on regulator by eliminating the play in the linking elements. From the smokebox it looks like this:
I'm affraid steam outlet is fixed to the boiler body for good:/ These three small threaded holes are for superheater assembly:
And this is how it looks like from the cabin side:
Unfortunatelly i have no book and it is hard to guess. I don't want to use too much force. Can anyone chack in the book what is the design arrangment? The basic question: is the regulator designed to be repairable? Edited By bogus on 29/05/2020 21:25:36 |
| Redsetter | 29/05/2020 21:33:08 |
| 239 forum posts 1 photos | Just buy LBSC'S book on Maisie. Plenty of secondhand copies around, and I think it has been reprinted by TEE. |
| bogus | 29/05/2020 22:07:33 |
| 31 forum posts 54 photos | it's on my list |
| Phil H1 | 02/06/2020 08:57:14 |
| 467 forum posts 60 photos | Bogus, I've just checked my LBSC Betty regulator drawing and I sorry to say that it doesn't help. It looks completely different. Phil H |
| Redsetter | 02/06/2020 09:49:07 |
| 239 forum posts 1 photos | From the photos it looks as if the regulator is working. Why the overwhelming urge to take everything to pieces? If it ain't broke, don't fix it. |
| Manofkent | 02/06/2020 10:26:15 |
| 145 forum posts 29 photos | Hi There should be two screws on the top of the boiler - 5 BA countersink if I recall correctly, that hold the regulator vakve body in place. If you undo these you might be able to move the regulator body sufficiently to see what is going on. John
|
| MichaelR | 02/06/2020 10:32:42 |
 528 forum posts 79 photos | It's many years since I made my Masie but from memory. To remove the regulator rod take the regulator handle off, and unscrew the bush that the rod goes through and you can then draw the rod with the bush out, the rod has a stop collar behind the bush and a square section on the rod at the regulator valve end, the linkage at the valve can then be removed. MichaelR
|
| bogus | 02/06/2020 10:42:52 |
| 31 forum posts 54 photos | Thank you guys. On mine there is only one screw - i suppouse this is the one (steel, round head, slotted):
I tried to move it but at some point of force i decided not to go any further. Maybe i'll try to heat it up. Maybe the builder used some kind of blue to seal it. However i don't understand how the rest of the assembly. Even if i remove the srew holding the valve body in place what about the other two elements: 1. the stem/bar(?) going to the handle in the cabin - here i assume it's only going via some kind of sealing. But here again: i tried to undo the threaded elements and give up at some point 2. the arrangement going from the valve to the smokebox. It is mystery for me... I thiught it should be rigid. I can't see any means to undo at the smokebox side:
The reason is two fold - i'm VERY curious and there is a backlash in the connecting linkage elements of the regulator valve. I can do ca. 15 deg of movement on the handle before the valve sliding plate starts to move in the opposite direction. For me it's way to much in terms of "response". |
| bogus | 02/06/2020 10:47:26 |
| 31 forum posts 54 photos | Any one can share some drawing of this arrangement please? |
| John Baguley | 02/06/2020 11:22:41 |
 517 forum posts 57 photos | Hi Bogus, Here's the drawing of the regulator arrangement:
To remove it you will have to first unscrew the fitting on the front tubeplate. It threads into the tubeplate and onto the end of the steampipe at the same time so will not be easy. You will either have to try and grip the outside with something or maybe put a couple of screws into the threaded holes that hold the superheater on and try unscewing it with a bar. The steampipe may come out with the fitting. If not, you will have to remove it by unscrewing it from the regulator block. One way is to tap the square end of a file shank into the end of the pipe or a square file and use that to unscrew it. You will probably damage the pipe trying to get it out! Once the steampipe is removed you should be able to remove the regulator block through the dome bush after removing the screw on the top of the boiler that holds it. Hope that helps, John |
| bogus | 02/06/2020 12:23:01 |
| 31 forum posts 54 photos | This is the one i have! I reconize it
|
| julian atkins | 02/06/2020 13:44:37 |
 1285 forum posts 353 photos | Hello Bogus, If you only need to deal with slack in the linkage of the regulator valve to the square on the regulator rod, then I would leave the regulator body and the steam pipe and tubeplate flange well alone. You can remove the regulator rod and valve and linkage by removing the regulator handle and the gland for the packing. The regulator rod cannot be withdrawn at this stage because of the collar fixed to it as shown in John's drawing. Therefore you need to remove the flange that screws into the backhead bush. Be very careful here if the backhead bush is screwed into the backhead as per the drawing (and not additionally silver soldered. Even if this is caulked with 'soft solder' the soft solder can shear. You can then withdraw the regulator rod but before you do so put some wire around the linkage to stop the regulator valve and linkage falling into the boiler. The wire can then be used to drop the valve down and be lifted out with the linkage and arm attached. Cheers, Julian |
| bogus | 02/06/2020 19:35:14 |
| 31 forum posts 54 photos | Thank you so much guys for your advices. It looks it will be an awkard job. If i remember right the play is mainly (if not only) on the linkage that is connected to the valve slider block (light blue color in the photo). It looks like the holes the red screws are going through are worn. Julian if i understand you correctly - should i assume that if i undo the gland (bard blue) and flange (violet color) and slide the rod assy. out of the boiler the square section on the end of the rod will just slide out of the green element? Good point to suspend the slider first!
Thanks! Wojtek |
| julian atkins | 03/06/2020 01:58:36 |
1285 forum posts 353 photos | Yes, the regulator rod should slide out of the green bit on it's square. You don't have to undo the red screws at this stage.The valve and linkage will drop down and be retrieved by the wire I specified you must add to stop these bits falling down into the boiler. Don't remove your '1' and '2'. Don't disturb this assembly please! Cheers, Julian |
| bogus | 03/06/2020 10:28:13 |
| 31 forum posts 54 photos | Julian, you're totally right. I won't Now i fully understand this part. Thank you. Double happy as i got message from my wife about delivery - i was lucky to find 5mm O.D. borosilicate glass capilary tubes, 0.8mm wall thickness so the capilary action false readings will be minimised. Rated for 26 bar of pressure. I broke water gauge accidentially during disassembly. What a day Wojtek |


 Of course i can not be 100% that the builder of my loco have done it as per drawings. Howeve i studied many photos of other 3.5" gauge Maisies on the web and most of them have regulator arrangement in the cabin looking like on mine. Haven't seen regulator valve under the steam dome, though. Any one have photos of it? I couldn't find them on internet.

Please login to post a reply.
Magazine Locator
Want the latest issue of Model Engineer or Model Engineers' Workshop? Use our magazine locator links to find your nearest stockist!
Sign up to our Newsletter
Sign up to our newsletter and get a free digital issue.
You can unsubscribe at anytime. View our privacy policy at www.mortons.co.uk/privacy
Latest Forum Posts
- *Oct 2023: FORUM MIGRATION TIMELINE*
05/10/2023 07:57:11 - Making ER11 collet chuck
05/10/2023 07:56:24 - What did you do today? 2023
05/10/2023 07:25:01 - Orrery
05/10/2023 06:00:41 - Wera hand-tools
05/10/2023 05:47:07 - New member
05/10/2023 04:40:11 - Problems with external pot on at1 vfd
05/10/2023 00:06:32 - Drain plug
04/10/2023 23:36:17 - digi phase converter for 10 machines.....
04/10/2023 23:13:48 - Winter Storage Of Locomotives
04/10/2023 21:02:11 - More Latest Posts...
- View All Topics
Support Our Partners


Shopping Partners
Subscription Offer

Latest "For Sale" Ads
- Reeves** - Rebuilt Royal Scot by Martin Evans
by John Broughton
£300.00 - BRITANNIA 5" GAUGE James Perrier
by Jon Seabright 1
£2,500.00 - Drill Grinder - for restoration
by Nigel Graham 2
£0.00 - WARCO WM18 MILLING MACHINE
by Alex Chudley
£1,200.00 - MYFORD SUPER 7 LATHE
by Alex Chudley
£2,000.00 - More "For Sale" Ads...
Latest "Wanted" Ads
- D1-3 backplate
by Michael Horley
Price Not Specified - fixed steady for a Colchester bantam mark1 800
by George Jervis
Price Not Specified - lbsc pansy
by JACK SIDEBOTHAM
Price Not Specified - Pratt Burnerd multifit chuck key.
by Tim Riome
Price Not Specified - BANDSAW BLADE WELDER
by HUGH
Price Not Specified - More "Wanted" Ads...
Get In Touch!
Do you want to contact the Model Engineer and Model Engineers' Workshop team?
You can contact us by phone, mail or email about the magazines including becoming a contributor, submitting reader's letters or making queries about articles. You can also get in touch about this website, advertising or other general issues.
Click THIS LINK for full contact details.
For subscription issues please see THIS LINK.
Digital Back Issues


Donate

 Register
 Log-in
Model Engineer Magazine
- Percival Marshall
- M.E. History
- LittleLEC
- M.E. Clock

ME Workshop
- An Adcock
- & Shipley
- Horizontal
- Mill

Subscribe Now
- Great savings
- Delivered to your door

Pre-order your copy!
- Delivered to your doorstep!
- Free UK delivery!
All Forum Topics > Locomotives > LBSC 3.5" "Maisie" - steam regulator valve assembly