Forum sponsored by:

Taper Pins
Methods of fitting
| Chris V | 09/05/2020 18:51:24 |
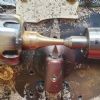 313 forum posts 42 photos | As I wait for parts to get my Drummond M up and running I was admiring the taper pin method of joining ball handle to screw on the top slide. I looked up previous posts and watched a delightful online clip from the 1940's, but that showed fitting of large size pins. Looking to have a go with something small say 1/8" diameter I now know metric and imperial tapers are different, and you can buy tapered reamers. Question is do you drill the smaller end hole and ream the rest? Are clockmakers tapered pins different? Any and all tips gratefully received on methods and best places to buy? Cheers Chris |
| Ian McVickers | 09/05/2020 20:37:47 |
| 261 forum posts 117 photos | Someone else may correct me if Im wrong but I think they are started off with a taper drill then reamered if required. |
| old mart | 09/05/2020 20:42:00 |
| 4655 forum posts 304 photos | Drill the smaller size hole right through both parts with an ordinary drill. For your size there is no real need for the extra expense of a taper drill. |
| not done it yet | 09/05/2020 21:14:25 |
| 7517 forum posts 20 photos | Not an expert, by any means but I recently turned a pin to match the unknown tapered reamer I happen to have. I drilled a hole to just less than what I thought would be OK for the finished article (considering the diametr of the inner shaft), inserted the reamer to ‘touch-off’ then measured it roughly there, and my pin length along the reamer, to guestimate the finished diameter. Nothing particularly accurate in absolute terms. From that I just picked out some drills and drilled three-quarters, half and a quarter deep with drills that were nearly to the calculated size at those points (or nearly to 3/4, 1/2 and 1/4 depth - can’t remember which). I carefully finished off with the reamer. Not a particularly time-efficient way, but I was chuffed when the job was done and the pin fitted as perfectly as I could expect, and the hole through the inner shaft was adequate without being excessive. Repeating the job, with known components, would have been easier/simpler but as a first attempt, from scratch, I was pleased with the result - job done and reamer still in perfect working order 🙂 . My tapered pin will never come out, so it got loctited as well as thumping tight. I could simply have drilled a couple of blind holes and hammered in some suitable dowel pins, but the tapered reamer was just sitting on the bench at the time so I thought I would give a new method a go. The overall job was a shrink fitted shaft in a commercial morse taper blank. The pinning was just belt and braces as I don’t want it to come apart ever. I’ll await to see if the regulars just do it as you suggested.🙂 |
| Speedy Builder5 | 09/05/2020 21:14:48 |
| 2878 forum posts 248 photos | and go careful with the taper reamer, it is very easy to make the hole too large |
| Chris V | 09/05/2020 21:22:21 |
313 forum posts 42 photos | Ah thanks for that, I didn't know about tapered drills. Presume on larger sizes it would be plain drill, tapered drill and then tapered ream? |
| Chris V | 09/05/2020 21:34:51 |
313 forum posts 42 photos | Thank you not done it yet. Do you finish the pin flush or raised and rounded, or is that personal preference? |
| Rich Carlstedt | 10/05/2020 03:44:57 |
| 3 forum posts | For taper holes, know the depth of the finished hole Drill the small end size through as you mentioned Now on the finished pin, measure diameter at 1/2 that depth and do that drill to one half depth in the parts for example, say the taper is 1 inch long and 1/8 at the small end and 1/4 at the big end You drill 1/8th through , followed by a 3/16 drill to 1/2" depth Now when you start the reamer , it will cut on two places at the same time giving a very straight hole and also lowering the chip load. Check the pins you have against the reamer size & length- Pins vary in length by manufacturer I prefer to have the big end flush and the small end protrude very slightly. It makes removal easier as you know which end to hit. if you make it flush, you need to have the exact size punch on the small end . Rich |
| Paul Lousick | 10/05/2020 05:03:49 |
| 2276 forum posts 801 photos | I've not seen a tapered drill bit for steel. Drill bits cut on the tip of the drill, not the sides and reamers cut on the sides. I have see a combination tapered drill / reamer that cuts on both the end and on the sides but only for use in wood. Where do you get taperred drills for steel ? Paul.
|
| DC31k | 10/05/2020 07:29:58 |
| 1186 forum posts 11 photos | Posted by Paul Lousick on 10/05/2020 05:03:49:
Where do you get tapered drills for steel? For example: https://www.drill-service.co.uk/products/drills/taper-pin-drill/ It is horses for courses. If you are doing one or two in a home workshop, the expense is not justified. If you are doing production, where speed is money and labour cost is a factor, the taper drill is useful. |
| Nigel McBurney 1 | 10/05/2020 09:47:41 |
 1101 forum posts 3 photos | Taper reamers were made with straight flutes and spiral flutes, it was accepted practice that the sraight flutes were for hand reaming and the spiral for machine reaming,I have aquired an assortment of taper reamers as they were used on the better class stationary engines .Taper pins if fitted correctly are far superior to roll pins,though a lot more expensive to drill and fit.I have always just used standard drills , at work it was the same,though no doubt I expect manufactures who used them frequenly would have some sort of taper drill to rough them out prior to reaming, when taper reaming on the smaller sizes I would recomend reaming by hand ,using an Eclipse "T" type tap wrench,as the large end of the hole has a relative lot of material to remove ,remove the taper reamer frequenly as the flutes fill up with swarf which will jam the reamer and break it,I have seen a couple of reamers shattered in my dim and distant past. in those days the lubricants were either oil from the can or soluble oil, modern lubricant like Rocol does make it easier. when fitting the pin try to leave a small portion of the pin visible at each end so that in future you can see from which end the pin has to be hit to remove it ,of couse if the the shaft and collar or cam etc rotates at high speed then the pin may have to be flush to avoid catching into anything though when stationary engines and lots of mechanical equipment were made around a hundred years ago ,there lots of bits of rotating and unguarded shafts visible.Another point when removing taper pins, always try to hit the pin dead centre and do it with a single heavy blow, lots of lighter blows just burrs the pin over,and make sure you are hitting the small end ,and do not use long parallel pin punches,they are to springy use a punch which is tapered from the body down to the business end .start the pin moving and then knock it fully out with a parallel pin. If you have to drill an old pin out which has been peened over or rusted in ,then try to make sure that the pin is vertical,I have found lots of pins where the pin has been drilled,the drill gone off centre and at the small end of the hole ends up as a figure of 8 shape. And finally the when driving out a pin make sure the shaft or collar is well supported on a solid block of iron. |
| magpie | 10/05/2020 09:54:13 |
 508 forum posts 98 photos | I have a set of metric taper reamers and at the time of buying them I wondered what the difference was between metric and imperial. Unless the angle of taper is different, I would have thought that a set of one type would in most cases do for both types. EG a quarter inch one would do for six mil taper, just go steady and not go too far in with the reamer. |
| mgnbuk | 10/05/2020 10:02:59 |
| 1394 forum posts 103 photos | Unless the angle of taper is different, It is. 1:48 for Imperial and 1:50 for Metric. We used the taper drills before reaming when installing taper pins at my last employment - as well as having the overall taper they also have notches in the flute edges to break up the chips. They required regular removal from the hole to clear the build-up of chips. Nigel B. |
| magpie | 10/05/2020 10:07:20 |
508 forum posts 98 photos |
|
| not done it yet | 10/05/2020 10:07:53 |
| 7517 forum posts 20 photos |
4% difference in taper. 1:48 for imperial and 1:50 for metric. Mine was a permanent fixture, so not only made flush but staked as well (shrink fitted, fitted pins, loctited and staked🙂 ). It will never come apart, hopefully. I do like the ‘belt and braces’ approach if possible.🙂 |
| Chris V | 10/05/2020 10:19:30 |
313 forum posts 42 photos | Brilliant, many thanks to all, I recon I know about 90% more on the subject now from reading this thread compared with last night! Blimey those taper pin drill bits are pricey! Still when time is money they would make sense. Don't suppose I need to worry about the difference in taper between metric & imperial, but will certainly aim to obtain one or the other. I saw some taper pins on eBay described as clock makers tapered pins, they looked to be good value compared with elsewhere, anyone know if these are different to regular tapered pins? Or put another way, where do others buy their pins?? Chris. |
| geoff walker 1 | 10/05/2020 13:59:25 |
| 521 forum posts 217 photos | HI Chris, You have some good advice here, not a lot I can add. I bought my taper reamers from Tracy tools, good company, never bought anything from them that I have been unhappy with. I made some twenty tooth drummond gears many years ago. Drilled the pin holes the same size as smallest diameter and then reamed by hand for the pin. Very easy in cast iron. From your first post in this thread you say you "admire" the taper pin method of securing the topslide handle on your M type. WHY? Do you plan to remove the pin for any reason. If you are, good luck, they can be right b******* to get out. If and when the handle is off the machine do fit a topsllde index dial before replacing it, not difficult to make one, more details on request. Geoff |
| Chris V | 10/05/2020 14:33:20 |
313 forum posts 42 photos | Hi Geoff, Yes Tracy tools & GLR I have found to be excellent. In answer to why I admire the taper pin method, it is the same as why I now have the M, I love the look and build quality of old machinery. I asked a chap on Instagram whose work I greatly admire about how he fixes his turned handles to their threaded stems, his reply was just screw it in tight, or use super glue if you like. Well yes that would work and be FAR simpler than a taper pin, but wheres the satisfaction in that!? I'd rather learn a little of the old ways I admire than lots of quick fixes. That said I have no engineering training so as and when I have a go at taper pins and possibly mess up...who knows super glue may look more attractive! (-: No plans to remove anything on my lathe right now, once I gather bits for the counter shaft it seems a better idea to see if it all works ok! Chris. |
| Howard Lewis | 10/05/2020 14:53:31 |
| 7227 forum posts 21 photos | Sometimes handles were screwed onto the end of a Leadscrew, so that backlash between the handle and the slide could be taken up by adjusting the position of the handle. If memory serves correctly after so many years, this was the case on the ML7 Cross Slide. Howard |
| Chris V | 10/05/2020 15:10:24 |
313 forum posts 42 photos |
Thanks Howard, is that what the pair of locknuts are for on mine? Cheers Chris. |

Please login to post a reply.
Magazine Locator
Want the latest issue of Model Engineer or Model Engineers' Workshop? Use our magazine locator links to find your nearest stockist!
Sign up to our Newsletter
Sign up to our newsletter and get a free digital issue.
You can unsubscribe at anytime. View our privacy policy at www.mortons.co.uk/privacy
Latest Forum Posts
- *Oct 2023: FORUM MIGRATION TIMELINE*
05/10/2023 07:57:11 - Making ER11 collet chuck
05/10/2023 07:56:24 - What did you do today? 2023
05/10/2023 07:25:01 - Orrery
05/10/2023 06:00:41 - Wera hand-tools
05/10/2023 05:47:07 - New member
05/10/2023 04:40:11 - Problems with external pot on at1 vfd
05/10/2023 00:06:32 - Drain plug
04/10/2023 23:36:17 - digi phase converter for 10 machines.....
04/10/2023 23:13:48 - Winter Storage Of Locomotives
04/10/2023 21:02:11 - More Latest Posts...
- View All Topics
Support Our Partners


Shopping Partners
Subscription Offer

Latest "For Sale" Ads
- Reeves** - Rebuilt Royal Scot by Martin Evans
by John Broughton
£300.00 - BRITANNIA 5" GAUGE James Perrier
by Jon Seabright 1
£2,500.00 - Drill Grinder - for restoration
by Nigel Graham 2
£0.00 - WARCO WM18 MILLING MACHINE
by Alex Chudley
£1,200.00 - MYFORD SUPER 7 LATHE
by Alex Chudley
£2,000.00 - More "For Sale" Ads...
Latest "Wanted" Ads
- D1-3 backplate
by Michael Horley
Price Not Specified - fixed steady for a Colchester bantam mark1 800
by George Jervis
Price Not Specified - lbsc pansy
by JACK SIDEBOTHAM
Price Not Specified - Pratt Burnerd multifit chuck key.
by Tim Riome
Price Not Specified - BANDSAW BLADE WELDER
by HUGH
Price Not Specified - More "Wanted" Ads...
Get In Touch!
Do you want to contact the Model Engineer and Model Engineers' Workshop team?
You can contact us by phone, mail or email about the magazines including becoming a contributor, submitting reader's letters or making queries about articles. You can also get in touch about this website, advertising or other general issues.
Click THIS LINK for full contact details.
For subscription issues please see THIS LINK.
Digital Back Issues


Donate

 Register
 Log-in
Model Engineer Magazine
- Percival Marshall
- M.E. History
- LittleLEC
- M.E. Clock

ME Workshop
- An Adcock
- & Shipley
- Horizontal
- Mill

Subscribe Now
- Great savings
- Delivered to your door

Pre-order your copy!
- Delivered to your doorstep!
- Free UK delivery!
All Forum Topics > General Questions > Taper Pins