Forum sponsored by:

Clarkson autolock help
| Steviegtr | 28/04/2020 22:53:15 |
 2668 forum posts 352 photos | When I bought the mill it came with a Clarkson Autolock collet type S chuck. I did nothing with it because it only came with 2 collets that were not the size I needed. I have been using a ER25 collet chuck up to press with reasonable success. I now have the correct collets for the Clarkson & cutters to suit. Just setting up for tomorrow's task & fitted the Clarkson to the mill. On using the supplied spanner to tighten & a suitable round bar in the neck of it, the neck unscrewed. It turned all the way up to the MT2 taper flange. Is this correct as it does seem logical that being like this it gives support to the MT2 taper on the end or nose of it. Just not sure this is how it goes having never used one. Any info appreciated. Steve. |
| IanT | 28/04/2020 23:01:24 |
| 2147 forum posts 222 photos | Steve, I'm not sure from your description exactly what's happened - but my Clarkson has a threaded nut that holds the collet in - plus it has a screwed outer sleeve that enables the chuck's MT2 taper shank to be withdrawn from the machine easily. Is it this sleeve that you are referring too perhaps? Regards, IanT |
| Steviegtr | 28/04/2020 23:09:28 |
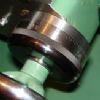
2668 forum posts 352 photos | Yes sorry I was not sure if I wrote it correctly. I have a picture. Basically I fitted the chuck, inserted & tightened the draw bar. Then I fitted a 11/16" cutter to the collet, then screwed the collet in to the main body. The chuck came with a big cast spanner which I tightened the collet in with. But there was no way of stopping the whole thing rotating. I saw it had a collar above the chuck with 4 holes around it. Found a bar that fitted & continued to tighten the collet. But noticed the collar was screwing upwards towards the taper. When it was up to the taper it snugged up against it leaving no gap that my ER25 one does. Picture. Steve.
|
| JohnF | 28/04/2020 23:26:20 |
 1243 forum posts 202 photos | Steve the chuck you have is made for use on light machines and has a spacial feature - the screw collar at the top of the chuck. To use insert into your spindle with the collar clear of the spindle nose, tighten the draw bolt on the top of the machine spindle then screw the collar up to the meekest the spindle nose and nip it up. Insert the correct collet for the cutter and screw the locking nut up by hand then insert the cutter and screw it to meet the location point inside the chuck, then back off the losing nut 1/8 of a turn and screw the cutter to meet the point again, now lock the chuck with the spanner. You can of course screw the cutter into the collet first BUT make sure it is not far enough in to meet the location point. Personally i never do this. I think i have an instruction leaflet in my workshop for this chuck - will look tomorrow John Edited By JohnF on 28/04/2020 23:27:52 Edited By JohnF on 28/04/2020 23:28:49 |
| not done it yet | 28/04/2020 23:40:27 |
| 7517 forum posts 20 photos | John’s instruction might initially seem a bit of a faff, but as the collets are each for one specific size of cutter, you would generally only change the cutter position in the collet when setting it up first time. |
| Dennis R | 28/04/2020 23:55:11 |
| 76 forum posts 16 photos | Go to this site for instructions on Clarkson Autolock chucks. Dennis |
| Steviegtr | 29/04/2020 00:04:20 |
2668 forum posts 352 photos | Thanks guys. I had been told how to insert the cutters by a friend who has a large milling machine. It was that loose collar that had me worried. I now understand when I think it may have been SOD who said they give a MT2 more support. So I will use this now whenever I can. Thanks again. Steve. |
| Steamer1915 | 29/04/2020 09:51:52 |
 171 forum posts 42 photos | I'm sure we have been here before but you should not back off the nut (not even an eighth of a turn) before screwing the cutter home against the centre point. There must not be a gap between the nut and the body. The cutter will self tighten depending on how high the cutting forces. The cutter will not screw into the body any further when it does this. All that happens is that when the cutter turns, it forces the collet downwards into the taper of the nut and this in turn increases the grip on the cutter. If you have a gap between the nut and the main body, you will most likely (especially on the 6mm or 1/4" shanks) break out the centre in the end of the cutter when the nut is tightened. (dons tin helmet) Steve. |
| Andrew Johnston | 29/04/2020 10:19:52 |
 7061 forum posts 719 photos | Posted by Steamer1915 on 29/04/2020 09:51:52:
If you have a gap between the nut and the main body, you will most likely (especially on the 6mm or 1/4" shanks) break out the centre in the end of the cutter when the nut is tightened. Been there, done that and broken the centre end on a 1/4" cutter. I'd also agree that there should be no gap between the nut and body. Instructions here:
Andrew |
| Nigel McBurney 1 | 29/04/2020 10:20:26 |
 1101 forum posts 3 photos | I was taught (late 1950s) to fit the collet ,screw on the nut,fully home then back off part of a turn then insert the cutter,just tighten the nut by hand , still leaving a gap ,the spanner was only used to remove the nut never to tighten it ,everyone in our shop used this method with no problems or broken threaded ends of cutter,collets in those days collets had two raised driving pegs |
| IanT | 29/04/2020 11:01:48 |
| 2147 forum posts 222 photos | Posted by Nigel McBurney 1 on 29/04/2020 10:20:26:
I was taught (late 1950s) to fit the collet ,screw on the nut,fully home then back off part of a turn then insert the cutter,just tighten the nut by hand , still leaving a gap ,the spanner was only used to remove the nut never to tighten it ,everyone in our shop used this method with no problems or broken threaded ends of cutter,collets in those days collets had two raised driving pegs I was shown the same way many years ago Nigel - but was taught to have the smallest 'gap' possible (just an easing back) - I still do it that way but clearly it's not what Clarkson recommend... Regards, IanT |
| Steviegtr | 29/04/2020 11:25:00 |
2668 forum posts 352 photos | Thank again for all the answers given. It seems the collar is unique for MT2 for stability. The only variation in comments is the technique for fitting the cutters. Some say leave a gap, some say snugged up to no gap. The link shows it been snugged up completely to it's shoulder. It then explains how the bit if it rotates will self tighten if needed. The only downside I can see then is if you have set up to a accurate depth of cut & then the cutter tightens some more. You would then have the wrong depth of cut. Not a problem for me with the bits I have been doing so far. Does this mean if you were to do some exact work, 1st do a test pass on some scrap metal to ensure the bit is fully home. Edit, having read those instructions again it only says that if the cutter tries to rotate is will just tighten the chuck more. The cutter cannot go up because it is already located in its pin. Steve. Edited By Steviegtr on 29/04/2020 11:28:19 |
| JohnF | 29/04/2020 12:30:45 |
1243 forum posts 202 photos | Steamer & Andrew are absolutely correct according to Clarkson but as Nigel & IanT say I too was taught the same way and never had a problem. Another member messaged me and I replied thus below :--- I have made an album of the Clarkson instructions all in jpg format so you can read it there. It does in fact say as you do in 1. to just screw the cutter up to the location "point" in the chuck and tighten the lock nut -- no backing off ! However when and apprentice back in the early '60's we were advised to back off a very small amount so can only assume it was practical experience that was passed on -- always did it, still do and its never caused me a problem ! The principle of the Clarkson system is that the cutter is self tightening during use and it cannot be driven into or pulled out of the chuck by cutting forces it works extremely well. John |
| old mart | 29/04/2020 12:51:56 |
| 4655 forum posts 304 photos | See the ninth post in the current thread " getting a milling machine ready for use". |
| Lathejack | 29/04/2020 15:43:44 |
| 339 forum posts 337 photos | I was also told to back off the the nose piece on an Autolock chuck when I started work almost 40 years ago, but it is certainly not the correct method and is unnecessary and not what the designer and manufacturer intended, and I never do it. The nose piece with its collet should be screwed and nipped up fully up to the shoulder and left there. Then the cutters are screwed fully in until they tighten up, the collets will fully lock automatically when cutting, hence the name Autolock. The shoulder is also a register to square up the nose piece, and the radial register will centralise it to ensure that cutters run true. Posiloc milling chucks work on the same principle, but the nose piece is located by a taper at the bottom as well as a radial register. So when the nose piece on these is fully screwed up there is always a large gap below the unused shoulder. I think the upper threaded collar on Steve's Morse taper Autolock chuck can also be used to eject the chuck by screwing it up against the spindle after the draw bar is released.
Edited By Lathejack on 29/04/2020 15:44:43 Edited By Lathejack on 29/04/2020 15:46:46 |
| IanT | 29/04/2020 15:54:00 |
| 2147 forum posts 222 photos | Posted by Lathejack on 29/04/2020 15:43:44:
I think the upper threaded collar on Steve's Morse taper Autolock chuck can also be used to eject the chuck by screwing it up against the spindle after the draw bar is released. That's certainly what I use it for. IanT |
| Mike Poole | 29/04/2020 16:09:19 |
 3676 forum posts 82 photos | I was taught the Clarkson way of no gap and wondered how the 6mm and 1/4” cutters managed to break the centre end of cutters. The correct method of assembling an Autolock has come up many times on here over the years and the gap method has its followers including JS if I remember correctly. The penny dropped that a large spanner could exert a centre splitting force on the cutter and the mystery was solved. The collet holder has two register faces to ensure concentricity and axial truth for the collet closing cone, I can envisage a tiny misalignment of the cone if the gap is not closed so the register does its job. I always use a rag to screw the cutter in as far as possible so the collet is closed and it is firmly located on the centre pin. I have had no issues with the cutter moving during machining and that is on proper mills rather than the lighter editions most of us use at home. I have an SKF Dormer version of the Autolock and this differs by using a taper rather than the double register so not tightening the collet holder first could result in poor location and the cutter not running true. Mike |
| Clive Foster | 29/04/2020 16:53:34 |
| 3630 forum posts 128 photos | My impression is that the Posiloc type with the inherent large gap are more likely to split the back end of a small cutter than a "proper" Clarkson. Mine will split the back of a 1/4" cutter pretty much every time if you don't snug the nose piece down first. Firm finger tight should be OK but I always give mine a light bump with the spanner after screwing the cutter in. Got a nice 4 for 2 Brucie bonus when Paul "I used to be a toolmaker" borrowed my Bridgeport and promptly killed the tail end of two cutters. He was taught to use the back off to a tiny gap method on the Clarkson. Most surprised when I showed him a print out of the instructions. Issue probably arises because folk tend to think the screw on nose is for tightening the collet. Which you'd expect if it were a conventional collet system. Think ER for example. I blame the Clarkson instructions which never make it really clear that the nose piece unscrews so you can get the collet out to change it making it a structural part that has to be kept properly done up. Clive |
| thaiguzzi | 29/04/2020 16:59:09 |
 704 forum posts 131 photos | Funny old world. I ALWAYS make sure there is a gap twixt body and nut, been using Autolocks since 1990 professionally on a Beaver and home use on a Tom Senior. |
| Martin Connelly | 29/04/2020 18:05:17 |
 2549 forum posts 235 photos | I expect closing the gap on the Clarkson design ensures the collet is in the correct position to be driven by the drive dogs. When the collet is first put in the chuck is it possible to trap it in the wrong place? Martin C |


Please login to post a reply.
Magazine Locator
Want the latest issue of Model Engineer or Model Engineers' Workshop? Use our magazine locator links to find your nearest stockist!
Sign up to our Newsletter
Sign up to our newsletter and get a free digital issue.
You can unsubscribe at anytime. View our privacy policy at www.mortons.co.uk/privacy
Latest Forum Posts
- *Oct 2023: FORUM MIGRATION TIMELINE*
05/10/2023 07:57:11 - Making ER11 collet chuck
05/10/2023 07:56:24 - What did you do today? 2023
05/10/2023 07:25:01 - Orrery
05/10/2023 06:00:41 - Wera hand-tools
05/10/2023 05:47:07 - New member
05/10/2023 04:40:11 - Problems with external pot on at1 vfd
05/10/2023 00:06:32 - Drain plug
04/10/2023 23:36:17 - digi phase converter for 10 machines.....
04/10/2023 23:13:48 - Winter Storage Of Locomotives
04/10/2023 21:02:11 - More Latest Posts...
- View All Topics
Support Our Partners


Shopping Partners
Subscription Offer

Latest "For Sale" Ads
- Reeves** - Rebuilt Royal Scot by Martin Evans
by John Broughton
£300.00 - BRITANNIA 5" GAUGE James Perrier
by Jon Seabright 1
£2,500.00 - Drill Grinder - for restoration
by Nigel Graham 2
£0.00 - WARCO WM18 MILLING MACHINE
by Alex Chudley
£1,200.00 - MYFORD SUPER 7 LATHE
by Alex Chudley
£2,000.00 - More "For Sale" Ads...
Latest "Wanted" Ads
- D1-3 backplate
by Michael Horley
Price Not Specified - fixed steady for a Colchester bantam mark1 800
by George Jervis
Price Not Specified - lbsc pansy
by JACK SIDEBOTHAM
Price Not Specified - Pratt Burnerd multifit chuck key.
by Tim Riome
Price Not Specified - BANDSAW BLADE WELDER
by HUGH
Price Not Specified - More "Wanted" Ads...
Get In Touch!
Do you want to contact the Model Engineer and Model Engineers' Workshop team?
You can contact us by phone, mail or email about the magazines including becoming a contributor, submitting reader's letters or making queries about articles. You can also get in touch about this website, advertising or other general issues.
Click THIS LINK for full contact details.
For subscription issues please see THIS LINK.
Digital Back Issues


Donate

 Register
 Log-in
Model Engineer Magazine
- Percival Marshall
- M.E. History
- LittleLEC
- M.E. Clock

ME Workshop
- An Adcock
- & Shipley
- Horizontal
- Mill

Subscribe Now
- Great savings
- Delivered to your door

Pre-order your copy!
- Delivered to your doorstep!
- Free UK delivery!
All Forum Topics > Help and Assistance! (Offered or Wanted) > Clarkson autolock help