Forum sponsored by:

Soldering a tender
| Phil H1 | 03/12/2019 21:09:01 |
| 467 forum posts 60 photos | I am trying to select the best tools and techniques to complete the brass body of a 'Betty' 3 1/2" gauge, locomotive tender. The sheet brass body sections have already been assembled in accordance with the instruction manual. Note that the manual and drawings show 1/4" x 1/4" brass angle attached to the inside of the body using 1/16" diameter snap head rivets. The rivets have their heads on the inside and countersinks on the outside plate. A large number of countersunk screws are used for the top plates and to hold the body to the sole plate. This means that the current tank work is already quite strong but will probably leak like a sieve. The manual goes on to suggest the use of a soldering iron rather than a torch to seal up the tank. It states that a torch will probably buckle the nice flat brass platework but my guess is that LBSC probably had an old traditional flame heated soldering iron in mind. So, this is quite tricky because the sections or angle and the rivets can not be tinned i.e., they are already fitted and I would prefer to have a go at solder rather than some kind of epoxy or petrol tank sealant. Anybody out there done this successfully with an iron and are there any good tips? Thanks Phil H |
| Buffer | 04/12/2019 08:45:36 |
| 430 forum posts 171 photos | Phil I have just finished soldering up my 5 inch tender. The best advice I can give is to clean all the joint areas, I use a blue garyflex block from cousins. The flux I use is fluxite in the green tin. I think the fumes from this might corrode machinery so keep the door open and maybe cover any machine etc. Get an old small brush so you can spread it easily along the joints and I don't think you can use too much. The most important thing I found after warping the sole plate with a gas torch was to use a lead based solder as it melts about 50 degrees lower than the non lead variety. You can buy it from rs components about 1.2mm diameter and about 250 gram roll. You will need a business account to buy it or find someone in a company to get it for you. The lower melting point makes a huge difference in the amount of heat required and the chances of warping. The second thing I did was use an electric hot air gun to pre warm the tender paying particular attention to the bit I was about to solder. Heating the inside of the corner and the outside. I found it made the heating from the soldering iron much quicker and easier and it also helped in making the solder flow nicely. I used a very large soldering iron of over 100 watt. Hopefully if you get the joints clean fluxed and hot enough you should have no problems. One last thing I did was prop the body at 45 degrees with the corner I am about to solder at the bottom and level. This way the solder doesn't all run down to the sole plate but stays on the angle along its length. hope this is all clear if not just ask and I will send pictures or explain more. Rich |
| John Baguley | 04/12/2019 09:09:25 |
 517 forum posts 57 photos | When I've soldered tanks etc. I've used one of the lower melting point solders from Carrs such as the 143ºC stuff. You can get them with a melting point down to 70ºC. They are available from Phoenix Paints amongst others. Not cheap though but you don't need a lot if the joints are close fitting. Some of the solders used to contain Cadmium which made them flow very easily but don't know if they still do? I've always used a needle flame torch for heating with no problems but you do have to be careful not to overheat the metal and distort it. Using a low melt solder definitely helps with that. John |
| Phil H1 | 04/12/2019 09:33:49 |
| 467 forum posts 60 photos | Rich/ John, Thanks very much for taking the time to answer and thanks for the tips. I notice that low temperature lead solder still seems to be available on-line. I'll have a go at ordering some and I'll also take a look at Phoenix. I like the heat gun tip to pre warm the metalwork. I would imagine that reduces the risk of distortion significantly and it might help the soldering iron? I will enlist a willing volunteer to use the heater whilst I use the iron. It will be a good training scheme for when I need two propane torches on the boiler. One of my main concerns was getting a soldering iron with sufficient power to do the job but I also notice that there are some 100W + irons available on-line. Pictures will follow. Thanks, Phil H |
| Simon Collier | 04/12/2019 10:41:49 |
 525 forum posts 65 photos | I did not have a happy time trying to solder up my tender kit. I used tin/ lead solder and Bakers fluid flux. I borrowed a 300 watt iron but did not have much joy with it and mostly used flame. I learned to clamp brass square bar to the plates to prevent warping upon heating. It leaked like a sieve and just days ago, I used petrol tank sealant to seal it. Thankfully this worked and completely sealed the tank. |
| Phil H1 | 04/12/2019 13:37:39 |
| 467 forum posts 60 photos | Simon, Thanks for that - I was thinking about asking people about their experience with the laser cut parts for some other future project. I do have a central heating, butane style torch that I could use but I would like to try the iron first. If an iron has worked on a 5" gauge tender - it will surely work on a 3 1/2" engine. Also, I can always fall back to the petrol tank sealant or I was thinking of the higher quality bathroom type silicon sealants if the soldering doesn't work. The current plate work strips down to the sides, top and sole plate - so there is a good chance I can thoroughly clean the parts before trying to solder them. Phil H |
| Buffer | 04/12/2019 14:26:01 |
| 430 forum posts 171 photos | Phil If you can get your joints apart I would tin them first. get them nice and shiny then flux solder and wipe the solder away when its still hot and runny. You will then have a nice thin solder coating on both sides of the joint. You want to wipe the excess off so your joints go back together nicely. You should get no distortion as long as the volunteer keeps the hot air moving and then just blasts the bit your doing as you do it. When youve done it I will show you a great tool for cleaning up the joints on the outside. Off topic a bit but I used oxy acetylene on my boiler after it had been pre heated with gas torches. Again this was no problem and works very well if you have the use of this kit. Rich
Edited By Richard brown 1 on 04/12/2019 14:32:30 |
| Phil H1 | 04/12/2019 15:16:42 |
| 467 forum posts 60 photos | Richard, I can separate the top from the sides and the soleplate from the sides but the brass angle is attached to the sides with 100+ 1/16" rivets. I might get them apart but it would make a hell of a mess. I'll take and post some pictures. The boiler..... I like the idea of oxy propane but I will try using two decent propane torches first. I've seen a thread on one of the other sites where a chap has very recently made a 5" gauge Britannia boiler with 2 propane torches. He had to resort to oxy propane for a couple of leaks. I think I will also see what my local club can offer when it comes to the boiler. Phil H |
| Buffer | 04/12/2019 16:01:21 |
| 430 forum posts 171 photos | Phil if you can get it off the sole plate thats great news as you should have no problem to get some emery or a garyflex along the entire length of the edge of the angle and the sides and get all the edges really cleaned up. Your then half way there. |
| RMA | 04/12/2019 16:01:48 |
| 332 forum posts 4 photos | Posted by Richard brown 1 on 04/12/2019 14:26:01:
When youve done it I will show you a great tool for cleaning up the joints on the outside.
Rich
Edited By Richard brown 1 on 04/12/2019 14:32:30 Would it be possible to post the details for all to see. Thanks |
| Brian Baker 1 | 04/12/2019 17:00:22 |
 229 forum posts 40 photos | Greetings Phil, would it not be worth using epoxy to make them water tight. I have done this several times & it works well. Just get the brass as clean as you can with say a small wire brush in a Dremel, and paint it on. the brass catalyses the reaction, and it needs to be kept warm. Avoid the rapid set epoxy, it's strength is lower than the long time set material Boat chandlers sell a suitable product. Regards Brian Baker
|
| Phil H1 | 04/12/2019 18:53:50 |
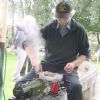
| 467 forum posts 60 photos | Folk, The pictures as promised. This is the tender as I received it. You can see that it is virtually complete (90% ish) but has a few minor issues such as the rust on the frames and the body of the tank work needs to be sealed - possibly with solder - hence this post. |
| Phil H1 | 04/12/2019 19:15:07 |
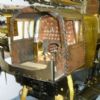
| 467 forum posts 60 photos | A few more pictures of the platework showing the internal riveted angles, the sole plate with a huge number of countersunk holes and the removable top section. The platework has been put together quite nicely in my opinion. It just needs a little bit of tidying. Note that any soldering will need to be done with care to prevent loss of the already soldered half round beading. I will experiment with the removable top to see how it goes. It might not be so clear from the pictures but the pump access hole surround is a little bit twisted. I know that I am being a bit pedantic because you can hardly notice the twist but I think trying to straighten it out will be a good starting exercise.
|
| Phil H1 | 04/12/2019 19:24:46 |
| 467 forum posts 60 photos | Brian, I assume the epoxy from the boat chandlers is a special brass product? I ask because I think I have seen other posts about the lack of adhesion between brass and various other products e.g., glues/ paint etc? As you will note from the pictures, the existing structure should be very strong with all the rivets and countersunk screws so I don't have a closed mind to clever products that will probably save time and energy. I guess I just like the idea of the metal solder option. Phil H |
| Buffer | 04/12/2019 21:05:43 |
| 430 forum posts 171 photos | Here is is the little tool i use to clean up after soldering. Its a little mini scraper made from a piece of 12mm wide x1.5mm thick carbide scraper blade silver soldered to a steel rod. A flat edge is put on it just like any other scraper with a diamond wheel and then run it along the joints. It works very well on flat and in corners. The solder comes off as easy as anything in nice little curls and as it's so small it leaves very clean corner joints. |
| Phil H1 | 06/12/2019 13:59:43 |
| 467 forum posts 60 photos | Richard, nice scraper. I might grind up an old screw driver or a piece of HSS to do the same job. Latest - if anybody is interested?.....; I decided to leave the access hole to the emergency pump alone. After cleaning with emery cloth etc, the existing soldered joint is quite nice so I levelled the top of the hole surround with a file and polished the plate. It now looks quite nice. I did try some lead solder (180 degC stuff) on the front plate of the tender tank using a DIY, central heating type flame torch on a small flame. The good news is that my technique to clean the rivet heads and angle using emery and a Dremel went well because the solder formed nice fillets. The bad news is that even with very careful heating, the plate did distort significantly. Luckily, this particular plate is only about 61/2" wide X 3" and it was quite easy to straighten it back out using wood and a few taps from a mallet. So, for my next trial, I will ditch the small torch, buy some lower temperature solder and a big soldering iron and try again. I was lucky with the front plate. If I distort the tender sides, I doubt if I will be able to retrieve them. Phil H |
| Stuart Smith 5 | 06/12/2019 15:57:32 |
| 349 forum posts 61 photos | Phil have you tried a mini blowtorch like this one: Mini blowtorch I don't know if it would work, but I used one to solder the brass body for my 16mm scale loco. Obviously a lot smaller, but it might be ok for what you want to do. Stuart |
| Phil H1 | 06/12/2019 22:24:25 |
| 467 forum posts 60 photos | Stuart, i have considered a micro torch but going back to previous posts, Richard has recently built a 5" gauge tender using a hot air gun and a soldering iron - so I will have a got at that method first. I do like the look of the micro torch though. Phil H |
| Buffer | 07/12/2019 07:36:36 |
| 430 forum posts 171 photos | Phil I used a dremel micro torch and I have distorted sheet with that. I think they just have too much heat concentrated on two small an area. I am sure the trick to avoid warping is to get the whole lot upto a decent temperature. One guy in our club even put his in the kitchen oven to get it all warmed up evenly and it worked. Regards Rich |
| Brian Baker 1 | 07/12/2019 08:09:14 |
229 forum posts 40 photos | Greetings Phil, no, the epoxy is mostly used for repairs to wooden & GRP boats, and chandlers are the easiest places to find it. I have never tried Araldite for the job, but I am sure the normal stuff will work OK, except you will need a few tubes. I have used it on several tanks, but you need to clean & rough up the surface first, I used medium emery paper, dead smooth makes it harder for the epoxy to stick. I think I have seen a grade of epoxy especially for metal, but the material I use comes straight from my boat repair stock. If you fancy solder, then do it, and when it starts to leak, after a while, use the epoxy to seal it, that's how I started using it on an A3 tender. regards Brian |


Please login to post a reply.
Magazine Locator
Want the latest issue of Model Engineer or Model Engineers' Workshop? Use our magazine locator links to find your nearest stockist!
Sign up to our Newsletter
Sign up to our newsletter and get a free digital issue.
You can unsubscribe at anytime. View our privacy policy at www.mortons.co.uk/privacy
Latest Forum Posts
- *Oct 2023: FORUM MIGRATION TIMELINE*
05/10/2023 07:57:11 - Making ER11 collet chuck
05/10/2023 07:56:24 - What did you do today? 2023
05/10/2023 07:25:01 - Orrery
05/10/2023 06:00:41 - Wera hand-tools
05/10/2023 05:47:07 - New member
05/10/2023 04:40:11 - Problems with external pot on at1 vfd
05/10/2023 00:06:32 - Drain plug
04/10/2023 23:36:17 - digi phase converter for 10 machines.....
04/10/2023 23:13:48 - Winter Storage Of Locomotives
04/10/2023 21:02:11 - More Latest Posts...
- View All Topics
Support Our Partners


Shopping Partners
Subscription Offer

Latest "For Sale" Ads
- Reeves** - Rebuilt Royal Scot by Martin Evans
by John Broughton
£300.00 - BRITANNIA 5" GAUGE James Perrier
by Jon Seabright 1
£2,500.00 - Drill Grinder - for restoration
by Nigel Graham 2
£0.00 - WARCO WM18 MILLING MACHINE
by Alex Chudley
£1,200.00 - MYFORD SUPER 7 LATHE
by Alex Chudley
£2,000.00 - More "For Sale" Ads...
Latest "Wanted" Ads
- D1-3 backplate
by Michael Horley
Price Not Specified - fixed steady for a Colchester bantam mark1 800
by George Jervis
Price Not Specified - lbsc pansy
by JACK SIDEBOTHAM
Price Not Specified - Pratt Burnerd multifit chuck key.
by Tim Riome
Price Not Specified - BANDSAW BLADE WELDER
by HUGH
Price Not Specified - More "Wanted" Ads...
Get In Touch!
Do you want to contact the Model Engineer and Model Engineers' Workshop team?
You can contact us by phone, mail or email about the magazines including becoming a contributor, submitting reader's letters or making queries about articles. You can also get in touch about this website, advertising or other general issues.
Click THIS LINK for full contact details.
For subscription issues please see THIS LINK.
Digital Back Issues


Donate

 Register
 Log-in
Model Engineer Magazine
- Percival Marshall
- M.E. History
- LittleLEC
- M.E. Clock

ME Workshop
- An Adcock
- & Shipley
- Horizontal
- Mill

Subscribe Now
- Great savings
- Delivered to your door

Pre-order your copy!
- Delivered to your doorstep!
- Free UK delivery!
All Forum Topics > Beginners questions > Soldering a tender