Forum sponsored by:

V-Twin 100cc Design & Build
| Craig Booth 1 | 09/07/2019 22:11:10 |
| 84 forum posts 165 photos | Hi all, and so on to my next project. This is going to be a big challenge but have always wanted to design my own engine, so have made a start using some spare time this summer holiday. The engine type and size is based around a new RC plane I am also designing. The engine specs so far are: Type: V-Twin gas Capacity: 100cc (2 x 50cc) Stroke: 3.9cm Bore: 4.0cm Compression Ratio: 8.5 Ignition: Spark My starting point was to draw the basic geometry in Autocad to check the key dimensions. Hopefully the time spent on this will reduce the problems I have later.
|
| Emgee | 09/07/2019 22:19:50 |
| 2610 forum posts 312 photos | Did you consider less than 90 deg Vee to keep width less ? Emgee
|
| Craig Booth 1 | 09/07/2019 22:21:06 |
| 84 forum posts 165 photos | next step was to draw everything in Autodesk Inventor. I am learner to this software but it is proving relatively easy to use and extremely useful in checking clearances, parts fit, and also checking the moving parts. Each part right down to the bolts are drawn as individual components and then "assembled" using physical contraints. Any subsequent changes to the components is automatically reflected in the assembled model. A big plus also is the it is extremely easy to output working drawings (and again these automatically update if any changes are made in the model). Below is rendered version from the assembled model, plus a series of screen grabs.
|
| Craig Booth 1 | 09/07/2019 22:24:34 |
| 84 forum posts 165 photos | Posted by Emgee on 09/07/2019 22:19:50:
Did you consider less than 90 deg Vee to keep width less ? Emgee
Hi Emgee, yes I did, but was struggling to get the cam shaft housing to work, plus the 90deg actually works well with the plane I am designing. The cylinder heads will intentionally project out of the cowling as I want them on show to suit the style of plane. (I will try to get a drawing of the plane uploaded soon) |
| Tim Stevens | 09/07/2019 23:09:27 |
 1779 forum posts 1 photos | Might the valve guides be on the short side? - resulting in valves not seating firmly, perhaps. Regards, Tim |
| Hopper | 10/07/2019 01:27:46 |
 7881 forum posts 397 photos | Big advantage of a 90 degree V-twin is perfect primary balance. Start closing the V up and they start vibrating. Vis: 90-deg Ducati motorbikes vs 45-deg Harley-Davidson. Looks like a nice engine in the drawings there. Should look pretty cool in the plane with those exposed rocker arms sticking out in the breeze on full view. Edited By Hopper on 10/07/2019 01:31:12 |
| Craig Booth 1 | 10/07/2019 07:46:08 |
| 84 forum posts 165 photos | Posted by Tim Stevens on 09/07/2019 23:09:27:
Might the valve guides be on the short side? - resulting in valves not seating firmly, perhaps. Regards, Tim Hi Tim, thanks for the comments. I've shown a closer cut away below. The valve guide in contact with the valve is 13mm in relation to a 4mm diameter valve. The sleeve (colphos) also passes through the rocker arm bracket (aluminium), but the valve does no come into contact with it. Let me know what you think. In my head 13mm feels about right to keep the valve aligned, but I don't have any reference to go by so happy to listen to experience. While we are on valves, I am going to use a split collet/collar to retain the spring. My last engine used a circlip which makes me nervous about failing. Cheers Craig
|
| Craig Booth 1 | 10/07/2019 07:56:47 |
| 84 forum posts 165 photos | a few more details: Main body and head: Aluminium HE30 Piston and conrod: Aluminium HE15 Piston Sleeve: Cast Iron Piston Rings: Cast Iron Crank: EN16 Crank support: roller bearings: nose/main/rear Conrod: needle bearings big end/colphos bushing small end Valves: Stainless The camshaft will be mounted within the main crankshaft body on needle bearings, driven by a toothed belt and pulleys at the rear. This is the main area I am still working on in terms of how I achieve the connection to the crankshaft. Cheers Craig |
| Niels Abildgaard | 10/07/2019 08:29:57 |
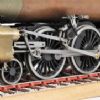
| 470 forum posts 177 photos | I think You need to reserve more space in crankcase for crank,counterweigth and conrod big-ends. The crank shown from a leaf-blower engine balances all rotating and half reciprocatory forces. To achive primary perfect massbalance i a 90 degree V-twin You shall balance all rotary and one reciprocatory totaly. This means that Your crank will be two times as voluminous relative to piston as shown on picture.
Edited By Niels Abildgaard on 10/07/2019 08:30:57 |
| Emgee | 10/07/2019 10:01:57 |
| 2610 forum posts 312 photos | Niels Isn't the greater weight of the counter balance shown in your pic a result of the heavy fan unit, on the model engine it will only be a much lighter prop driver. Craig. You could extend the valve guides into the port if further guide length is needed. Emgee |
| Niels Abildgaard | 10/07/2019 10:47:58 |
| 470 forum posts 177 photos | Posted by Emgee on 10/07/2019 10:01:57:
Niels Isn't the greater weight of the counter balance shown in your pic a result of the heavy fan unit, on the model engine it will only be a much lighter prop driver.
Emgee Nope. The fan unit/flywheel with ignition magnets etc balances very nicely on the rotation centerline. |
| John MC | 10/07/2019 11:41:51 |
 464 forum posts 72 photos | Posted by Craig Booth 1 on 09/07/2019 22:21:06:
You need to sort out the crankshaft bearing arrangement, I assume they are ball races. John |
| Dave Halford | 10/07/2019 11:43:50 |
| 2536 forum posts 24 photos | Posted by Emgee on 10/07/2019 10:01:57:
Niels Isn't the greater weight of the counter balance shown in your pic a result of the heavy fan unit, on the model engine it will only be a much lighter prop driver. Emgee prop driver plus prop. I still think the valve guide is not supported firmly enough in the head. The spring plate, being separate will have to be a clearance fit would it not? That gives approx. 3mm of guide supported by the head, I would have thought that there would be a high chance of a crack forming at the base given the rotary movement of the rocker 'working' the top of the stem sideways over time.
But then I could be wrong |
| Craig Booth 1 | 10/07/2019 11:53:57 |
| 84 forum posts 165 photos | Posted by John MC on 10/07/2019 11:41:51:
Posted by Craig Booth 1 on 09/07/2019 22:21:06:
You need to sort out the crankshaft bearing arrangement, I assume they are ball races. John Hi John, can you please expand more on the crankshaft arrangement. Yes, they are deep groove ball bearings. Main bearing open, nose bearing sealed only one side, what is not shown yet is the rear bearing and second crank web. cheers Craig |
| Craig Booth 1 | 10/07/2019 11:56:26 |
| 84 forum posts 165 photos | Posted by Dave Halford on 10/07/2019 11:43:50:
Posted by Emgee on 10/07/2019 10:01:57:
Niels Isn't the greater weight of the counter balance shown in your pic a result of the heavy fan unit, on the model engine it will only be a much lighter prop driver. Emgee prop driver plus prop. I still think the valve guide is not supported firmly enough in the head. The spring plate, being separate will have to be a clearance fit would it not? That gives approx. 3mm of guide supported by the head, I would have thought that there would be a high chance of a crack forming at the base given the rotary movement of the rocker 'working' the top of the stem sideways over time.
But then I could be wrong Hi Emgee, yes I see your point, will look to address this. thanks
|
| Steve King 5 | 10/07/2019 11:57:13 |
| 86 forum posts 95 photos | Really looking forward to seeing this engine buid progress. Good luck and keep us all posted. |
| Tim Stevens | 10/07/2019 12:31:56 |
1779 forum posts 1 photos | My concern about valve guides is only partly to do with strength - and others have commented on that aspect. The other part of the problem relates to heat transfer. The exposed exhaust valve stem takes in heat from the exhaust gas, and the part in contact with the guide loses heat into the cylinder head. In your design there is too much exposed and not enough in contact. Another heat concern is the cooling of that area of head, which is exposed to a large area of exhaust port, and has no fins. You might think that modern engines don't seem to need fins here, but they are drenched in oil, which carries the heat away. Your system relies on no fins and next to no oil ... It may also be a problem with the whole exhaust port as a separate insert of bronze. This adds an extra joint where heat must be conducted, and this relies on real firm contact at all times. The port will heat up faster than the surrounding metal (although its coeff of expansion is going to be similar), so even if everything is tight on manufacture, the joint will soon cease to fit firmly everywhere. If you are reconsidering this area, I would suggest that the sides of the port are directly in the head aluminium, with a lid comprising the guide and a flange, in bronze. If the flange extended as a fin, that would be an advantage. But then, what do I know? Tim Stevens Edited By Tim Stevens on 10/07/2019 12:32:49 |
| JasonB | 10/07/2019 13:18:24 |
 25215 forum posts 3105 photos 1 articles | looks quite a similar setup to Malcom Stride's Bobcat/Jaguar designs and the Ocelot and Puma derivatives which seem to run OK with no fins whatsoever in the head and with inset valve cages. Though as you have a slightly larger engine may as well put some fins in as it woun't be too fiddly to do.
|
| John MC | 10/07/2019 15:24:32 |
464 forum posts 72 photos | Craig, the bearings need to be constrained correctly. Its a rotating shaft so the inner races need to be clamped to the shaft. As drawn, when the engine gets hot axial load from the expansion of the bearing housing (al/alloy?) will put extra power absorbing axial load on the bearings One of the outer races needs to be fully constrained so an interference fit in it's housing and one side against an abutment in the housing and, in this application, a circlip (space/weight considerations) for the other side, that is to say the bearing cannot move axially and therefore provides the axial location for the crankshaft. The other outer race needs to be able to move so a transition fit in it's housing but not against any abutment. This is so the bearing can move (a very small amount) as the engine gets hot. This will stop the bearings taking unnecessary axial loads. The SKF catalogue has all the information on tolerances. You could consider a fully constrained ball race for axial location at the drive (propellor) end of the crank, that would locate the shaft and a drawn cup needle roller (hard steel sleeve pressed on to shaft) at the other end, absolutely no risk of excess axial loading. I see the incorrect mounting of rolling element bearings in the model engineering world all too often, has there never been an article in ME to show the right way? John |
| Jon Lawes | 10/07/2019 15:37:01 |
 1078 forum posts | Posted by John MC on 10/07/2019 15:24:32:
I see the incorrect mounting of rolling element bearings in the model engineering world all too often, has there never been an article in ME to show the right way? John That's a great idea, I'm sure they would be very grateful. |


Please login to post a reply.
Magazine Locator
Want the latest issue of Model Engineer or Model Engineers' Workshop? Use our magazine locator links to find your nearest stockist!
Sign up to our Newsletter
Sign up to our newsletter and get a free digital issue.
You can unsubscribe at anytime. View our privacy policy at www.mortons.co.uk/privacy
Latest Forum Posts
- hemingway ball turner
04/07/2025 14:40:26 - *Oct 2023: FORUM MIGRATION TIMELINE*
05/10/2023 07:57:11 - Making ER11 collet chuck
05/10/2023 07:56:24 - What did you do today? 2023
05/10/2023 07:25:01 - Orrery
05/10/2023 06:00:41 - Wera hand-tools
05/10/2023 05:47:07 - New member
05/10/2023 04:40:11 - Problems with external pot on at1 vfd
05/10/2023 00:06:32 - Drain plug
04/10/2023 23:36:17 - digi phase converter for 10 machines.....
04/10/2023 23:13:48 - More Latest Posts...
- View All Topics
Support Our Partners


Shopping Partners
Subscription Offer

Latest "For Sale" Ads
- Reeves** - Rebuilt Royal Scot by Martin Evans
by John Broughton
£300.00 - BRITANNIA 5" GAUGE James Perrier
by Jon Seabright 1
£2,500.00 - Drill Grinder - for restoration
by Nigel Graham 2
£0.00 - WARCO WM18 MILLING MACHINE
by Alex Chudley
£1,200.00 - MYFORD SUPER 7 LATHE
by Alex Chudley
£2,000.00 - More "For Sale" Ads...
Latest "Wanted" Ads
- D1-3 backplate
by Michael Horley
Price Not Specified - fixed steady for a Colchester bantam mark1 800
by George Jervis
Price Not Specified - lbsc pansy
by JACK SIDEBOTHAM
Price Not Specified - Pratt Burnerd multifit chuck key.
by Tim Riome
Price Not Specified - BANDSAW BLADE WELDER
by HUGH
Price Not Specified - More "Wanted" Ads...
Get In Touch!
Do you want to contact the Model Engineer and Model Engineers' Workshop team?
You can contact us by phone, mail or email about the magazines including becoming a contributor, submitting reader's letters or making queries about articles. You can also get in touch about this website, advertising or other general issues.
Click THIS LINK for full contact details.
For subscription issues please see THIS LINK.
Digital Back Issues


Donate

 Register
 Log-in
Model Engineer Magazine
- Percival Marshall
- M.E. History
- LittleLEC
- M.E. Clock

ME Workshop
- An Adcock
- & Shipley
- Horizontal
- Mill

Subscribe Now
- Great savings
- Delivered to your door

Pre-order your copy!
- Delivered to your doorstep!
- Free UK delivery!
All Forum Topics > Work In Progress and completed items > V-Twin 100cc Design & Build