Forum sponsored by:

Baldwin Gas Mechanical Cab Started
| Steve Addy | 22/03/2017 21:40:48 |
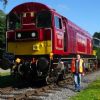
 158 forum posts 107 photos 1 articles | Having cut the cab upright angles to length on the horizontal miller, similarly cutting mitres for the bits at the back of the cab, I then welded the cab roof arch angles together from laser cut parts. The two upright/arches have been welded together. It seemed like a good idea to pop the bits on the loco with a few clamps. Thankfully it seems to fit OK so far. It is very strange to be looking up at it though, it suddenly looks a lot larger. The bits sticking through the cab window are the lengths of beading for the cab.
|
| OldMetaller | 23/03/2017 08:24:38 |
 208 forum posts 25 photos | That's looking great Steve! Please keep posting, I'm inspired to resume one of my loco projects now! Regards, John. |
| Steve Addy | 23/03/2017 20:59:36 |
158 forum posts 107 photos 1 articles | Hi John, I'll keep at it! What are you building? It is difficult to motivate yourself sometimes. I have been scratching my head with this as I drew the cab and sand tank parts over a year ago. Been working on the lamps, fuel tank and other cast bits, but they're done and I need to build the cab. Steve |
| OldMetaller | 24/03/2017 07:06:30 |
208 forum posts 25 photos | Hi Steve, I've got a 3 & 1/2" gauge Tich on the go, also no less than three 16mm scale steam locos and one diesel. One day I'll learn the discipline needed to actually finish something! Regards, John. |
| Steve Addy | 30/03/2017 13:23:47 |
158 forum posts 107 photos 1 articles | Cheers John! All the best! Steve
|
| Steve Addy | 22/07/2017 21:17:22 |
158 forum posts 107 photos 1 articles | A bit more progress on the cab, this is the beading bending jig for the cab front window openings. I made some buttons which are bolted to a 6mm plate, then the 6mm half round was warmed in the right place with the oxy/acetylene gear and the beading bent round the button using hand force and another piece of plate. They were then silver soldered together at the ends and have now been drilled using a slotted steel jig for the rivet holes.
Edited By Steve Addy on 22/07/2017 21:17:50 |
| Steve Addy | 24/07/2017 16:07:42 |
158 forum posts 107 photos 1 articles | Since the last posting I have made a further jig to locate and drill the holes in the curved corners of the window beadings. This afternoon I have done a bit more drawing of the cab parts.
|
| Steve Addy | 20/11/2017 23:59:44 |
158 forum posts 107 photos 1 articles | A bit more progress has been made adding the beading to the cab parts. I have riveted them onto slow epoxy in the hope that it will exclude water and thus corrosion.
|
| Steve Addy | 21/11/2017 00:02:43 |
158 forum posts 107 photos 1 articles | Rivet heads inside the cab windows, drilling a cab back for the beading rivets and countersunk rivets suitably bashed.
Edited By Steve Addy on 21/11/2017 00:11:23 |
| Steve Addy | 21/11/2017 00:06:34 |
158 forum posts 107 photos 1 articles | Cab back handle detail, cab back outside beading, cab upper angle frame fastened with Cleco clamps and riveted up and put on the chassis.
Edited By Steve Addy on 21/11/2017 00:13:51 |
| Steve Addy | 26/12/2017 11:17:19 |
158 forum posts 107 photos 1 articles | Unfortunately, 4 days after my last post I slipped and fell on ice; ripping the quadriceps tendon from my left kneecap. I've had the surgery to suture it back on, but am stuck in a rigid leg brace until 12th Jan. They then intend to fit one with a bit of flexure in it, after that if will be physio and more brace movement for several months! I'm so bored but I daren't go in the workshop. Fellow modellers may be interested to know that they drilled 2.5mm holes in the kneecap using a battery cordless drill, so they had somewhere to anchor the sutures. The drill was a fancy medical version, not a Makita!
Happy New Year! Steve |
| Brian Sweeting | 26/12/2017 15:00:17 |
| 453 forum posts 1 photos | Speedy recovery Steve. Time to start thinking about that seat to fit under the workbench now. |
| OldMetaller | 26/12/2017 15:27:15 |
208 forum posts 25 photos | Bad luck Steve: get well soon! Regards, John. |
| Jim Nic | 26/12/2017 15:46:36 |
 406 forum posts 235 photos | Ouch ! Jim |
| Neil Wyatt | 26/12/2017 19:31:13 |
 19226 forum posts 749 photos 86 articles | Ow that's nasty, Steve. But congrats on how the loco is coming on. Neil |
| duncan webster | 26/12/2017 21:52:35 |
| 5307 forum posts 83 photos |
No wonder the NHS is skint, others manage with tools from hardware store!
|
| Hopper | 27/12/2017 04:31:59 |
 7881 forum posts 397 photos | Posted by duncan webster on 26/12/2017 21:52:35:
No wonder the NHS is skint, others manage with tools from hardware store!
Wow. Used the pliers from the boot of his car to do cranial surgery. We forget how good we have it. Steve, hope you are back hopping around the workshop soon (and if you see your doctor rummaging in his boot, run! - or hop real fast at least.) Edited By Hopper on 27/12/2017 04:33:47 |
| Ian S C | 27/12/2017 10:33:22 |
 7468 forum posts 230 photos | Whrn I was nursing in a small rural hospital, the Dr did a craniotomy (a hole in the skull) using a Stanely hand drill from his DIY tool kit, we did serilize the bit first. The patient was a car crash victim, needed to relieve the pressure before we sent him off to Dunedin, where he would arrive about 3 hours later. Ian S C |
| Steve Addy | 09/02/2018 22:25:05 |
158 forum posts 107 photos 1 articles | Hi everyone Thanks for the kind words, I managed to do a couple of hours on the cab last week, but I knew about it afterwards. Need to get myself in there again. I'm now in the hinged brace which restricts the flexion of the knee. Started at 30 degrees on Friday 12th Jan, then have been seeing a physio on Mondays since then. Got adjusted to allow 60 degrees after the first week, then 90. I'm currently working on getting to hit the 100 degree stops at both sides and to recover the lost muscle mass. I have another 2 weeks before I see the physio again, so he has given me permission to go for another 10 degrees if I feel ready for it. I'm sure being able to talk sense helped there. I had no idea that muscles waste away so quickly, which was probably a good thing; not only that, they get shorter too. That is why there is a range of movement problem. Getting there slowly. All the best Steve Edited By Steve Addy on 09/02/2018 22:26:21 |
| Steve Addy | 10/12/2019 14:22:46 |
158 forum posts 107 photos 1 articles | Well this year I've got back to working on the Baldwin cab, all the rivet holes for the various parts exist, but I'm going to need another pair of hands to help rivet them up. Picture is one of the sand tanks inside the cab. Since then I have been working on the drawings for the loco body and the doors which between them have 70 louvres. For those who wonder what the silver things are, they're Cleco skin pins, a sort of removable pop rivet and very useful.
Edited By Steve Addy on 10/12/2019 14:24:35 |


Please login to post a reply.
Magazine Locator
Want the latest issue of Model Engineer or Model Engineers' Workshop? Use our magazine locator links to find your nearest stockist!
Sign up to our Newsletter
Sign up to our newsletter and get a free digital issue.
You can unsubscribe at anytime. View our privacy policy at www.mortons.co.uk/privacy
Latest Forum Posts
- *Oct 2023: FORUM MIGRATION TIMELINE*
05/10/2023 07:57:11 - Making ER11 collet chuck
05/10/2023 07:56:24 - What did you do today? 2023
05/10/2023 07:25:01 - Orrery
05/10/2023 06:00:41 - Wera hand-tools
05/10/2023 05:47:07 - New member
05/10/2023 04:40:11 - Problems with external pot on at1 vfd
05/10/2023 00:06:32 - Drain plug
04/10/2023 23:36:17 - digi phase converter for 10 machines.....
04/10/2023 23:13:48 - Winter Storage Of Locomotives
04/10/2023 21:02:11 - More Latest Posts...
- View All Topics
Support Our Partners


Shopping Partners
Subscription Offer

Latest "For Sale" Ads
- Reeves** - Rebuilt Royal Scot by Martin Evans
by John Broughton
£300.00 - BRITANNIA 5" GAUGE James Perrier
by Jon Seabright 1
£2,500.00 - Drill Grinder - for restoration
by Nigel Graham 2
£0.00 - WARCO WM18 MILLING MACHINE
by Alex Chudley
£1,200.00 - MYFORD SUPER 7 LATHE
by Alex Chudley
£2,000.00 - More "For Sale" Ads...
Latest "Wanted" Ads
- D1-3 backplate
by Michael Horley
Price Not Specified - fixed steady for a Colchester bantam mark1 800
by George Jervis
Price Not Specified - lbsc pansy
by JACK SIDEBOTHAM
Price Not Specified - Pratt Burnerd multifit chuck key.
by Tim Riome
Price Not Specified - BANDSAW BLADE WELDER
by HUGH
Price Not Specified - More "Wanted" Ads...
Get In Touch!
Do you want to contact the Model Engineer and Model Engineers' Workshop team?
You can contact us by phone, mail or email about the magazines including becoming a contributor, submitting reader's letters or making queries about articles. You can also get in touch about this website, advertising or other general issues.
Click THIS LINK for full contact details.
For subscription issues please see THIS LINK.
Digital Back Issues


Donate

 Register
 Log-in
Model Engineer Magazine
- Percival Marshall
- M.E. History
- LittleLEC
- M.E. Clock

ME Workshop
- An Adcock
- & Shipley
- Horizontal
- Mill

Subscribe Now
- Great savings
- Delivered to your door

Pre-order your copy!
- Delivered to your doorstep!
- Free UK delivery!
All Forum Topics > Work In Progress and completed items > Baldwin Gas Mechanical Cab Started