Forum sponsored by:

The long and twisting drill
Drilling the camshaft bearings
| Jesse Hancock 1 | 09/04/2015 19:51:46 |
| 314 forum posts | Hi guys, I am about to drill the holes for the camshaft bearings in the aluminium casting of the Westbury Sealion. The part has three supports about 50mm apart and each support is 12mm thick. Length over all is 132mm. I was going to drill and ream using long drills and reams bought for the job. Is there anyone who can offer advice? This has to be accurate and right first time. |
| JasonB | 09/04/2015 20:12:43 |
 25215 forum posts 3105 photos 1 articles | Worth investing in a long series centre drill to start the central hole I have a 3" long 3/16" dia one which would be ideal.
J EDIT I did at first read it as teh crankshaft and suggested between ctrs but deleted that when I saw it wa steh camshaft though looking again at the drawings a 3/8" bar may just do it without too much whip Edited By JasonB on 09/04/2015 20:27:10 |
| GarryC | 09/04/2015 20:22:56 |
 740 forum posts 1043 photos | Hi Jesse oops sorry I misunderstood so have deleted... Cheers and thanks for the G Clamp advice - it sounds like a very good idea that I may well use in the future. Allan. Edited By Allan. on 09/04/2015 20:27:14 Edited By Allan. on 09/04/2015 20:30:09 |
| Bob Brown 1 | 09/04/2015 20:55:20 |
 1022 forum posts 127 photos | I have a similar job to do on a gun metal steam chest, a reamed 3/16" hole through the chest 4 1/8" across with a 2 3/16" gap in the middle, main problem I foresee is starting the second half of the hole in a cast surface true to first. I am hoping a split point drill will not wander. Bob
Edited By Bob Brown 1 on 09/04/2015 21:06:38 |
| NJH | 09/04/2015 21:12:36 |
 2314 forum posts 139 photos | Bob I'm not quite clear about what you are doing but I had a problem with starting a hole across a steam chest. Like you I first reamed a 3/16 hole. I then took a length of 3/16 silver steel and, with it set in a collet. drilled a hole in the end to take the body of a No.1 centre drill which I then secured with loctite. This was very rigid and easily spanned the space producing an accurate starting point for the second half the hole. Good luck ! Norman |
| JasonB | 10/04/2015 07:25:31 |
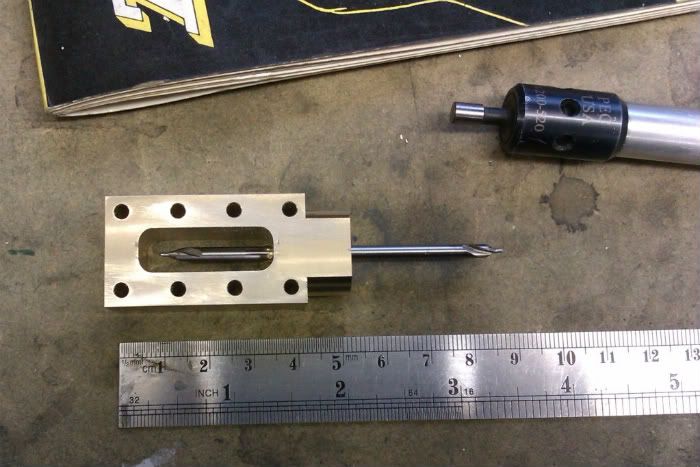
25215 forum posts 3105 photos 1 articles | The two faces of the central web can be milled flat first to help stop the drill skidding about and then try something like this or make an extension as Norman suggests
|
| Jesse Hancock 1 | 10/04/2015 07:27:54 |
| 314 forum posts | JasonB, I haven't heard of those Jason I will have a look thanks. Jason I'm waiting for my new mill to arrive. I wouldn't trust the other one I have as far as I can throw it! Allan, it's expensive getting started and so like you I get tempted into all sorts of ill gotten thoughts. Bob Brown. Done similar mate but not on that scale. Your canine mate below sounds like good advice to me. Edited By Jesse Hancock 1 on 10/04/2015 07:42:21 |
| JasonB | 10/04/2015 07:48:39 |
25215 forum posts 3105 photos 1 articles | Just had another look at the drawing and I think you will have to go with a between ctrs bar to cut the 5/8" clearance for the cam lobes anyway so may as well do the lot like that. This is the job for those that don't know, three 1/2" holes to take bronze bushes and a 5/8 clearance ( that should read 5/16"R on the drawing)
|
| Bob Brown 1 | 10/04/2015 08:00:47 |
1022 forum posts 127 photos | Following the views above I have found a No 2 centre drill (3/16) 5" long, so my thoughts are centre, drill and ream the first side then use that hole as a guide for second. Will all be done in the lathe, job held in collet chuck and with out removing the work piece.
A 5" + long centre drill should span the gaps in the Sealion casting allowing a straight hole to be drilled. Bob
Edited By Bob Brown 1 on 10/04/2015 08:23:14 |
| Neil Lickfold | 10/04/2015 09:36:37 |
| 1025 forum posts 204 photos | Making an alignment drill guide is another way, bit more time, but more guaranteed alignment. Neil |
| Jesse Hancock 1 | 10/04/2015 09:51:39 |
| 314 forum posts | Neil, sorry mate but can you enlighten me as to how I make alignment drill guide. Jason I pretty much think so too. PS: I think by the time I finish this engine I will have posted about 2,000 times.
Edited By Jesse Hancock 1 on 10/04/2015 09:52:47 Edited By Jesse Hancock 1 on 10/04/2015 10:00:03 |
| roy entwistle | 10/04/2015 10:17:44 |
| 1716 forum posts | To anyone drilling a steam chest why not clean up the inside with a file to get a decent surface to drill into and I would still use an extended centre drill Roy |
| Neil Lickfold | 12/04/2015 01:27:23 |
| 1025 forum posts 204 photos | To make a guide , use either square or round stock, what ever will fit inside what you are drilling. Drill/ream/bore to suite the drill you are using. After drilling through the 1st, then put the guide into place. You will needs shims and clamps to support, or else you make a external packer to support it. You will know when it is correctly aligned as the drill will spin freely. Then drill the next hole and repeat. Another way is to make a hinge drill jig. Like it says, it is a piece that had been drilled though and cut away or made up of segments like a door hinge,1 side only. The drill goes through the 1st hole of the hinge, the ist drilled hole is in the space, the drill goes through the second hinge hole as a guide, the last gap is where the part is being drilled. It all depends on your drilling set up etc as to how it can be achieved. Long centre drills can be easy 0.1mm off centre. Neil |


Please login to post a reply.
Magazine Locator
Want the latest issue of Model Engineer or Model Engineers' Workshop? Use our magazine locator links to find your nearest stockist!
Sign up to our Newsletter
Sign up to our newsletter and get a free digital issue.
You can unsubscribe at anytime. View our privacy policy at www.mortons.co.uk/privacy
Latest Forum Posts
- *Oct 2023: FORUM MIGRATION TIMELINE*
05/10/2023 07:57:11 - Making ER11 collet chuck
05/10/2023 07:56:24 - What did you do today? 2023
05/10/2023 07:25:01 - Orrery
05/10/2023 06:00:41 - Wera hand-tools
05/10/2023 05:47:07 - New member
05/10/2023 04:40:11 - Problems with external pot on at1 vfd
05/10/2023 00:06:32 - Drain plug
04/10/2023 23:36:17 - digi phase converter for 10 machines.....
04/10/2023 23:13:48 - Winter Storage Of Locomotives
04/10/2023 21:02:11 - More Latest Posts...
- View All Topics
Support Our Partners


Shopping Partners
Subscription Offer

Latest "For Sale" Ads
- Reeves** - Rebuilt Royal Scot by Martin Evans
by John Broughton
£300.00 - BRITANNIA 5" GAUGE James Perrier
by Jon Seabright 1
£2,500.00 - Drill Grinder - for restoration
by Nigel Graham 2
£0.00 - WARCO WM18 MILLING MACHINE
by Alex Chudley
£1,200.00 - MYFORD SUPER 7 LATHE
by Alex Chudley
£2,000.00 - More "For Sale" Ads...
Latest "Wanted" Ads
- D1-3 backplate
by Michael Horley
Price Not Specified - fixed steady for a Colchester bantam mark1 800
by George Jervis
Price Not Specified - lbsc pansy
by JACK SIDEBOTHAM
Price Not Specified - Pratt Burnerd multifit chuck key.
by Tim Riome
Price Not Specified - BANDSAW BLADE WELDER
by HUGH
Price Not Specified - More "Wanted" Ads...
Get In Touch!
Do you want to contact the Model Engineer and Model Engineers' Workshop team?
You can contact us by phone, mail or email about the magazines including becoming a contributor, submitting reader's letters or making queries about articles. You can also get in touch about this website, advertising or other general issues.
Click THIS LINK for full contact details.
For subscription issues please see THIS LINK.
Digital Back Issues


Donate

 Register
 Log-in
Model Engineer Magazine
- Percival Marshall
- M.E. History
- LittleLEC
- M.E. Clock

ME Workshop
- An Adcock
- & Shipley
- Horizontal
- Mill

Subscribe Now
- Great savings
- Delivered to your door

Pre-order your copy!
- Delivered to your doorstep!
- Free UK delivery!
All Forum Topics > General Questions > The long and twisting drill