Forum sponsored by:

The Workshop Progress Thread 2019
| JasonB | 19/09/2019 11:08:02 |
 25215 forum posts 3105 photos 1 articles | John, I think Atom should also have "part colour" from that you can set the opacity of any part, in this situation just the case parts would need doing. I find this quite handy when checking an assembly as you can move say a crankshaft and check inside the crankcase to see if anything is going to hit as all the parts rotate. Although not a fan of multi coloured drawings you could also show the selector forks in a bronze colour and the case in a lighter shade of grey to the gears and shafts.
|
| John Hinkley | 19/09/2019 13:19:11 |
 1545 forum posts 484 photos | That worked, Jason. Here's the result, at 50% translucency:
I'll stop posting for the moment. I feel I've monopolised this thread for long enough! John
|
| JasonB | 22/09/2019 19:12:21 |
25215 forum posts 3105 photos 1 articles | Got a few more bits done on the '36 midget Cut the crank webs to form counterbalance weights with a 10mm ball nose cutter
Hardened and tempered the cam lobes and set then onto the camshaft with 648, as the indexer was on the mill I used that and a square to set the angle. Once done pushrods and springs were completed
Then did a bit of screwing, starting with a plug for the oil level hole
Followed by some M3 and M2.5 ones with a fillister style head.
|
| GoCreate | 27/09/2019 15:18:11 |
 387 forum posts 119 photos | 5" Lion build. Finally, after what seems endless hours and problems with weeping bushes I have a water tight boiler on the third hydraulic test, held 160psi for 15 minutes. It's not pretty but it's water tight. I received a great tip, after the boiler was finished off course, when making the threaded bushes drill and tap them with a blind hole then, when you test the boiler you don't need to fit blanking plugs, once the boiler is tested successfully finish drilling and tapping the threaded bushes. I have done the boiler first as this was the biggest challenge, so pleased I can now get on with the frames and wheels etc. Nigel
Edited By tractionengine42 on 27/09/2019 15:18:30 |
| Brian H | 27/09/2019 15:22:37 |
 2312 forum posts 112 photos | Looks good Nigel, hopefully will encourage others who may think that boilermaking is a 'black art'! Brian |
| JasonB | 29/09/2019 12:18:09 |
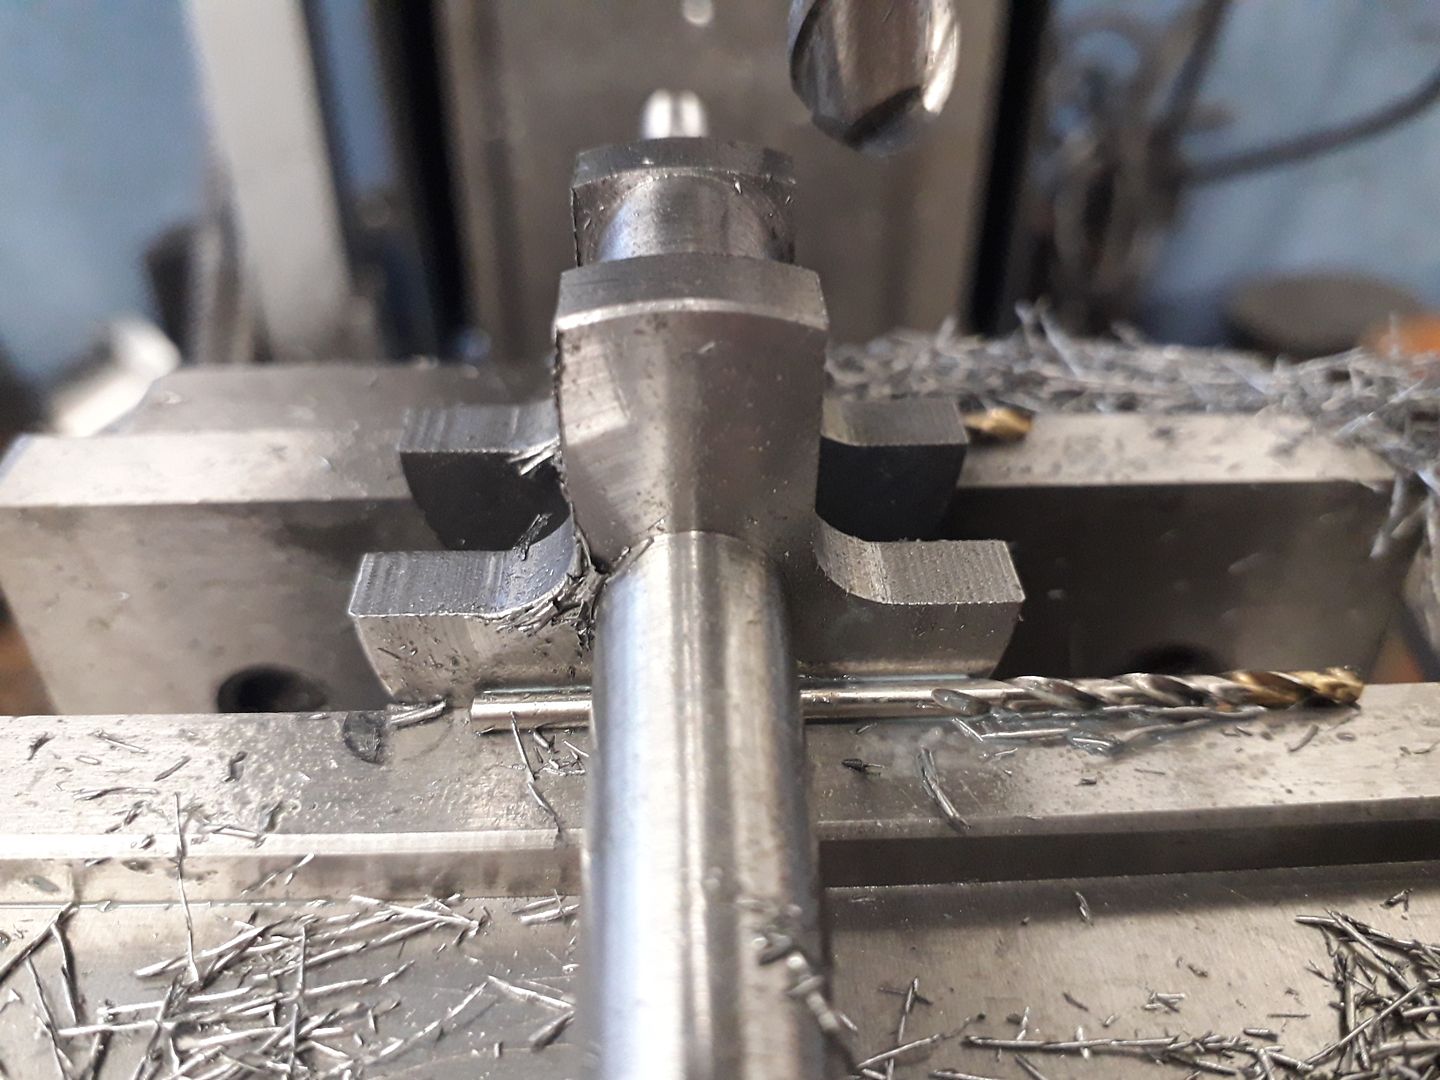
25215 forum posts 3105 photos 1 articles | With the bracket for the ignition contacts completed ( see CNC thread) I made up the rest of the parts for that.
And also knocked up an exhaust pipe.
|
| Jim Nic | 01/10/2019 14:44:54 |
 406 forum posts 235 photos | I have made a start on Muncaster’s Double Acting Oscillating engine. First off I gathered some bits of metal:
Then, since I hadn't figured out how to go about any other parts I made the flywheel, which still needs a bit of car body filler around the spoke ends to add a bit more realism.
Then I took delivery of the engine frames from Model Engineer’s Laser.
I had these lasered because I’m getting lazy in my old’ish age and could easily see me messing up forming the bowed feature halfway up and having to make more than one attempt. Now I'm going to have to get my thinking head on and tackle the cylinder. Jim Edited By Jim Nic on 01/10/2019 14:51:51 |
| JasonB | 01/10/2019 16:20:27 |
25215 forum posts 3105 photos 1 articles | Off to a good start Jim. |
| Richard S2 | 06/10/2019 17:25:15 |
 237 forum posts 135 photos | Reached a point where the repetition of making spokes for the wheels of the 1inch scale Water Cart is over-
I can relax a bit now I've set the spokes to hubs fixings before more work on the hubs detail and fix to the rims-
Spokes are set into recesses in the hubs and fixed with 10ba countersunk screws. |
| mal webber | 06/10/2019 18:56:56 |
 154 forum posts 309 photos | Nice job on them wheels Richard they look grand. |
| geoff walker 1 | 07/10/2019 01:22:53 |
| 521 forum posts 217 photos | Hi Jim, (Nic) I just noticed your earlier post 1/10 and see you have started the Muncaster oscillator. Good idea to have the frames laser cut, I know what you mean they were somewhat tedious to make, sawing filing etc. This is how I started machining the cylinder casting. 1. I skimmed one end of the casting so it was reasonably square to the core hole. Then set the face plate up as shown in the next photo. The hole in the strap was drilled and bored in situ and is the same size as the spigot on the front of the casting, the pivot spigot.
The spigot fits snugly in the hole and the casting is clamped to the angle plate as shown in the next photo. With the other spigot running as true as possible, the trunnion spigot, just take a light skim of the diameter, the end and also centre drill the end. don't skim the inner port face at this setting.
Now hold the trunnion spigot in a collet or a grip true chuck and centre drill the pivot spigot. Using a half tailstock centre support the casting and skim the end of the spigot and also true up the diameter. Now hold the work between centres similar to the set up in the last photo, skim the trunnion spigot again and lightly face square the inner port face. Next set the casting up on an angle plate, port face down, and bore to size, 20mm diameter. also at this setting machine the casting to its final length 46mm ensuring that each end is an equal distance from the centre line of the trunnion.
Mount the work between centres again and turn the trunnion to the correct diameter and face the inner port face so it is 19mm from the centre of the bore.
Hope this is of some help Jim Geoff
|
| Jim Nic | 07/10/2019 12:44:47 |
406 forum posts 235 photos | Hi Geoff Thanks for that descriptive post. I am not well versed in how to approach castings, only 2 of my 10 completed engnes have used them so your guidance will be valuable indeed. Jim |
| geoff walker 1 | 08/10/2019 11:18:18 |
| 521 forum posts 217 photos | Thanks Jim and you're welcome. Here is another rotary table photo which shows how I machined a shoulder on the inside of the flanges. The shoulder is for the hardwood cleading to sit on. The packing pieces are also hardwood. I turned up some hardwood rings which I then split into segments and then jb welded to the cylinder. These were leveled at the same setting to the same height as the shoulders. Geoff
|
| JasonB | 13/10/2019 12:24:12 |
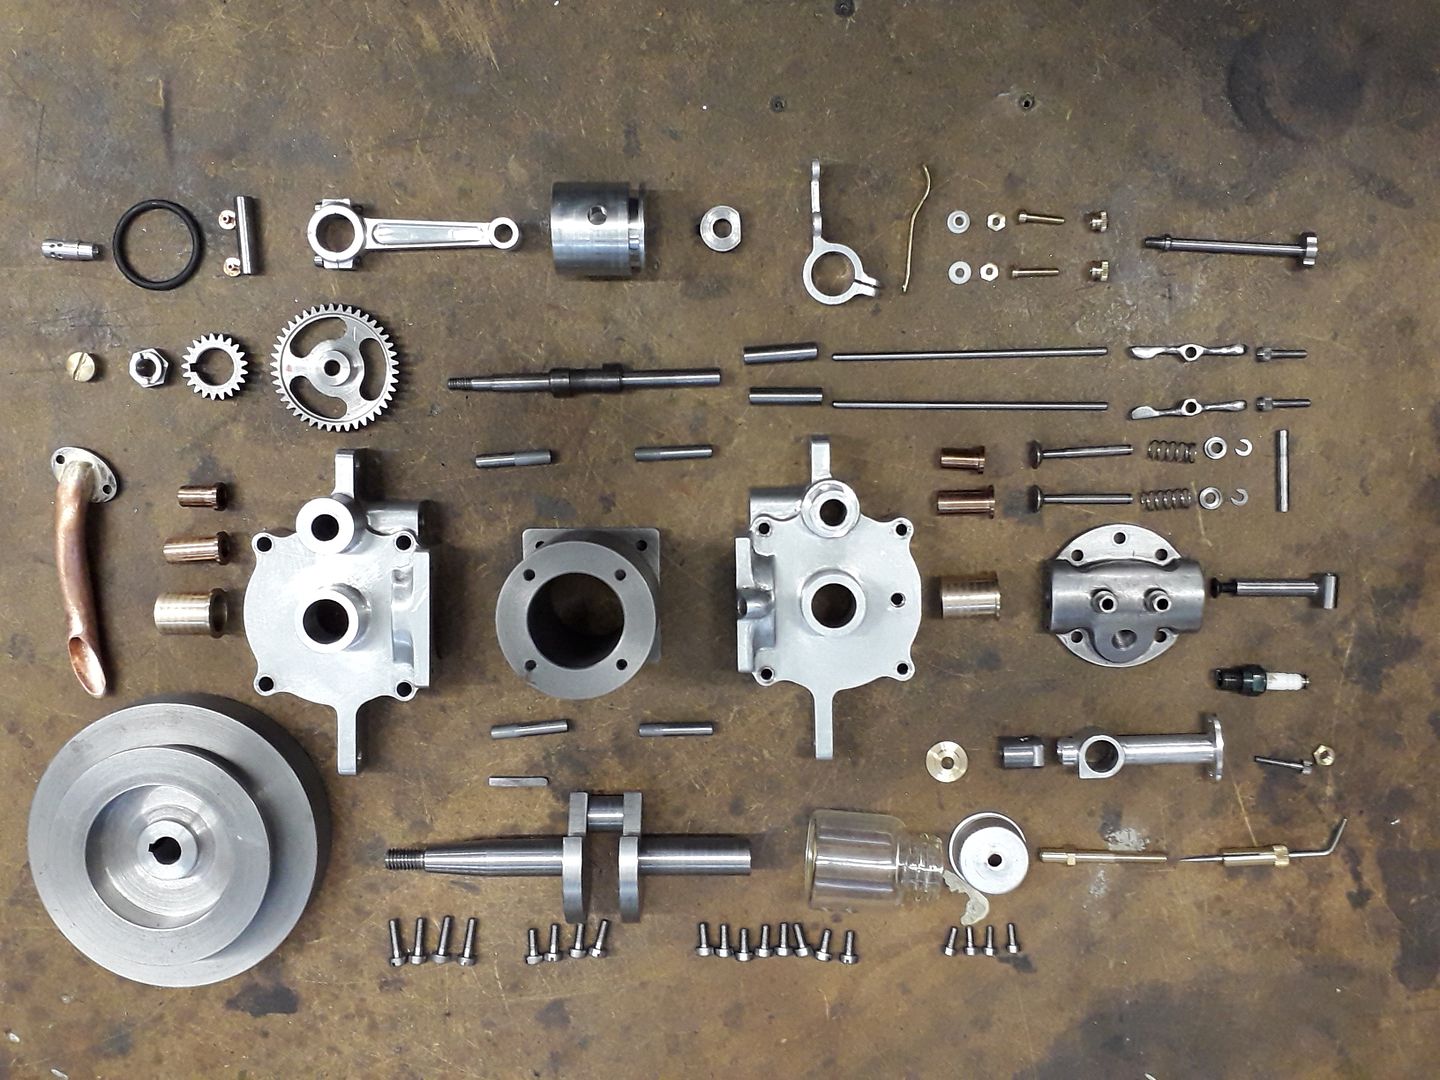
25215 forum posts 3105 photos 1 articles | I got all the Midget parts finished, 57 individual items plus a further 30 custom made nuts, screws etc.
Luckily I remembered how it all went back together. Valve timing was set by eye while turning the engine over slowly watching when the valves opened and closed. A little more oil than the normal running level into the crankcase, some Colemans with a drip of 2-stroke oil into the fuel jar and give it a go. I got some pops straight away and with a bit more retardation of the timing it fired into life. Throttle is by rotating the jam jar fuel tank but quite slow to react due to sizeable flywheel, advance & retard are a better way to set the speed which I had always intended was going to be for looks and noise rather than outright speed and performance. Just goes to show that you don't need to worry about working to umpteen decimal places, a micrometer was only used on the crankshaft and the 0.8 MOD gears on metric ctrs were cut with 32DP cutter but it seems to start and run . Just needs a bit of colour to finish it off |
| Oldiron | 13/10/2019 12:37:11 |
| 1193 forum posts 59 photos | Nice batch of parts Jason. A right proper little jigsaw puzzle. Video is private ? |
| JasonB | 13/10/2019 13:03:22 |
25215 forum posts 3105 photos 1 articles | Is it working now? |
| mal webber | 13/10/2019 13:25:04 |
154 forum posts 309 photos | Very nice Jason sounds lovely and sweet. |
| Jeff Dayman | 13/10/2019 13:25:19 |
| 2356 forum posts 47 photos | Nice runner Jason! |
| Ron Laden | 13/10/2019 13:26:27 |
 2320 forum posts 452 photos | Yep its working now, and what a lovely little engine. I love the sound of it very nice indeed and good that you got it running so quickly. |
| Brian H | 13/10/2019 13:36:31 |
2312 forum posts 112 photos | Super engine Jason, will it be at the midlands exhibition next week? Brian |


This thread is closed.
Magazine Locator
Want the latest issue of Model Engineer or Model Engineers' Workshop? Use our magazine locator links to find your nearest stockist!
Sign up to our Newsletter
Sign up to our newsletter and get a free digital issue.
You can unsubscribe at anytime. View our privacy policy at www.mortons.co.uk/privacy
Latest Forum Posts
- hemingway ball turner
04/07/2025 14:40:26 - *Oct 2023: FORUM MIGRATION TIMELINE*
05/10/2023 07:57:11 - Making ER11 collet chuck
05/10/2023 07:56:24 - What did you do today? 2023
05/10/2023 07:25:01 - Orrery
05/10/2023 06:00:41 - Wera hand-tools
05/10/2023 05:47:07 - New member
05/10/2023 04:40:11 - Problems with external pot on at1 vfd
05/10/2023 00:06:32 - Drain plug
04/10/2023 23:36:17 - digi phase converter for 10 machines.....
04/10/2023 23:13:48 - More Latest Posts...
- View All Topics
Support Our Partners


Shopping Partners
Subscription Offer

Latest "For Sale" Ads
- Reeves** - Rebuilt Royal Scot by Martin Evans
by John Broughton
£300.00 - BRITANNIA 5" GAUGE James Perrier
by Jon Seabright 1
£2,500.00 - Drill Grinder - for restoration
by Nigel Graham 2
£0.00 - WARCO WM18 MILLING MACHINE
by Alex Chudley
£1,200.00 - MYFORD SUPER 7 LATHE
by Alex Chudley
£2,000.00 - More "For Sale" Ads...
Latest "Wanted" Ads
- D1-3 backplate
by Michael Horley
Price Not Specified - fixed steady for a Colchester bantam mark1 800
by George Jervis
Price Not Specified - lbsc pansy
by JACK SIDEBOTHAM
Price Not Specified - Pratt Burnerd multifit chuck key.
by Tim Riome
Price Not Specified - BANDSAW BLADE WELDER
by HUGH
Price Not Specified - More "Wanted" Ads...
Get In Touch!
Do you want to contact the Model Engineer and Model Engineers' Workshop team?
You can contact us by phone, mail or email about the magazines including becoming a contributor, submitting reader's letters or making queries about articles. You can also get in touch about this website, advertising or other general issues.
Click THIS LINK for full contact details.
For subscription issues please see THIS LINK.
Digital Back Issues


Donate

 Register
 Log-in
Model Engineer Magazine
- Percival Marshall
- M.E. History
- LittleLEC
- M.E. Clock

ME Workshop
- An Adcock
- & Shipley
- Horizontal
- Mill

Subscribe Now
- Great savings
- Delivered to your door

Pre-order your copy!
- Delivered to your doorstep!
- Free UK delivery!
All Forum Topics > Work In Progress and completed items > The Workshop Progress Thread 2019