Forum sponsored by:

Vertical Boiler Fittings
| JasonB | 10/08/2018 06:51:55 |
 25215 forum posts 3105 photos 1 articles | That's the rebranded Folic which I have used but not tried the new one which is a combination of the two old Graphite and maganese Foliacs, one of which set hard the other did not. It was usually used for flat (flange) type fittings rather than screwed. |
| Brian Baker 1 | 10/08/2018 08:01:19 |
 229 forum posts 40 photos | Greetings, I have been using loctite 572 for many years, with excellent results. regards Brian |
| gary arthur | 10/08/2018 08:34:32 |
 113 forum posts 706 photos | Thank you once again Jason. Might avoid that one then. Brian - Thank you. I'm quite tempted by Loctite 572. It's cheaper than 5770 and available in the UK. I'm assuming that as you have been happy with it, it must be ok at boiler temperatures. Would you be so kind as to let me know your thoughts on the question of whether it sets soft enough so that fittings will unscrew if required rather than snap off? Edited By gary.a.ayres on 10/08/2018 08:35:40 Edited By gary.a.ayres on 10/08/2018 08:37:08 |
| Doubletop | 10/08/2018 09:47:22 |
 439 forum posts 4 photos | Gary Just get the data sheets and compare them Loctite 5770 Loctite 572 Loctite 567 Permatex 59214 Rocol steamseal
Pete Edited By Doubletop on 10/08/2018 09:47:46 |
| gary arthur | 10/08/2018 12:12:59 |
113 forum posts 706 photos | Thanks Pete - Loctite 5770: After 24 hours @ 25 °C Breakloose Torque, ISO 10964, Pre-torqued to 5 N·m: 3/8 x 16 steel nuts and bolts (grade 5) (degreased) N·m 9.0 to 28.4LMS (lb.in.) (79.6 to 251) Loctite 572: After 24 hours @ 22 °C Breakaway Torque, ISO 10964: M10 steel nuts and bolts N·m 7 (lb.in.) (60) -------- ROCOL STEAMSEAL is a high pressure, setting pipe sealant for metallic threaded and flanged joints. Joints sealed with ROCOL STEAMSEAL are easy to break and clean. -------- I find this kind of info difficult to interpret, and it seems to me that one can't make a like-for-like comparison between the two Loctites as the parameters are different. However, it *looks* to me that the 572 might be easier to loosen. However, the info that Steamseal is suitable for threaded joints led me in that direction insteaad, so I rang Heritage Steam Supplies in the UK who sell it. They put me on to their tech guy (involved with steam engines all of his life, steam cars and so on) and he advised me against the Steamseal as - he said - it does in fact set pretty hard (because of the manganese in it I think). In fact, he said 'just use PTFE tape - it will work perfectly well'. He was not at all convinced that there is a risk that shreds of PTFE will clog valves and so on. He did, however, go on to say that if I want to use a sealant, use Wellseal, which does not set hard and is easy to dismantle if required. It can be used as a standalone or in combination with PTFE tape. 'Don't get yourself involved with Loctite and all that stuff', he said. As a rookie I expected this to be simple but as usual it's tortuous and complex territory, and people have many different opinions. Interesting stuff! So... given that in the end one has to make a choice, I have ordered a tube of Wellseal. Am not sure about the PTFE tape at this stage - have used it for hydro testing but for steam I might try the Wellseal on its own. Feel free to comment further, but in any case thanks for all of your input on this. Will report back in due course gary
|
| gary arthur | 14/08/2018 22:59:11 |
113 forum posts 706 photos | Hi - Tried out the Wellseal this evening on a few fittings. It's transparent, dark brown, runny and very sticky and looks for all the world like something chocolatey which you might squeeze on to an ice cream from a plastic bottle. You clean any grease from the mating threads (I used acetone), then anoint them with the Wellseal. You then leave them apart for about 5 minutes while the Wellseal thickens up, after which you either add a bit more Wellseal (if required) or just screw them together. Apparently it never really sets, so it's easy to remove the fittings if required and clean it off with a solvent. I must admit that the stuff inspires confidence - it's so damn sticky! It gets right into the threads and it's hard to imagine it not making an effective seal. However, the proof of the pudding will be in the testing so I'll let you know how that goes. If it doesn't work I'll try one of the Loctites which you guys have recommended, but for now I remain hopeful. gary Edited By gary.a.ayres on 14/08/2018 22:59:40 Edited By gary.a.ayres on 14/08/2018 23:00:46 |
| Neil Wyatt | 15/08/2018 18:28:43 |
 19226 forum posts 749 photos 86 articles | There's always Boss White for the impecunious. Neil |
| duncan webster | 15/08/2018 21:30:44 |
| 5307 forum posts 83 photos | Posted by Neil Wyatt on 15/08/2018 18:28:43:
There's always Boss White for the impecunious. Neil sounds like 'Harwich for the continent, Frinton for the incontinent' Edited By duncan webster on 15/08/2018 21:30:58 |
| Bob Rodgerson | 15/08/2018 21:46:12 |
| 612 forum posts 174 photos | I use Wellseal on my Motorcycle all the time. It's really good stuff for getting a good seal on mating surfaces. It doesn't harden and can be cleaned off with methylated spirits. |
| gary arthur | 15/08/2018 21:57:11 |
113 forum posts 706 photos | Thanks guys. Neil - I hadn't heard of Boss White but it looks reasonable to me. I guess the Wellseal would be more forgiving visually if it oozes on to the copper, but it can all be cleaned off anyway I note that both Wellseal and Boss White have a top working temperature of 200 degrees C. Could this be a problem? I wonder if parts of the boiler - even those not directly touched by direct heat - might get hotter than that and ruin the thread seals. Remember I'm a clueless beginner...even if I do have good teachers |
| Hopper | 16/08/2018 09:08:30 |
 7881 forum posts 397 photos |
Edited By Hopper on 16/08/2018 09:33:48 |
| Neil Wyatt | 16/08/2018 10:14:42 |
19226 forum posts 749 photos 86 articles | Boss white was LBSC's choice It's intended for steam up to 7 bar, so as long as your steam pressure is comfortably lower than that (165 degrees for wet steam at 7 bar/100psi) yopu shoudl be OK. Don't use it for radian superheaters! Neil |
| gary arthur | 16/08/2018 12:34:34 |
113 forum posts 706 photos | Many thanks, both. @ Hopper - you are not the first person that has recommended PTFE tape. I have used it on the input end of my clacks as I was worried that any stray Wellseal might work mischief with the nitrile balls in the valves. I wouldn't rule out using it more in the future, especially in situations where cosmetic concerns are not paramount. ('Gorilla snot...' lol). @ Neil - that's reassuring. My safety valve will blow off at 45psi. Will keep on trucking with the Wellseal now (also good for 200C) and see how it goes but will bear Boss White in mind for the future. It comes well recommended Cheers, gary Edited By gary.a.ayres on 16/08/2018 12:35:57 |
| gary arthur | 02/09/2018 00:34:15 |
113 forum posts 706 photos | Progress has been slow due to hot weather (barbie season) followed by a major renovation of our living room which is currently ongoing. However, I took today off and spent some time in the workshop. Stan Braye (on whose design this boiler is based) has little to say about he configuration of the cap, smoke stack and steam stop and safety valves, so I found myself having to figure it out myself. It was necessary to make extensions for the bushes on the top of the boiler so that the valves will sit above the cap. The first picture below shows the internal thread on one of them being tapped in round bronze bar in the lathe using a piloted spindle (which is a godsend - no more squint threads!):
I figured it would be easier to gauge the required heights for the extensions if I made the cap first. The photo below shows that the underside of the brass cap has a circular locating groove into which the top edge of the boiler fits. This was milled on my Dore Westbury Mk I using a rotary table. This is not the tidiest piece of milling in the world - a result of several issues which currently beset the mill (a situation which will be addressed in the near future...). It's not critical though as it won't be seen. You will also notice that the groove is a bit on the wide side - it's the size of the smallest endmill I currently have. Below you will see the cap (in which the hole for the smoike stack has not yet been made), the bush extensions, the cap retaining nuts (made from brass hex bar tapped M12), and the two valves:
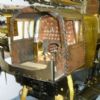
The last photo shows a trial fit of the unfinished cap assembly. Unfortunately the two valves are out of perpendicularity with the top of the boiler. This happened either at the end plate forming stage or while silver soldering. They look squint but there is nothing I can do about it now other than put the fiery flame on it again and that isn't going to happen. It's not perfect but it shouldn't affect the functionality and will be good enough given it's my first effort. It does however mean that there is a small gap between one side of each nut and the cap. To prevent combustion gases from escaping via that route I would like to close this using some kind of soft washer or gasket which would have to be heat-resistant. Any suggestions from you good people regarding what I should use for this would be welcome. In the photo you will also see that most of the fittings are now in situ. They are sealed (hopefully) with Wellseal. Not so far away now from the second hydro test at 1.5 wp...! The picture shows the boiler in its current state sitting on the belt sanding attachment of my beloved Coronet Major woodturning lathe/all bells and whistles wood machining workstation:
gary Edited By gary.a.ayres on 02/09/2018 00:38:51 |
| gary arthur | 04/09/2018 22:06:47 |
113 forum posts 706 photos | To answer my own question above - I went to a local suppliers and found this:
It's carbon gasket material, rated at 500 degrees centigrade. I reckon that will do! The stuff is very expensive but he had an offcut which cost me a fiver. It's plain black on the other side, and surprisingly easy to work. I scribed it with dividers, cut it with scissors, drilled it, and cleaned up the edges as best I could on a small drum sander chucked in the drill press. All very easy. Here's the finished set:
Here are the top gaskets in situ: And here's the one under the cap, viewed from below:
The gaps appear to be closed and I have no reason at this stage to think it won't do the job. When I was cutting the bush extensions to height, I forgot to take into account the thickness of the gaskets. This turned out to be a blessing in disguise because rather than make new extensions I just skimmed the nuts down to size in the lathe, making them look slimmer and (imho) better. gary |
| gary arthur | 18/09/2018 22:56:29 |
113 forum posts 706 photos | A little bit of progress this evening after a major episode of DIY in the house. |
| gary arthur | 30/09/2018 22:42:31 |
113 forum posts 706 photos | Chimney silver soldered on to cap:
|
| gary arthur | 02/10/2018 23:05:57 |
113 forum posts 706 photos | Second water pressure test at 1.5 x WP successful All fittings were in situ apart from the steam pressure gauge and the safety valve. On to the first steam test next, using gas to fire it with. |
| gary arthur | 07/10/2018 20:18:50 |
113 forum posts 706 photos | A major staging post achieved. First steam! Edited By gary.a.ayres on 07/10/2018 20:19:54 |
| julian atkins | 07/10/2018 20:32:31 |
 1285 forum posts 353 photos | Hi Gary, Well done! I enjoyed your clip! Nice to see someone make their own boiler! And Jolly Good Fun too! Cheers, Julian |


Please login to post a reply.
Magazine Locator
Want the latest issue of Model Engineer or Model Engineers' Workshop? Use our magazine locator links to find your nearest stockist!
Sign up to our Newsletter
Sign up to our newsletter and get a free digital issue.
You can unsubscribe at anytime. View our privacy policy at www.mortons.co.uk/privacy
Latest Forum Posts
- hemingway ball turner
04/07/2025 14:40:26 - *Oct 2023: FORUM MIGRATION TIMELINE*
05/10/2023 07:57:11 - Making ER11 collet chuck
05/10/2023 07:56:24 - What did you do today? 2023
05/10/2023 07:25:01 - Orrery
05/10/2023 06:00:41 - Wera hand-tools
05/10/2023 05:47:07 - New member
05/10/2023 04:40:11 - Problems with external pot on at1 vfd
05/10/2023 00:06:32 - Drain plug
04/10/2023 23:36:17 - digi phase converter for 10 machines.....
04/10/2023 23:13:48 - More Latest Posts...
- View All Topics
Support Our Partners


Shopping Partners
Subscription Offer

Latest "For Sale" Ads
- Reeves** - Rebuilt Royal Scot by Martin Evans
by John Broughton
£300.00 - BRITANNIA 5" GAUGE James Perrier
by Jon Seabright 1
£2,500.00 - Drill Grinder - for restoration
by Nigel Graham 2
£0.00 - WARCO WM18 MILLING MACHINE
by Alex Chudley
£1,200.00 - MYFORD SUPER 7 LATHE
by Alex Chudley
£2,000.00 - More "For Sale" Ads...
Latest "Wanted" Ads
- D1-3 backplate
by Michael Horley
Price Not Specified - fixed steady for a Colchester bantam mark1 800
by George Jervis
Price Not Specified - lbsc pansy
by JACK SIDEBOTHAM
Price Not Specified - Pratt Burnerd multifit chuck key.
by Tim Riome
Price Not Specified - BANDSAW BLADE WELDER
by HUGH
Price Not Specified - More "Wanted" Ads...
Get In Touch!
Do you want to contact the Model Engineer and Model Engineers' Workshop team?
You can contact us by phone, mail or email about the magazines including becoming a contributor, submitting reader's letters or making queries about articles. You can also get in touch about this website, advertising or other general issues.
Click THIS LINK for full contact details.
For subscription issues please see THIS LINK.
Digital Back Issues


Donate

 Register
 Log-in
Model Engineer Magazine
- Percival Marshall
- M.E. History
- LittleLEC
- M.E. Clock

ME Workshop
- An Adcock
- & Shipley
- Horizontal
- Mill

Subscribe Now
- Great savings
- Delivered to your door

Pre-order your copy!
- Delivered to your doorstep!
- Free UK delivery!
All Forum Topics > Beginners questions > Vertical Boiler Fittings