Forum sponsored by:

Setting up my workshop
| DutchDan | 02/02/2022 09:16:57 |
 49 forum posts 16 photos | Dave, I'm not sure your average junkie shed-burglar has the learning capacity of a seagull! I was considering putting a grim sounding warning sign on the front about high voltage risk of death, or ionising radiation or something. Again, I think that may not work, and physical security is the best measure against human stupidity/greed. For an interesting read on the subject I suggest looking up the "Goiânia accident". |
| SillyOldDuffer | 02/02/2022 10:30:20 |
| 10668 forum posts 2415 photos | Posted by DutchDan on 02/02/2022 09:16:57:
Dave, I'm not sure your average junkie shed-burglar has the learning capacity of a seagull! I was considering putting a grim sounding warning sign on the front about high voltage risk of death, or ionising radiation or something. Again, I think that may not work, and physical security is the best measure against human stupidity/greed. For an interesting read on the subject I suggest looking up the "Goiânia accident". For what it's worth, Wiltshire has the UK's lowest crime rate. Put your postcode into this website to find out how bad crime actually is near your home. Is there a local problem or not? Big cities, especially in the North, suffer most crime. In Wiltshire high security might not be needed. Dave |
| martin haysom | 02/02/2022 11:37:39 |
 165 forum posts | Posted by norm norton on 01/02/2022 10:18:44:
a blacksmiths forge with earth floor, black dust and metal fragments everywhere, a machine shop with overhead line shafts and oil dripping over the lathes. Those are the places I am sure that many of us love to see and visit, but we don't want to work in them do we? The one thing I would find essential any new workshop though is a 'dirty area' and fume extraction. A shiny, white workshop will soon look different after a couple of years of welding, angle grinding and paint spraying; or do people not undertake those techniques any more? yes i would like to work in a place like that my whole workshop is a dirty aera |
| vic newey | 02/02/2022 11:55:56 |
 347 forum posts 173 photos | Your sheds are all to pretty, this is what a real shed looks like |
| Bazyle | 02/02/2022 13:15:23 |
 6956 forum posts 229 photos | No, far too much empty floor space there. You can fit in at least one more lathe, a band saw, an air compressor, 3 locos on build stands, You see that small board under the broom - that is the only permitted spare space.
|
| vic newey | 02/02/2022 13:55:31 |
347 forum posts 173 photos | Posted by Bazyle on 02/02/2022 13:15:23:
No, far too much empty floor space there. You can fit in at least one more lathe, a band saw, an air compressor, 3 locos on build stands, You see that small board under the broom - that is the only permitted spare space. -------------------------------------------------------------- Those items are all on order although I'm trying to avoid moving the broom if I can avoid it There are five lathes in view there, a 1895 Pittler B2, a 1937 Holbrook B8, a 1961 Unimat SL, an unknown make copy of a Myford behind the milling machine which I'm selling, a 1939 South Bend 9" workshop lathe. still plenty of room there
|
| DutchDan | 03/02/2022 18:20:59 |
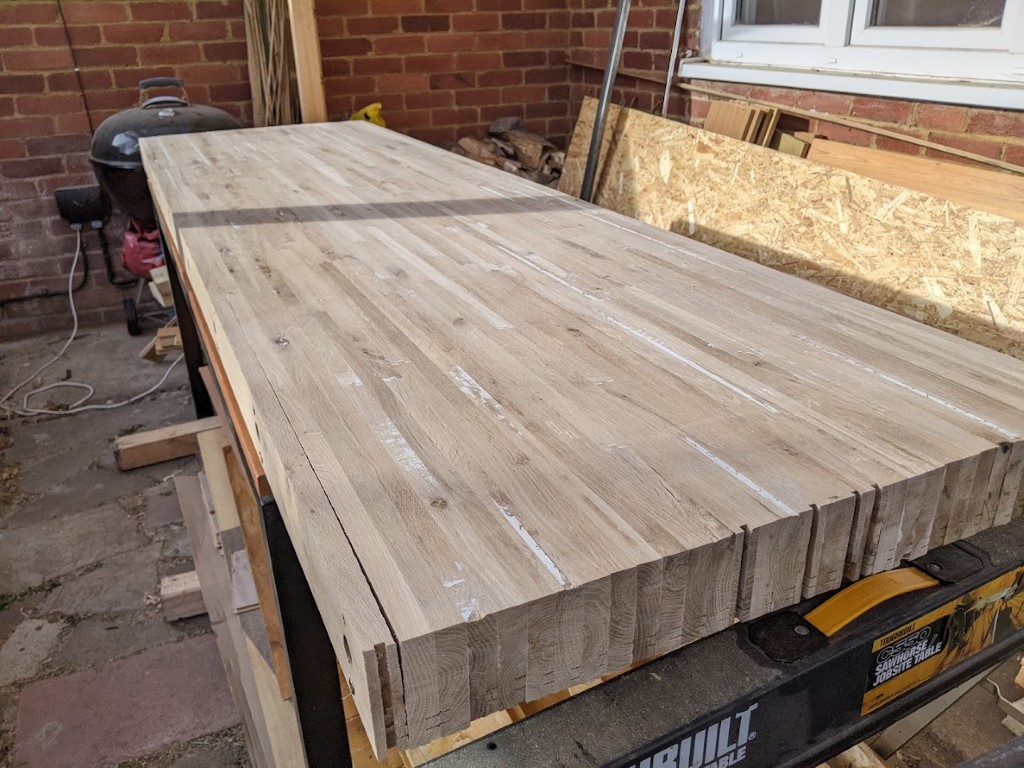
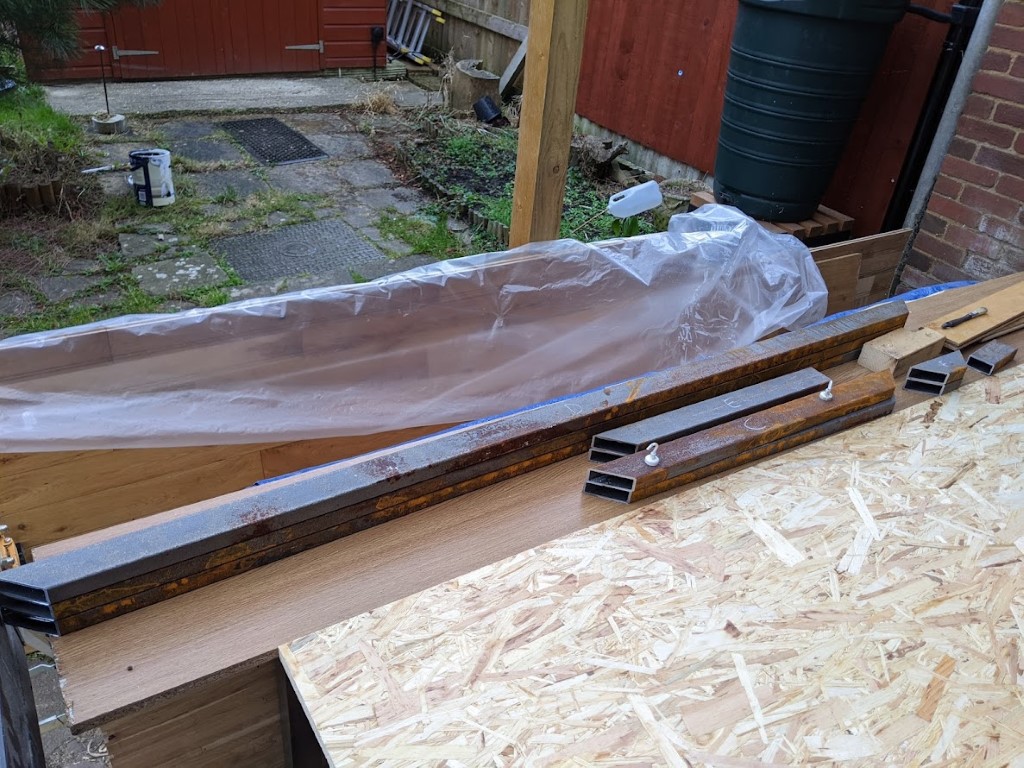
49 forum posts 16 photos | Vic, as you can tell from one of my earlier photos my shed gets in a bit of a state when I'm actively working on something, but I try and declutter between things. You seem to have a nice patch of floor to work on though I have been working on the top for my workbench in the meantime. I sadly had to tear out the living room's wooden flooring after a leak forced me to. Nice floor too, I believe red oak. Obviously there was no way I was going to take that to the tip, and decided to turn it into a worktop for the shop. The plan was to stack the planks, tie them together with 10mm threaded rod, and then use an electric plane to flatten the tongues and grooves after. I made a template of evenly spaced out holes for the rods, and started tearing planks out of the removed sections of floor. Knocking holes in them, drilling those to size, and then stacking them into a top. Starting to get quite quick with it. I wanted to have some nuts at the 1/3 and 2/3rd mark to get the planks nice and tight together. I quickly realised that wrenching nyloc nuts onto 10x70cm of threaded rod was going to be an absolute nightmare. Seeing as I had some conduit left and a 3D printer, I knocked up two little adapters for a little socket I had for the electric drill and another that'd fit the nut with an opening to allow the rod into the conduit:
After two iterations it worked brilliantly and made threading the nuts on a breeze.
The top is coming along! Hoping to finish it this weekend so I can stop playing with the brown stuff and start cutting some steel! |
| vic newey | 03/02/2022 20:13:02 |
347 forum posts 173 photos | Posted by DutchDan on 03/02/2022 18:20:59:
Vic, as you can tell from one of my earlier photos my shed gets in a bit of a state when I'm actively working on something, but I try and declutter between things. You seem to have a nice patch of floor to work on though ------------------------------------------------------------------------------- You certainly have plenty to be going on with! My shed is a lean to against the house 14X8ft sitting on concrete posts laid horizontally so it's woodwork is off the ground, It has a clear roof. it's been there 22 years and the only real problem is shading the roof so I have camouflage nets strung up in summer. As you can see there is no insulation and yet nothing ever rusts or gets affected by extremes of cold. It is more untidy than usual at the moment as I'm having a clear out of accumulated junk and selling one of the lathes.
|
| DutchDan | 04/02/2022 08:32:41 |
49 forum posts 16 photos | I've built a clear-roofed veranda in a suntrap in our south-facing garden. I put ventilation gaps in at the top which helps a lot on warm summer's day. But then again... so does the lack of walls! It must be lovely and bright in there though, and warm up nicely in the autumn and early spring. One thing is for sure, it'll take me at least a decade to cram as much soul into that workshop as there is in yours. |
| vic newey | 04/02/2022 10:25:49 |
347 forum posts 173 photos | Posted by DutchDan on 04/02/2022 08:32:41:
One thing is for sure, it'll take me at least a decade to cram as much soul into that workshop as there is in yours. -------------------------------------------------------------------------------------------------------- A lot of my big stuff was obtained in the 1980's and then added to over the years, here is a view of my shed towards the door. Perhaps we should have a separate 'Show us yer sheds' thread
|
| DutchDan | 05/02/2022 20:18:06 |
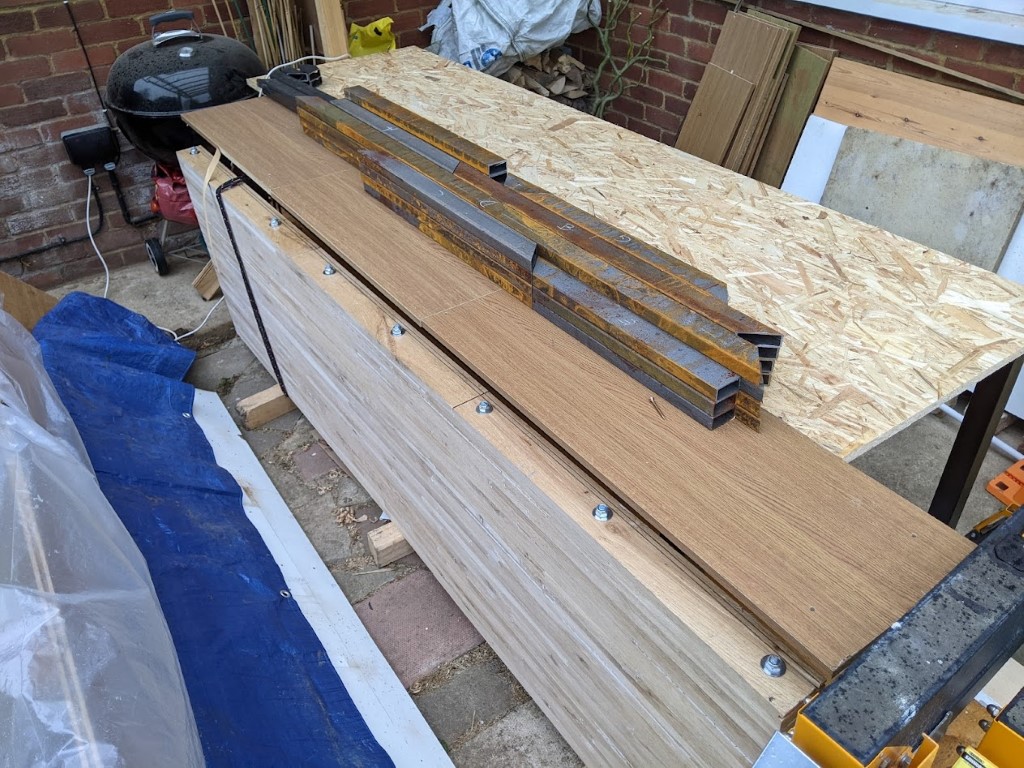
49 forum posts 16 photos | I particularly like all the little drawers, I'm still figuring out how I want to do something like that. I'd lvoe to build custom-fit steel drawers as I have a bunch of nice drawer sliders I salvaged off an old file cabinet years ago. The problem is I don't have a box bender or the place to store one. I may just have to by some... In the meantime, I have finished the top. It must weigh about 120 kg (or about 19st in old money) or so, maybe a little more. It's a pain to move but it'll make a brilliant benchtop! Now the arduous task of planing begins. When I got the plane it seemed useful to get a battery one to match some of the batteries I already have so as not to deal with the cord. But it uses so much power it eats through those batteries very quickly. Starting to second guess my decision. Ah well, we'll called it forced de-hurrying (as my mom used to say)
|
| DutchDan | 14/02/2022 09:57:21 |
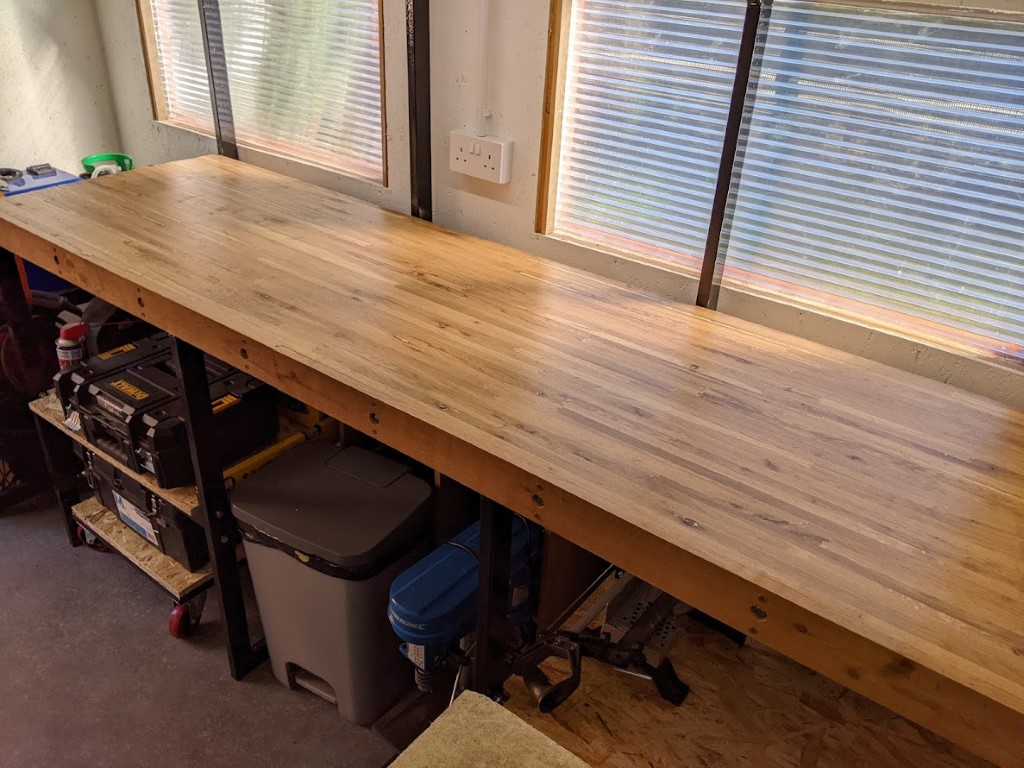
49 forum posts 16 photos | I got some more work done over the past week, and the Saturday before Sunday got very very wet. For this post I'm trying to link in photos hosted on my own server as I feel bad for using up all the forum's drive space! let me know if that causes issues for anyone. I put some filler in the remaining gaps. Then went at the top with my straight edge, a pencil and the belt sander with 40 grit until I'd knocked down all the high spots. Then sanded the gauges out with 80, and gave it a final once over with 120 on the hand sander. I plan to finish in boiled linseed oil. Any thoughts on that? Does anyone have any experience on how that copes with oil/cutting fluid etc? Once polymerised I reckon it should be ok, and nicer than polyurethane to occasionally 'refresh'. Note the gap at the front there. The front board is screwed on but the oak was hard enough for my impact driver to strip the screw so I need to get that out, pre-drill more thoroughly and try again which should fix that.
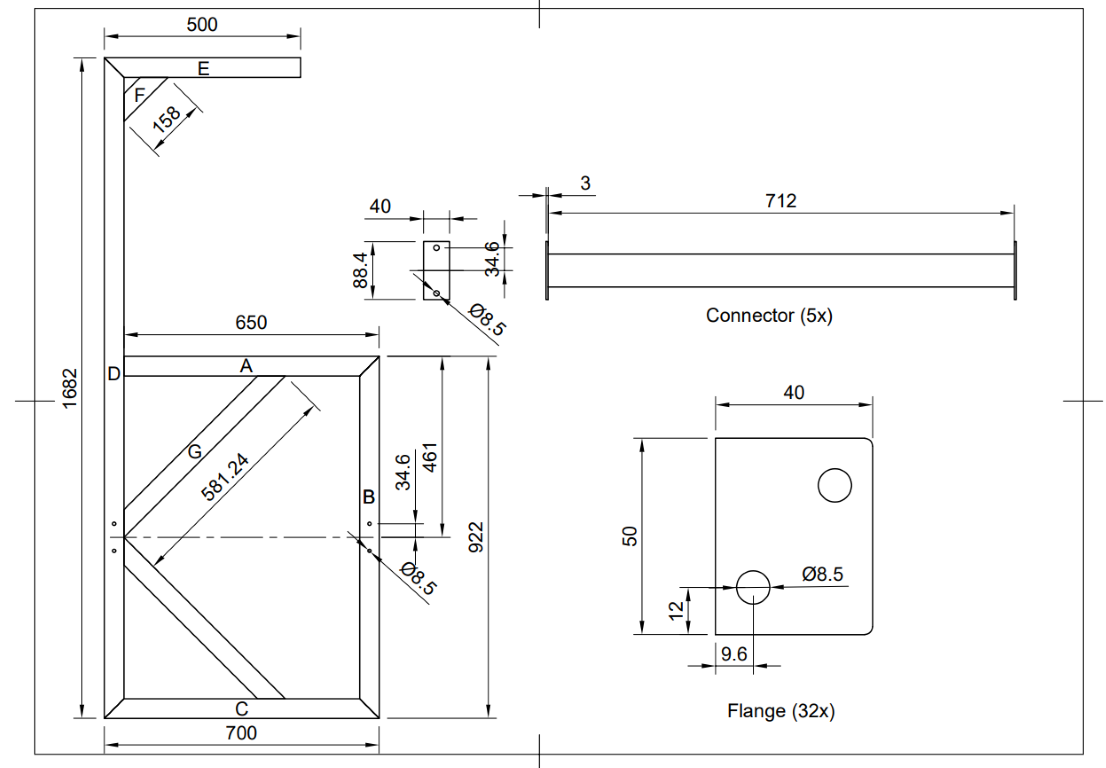
After that it was finally over with the brown stuff and on to the steel! Printed out a drawing (this is for me, so not to any standard really!) and made a cutlist.
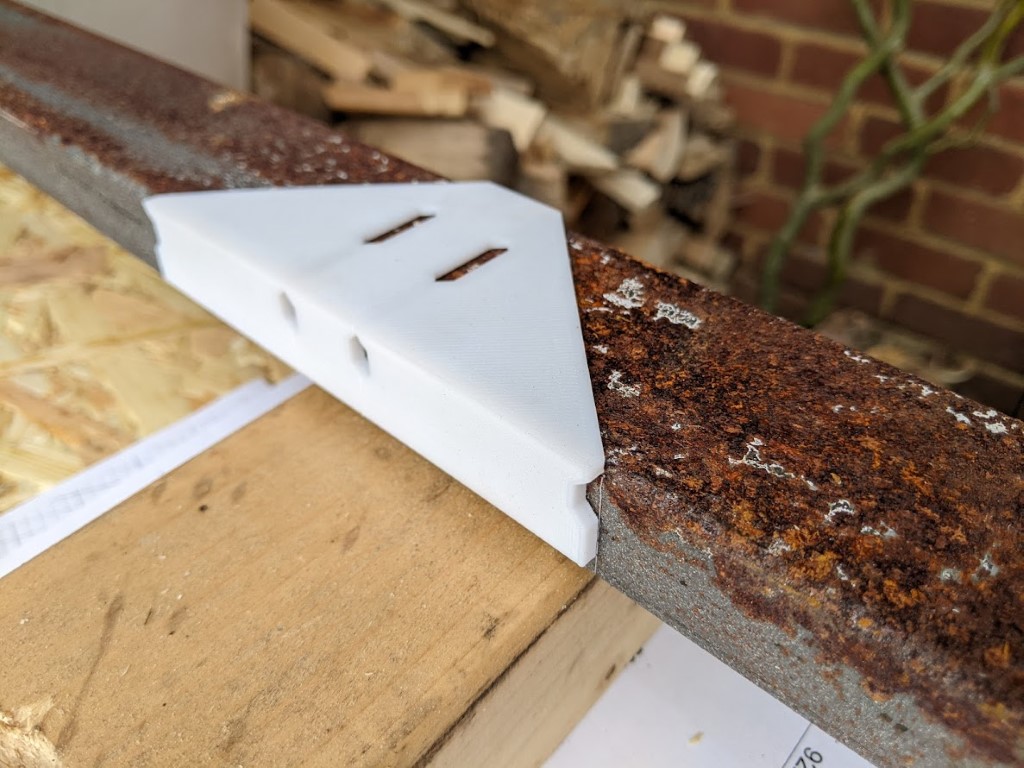
Having worked with these profiles I knew it was tricky to accurately mark the 45 degrees to a specific length due to the rounded corners. I 3D-printed a little jig and that worked absolutely brilliantly.
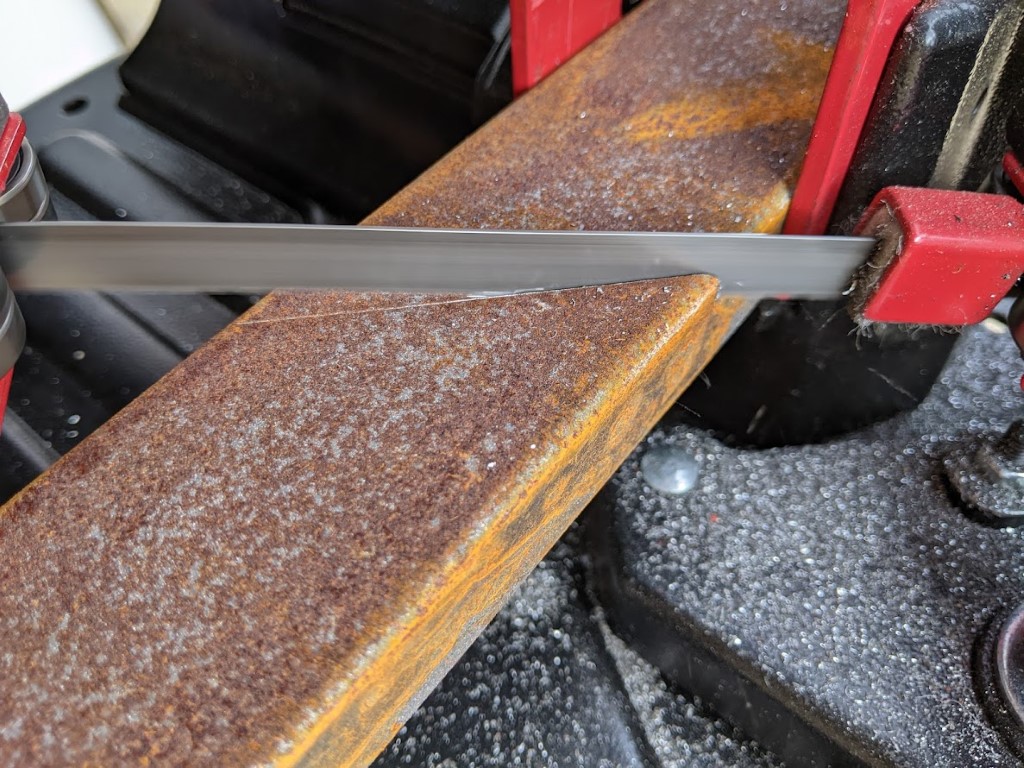
The I started cutting. I got this bandsaw some time ago to replace the mess, noise and inaccuracy of the angle grinder and have been very happy with it.
Spot on. After cutting up the first 7,5 m section it started p*ssing it down so called it a day.
Then finally, I had a very nice chat with a chap at Warco, and have sent him a list of the 290V and the load of stuff I want to get with it to get me started. I've asked for delivery w/c the 14th of March, so I'm going to have to crack on! I did also look at the GH1230 they do, which looks like a lot more Lathe for the money, but as that can't be supplied without stands due to the integrated brake and coolant system I decided against it. It is a shame as it looks like a nice machine, but it does mean my shed is slightly less overly full! Another decision I took is to spend the money on getting the necessary supplies to mill on the lathe to tide me over until I get a mill. Milling slide table, ER32 collet chuck and a collet set. It's a little bit of an investment, but most of the tooling will be used even when I get a mill. I've also been thinking about the project I'm going to undertake. I'm going to start with some practice projects in the form of the classic captive nut and engineers hammer. Maybe a scribe as well. I'll then move on to the Steward 10H engine. I know Harold Hall has a big writeup on making that using just the Lathe on his site which'll be great as a beginner. I've been wanting machine tools since I moved out of my parents' house about 13 years ago and the dream is coming true, so I'm well excited! And then finally a little throwback photo of me, probably about a decade ago, in uni:
|
| DutchDan | 21/02/2022 11:52:34 |
49 forum posts 16 photos | In between the terrible weather I've slowly been progressing. I've finished cutting all the steel for the left workbench:
And have started cleaning them up for welding (if it ever stops being so windy)
Which is always a lot of work, but sadly a part of it (or maybe I should just switch to stick!) I've now completed all the flanges that will be used to connect the stands to the top and the back wall.
I would've finished the flanges that will attach the cross bars mounted between the uprights. I got a set of 8.5mm cobalt drills from an amazon supplier for about 2 quid each. Didn't expect much for the price, but they appear to be ground by someone who only had a vague notion of what a drill looks like. Gave it a try anyway and they performed as horribly as expected. I've got a refund and ordered a (hopefully) proper drill from FFX. In the meantime I started thinking a bit more about getting the machinery in place. Having heavy machines is one thing, and although I've lifted 205kg off the ground once, I'm going to need some help for the machines. Looking at rental prices for engine hoists I decided to just buy a cheap model that folds away, and recoup my investments in a few uses.
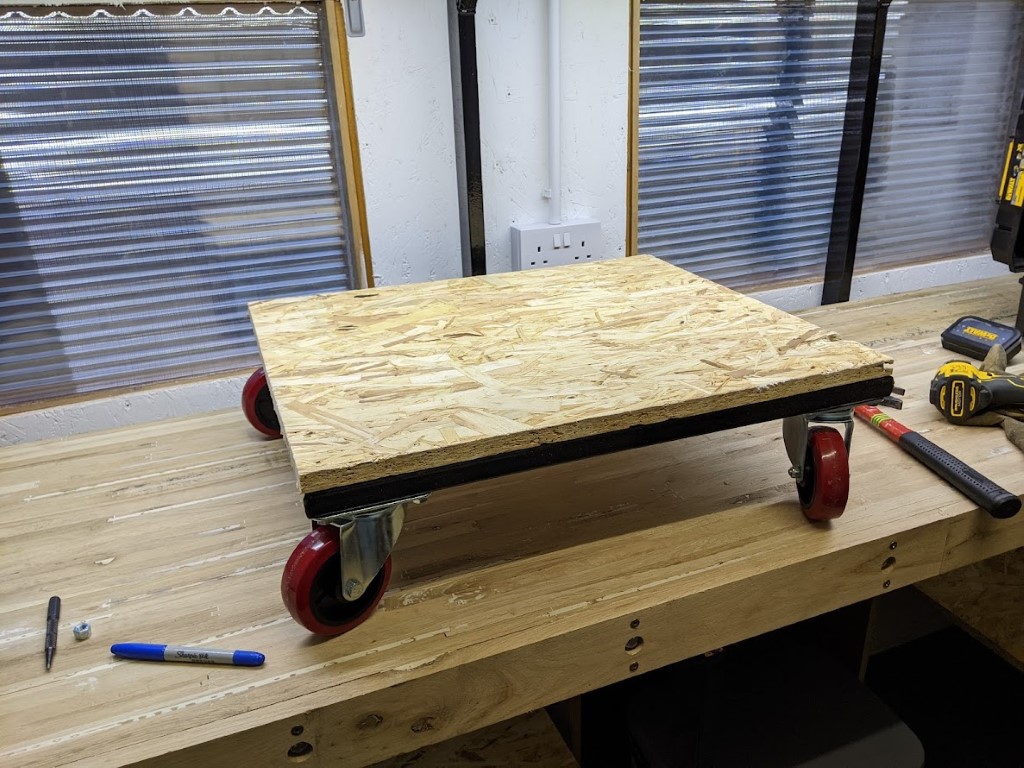
I also started looking at dollies that were rated safely above the weight I'll be moving (uneven tiles outside!) and found them to pricey. So I ordered 4 wheels rated for 200kg each online and cut some steel cutoffs from a previous project to length to fashion into a dolly:
Finally I have done some shuffling in my budget, and decided that I'd buy a lathe and mill at the same time with bare minimum tooling and get more tooling as time carries on. I'm starting out with the minimum I'll need to work through the exercises in Mr. hall's books which should take me a while. The next step after that will be to try my hand at the Stuart 10H! I'd originally planned to get the lathe first and spend a fair bit on a milling slide to tide me over. My bonus over last year came in and was a bit more than expected, so I decided to go this route. I'll be placing the order with Warco for the Wm290V Lathe and the WM18B mill. I'd honestly rather have gotten older machines like a big colchester and a bridgeport or something along those lines. After much consideration I decided to go for these imports for a few primary reasons: Part of the long term plan is to move to a more rural location in a decade or so in my early forties. Part of that will be a properly sized workshop with access (I'm removing some fencing and going through the neighbour's yard this time) and by that time I will get some true big-boy toys. That being said, both these machines, from what I'm reading, are quite good. I've looked at the various suppliers and read around loads both here on the forum and elsewhere, and I reckon they will serve me well. Hoping to plan delivery w/c 14th of March, so I'll have to crack on with building the benches. |
| DutchDan | 15/03/2022 12:00:55 |
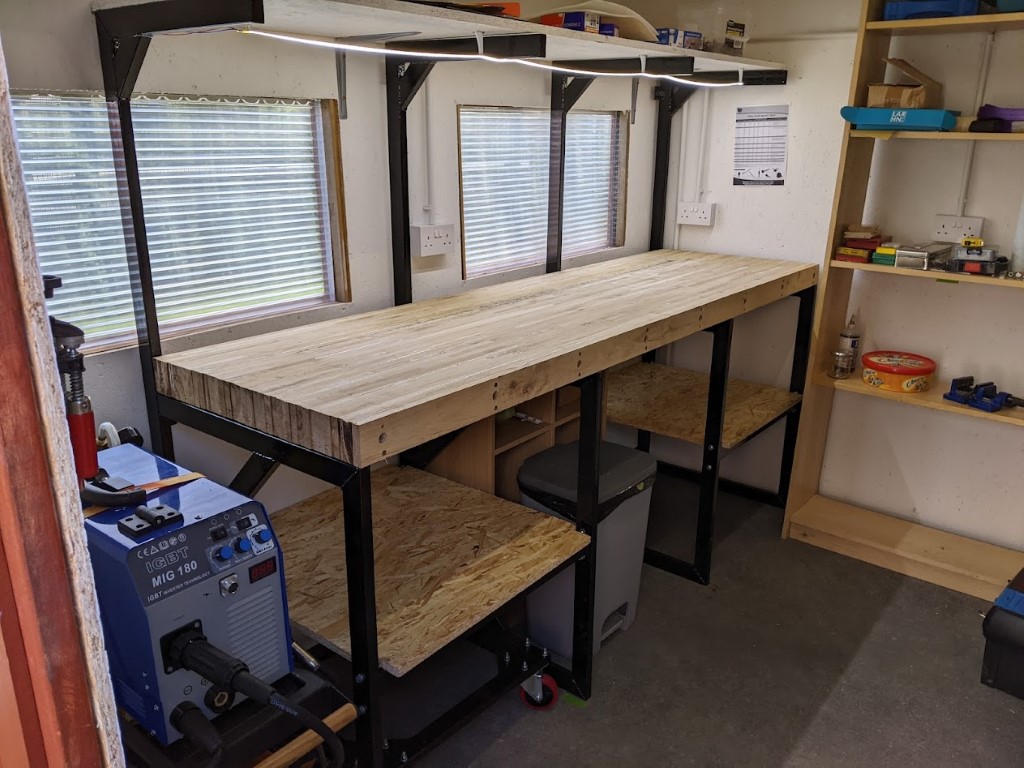
49 forum posts 16 photos | I have not sat still! I finished welding up the stands, placed them and put the top on:
It is very very solid, and the top is perfectly level in the x, and within 0.5 in the y without any further work.
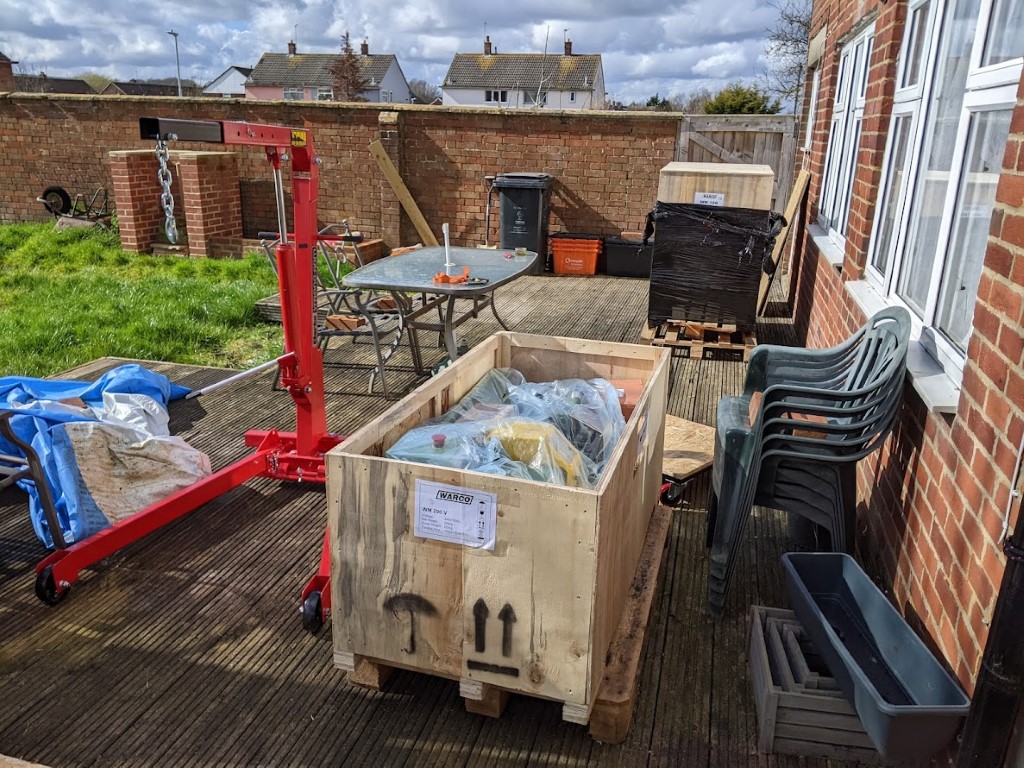
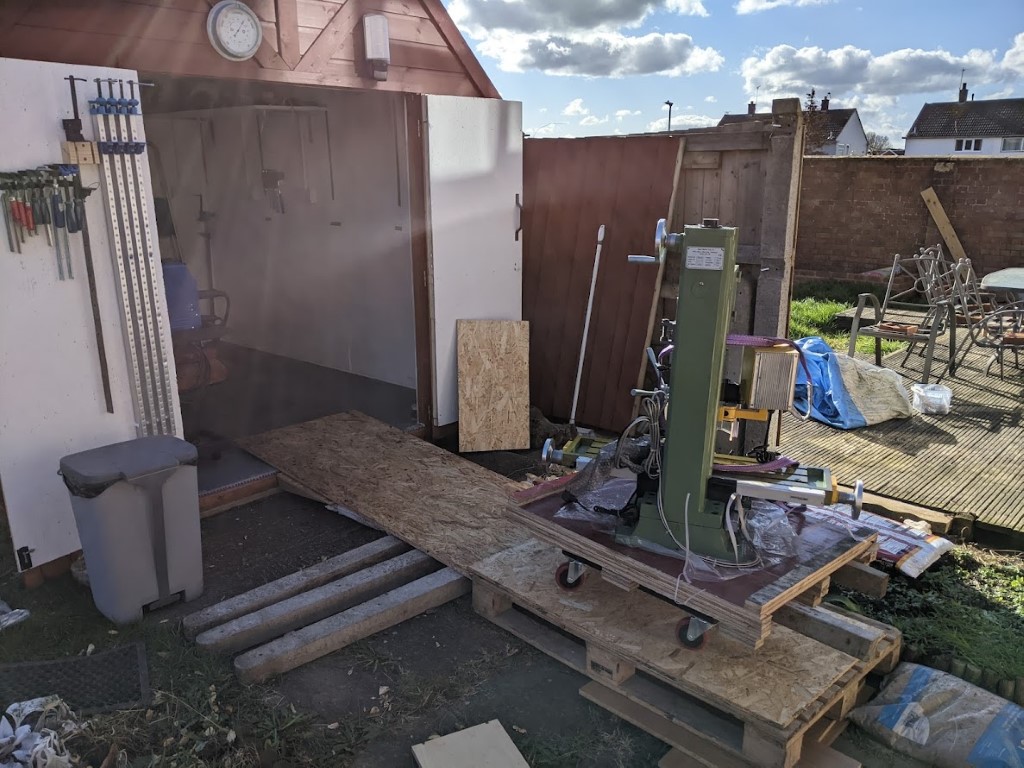
In preparation for delivery yesterday I removed the fencing between my and my neighbour's backyard, as she has access from the street (well, we put a bunch of OSB offcuts across the grass). The driver was kind enough to help me manoeuvre the boxes across the grass, up a little ramp I built an onto my neighbour's decking.
I then proceeded to open the crates and remove the sides of the boxes. I took the chuck, splash guard and tailstock off the lathe and with a little effort and my girlfriend operating the pump used the crane to put it on my dolly. It was then moved into the shed with lots of effort. I'm lucky I had the strength to lift the lath as long as it was one end at a time as one of the wheels slipped off the ramp and into the soil... Finally I engine hoisted it onto it's place on the bench. I then unpacked the mill, but this time prepared the way to the shed a bit more thoroughly. I also drove some long screws into the plate it was mounted to to affix it to the dolly. I used some sand bags and old concrete posts, and this move was much smoother.
The lathe will have to move some more as I make some tweaks to the swarf tray. It normally comes on a stand, but I opted to do without and build my own as I figured I could build something more solid. As a result I have a swarf tray that's for a different lathe, and has holes in the wrong places. Once I get the mill in place and set up I'll use that to modify the plate, and I'll get some threaded rod to attach it firmly to the bench. I'll also need to mount the DRO to my frame/shelf rather than the machine as the shelf gets in the way. I also had to remove the chuck guard (who uses them anyway? Stay away from the spinny bits!). I gave the lathe a quick spin last night, but will clean everything and re-lubricate before actually using it. The mill will go in place somewhere this week. After all this I was absolutely knackered, but also very satisfied. Took about 3,5 hours from the lorry showing up to this:
Note the stand for the mill is temporary, but should do alright for now. Will just bolt it to the wall before putting the mill on. edit: clicking images should now link to my hosting sowing them a little bigger. Edited By DutchDan on 15/03/2022 12:02:42 |
| DutchDan | 21/03/2022 11:41:34 |
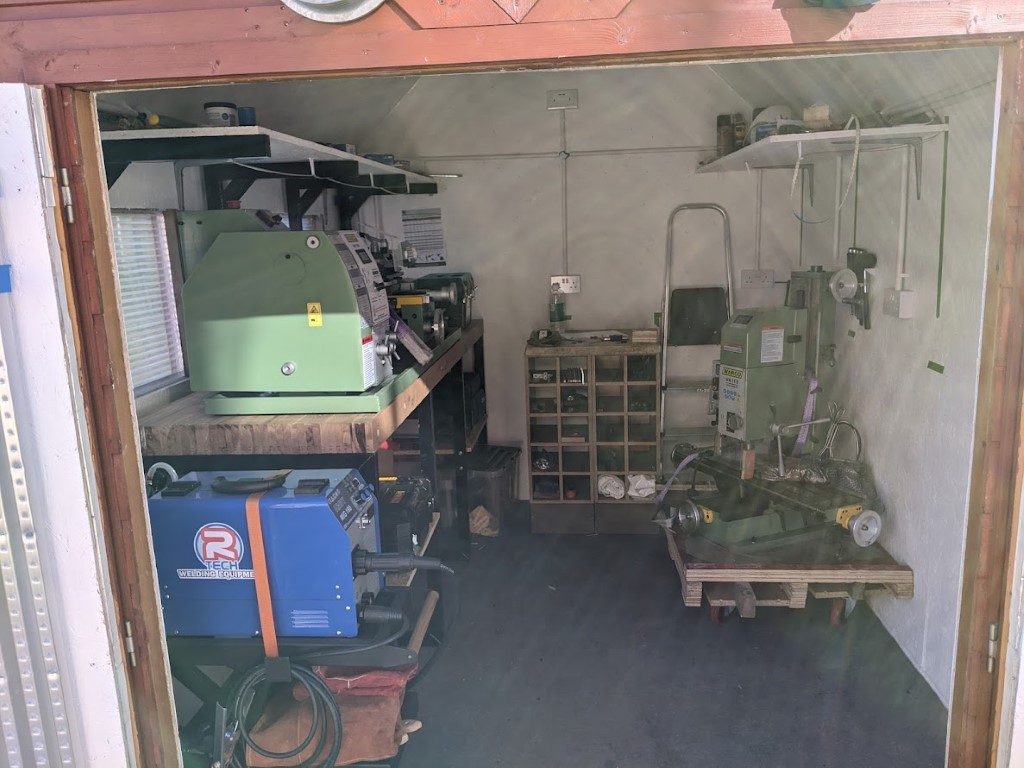
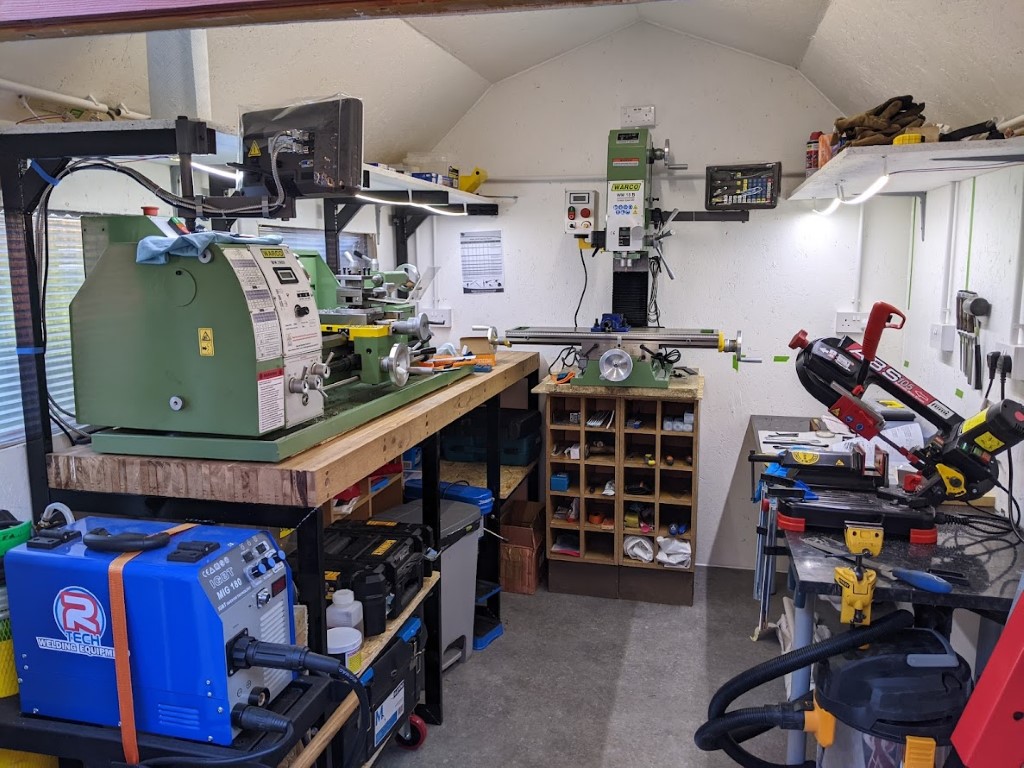
49 forum posts 16 photos | And the workshop is operational.
More work to be done on the second workbench and an actual stand for the mill, but for now I'm making some chips first. |
| vic newey | 21/03/2022 12:00:33 |
347 forum posts 173 photos | Glad to see you finally got it ready to use! Are you planning to make anything in particular or just potter about like me? I'm rearranging my machines to make way for another lathe, I've dismantled a bench that was covered in junk and moved my Pittler lathe into the space so leaving a bigger space for the another larger vintage lathe. |
| Hopper | 21/03/2022 12:05:44 |
 7881 forum posts 397 photos | Wow that came up nice. Painting the walls and floor before moving in makes a big difference. Wish I had done it before I filled every available space with too much junk to ever move again. And that workbench the lathe is on looks super solid! I bet that soaks up every last vibration that lathe attempts to kick out. |
| DutchDan | 21/03/2022 12:18:30 |
49 forum posts 16 photos | Vic, I have a few things lined up. I'm first making my way through Harold Hall's lathework and milling courses. I've also bought myself material to make a machinist's hammer and then (a little more ambitious) some stainless to make a ThisOldTony style tap wrench. After that I have a Stuart 10H kit I got for my birthday from my girlfriend, after which I may build a stirling engine from scratch. Ultimately I'm always building things, now I can just do it out of metal, and not just wood and plastic. Hopper, the painted walls do add a lot of lightness to the room. The flooring is actually the cheapest vinyl I could find. it has actually held up very well to me moving stuff about it. The advantage of the vinyl over the wooden floor is that spills just sit on top of it, rather than soaking into the wood. Very easy to clean. The workbench is extremely solid. The oak top weighs over 100kg and the frame must be just shy of that. All screwed to the walls, so a very nice damping mass. The lathe is currently just sat there, not bolted down. I want to design some sort of adjustable insert for it. Epoxy one side into the worktop and have another bit that attaches to the lathe that I can raise lower to level out the lathe. I also want the lathe a little higher to make it easier to clean underneath. Ideally I'd adjust the drip tray to be removable, as my first go at cleaning up the swarf last night was a it of a pain. The 290V usually comes with a drawer on the stand, but I wanted it on my workbench, so I'll have to devise something myself. |
| Thor 🇳🇴 | 21/03/2022 14:53:43 |
 1766 forum posts 46 photos | That is a very nice workshop, good luck with the Stuart. Thor |
| Howard Lewis | 21/03/2022 15:14:38 |
| 7227 forum posts 21 photos | A nice workshop! Wish that mine could be so clean and tidy. I found that shops tend to be governed by a sub clause of Parkinson's law. "Equipment expands to fill mthe space available" In my experience, things like drill chucks breed like rabbits. (have lost count! ) With regard to ventilation, it would pay to install a fixed vent as near as possible to floor level, and more at high level. Ideally on opposite ends of a diagonal. They do not need to be large. A lot of air can pass through a 1" hole, without any great pressure difference.. The low level vent allows moist air to exit and be replaced by hopefully drier air entering via the high level one. Obviously the vents need to be weatherproofed (My high level one has a long downward facing hood over it. Some form of gauze over the vents will minimise the risk of spiders and insects taking up residence.. HTH Howard |


Please login to post a reply.
Magazine Locator
Want the latest issue of Model Engineer or Model Engineers' Workshop? Use our magazine locator links to find your nearest stockist!
Sign up to our Newsletter
Sign up to our newsletter and get a free digital issue.
You can unsubscribe at anytime. View our privacy policy at www.mortons.co.uk/privacy
Latest Forum Posts
- hemingway ball turner
04/07/2025 14:40:26 - *Oct 2023: FORUM MIGRATION TIMELINE*
05/10/2023 07:57:11 - Making ER11 collet chuck
05/10/2023 07:56:24 - What did you do today? 2023
05/10/2023 07:25:01 - Orrery
05/10/2023 06:00:41 - Wera hand-tools
05/10/2023 05:47:07 - New member
05/10/2023 04:40:11 - Problems with external pot on at1 vfd
05/10/2023 00:06:32 - Drain plug
04/10/2023 23:36:17 - digi phase converter for 10 machines.....
04/10/2023 23:13:48 - More Latest Posts...
- View All Topics
Support Our Partners


Shopping Partners
Subscription Offer

Latest "For Sale" Ads
- Reeves** - Rebuilt Royal Scot by Martin Evans
by John Broughton
£300.00 - BRITANNIA 5" GAUGE James Perrier
by Jon Seabright 1
£2,500.00 - Drill Grinder - for restoration
by Nigel Graham 2
£0.00 - WARCO WM18 MILLING MACHINE
by Alex Chudley
£1,200.00 - MYFORD SUPER 7 LATHE
by Alex Chudley
£2,000.00 - More "For Sale" Ads...
Latest "Wanted" Ads
- D1-3 backplate
by Michael Horley
Price Not Specified - fixed steady for a Colchester bantam mark1 800
by George Jervis
Price Not Specified - lbsc pansy
by JACK SIDEBOTHAM
Price Not Specified - Pratt Burnerd multifit chuck key.
by Tim Riome
Price Not Specified - BANDSAW BLADE WELDER
by HUGH
Price Not Specified - More "Wanted" Ads...
Get In Touch!
Do you want to contact the Model Engineer and Model Engineers' Workshop team?
You can contact us by phone, mail or email about the magazines including becoming a contributor, submitting reader's letters or making queries about articles. You can also get in touch about this website, advertising or other general issues.
Click THIS LINK for full contact details.
For subscription issues please see THIS LINK.
Digital Back Issues


Donate

 Register
 Log-in
Model Engineer Magazine
- Percival Marshall
- M.E. History
- LittleLEC
- M.E. Clock

ME Workshop
- An Adcock
- & Shipley
- Horizontal
- Mill

Subscribe Now
- Great savings
- Delivered to your door

Pre-order your copy!
- Delivered to your doorstep!
- Free UK delivery!
All Forum Topics > Work In Progress and completed items > Setting up my workshop