Forum sponsored by:

Silver soldering boiler
| David George 1 | 22/05/2020 16:52:58 |
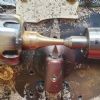
 2110 forum posts 565 photos | Made the boiler end support plates. I decided to make them from stainless steel perhaps could have been a little thinner material, 1.2mm, but I managed them in the end although I had to put a groove down the fold line to get a nice bend.
Rotary mill end top radius.
Bore hole for boiler.
Bent ready to try.
These are finnished now. David
|
| David George 1 | 26/05/2020 22:59:25 |
2110 forum posts 565 photos | Made a bit of progress on boiler and made a small drain cock for condensate in chimney, made chimney and started mounting boiler and engin.
David
Edited By David George 1 on 26/05/2020 23:01:24 Edited By David George 1 on 26/05/2020 23:02:18 |
| Pete. | 26/05/2020 23:08:38 |
 910 forum posts 303 photos | That looks really good David. |
| geoff walker 1 | 27/05/2020 17:49:30 |
| 521 forum posts 217 photos | Yes, agree with Pete, looks great. The smoke stack puzzled me but having looked at the drawings on steves website I can see that it is for the engine exhaust. Have you made a burner Geoff |
| David George 1 | 28/05/2020 06:46:31 |
2110 forum posts 565 photos | Hi Geoff. I have ordered the burner from Forest classics and the safety valve as I thought it would save time but it hasn't come yet. David |
| David George 1 | 29/05/2020 17:16:24 |
2110 forum posts 565 photos | I made a jig pattern to bend and hold the heat shield brass plate. I made it in wood so I can clamp the brass plate, when it gets here, and bend it round and drill and flange for brackets.
I drew the radius on the end and used a ball nosed cutter to shape the curve small step by small step then rip off small cusps with sand paper. The groove in the centre is to clear the centre bushes and the brass will be bent down to fit the boiler. It did make a bit of a mess which took about an hour to clean up. David
|
| David George 1 | 02/06/2020 19:39:40 |
2110 forum posts 565 photos | Decided to pressure test the boiler. As I didn't have a pressure pump I had to make something and with a piece of 1 1/2 mild steel drilled and reamed a 1/2 bore and cut a 3mm o ring groove to make a seal for a dowell for a plunger. Then I drilled a cross hole 4mm though and tapped them 8mm about 10mm deep. I then made two non return valves from a piece of brass two 5mm balls and a couple of springs one suck and seal, one pressure and seal, just make sure the spring is on the right side. I Soldered a couple of pipes into the non return valves one with a connection to boiler and a suction pipe to pick up water. David George
When I conected the pump to the boiler which I had pre filled with water the pump worked great and found a couple of leaks one on the level plug which needed a new washer as the copper one I made didn't seal but a bit of PTFE fixed that for now and the seal on the fitting which holds the pressure gauge had a slight leak at pressure a bit of solid locktited thread seal fixed that.
The boiler was ok in itself and holds pressure up to 60 PSI that is as far as the gauge goes. I replaced the grub screw with the safety valve and tested it and it released at about 20 PSI I hope that is enough to run the little wobbler. David
Edited By David George 1 on 02/06/2020 19:42:20 Edited By David George 1 on 02/06/2020 19:43:23 |
| David George 1 | 03/06/2020 20:01:14 |
2110 forum posts 565 photos |
Edited By David George 1 on 03/06/2020 20:03:54 Edited By David George 1 on 03/06/2020 20:05:17 |
| Chris V | 27/02/2021 17:29:44 |
 313 forum posts 42 photos | David did you spin the boiler end caps yourself? It all looks very neat & impressive! Chris. |
| Harry Wilkes | 27/02/2021 18:16:11 |
 1613 forum posts 72 photos | Nice work David but if it was mine I would have to change the fasteners for hex head think they would improve the look of what is a very nice boiler a little more H Posted by David George 1 on 26/05/2020 22:59:25: Made a bit of progress on boiler and made a small drain cock for condensate in chimney, made chimney and started mounting boiler and engin.
David
Edited By David George 1 on 26/05/2020 23:01:24 Edited By David George 1 on 26/05/2020 23:02:18
|
| David George 1 | 28/02/2021 07:37:30 |
2110 forum posts 565 photos |
The boiler ends were spun on a piece of steel turned with the correct diamiter to just give a few thou clearance on the boiler tube with the radius on the corner. The end of the bar was tapped to hold a heavy washer of a smaller diamiter to clamp the copper flat on the end. I firstly anealed the plate and with the jig in a vice and using a hide mallet bent the side down but by bit and repeating the annealing quite a few times. When it was getting nearer I put it on the lathe and using a piece of steel with the end smoothed into a toolholder and pressed whilst rotating and with some grease to lubricate as well. The final part was to skim the end of the cap to a nice finnish and debur. David Edited By David George 1 on 28/02/2021 07:57:51 Edited By David George 1 on 28/02/2021 07:58:58 |
| Brian H | 28/02/2021 08:13:00 |
 2312 forum posts 112 photos | That's a lovely piece of work David. Brian |


Please login to post a reply.
Magazine Locator
Want the latest issue of Model Engineer or Model Engineers' Workshop? Use our magazine locator links to find your nearest stockist!
Sign up to our Newsletter
Sign up to our newsletter and get a free digital issue.
You can unsubscribe at anytime. View our privacy policy at www.mortons.co.uk/privacy
Latest Forum Posts
- *Oct 2023: FORUM MIGRATION TIMELINE*
05/10/2023 07:57:11 - Making ER11 collet chuck
05/10/2023 07:56:24 - What did you do today? 2023
05/10/2023 07:25:01 - Orrery
05/10/2023 06:00:41 - Wera hand-tools
05/10/2023 05:47:07 - New member
05/10/2023 04:40:11 - Problems with external pot on at1 vfd
05/10/2023 00:06:32 - Drain plug
04/10/2023 23:36:17 - digi phase converter for 10 machines.....
04/10/2023 23:13:48 - Winter Storage Of Locomotives
04/10/2023 21:02:11 - More Latest Posts...
- View All Topics
Support Our Partners


Shopping Partners
Subscription Offer

Latest "For Sale" Ads
- Reeves** - Rebuilt Royal Scot by Martin Evans
by John Broughton
£300.00 - BRITANNIA 5" GAUGE James Perrier
by Jon Seabright 1
£2,500.00 - Drill Grinder - for restoration
by Nigel Graham 2
£0.00 - WARCO WM18 MILLING MACHINE
by Alex Chudley
£1,200.00 - MYFORD SUPER 7 LATHE
by Alex Chudley
£2,000.00 - More "For Sale" Ads...
Latest "Wanted" Ads
- D1-3 backplate
by Michael Horley
Price Not Specified - fixed steady for a Colchester bantam mark1 800
by George Jervis
Price Not Specified - lbsc pansy
by JACK SIDEBOTHAM
Price Not Specified - Pratt Burnerd multifit chuck key.
by Tim Riome
Price Not Specified - BANDSAW BLADE WELDER
by HUGH
Price Not Specified - More "Wanted" Ads...
Get In Touch!
Do you want to contact the Model Engineer and Model Engineers' Workshop team?
You can contact us by phone, mail or email about the magazines including becoming a contributor, submitting reader's letters or making queries about articles. You can also get in touch about this website, advertising or other general issues.
Click THIS LINK for full contact details.
For subscription issues please see THIS LINK.
Digital Back Issues


Donate

 Register
 Log-in
Model Engineer Magazine
- Percival Marshall
- M.E. History
- LittleLEC
- M.E. Clock

ME Workshop
- An Adcock
- & Shipley
- Horizontal
- Mill

Subscribe Now
- Great savings
- Delivered to your door

Pre-order your copy!
- Delivered to your doorstep!
- Free UK delivery!
All Forum Topics > Locomotives > Silver soldering boiler