Forum sponsored by:

Myford Mk1 Super 7 restoration
| SillyOldDuffer | 06/04/2020 17:21:00 |
| 10668 forum posts 2415 photos | Posted by V8Eng on 05/04/2020 19:01:36:
Posted by Mark Rand on 05/04/2020 17:42:50:
Posted by V8Eng on 05/04/2020 13:47:35:
Please Please promise that you won’t connect that lathe up to power again before you’ve had those electrics professionally checked out! ...Why do you think that? Yes it's old. Yes there isn't secondary isolation over the wiring. Yes it certainly doesn't comply with the 18th edition of the Regs, but there is no intrinsic danger visible... ... Get an unknown electrical system checked out! Nothing to do with elf n safety or an edition of the Regs, just sensible precautions and hopefully common sense! ... I agree with V8 and it's all easily fixed. In addition to the dodgy fuses and exposed wires, the earth is a tiny rusty bolt and the cables look like rubber. Never trust old rubber... Dave
|
| Morty | 07/04/2020 14:28:45 |
 94 forum posts 101 photos | Hi Everyone! I have decided th fit a new 3 phase motor and control gear, it comes ready wired up so I reckon it will be nice and safe and an improvement over the original motor as well! Cheers, Pete |
| Steviegtr | 08/04/2020 00:18:33 |
 2668 forum posts 352 photos | Hi Morty. Great job you are doing. I did quite a bit with mine when I bought it. It looked like new though. I fitted a set of standard Myford belts, don't be tempted as many will tell you how good they are, the temporary linked belts. Clack clack clack when worn. I will get shot for saying that but it's a fact. I fitted a inverter & 1.5hp motor. Not because of power like some rib me about, but because I got a great Omron inverter 2nd hand for £80. It was a 1.1kw. So with that I was going to fit a 1hp motor. The difference in price was little so I opted for the bigger motor. Running it is as quiet as a church mouse. Love it. I know the Myford has it's limits, which are a few ,like the 3 1/2" swing, MT2 through hole on the head stock. But when set up with minimum tolerances they are a nice machine. You will not be disappointed with it. Remember it is a small lathe. Some of my friends have huge Colchesters, Harrisons etc. But when they see my little machine they all comment on nice it is. Or is it them just being nice to me..HaHa. Look in my albums & you will see the control panel I built. It did not cost much & the engraved front plate was only £25. Which finishes it off nicely. Better than dymo tape stickers. If you are going to fit a tacho. See the one I fitted at the left of the headstock. Some fit them to the belt pulley under the guard, but I tried that & it did not seem right. I bonded the magnet to the locking ring to the left in your last picture. It has stayed in place ok. Tom Senior. Yes they go hand in hand. 2 old bangers together is what I have , after many hours /days/weeks looking at different milling machines. Lots of Asian import ones & in particular a Warco. & the Sieg 3.5 twin turbo, which is unavailable anyway. So I ended up with this one. Yesterday I have just finished the X-Axis power feed using the Ford Mondeo wiper motor. Tonight I have been milling some large toolholders down to fit the 250-111 quick change toolpost. Worked a treat. Anyway keep us all up to date as you progress through the refurb. I think I spend more time in the workshop looking at them than using them. Steve.
|
| Morty | 09/04/2020 14:43:34 |
94 forum posts 101 photos | Hi Steve! Nice workshop You've got there! Myford is looking sweet and the Tom is in really nice condition! I've been doing My homework on the Tom Milling Machines, but I missed the fact that the 'light' does not have power 'X' feed? The 'Light' is my prefered choice due to the fine downfeed, but they seem a bit thin on the ground compared to the M1. I have also put on the possibles list a new Warco VMC, I would prefer an old British though! Thanks for the info on building a control panel, filed away! I'm looking at the Newton Tesla 1hp motor for the Myford, comes with the inverter all wired in, bit more money but would seem a logical choice for Myself! Once again, many thanks for the help and advice, it is heartening that so many people are taking notice of My restoration, and the offers of help and advice are really humbling! I'm putting another posting up next on the Myford. Cheers, Pete
|
| Morty | 09/04/2020 15:29:37 |
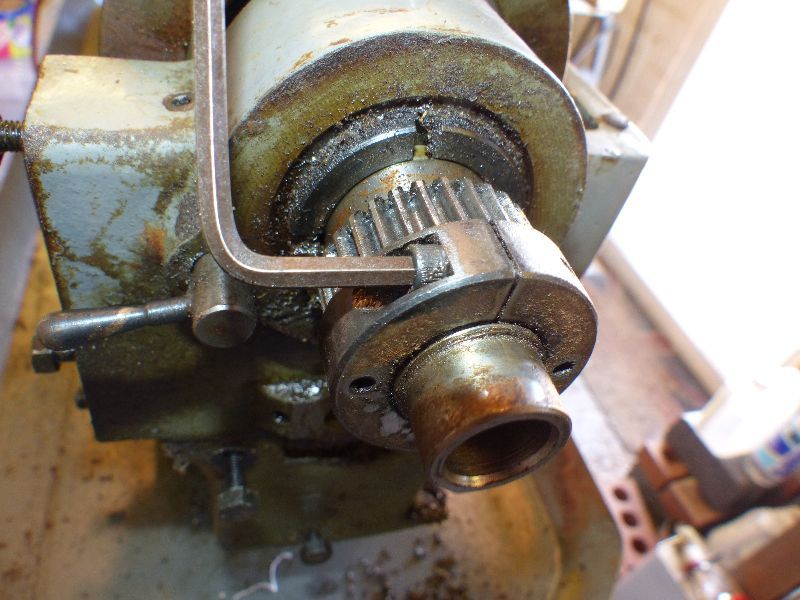
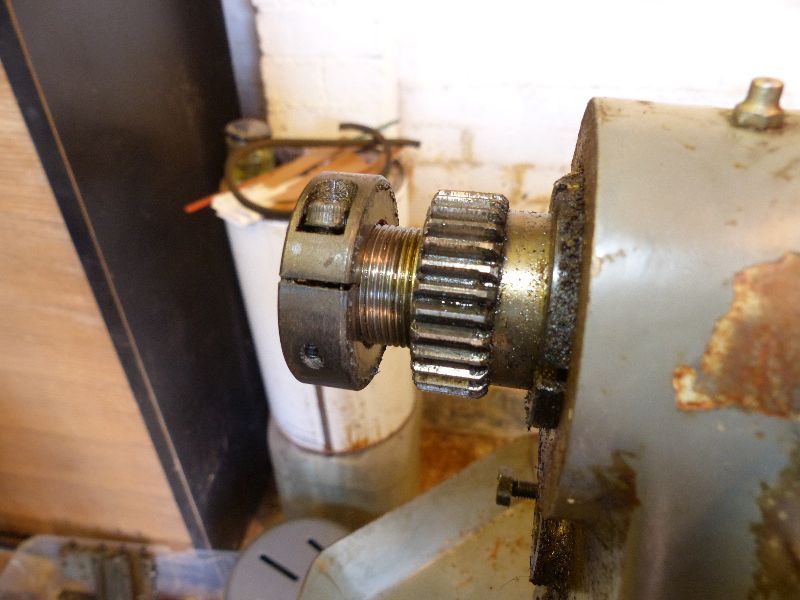
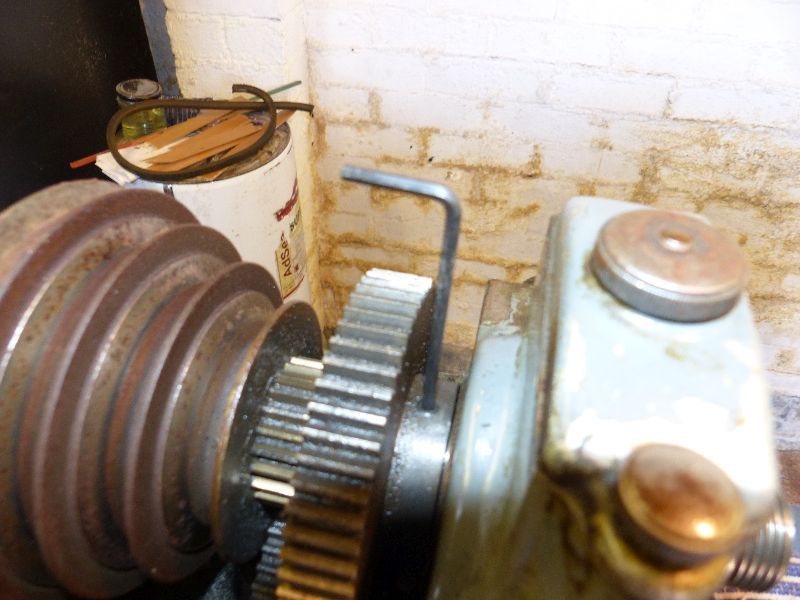
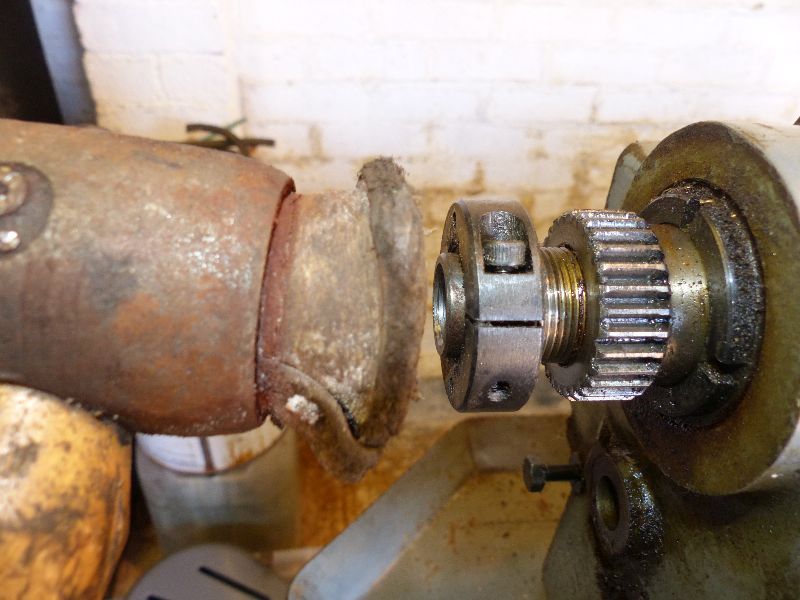
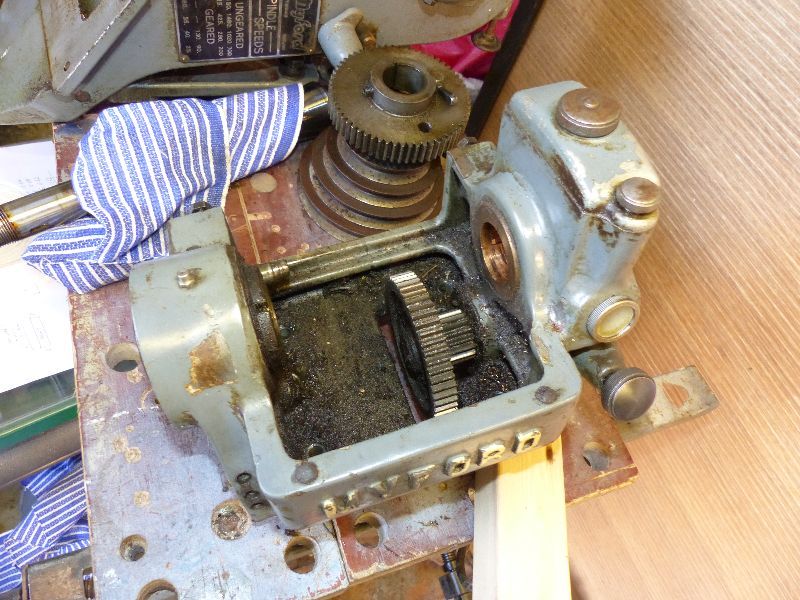
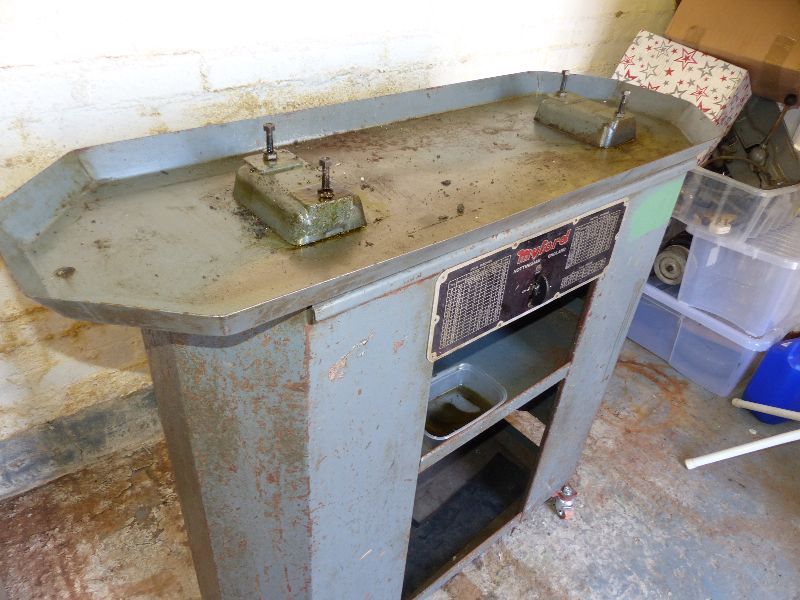
94 forum posts 101 photos | Hi there! Now, where was I......... Ah, yes, time to get the headstock off:- Loosen capscrew on locking collar and remove, undo grubscrew in back gear and drift out quill to the right ( must get some new heads on My mallet, only had it 40 years.......... (Don't forget to catch the Woodruff keys.....)
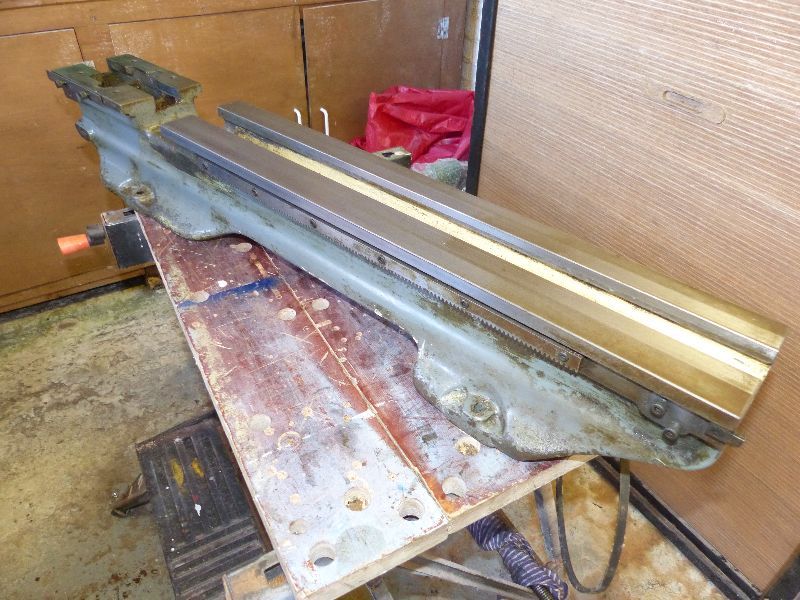
60 Years of crud in there, but managed to find the 4 capscrews and remove them ( very tight! ), and lift the headstock clear:-
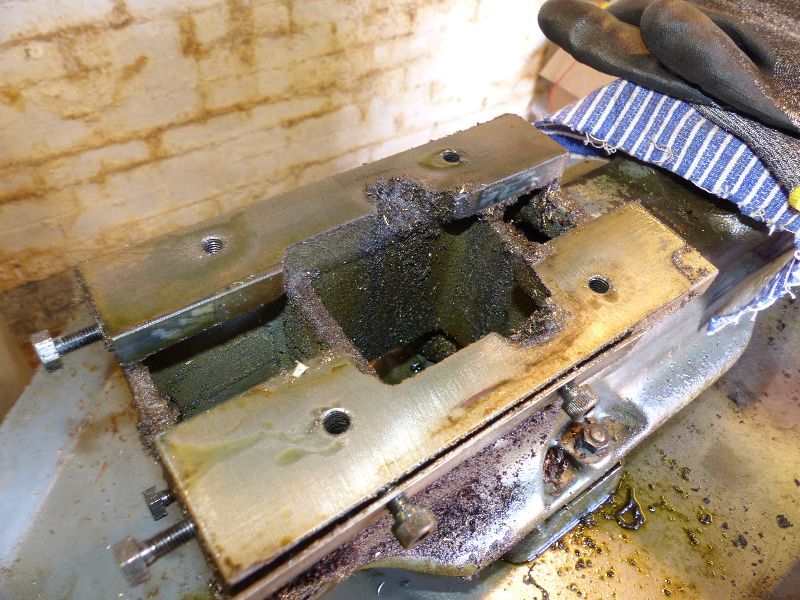
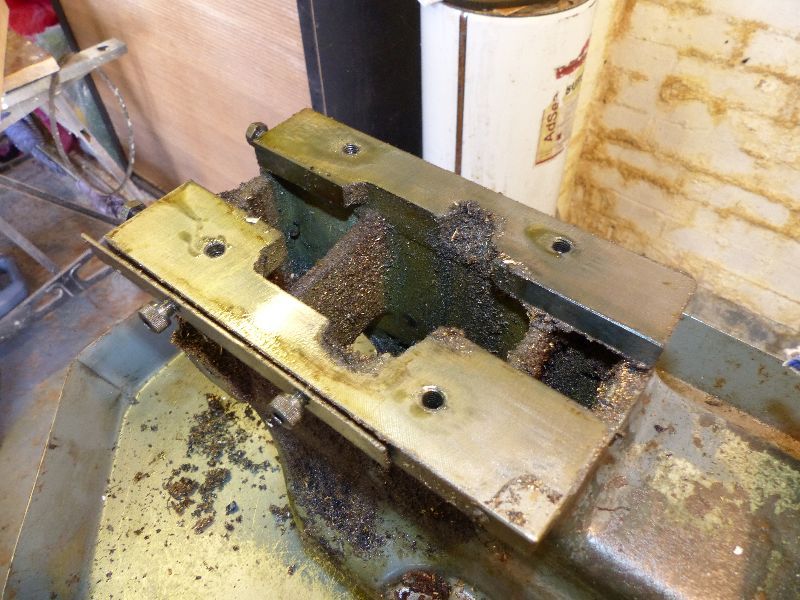
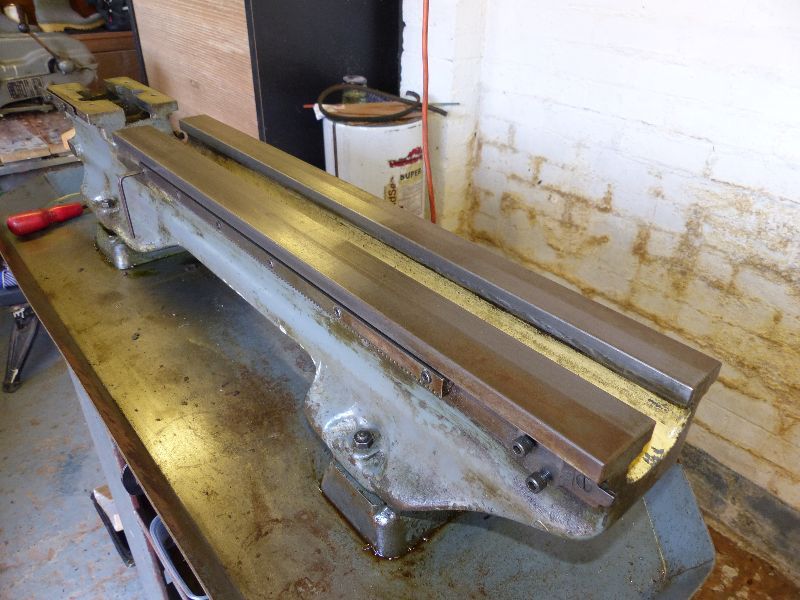
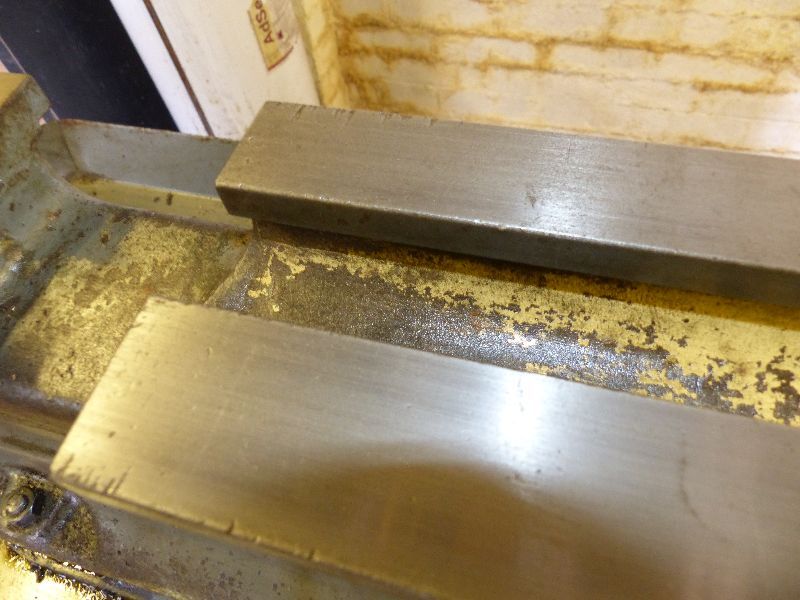
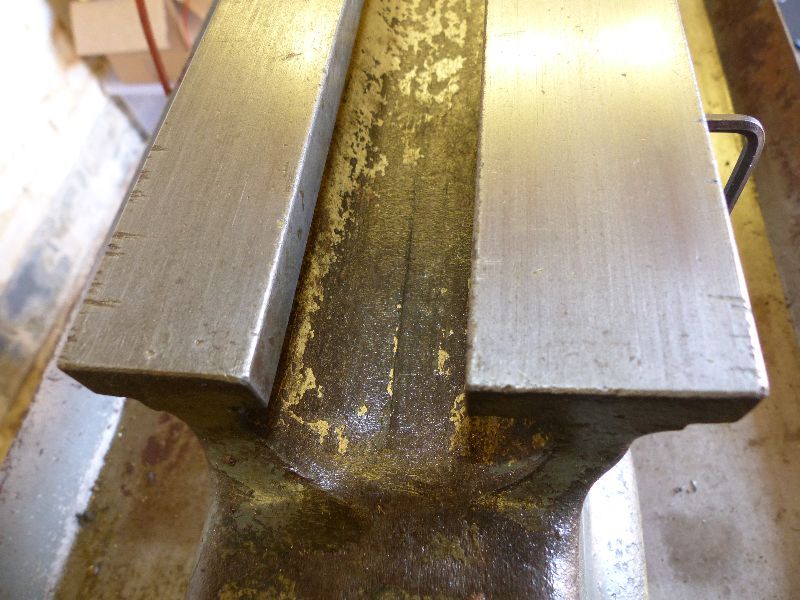
Bed wiped down for inspection and carefully lifted off and put to one side:-
A few 'manual' parting off marks on the top off bed but I have seen worse! Wear variation measurements as follows (taken at 5 points along bed):- 1:- Total width across both bedways- 0.011 mm 2:- Horizontal width of rear bedway- 0.080 mm 3:- Horizontal width of front bedway- 0.006 mm 4:- Depth of vertical shear front of front bedway- 0.087 mm 5:- Depth of vertical shear rear of front beadway- 0.214 mm 6:- Depth of vertical shear front of rear bedway- 0.164 mm 7:- Depth of vertical shear rear of rear bedway- 0.064 mm I am reading this as the worst wear is on the 2 inside vertical shears. Not being very knowledgeable about these matters, could somebody set Me on the right track here as to whether the bed is in need of a regind or is it servicable? (I'm not sure if all the above measurements are required, opinions vary, so I took them all anyway! Next job is sort the rising blocks, drip tray, switch removal and clean up the cabinet ready for stripping / re-painting.
Thanks for looking in! Cheers, Pete
|
| Werner Habbel | 09/04/2020 17:52:25 |
| 12 forum posts | Hi Pete, my name is Werner and I am from Germany. I own an eraly S7 with gearbox as well. Serial no SK3853 on the bed and 1184 on the gearbox. The gearbox unfourtunately has the soft gears. In 1995 on holidays in UK I visited Myford and asked for a repair because the metric threads didn't work. I had no appointment and the repair was done within one day. Lovely The S7 lost its precision so I am very intersted in your report and looking forward for the continuations. Werner |
| Dave Wootton | 09/04/2020 18:56:42 |
| 505 forum posts 99 photos | Hi Morty There have been a small series of articles by Peter Barker on checking for wear and rectifying in MEW magazine for the last few months. They are aimed at the ML7 but are well worth reading, there are some clever ideas in there. Dave |
| Steviegtr | 09/04/2020 19:09:59 |
2668 forum posts 352 photos | Hi again Morty. Look this guy up on youtube. He renovates Myford lathes in detail. Everything you need to know. He is slow but methodical. Steve. |
| Morty | 18/04/2020 00:11:24 |
94 forum posts 101 photos | Hi there! Sorry for the lack of updates, stripping the cabinet etc. at the moment not a lot to see, raising blocks responded well to paint stripper and wire brush, but on the tray and cabinet the stripper had no effect! ( thinking of something a bit more invasive, such as a small tactical nuclear weapon!! Seriously, I've sent for a stripping disc which should arrive during next week! Werner - It is nice to hear of the service that You received at Myford, good to hear that customers were looked after! Looking at ideas at the moment to improve the bed (see below ) Dave - I will search out the articles You mentioned, well worth a look. Steve - I had a look at Sven's videos before, He does go into the details really well! I think I am going to clean up the bed for now and get it going again, what I was looking at was changing over to a wide guide set up as detailed in this thread:- https://www.model-engineer.co.uk/forums/postings.asp?th=110700&p=1 This would be something I could do by just removing the saddle, but would need a miller (J.A. Radford's method), so It would have to wait until the workshop is completely set up.I Thanks for.the replies, I will put some progress pics up on the next posting. Cheers, Pete Edited By Morty on 18/04/2020 00:12:47 |
| Hillclimber | 18/04/2020 09:26:45 |
 215 forum posts 51 photos | If the paint is 'stuck' that well on the cabinet, perhaps better to leave it in place, sand it down to provide a key and clean it - and simply paint over it? Cheers, Colin |
| john fletcher 1 | 18/04/2020 10:34:10 |
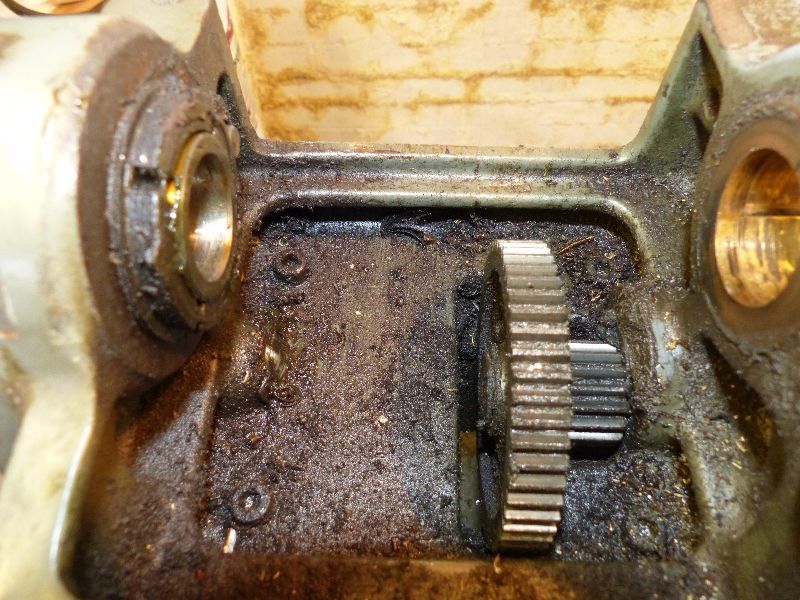
| 893 forum posts | I has the same early type Super 7 with early type gear box. I like Werner found that some of the internal gears had teeth missing, on contacting the original Myford they said, they no longer had spares for the early type gear box. I looked in HPC gear catalogue and found they had them on stock, unfortunately with a bigger bore. I bought the gears, increased the bored even more, then shrunk in a piece of prepared bar to fit, and then bored it to size when cool. I hope you don't need this information. John |
| Morty | 18/04/2020 15:47:31 |
94 forum posts 101 photos | Hi there! Werner:- Sorry, I did not see Your message until after I replied last night, I will Email You tomorrow! Colin:- I did think of leaving it and overpainting it, but I was not sure if the new paint would react with the old, I like to go back to base metal if possible, plus there are rusty areas to sand out as well. The stripping wheel I have ordered should sort it out OK. Hi John:- I will have a look at the gearbox a bit closer when I get to it, I did test run it before stripping the lathe down and it seemed quiet and smooth, but many thanks for letting Me know about Your repair, good to know it is possible as I did read that spares were not available for the earlier box. I also hope I don't need the info, but good to know! Many thanks All! Cheers, Pete |
| Werner Habbel | 18/04/2020 19:52:18 |
| 12 forum posts | Hi John, interesting to read about your repair method with HPC gears. Regards |
| Mike Poole | 18/04/2020 20:10:24 |
 3676 forum posts 82 photos | The screw holes in the motor are original as foot mounting or resilient mounting were both possible. Mike |
| Hopper | 19/04/2020 02:45:26 |
 7881 forum posts 397 photos | Posted by Morty on 18/04/2020 00:11:24:
Hi there! Sorry for the lack of updates, stripping the cabinet etc. at the moment not a lot to see, raising blocks responded well to paint stripper and wire brush, but on the tray and cabinet the stripper had no effect! ( thinking of something a bit more invasive, such as a small tactical nuclear weapon!! Seriously, I've sent for a stripping disc which should arrive during next week! Werner - It is nice to hear of the service that You received at Myford, good to hear that customers were looked after! Looking at ideas at the moment to improve the bed (see below ) Dave - I will search out the articles You mentioned, well worth a look. Steve - I had a look at Sven's videos before, He does go into the details really well! I think I am going to clean up the bed for now and get it going again, what I was looking at was changing over to a wide guide set up as detailed in this thread:- https://www.model-engineer.co.uk/forums/postings.asp?th=110700&p=1 This would be something I could do by just removing the saddle, but would need a miller (J.A. Radford's method), so It would have to wait until the workshop is completely set up.I Thanks for.the replies, I will put some progress pics up on the next posting. Cheers, Pete Edited By Morty on 18/04/2020 00:12:47 Hi Pete If you search the MEW index for the series of articles by Pete Barker over the past year or so, you will find a lot more information on Myford bed wear, wide guide, bearings etc etc if you can get back issues or a digital sub. In a nutshell, old Myford literature on their former reconditioning service recommends a bed regrind if wear exceeds .003" (note, inches not mm) measured in the horizontal plane (ie measuring wear on the vertical surface of the shear) and .005" in the vertical plane. But you could probably get away with a bit more if you are not doing micron-level work. There is an easier alternative to the Radford and Ganderton methods that does not require a milling machine. It is outlined in the MEW articles. Basically add a strip of gauge plate to the rear carriage surface so it contacts the bed's unworn rear shear. Then just leave the old narrow guide surface as is, sitting a good 20 or 30 thou away from contacting the shear. No need to do the Radford thing and have two contacting surfaces. The factory never did that. They just went (in 1972) to using the rear surface only. The surface of the carriage that runs on the top of the bed ways can then be touched up with a file and a small scraper made from a file. All detailed in the MEW articles. No need for a milling machine at all. Looks like you have a lot of wear on the inner vertical shear surfaces. This can also be remedied as outlined in the articles by adding a cutting tool to a vertical slide mounted on the carriage and running it back and forth like a hand-powered shaper. Sounds crude but it has produced an excellent result and a lathe that turns dead true between centres, where the tailstock relies on these surfaces for alignment. So is is well worth doing. Your measurements posted earlier seemed a little odd in that the vertical depth of the front shear varied so much from front to back. Not sure what is going on there? Depends where the wear is. Could be tailstock caused wear, or if it is in the usual high wear patch about six inches from the left end of the bed ways, it's from the carriage. Could be a bit excessive for fine work if that is the case. Might pay to measure carefully again and do an assessment. Have fun with your rebuild. It's very satisfying to be able to do precision work on a machine you have rebuilt yourself. Pete B. |
| Morty | 19/04/2020 11:22:13 |
94 forum posts 101 photos | Hi there! Mike:- Thanks for the information on the motor mounting, I had not come across this style of mounting on the various Myford S7's that I have seen, so it was a bit of a puzzle, thanks for the explaination! Pete:- Thank You for taking the time to post this very useful information, I will look into the articles in the MEW index, seems a very good source for delving into the inspection / rectification involved. I will go back over the measurements again, I have been made aware of the 'shaper' method which sounds interesting. As I mentioned in My post, I will probably get the lathe back together and run to check the accuracy first, as removing the saddle for any rectification work that does not involve a bed grind is a fairly quick and straightforward job. Again, many thanks to everybody for replying and advising Me on My Quest!! Cheers, Pete |
| Morty | 10/05/2020 00:07:09 |
94 forum posts 101 photos | Hi everyone! Just a quick post, sorry about the lack of updates, still stripping the paint of the cabinet,slow going as I have a few neck problems that cause trouble with My arms, so the drill I am using for the stripping disc gets heavy quick and I'm can only do so much at a time! Nearly there though, will post some pics in the week. Take care and keep safe! Cheers, Pete |
| Morty | 10/05/2020 00:07:10 |
94 forum posts 101 photos | Hi everyone! Just a quick post, sorry about the lack of updates, still stripping the paint of the cabinet,slow going as I have a few neck problems that cause trouble with My arms, so the drill I am using for the stripping disc gets heavy quick and I'm can only do so much at a time! Nearly there though, will post some pics in the week. Take care and keep safe! Cheers, Pete |
| Steviegtr | 10/05/2020 00:40:47 |
2668 forum posts 352 photos | If you are going to spray paint the cabinet then if you clean any rust spots off. Then buy some hi build primer. A few coats & then flat with the sander. More coats if necessary. It is amazing how with the primer you can get a nice even surface to paint on. Regards. Forgot to say I mean spray gun applied hi build. Not rattle cans. It was about £22 a litre last time I bought some. I have a few spray guns. The one I use for my primer is just a cheap one, it has the 2mm nozzle so you can put good heavy coats on. Steve. Edited By Steviegtr on 10/05/2020 00:43:47 |
| Michael Gilligan | 10/05/2020 07:04:20 |
 23121 forum posts 1360 photos | Posted by Morty on 09/04/2020 15:29:37:
Hi there! Now, where was I......... Ah, yes, time to get the headstock off:- […]
A very useful set of ‘real world’ reference images there, Pete ... I’m sure they will be quoted many times in the coming years. MichaelG. Edited By Michael Gilligan on 10/05/2020 07:06:13 |


Please login to post a reply.
Magazine Locator
Want the latest issue of Model Engineer or Model Engineers' Workshop? Use our magazine locator links to find your nearest stockist!
Sign up to our Newsletter
Sign up to our newsletter and get a free digital issue.
You can unsubscribe at anytime. View our privacy policy at www.mortons.co.uk/privacy
Latest Forum Posts
- *Oct 2023: FORUM MIGRATION TIMELINE*
05/10/2023 07:57:11 - Making ER11 collet chuck
05/10/2023 07:56:24 - What did you do today? 2023
05/10/2023 07:25:01 - Orrery
05/10/2023 06:00:41 - Wera hand-tools
05/10/2023 05:47:07 - New member
05/10/2023 04:40:11 - Problems with external pot on at1 vfd
05/10/2023 00:06:32 - Drain plug
04/10/2023 23:36:17 - digi phase converter for 10 machines.....
04/10/2023 23:13:48 - Winter Storage Of Locomotives
04/10/2023 21:02:11 - More Latest Posts...
- View All Topics
Support Our Partners


Shopping Partners
Subscription Offer

Latest "For Sale" Ads
- Reeves** - Rebuilt Royal Scot by Martin Evans
by John Broughton
£300.00 - BRITANNIA 5" GAUGE James Perrier
by Jon Seabright 1
£2,500.00 - Drill Grinder - for restoration
by Nigel Graham 2
£0.00 - WARCO WM18 MILLING MACHINE
by Alex Chudley
£1,200.00 - MYFORD SUPER 7 LATHE
by Alex Chudley
£2,000.00 - More "For Sale" Ads...
Latest "Wanted" Ads
- D1-3 backplate
by Michael Horley
Price Not Specified - fixed steady for a Colchester bantam mark1 800
by George Jervis
Price Not Specified - lbsc pansy
by JACK SIDEBOTHAM
Price Not Specified - Pratt Burnerd multifit chuck key.
by Tim Riome
Price Not Specified - BANDSAW BLADE WELDER
by HUGH
Price Not Specified - More "Wanted" Ads...
Get In Touch!
Do you want to contact the Model Engineer and Model Engineers' Workshop team?
You can contact us by phone, mail or email about the magazines including becoming a contributor, submitting reader's letters or making queries about articles. You can also get in touch about this website, advertising or other general issues.
Click THIS LINK for full contact details.
For subscription issues please see THIS LINK.
Digital Back Issues


Donate

 Register
 Log-in
Model Engineer Magazine
- Percival Marshall
- M.E. History
- LittleLEC
- M.E. Clock

ME Workshop
- An Adcock
- & Shipley
- Horizontal
- Mill

Subscribe Now
- Great savings
- Delivered to your door

Pre-order your copy!
- Delivered to your doorstep!
- Free UK delivery!
All Forum Topics > Manual machine tools > Myford Mk1 Super 7 restoration