Forum sponsored by:

Merryweather Steam Fire King self propelled
this is the story of my freelance constructed fire king
| Werner Schleidt | 25/06/2017 08:01:28 |
 158 forum posts 180 photos | Hello , I want to tell that my self build oil pump is now working satisfying. To get this it was unbelieveable easy. From a colleage i get the tip that he used a flat NBR rubber with a guide for the spring. In my design, a copy of a Martin Evans design, i had a support piece to guide the spring and that pressures the stainless steel ball. And that was not perfect thight. I was looking for flat rubber material and I found it in a large seal. I took a caliper to make holes in belts and adjust the right diameter an gave it a try. That little flat piecet was tight at the beginning and under steam too. This Video was made with the idea to have more driving experience and to look how much can I climb the hill track. My Firefighters are well prepared to do theire job now. I hope you can enjoy it Werner
|
| Werner Schleidt | 23/07/2017 15:32:38 |
158 forum posts 180 photos | Hello, I reworked my firepump to get more flow.I found out that the pipework and the inner diameters of the water channels are to small. I decided to look what I can do with a moderate rework. I opened the whole as much as possible and built a new valve box. And in addition I added a small wind vessel.
the arrangement looks much better now We made a new ride and test. The pump is much better now nearly two times the flow as before. The second gear of the steam engine is to slow, but very powerful. I made a ride to the junction of river rhine and main one way 1.3 km. The average speed was 3 kph and that was to slow so I deside to change the small chain wheel to larger one. I hope that the ratio change from 8 to 1 to 5 to 1 is from the performance good. here is the video from the ride before the change. it will be updated
werner |
| Werner Schleidt | 13/08/2017 15:05:28 |
158 forum posts 180 photos | Hello all, there is an update of my last activities. Sometimes good luck and bad luck are not far away from each other. I changed the gear ratio as I described it and the test ride was much better. It was was in the range i hoped and calculated it. After 500 m of ride with full pressure and speed the water glas gauge cracked and I pulled the grate as fast as I could. What I had made wrong, I added a blow down pipe to the water gauge and with some vibration it helps to crack the glas. My next step was renew the glas and stabilise it with a mounted half pipe in the back of the glas retaining nuts. Two days later I made a new ride to the water gate of Kostheim. This ride was very sucessful the only problem I have ,if I make Video during driving , I forgot some times the fire and recognize it when the pressure drops. Driving with steam is always an adventure and there is in every time room for getting some new experience.
|
| Harry Wilkes | 13/08/2017 15:48:47 |
 1613 forum posts 72 photos | Nice machine well done !!! H |
| charadam | 13/08/2017 16:14:41 |
| 185 forum posts 6 photos | Wonderful model and video. Please enlighten me - at about 2.08 there is a device visibly rotating anti-clockwise on the bulkhead a metre or so behind the fireman - what is it? |
| Neil Wyatt | 13/08/2017 16:37:53 |
 19226 forum posts 749 photos 86 articles | Excellent |
| NJH | 13/08/2017 17:05:10 |
 2314 forum posts 139 photos | Lovely work - excellent! <----------- I see one of my avtar's mates got in on the act too! Norman Edited By NJH on 13/08/2017 17:13:47 |
| Jeff Dayman | 13/08/2017 18:06:28 |
| 2356 forum posts 47 photos | Thanks for the videos Werner, very nice work on the fire engine! JD |
| Werner Schleidt | 13/08/2017 19:20:02 |
158 forum posts 180 photos | Hello all , many thanks for your reply !!! Hello charadam, I hope I understand your question correct. The anti clockwise rotating wheels is an optical illusion. The Video is made with 25 pictures per second and it was made with real pictures ,non interlaced. So if the wheel is turning it could be that fractions of the picture s you see give you the illusion that the wheel is standing still while driving or go slower or faster. It is for me easier to explain in german than in english . I hope you can understand it. The device between the front box and the water tank is a horizontal steam donkey pump. The amount of water is big enough to take a coffee or have break and the water level in the boiler keep stable. Werner |
| charadam | 13/08/2017 21:08:04 |
| 185 forum posts 6 photos | Werner, I have explained myself badly und mein Deutsch ist nur ausreichend, um ein Bier und Frühstück kaufen! I did not mean the roadwheel but the small brass(?) device on the vertical surface of the front "box". Sorry for any confusion. Charles |
| Werner Schleidt | 14/08/2017 07:00:49 |
158 forum posts 180 photos | Hello Charles , that is easy to explain ,because the front lamps need some energy. This brass cylinder is a fake fire extinguisher and is big enough to hold inside 3 AAA batteries or a Laptop lithium cell. The handle on the top is the on off switch for the lamp. I do not want to bring cables on the backside of the front plate and so the Idea came up to make the fake fire extinguishers. And I tried to make them realistic. In my second video I show how I made the lamps and the batterie holders. The lamps are with led diodes equiped and have an automatic connecting mechanism by mounting. I hope it explains your question. Werner
|
| Chris Evans 6 | 14/08/2017 08:04:20 |
 2156 forum posts | Many thanks for sharing your work with us. A most excellent build and many problems overcome. |
| Werner Schleidt | 06/09/2017 20:22:36 |
158 forum posts 180 photos | Hello all, thank you all for your nice words. As i said experience is the only thing that counts, therefore i made protectors for all my watergauges and i think it gives a better look as before.
After the run and cleaning i found that both eccentric cranks of the engine are not proper fitted on the shaft. After some discussion with a friend i decided to add loctite 638 and screw it as before. The cleaning action was a little bit difficult , but it was a straight forward job on one side. On the other side the reaction of the loctite was faster then i can adjust it Ok. The result was the screw has no fit ,because of a very small misalignment. The idea to cut the thread again was a stupid idea the thread drill cracked and was partly in the bore. I decide then to make the thread new on the opposit side of the shaft. Now i can not mix left with right. Always think positiv.
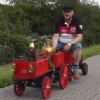
On our next club open day i drove with the new gear setup to the junction of the river rhine and main again. I had a much better driving performance faster with less coal and water consumption . On the background of the picture there is the city of mainz with the cathedral. I am now in preparation for the next event in the mannheim technoseum the steam meeting 16 and 17 of september . As you see on the picture the little firefighter is eagerly waiting for the next event and his coworker with the watergun too. I keep you updated. Werner Edited By Werner Schleidt on 06/09/2017 20:24:53 |
| Werner Schleidt | 19/09/2017 18:21:15 |
158 forum posts 180 photos | Hello all, the Mannheim steam event is now history and it was very nice in the museum called Technoseum. In the park before the museum there were nice areas to drive with traction engines and with my "fire king". I made a video of our driving and i hope you can enjoy it. My fire king was in good working order and we had a lot of fun. |
| Werner Schleidt | 12/11/2017 15:22:04 |
158 forum posts 180 photos | Hello all , after the Mannheim steam event i drove at our club track and there was some knocking noise hearable ,but it was hard to find out on witch part of the steam engine. I recognized that it was good to strip as many as possible from the frame in the garage,because i was not able to bring the machine over the stairs in to the basement. With the front part,the side tanks and the boiler detached, it was easier to investigate the noise. After stripping off i found that the attachement of the eccentric crank was not solid and there was lash. I stripped the shaft out of the engine and i added a feather key groove.I made the feather key to a very strong fit. Now i hope that it will withstand the power of the engine. To get a smoother running of the engine during water pumping with the fire pump ,I decided to add a flywheel. The material I had in stock. The flywheel under construction the end machining was made with a small round table on the milling machine.
It was a good exercise to do it ,if it is not heavy enough i made it from brass again. My rubber tires ,a 65 shore rubber, collects many stone from the road and they looked very bad after 34 Km of running.
So I looked for harder material . The idea came up to calculate how is the force where the wheel is standing at the road. With this calculation i had the idea it is nearly equivillant to a woman s heel. So i looked in google to shoe maker supplies and i found hard rubber in longer stripes. It was in a good price available.
The surface structure is like asphalt. In between I made the etching plates for the town name. I decide my fireking had the nearest fit to the fireking witch was in service in hungerford as i have an old picture of it. The large plate i was not able to make in my standard way .I had to do some improvisation. I searched in the house a larger dish. I had no success. As I want to clean my tool box I recognized that is the best way to use the empty box and made it quick and dirty.
It was very at the limit , the result was not 100% perfect but good enough to use it.
I had the problem that the etching was over 1 hour and the photo resist has some weak point on the downside of the letters. Atached on the doors it looked like the original for me
I hope you can enjoy the discription. best regards Werner
Edited By Werner Schleidt on 12/11/2017 15:23:49 |
| Werner Schleidt | 17/12/2017 11:37:47 |
158 forum posts 180 photos | Hello all , i want to update my work. During driving downhill and under parking conditions I missed a brake system.So I looked in the workshop how I can add it, with not much work and in a way that it looks like it was made from the beginning. It cost me some days to find the best way. The decision was made to use the housing of the differential gear in combination with the brake shoe.The brake shoe was made by wood with rubber glued on it. The difficulty was to find a routing for the brake cable. With some thinking and studiying my pictures I found a good way to combine the brake lever with the brake cable. I was able to use an old hole to attache the cable guide. The brake was used with a spindle system. So it is not too big but powerful enough to pull the cable. To give you an idea please look to the pictures.
The break cable have 10 mm of clearance to the driveshaft.
Break shoe and shaft. To keep the housing from the differential gear more clean, a brass tub was added to collect the oil and water drops of the engine.
To find a place for the brake spindle and the sizing was not easy ,but at the end it looked as it was constructed from the beginning.The lever and spindle is below the steeringwheel on the right side. And one thing I tried to make, a one hand using and driving possible. The left hand I use typical for the camera. The next step is to build an automatic pressure dependable blower valve to ease the usage and keep the fire in a better condition. In my driving this year i forgot very often to use the blower valve ,because the driving conditions are very different between full load and no load. The automatic valve keep the pressure around a half bar under the safety valve set point and if the pressure drops a half bar the blower starts automaticly. That gives a very good water usage and a good burning fire. In my 5 inch gauge small locomotives this was a very big improvement. best regards Werner
|
| Doubletop | 18/12/2017 09:50:21 |
 439 forum posts 4 photos | Werner Fantastisch!!! and although I live in New Zealand now, I come from a village a few miles from Hungerford, so even better. Well done Pete Edited By Doubletop on 18/12/2017 09:50:51 |
| Werner Schleidt | 28/01/2018 16:34:43 |
158 forum posts 180 photos | Hello all, I want to update my work. At first many thanks for the nice replies and I wish a good steaming in 2018. I made some progress in planning and puting things together. For easier use of my fireking I constructed and made an automatic blower valve. This blower valve opens and close automaticly the steam blowing into the chimney. The basic parts are the housing which is splitted in to funktions at first a steam valve and a diaphragm. The diaphragm is realised with an o ring and closing part pre tensioned by an adjuster nut and a spring. The valve is connected by a bar with the diaphragm. If the pressure is low the spring give tension to the o ring and the valve is open. If the pressure is rising to a certain point ,70 to 100 psi depends on adjustment , the steam pressure is higher than the spring tension and the valve was closed. In a good setup the hysteresis is about 3 to 4 psi. The anthracid coal is much better to control ,because if you add water or the pressure drops the blower valve react immidiatly. The cut off should be 3 to 4 psi under safety valve pressure. With this valve you have less cinder and a better fire. The behaviour is in easy words like you have a much bigger boiler. Secondly I realised that my, very fine made, donkey pump is to small for holding the water level in the boiler. Last year I decided to use only one cylinder in my fire pump setup. The second one came in a box with parts. By chance the idea came up to use it with some small modification to build a more powerful steam donkey pump. So I made new a smaller water cylinder in relation to the diameter of the steam cylinder . The valve work of the steam engine is a functional copy of the smaller one. Due to the fact that I did not open the smaller one so I had some thinking how I have to made the parts. I am very satisfied, with no mistake the pump get in function. It is always fascinating at the beginning there is the idea and the material ,then brain work , hand and maschine work and then there is life. I hope the steam tests are in the same way. I put together all in a small video I hope you can enjoy it. Edited By Werner Schleidt on 28/01/2018 16:35:19 Edited By Werner Schleidt on 28/01/2018 16:38:33 |
| FLguy | 28/01/2018 20:33:55 |
| 15 forum posts | I just registered because I was so impressed with every aspect of your build, your videos and the choice of music. It's people like you that make this website so enjoyable for this old Florida guy to read and learn from !
|
| Werner Schleidt | 25/02/2018 08:32:25 |
158 forum posts 180 photos | Hello all, I want to show some progress of my project. At first thanks to all who view my fire king. I attached my steam pump at the frame as replacement for the smaller pump. I hope that my calculation of the pumped water is now OK . I think there are some drawbacks by running in ,but that is normal. I had some good progress by installing the pump, only one small change at the the pipework have to be done.
And here is a close up.
In the time between building I started an additional project ,because I want to know the power output of my models. It is a device which enables me to collect data for my private imlec competition. I hope that i can find something to improve the efficency of my models. With this device I can measure force ,speed ,pressure,rotational speed, temperature with thermocouples and voltage and current for electric models. All measurement data have been collected by a small computer and is send via blue tooth to an android phone. At the phone I wrote the the data accquisition software in basic. All sensors and amplifiers are constructed at a low cost, but as accurate as possible. The force sensor is made with a strain gage force sensor from a cheap chinese luggage gauge. The measurement range is up to 400 N .The accuracy by my calibration is around 2 to 4 N . The speed sensor is made from a model aeroplane wheel attached with a magnetic wheel and a hall sensor. Precalibration is made but not a test in reallity. I will update this next with pictures. best regards Werner
|


Please login to post a reply.
Magazine Locator
Want the latest issue of Model Engineer or Model Engineers' Workshop? Use our magazine locator links to find your nearest stockist!
Sign up to our Newsletter
Sign up to our newsletter and get a free digital issue.
You can unsubscribe at anytime. View our privacy policy at www.mortons.co.uk/privacy
Latest Forum Posts
- hemingway ball turner
04/07/2025 14:40:26 - *Oct 2023: FORUM MIGRATION TIMELINE*
05/10/2023 07:57:11 - Making ER11 collet chuck
05/10/2023 07:56:24 - What did you do today? 2023
05/10/2023 07:25:01 - Orrery
05/10/2023 06:00:41 - Wera hand-tools
05/10/2023 05:47:07 - New member
05/10/2023 04:40:11 - Problems with external pot on at1 vfd
05/10/2023 00:06:32 - Drain plug
04/10/2023 23:36:17 - digi phase converter for 10 machines.....
04/10/2023 23:13:48 - More Latest Posts...
- View All Topics
Support Our Partners


Shopping Partners
Subscription Offer

Latest "For Sale" Ads
- Reeves** - Rebuilt Royal Scot by Martin Evans
by John Broughton
£300.00 - BRITANNIA 5" GAUGE James Perrier
by Jon Seabright 1
£2,500.00 - Drill Grinder - for restoration
by Nigel Graham 2
£0.00 - WARCO WM18 MILLING MACHINE
by Alex Chudley
£1,200.00 - MYFORD SUPER 7 LATHE
by Alex Chudley
£2,000.00 - More "For Sale" Ads...
Latest "Wanted" Ads
- D1-3 backplate
by Michael Horley
Price Not Specified - fixed steady for a Colchester bantam mark1 800
by George Jervis
Price Not Specified - lbsc pansy
by JACK SIDEBOTHAM
Price Not Specified - Pratt Burnerd multifit chuck key.
by Tim Riome
Price Not Specified - BANDSAW BLADE WELDER
by HUGH
Price Not Specified - More "Wanted" Ads...
Get In Touch!
Do you want to contact the Model Engineer and Model Engineers' Workshop team?
You can contact us by phone, mail or email about the magazines including becoming a contributor, submitting reader's letters or making queries about articles. You can also get in touch about this website, advertising or other general issues.
Click THIS LINK for full contact details.
For subscription issues please see THIS LINK.
Digital Back Issues


Donate

 Register
 Log-in
Model Engineer Magazine
- Percival Marshall
- M.E. History
- LittleLEC
- M.E. Clock

ME Workshop
- An Adcock
- & Shipley
- Horizontal
- Mill

Subscribe Now
- Great savings
- Delivered to your door

Pre-order your copy!
- Delivered to your doorstep!
- Free UK delivery!
All Forum Topics > Work In Progress and completed items > Merryweather Steam Fire King self propelled