Forum sponsored by:

Stirling Engine : Laura
A premilled kit by Bengs
| Ajohnw | 20/01/2016 10:08:37 |
| 3631 forum posts 160 photos | Posted by Ian S C on 14/01/2016 10:40:33:
I,v got a good collection of Crescent adjustable spanners, they are ok if all else fails, for heaven's sake don't do what I saw today, a mate had been trying to undo an oil bung from a Perkins engine on a Chamberlin tractor that had been used on a beach launching boats, and the bung was rusted solid, so after sockets being tried, he had a go with a pipe wrench. When I saw the mess, the only thing I could think of was to weld a bar on top, or drill it out. We.re getting a bit off course, but I had to get it off my chest. Ian S C I find them ok for all sorts of things especially if they are tightened onto any nut I want to use them on. Easy to do one handed on the smaller sized spanners. The bung might have come out if a decent pair of stilsons had been used on it - the right way round so that they self tighten. These sometimes need tightening on the nut as well. The hex nuts on bungs are sometimes too short to do that safely or the spanner made too poorly. I had to drill and add a couple of dowels on a Shogun once and undo with them on those - with a 3ft tube on the end. It must have been done up by a Sumo wrestler hanging on the end. John - |
| Brian John | 22/01/2016 06:16:23 |
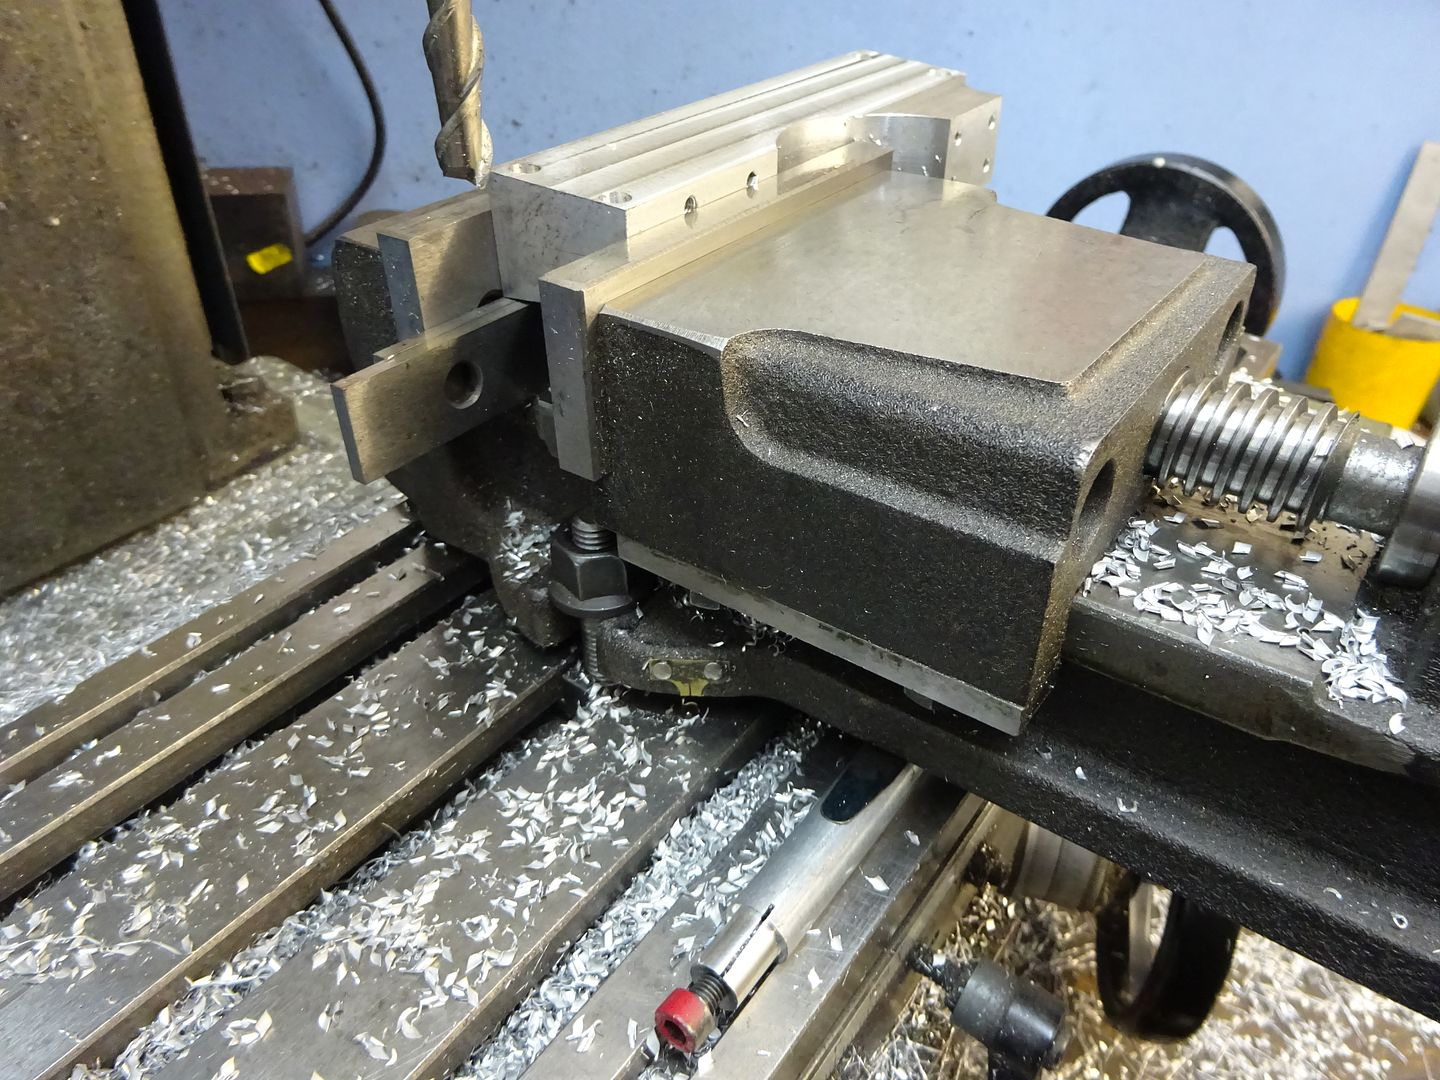
| 1487 forum posts 582 photos | I decided to tackle the flywheel next. I have been putting off my first use of the face plate but when I tried to set it up I found that I could not get the clamps inside the flywheel. The flywheel is too big ...this was the smallest flywheel I could find at the time. Maybe I am missing something here ? Anyway, I went back to the old method of using a steel mandrel. This worked well with a number of brass and aluminium flywheels but this wheel is cast iron which I have never machined before. I have drilled out to 5.8mm and then reamed it out to 6mm ; I now have a nice fit for the axle. I have machined the hubs : what a bugger trying to hold the hub in the lathe chuck and getting it to run true ! I have run out of time today but I will machine the edges tomorrow. The cast iron is tough stuff : I bent my 3mm drill bit when boring the axle hole.
Edited By Brian John on 22/01/2016 06:17:58 |
| pgk pgk | 22/01/2016 07:34:06 |
| 2661 forum posts 294 photos | Attach a piece of board to the faceplate and screw to that? |
| JasonB | 22/01/2016 11:26:07 |
 25215 forum posts 3105 photos 1 articles | Brian you may wantto add a ctr drilled hole onto the end of your mandrel and then you can bring up the tailstock for a bit more support. On my faceplate I drilled the mounting stud holes right through, tapped them and I now have 3 holes nearer the flange that I can screw studs into for holding work or driving a dog. |
| Ajohnw | 22/01/2016 13:39:15 |
| 3631 forum posts 160 photos | I'd say do put a centre hole in the end of the mandrel. Considering power and speed on a variable speed lathe you might benefit from buying a few tool bits of this style before even starting - cast iron can be very good at wrecking hss tools even when the lathe is run very slowly if it has a very hard skin - hopefully you wont buy any like that the usual problem is sand in the skin but it can be extremely hard even without that. Personally I prefer to buy them separately as sets usually have some in that never get used. They are generally the correct grade for cast iron but can also be use on other materials. They can be sharpened on a diamond or green grit wheel but it's important not to increase the clearance angle they come with as they will chip. At one time I was fond of converting the parting off blades to screw cutting tools and didn't use anything else. John - |
| Brian John | 22/01/2016 21:44:11 |
| 1487 forum posts 582 photos | Jason : there is already a hole in the end of the mandrel. It was put there when I was making the mandrel. Thanks for reminding me to use it. John : I do have a set of carbide tools. I found the flywheel tough to drill through but there was no problem facing off the hub. We will see what happens this afternoon when I finish machining it. |
| Brian John | 23/01/2016 06:24:59 |
| 1487 forum posts 582 photos | Okay...done , well almost. I have not drilled and tapped for the 3mm grub screw yet as I ran out of time. This is my first and last machining of a cast iron flywheel on this lathe. I ended up with a ''not too bad finish'' but it could have been better. I tried many different speeds and various tools to get a good finish. In the end I used a carbide tool on high speed (1200 RPM) with autofeed for the final finishing cut. Any slower and the lathe would stop.....even when taking 1/4 X 0.1mm cuts = .025 mm ! Even stainless steel is not as much trouble as this rubbish. Any future projects will have the cast iron flywheel substituted with a brass flywheel. I don't care what was prototypical ; I hate this stuff ! I am not sure how I will go about drilling and tapping for the 3mm grub screw. I do not have a tilting vice or a tilting drill press so I will have to drill it by hand. This will not be much fun considering the cast iron flywheel managed to bend my 3mm drill bit when using the lathe to bore the axle hole ! I am finished for the day : I will think about the best way to do this tonight and tackle it tomorrow. NOTE : the finish looks worse in the photos. In reality, it is not too bad.
Edited By Brian John on 23/01/2016 06:31:41 Edited By Brian John on 23/01/2016 06:32:21 |
| JasonB | 23/01/2016 08:42:19 |
25215 forum posts 3105 photos 1 articles | Looks quite a reasonable finish to me given what you have to work with. I would not say its the cast iron that is rubbish, more a case of at that diameter its on the limit of what the machine can handle. |
| Roger Provins 2 | 23/01/2016 09:17:00 |
| 344 forum posts | With a little ingenuity you should be able to clamp the wheel at a angle on your pillar drill table. Be much easier than by hand!
I'm surprised that your drill doesn’t tilt – all the other similar ones I've seen do |
| Howi | 23/01/2016 09:21:23 |
 442 forum posts 19 photos | That flywheel looks big for "Laura" - you say biggest you could find? Didn't one come in the kit? What is wrong with the one supplied? Stirling engines like Laura do not produce a lot of power. |
| Brian John | 23/01/2016 10:00:11 |
| 1487 forum posts 582 photos | That is the supplied flywheel for the Laura kit. |
| JasonB | 23/01/2016 10:05:52 |
25215 forum posts 3105 photos 1 articles | Brian are you sure the tabel does not tilt, couple of bolts under the bracket. what model is it a seven Trademasters smallest one will tilt.
Failing that a bitof packing under one end of your vice will do, don't tighten it too hard to the table
|
| Ajohnw | 23/01/2016 10:59:16 |
| 3631 forum posts 160 photos | You could soon polish the flywheel up with emery cloth Brian. Maybe with a drop of oil to help stop it clogging up. You'll probably need an extension drill for the grub screw hole. There are 2 ways of doing that. Face, centre drill some 1/4 dia mild steel, drill a hole and then loctite the drill in in it. Or use a pin chuck to hold the drill and fit that in the machine's chuck. These might need tightening with pliers. When you figure out how to hold the flywheel at an angle don't angle it any more than you need because the drill will be inclined to skid on the surface. A centre punch mark at the angle the wheel is at will help but I'd be inclined to mark the surface with say a 1/4" dia drill as well before using the one for the tapped hole. Holding it at an angle?? Saw the angle through a piece of wood leaving 2 pieces at the correct angle and clamp between those. Tilt the table if it will do that but the vice will need clamping that way. A flexible drill vice is handy. I have one bought a long time ago that was made in India. It's similar to this one Arc also do another range that is cheaper but they look to have gone pointlessly over the top with shapes machined into the jaws. All that is really needed is a ledge for plate, a horizontal V and a vertical one. People have used the one I have for milling and drilling things like lock plates. Ideally they should open to a bit more than the jaw width. Rotagrip sold an identical one but seem to have changed designs now. Oz - there are some similar one's on ebay including by John -
Edited By Ajohnw on 23/01/2016 11:00:40 |
| Brian John | 23/01/2016 11:17:43 |
| 1487 forum posts 582 photos | Jason : you are quite right, the table on my bench drill does tilt. There is large bolt which will first have to be loosened but I cannot shift it at the moment. I will give it a go tomorrow afternoon. John : I did try to give it a bit of a polish with some 1500 grit sandpaper but it made no impression at all. Edited By Brian John on 23/01/2016 11:21:53 |
| Ajohnw | 23/01/2016 11:50:24 |
| 3631 forum posts 160 photos | Try something like 180 or 200. Emery cloth or wet and dry not sandpaper. The cloth lasts a lot longer. I'm stuck with 180. I walked into a surplus tool place and the owner had put a large roil of the stuff and other bits and pieces on a pallet before the place shut down. If you bent a drill I wonder if you lack some of these Designed to remain on centre to form a start for a drill. When you break a tip off one, not that difficult at finer sizes you can use your dremel to cut a slot where the tip was to make an extractor. John - |
| Ian S C | 23/01/2016 11:57:50 |
 7468 forum posts 230 photos | Brian, you need to start with something quite a bit courser than 1500, try either worn emery cloth with a drop of oil on it, back it with a steel rule or fine file, or you can use wet and dry paper, say around 300 grit, then somewhere up to 1000 grit. You'll get that stuff at the hardwhere shop handy to have some (which reminds me, gotto get some). The only problem I can see you having is the BLACK dust, although that can be helped if you can rig up a vacuum cleaner next to the tool post on the lathe (just don't let the dust go through the motor on the vacuum cleaner). I normally cut CI at about half the speed of mild steel, and I usually cut the MS too slow. Ian S C |
| JasonB | 23/01/2016 12:45:21 |
25215 forum posts 3105 photos 1 articles | 150grit works for me after starting with 100g
|
| Brian John | 23/01/2016 22:24:59 |
| 1487 forum posts 582 photos | John : I meant wet and dry...not sandpaper. I always use a centre drill to get things started. |
| Brian John | 24/01/2016 06:24:35 |
| 1487 forum posts 582 photos | I could not budge that large nut (19mm AF) to tilt the bench table ; it just would not move so I used a block of wood under the vice. When drilling the hole I almost did not leave enough room for the chuck on the tap tool (it was touching the outer rim of the flywheel) but I just managed to get it in there....lucky ! I then polished it up with 400 grit wet and dry ; I had nothing larger to hand. It is a nice finish...almost a shame to paint it at all and that includes the cast surfaces which would normally be painted (red). I may just leave it as is. The last parts to do are the crank arms 8 and 9. You might remember that I made a mess of these at the start of this thread. They were the very first parts I attempted to make. Hopefully I can do a better job tomorrow. I cannot put them off any longer : there are no other parts to make
Edited By Brian John on 24/01/2016 06:25:00 |
| Ian S C | 24/01/2016 11:14:43 |
7468 forum posts 230 photos | Brian, you have a better finish on your FW than most of mine are, most of mine are experimental motors rather than models, but I do try, really I do. Ian S C |


 I should not have tried to take a cleaning cut on the inside. It was quite tidy as cast and I only made things more difficult by trying to do this. I have machined enough brass and aluminium flywheels to know this by now ! I may end up painting the outside as well as the inside of the flywheel...perhaps black on the outer surfaces with red on the inside ? That will stop the rust. It is a lovely looking flywheel though ; I wish I could find something similar cast in brass.

 The lads said help yourself. Actually I don't think the stuff I have ever wears out, it just clogs.

Please login to post a reply.
Magazine Locator
Want the latest issue of Model Engineer or Model Engineers' Workshop? Use our magazine locator links to find your nearest stockist!
Sign up to our Newsletter
Sign up to our newsletter and get a free digital issue.
You can unsubscribe at anytime. View our privacy policy at www.mortons.co.uk/privacy
Latest Forum Posts
- *Oct 2023: FORUM MIGRATION TIMELINE*
05/10/2023 07:57:11 - Making ER11 collet chuck
05/10/2023 07:56:24 - What did you do today? 2023
05/10/2023 07:25:01 - Orrery
05/10/2023 06:00:41 - Wera hand-tools
05/10/2023 05:47:07 - New member
05/10/2023 04:40:11 - Problems with external pot on at1 vfd
05/10/2023 00:06:32 - Drain plug
04/10/2023 23:36:17 - digi phase converter for 10 machines.....
04/10/2023 23:13:48 - Winter Storage Of Locomotives
04/10/2023 21:02:11 - More Latest Posts...
- View All Topics
Support Our Partners


Shopping Partners
Subscription Offer

Latest "For Sale" Ads
- Reeves** - Rebuilt Royal Scot by Martin Evans
by John Broughton
£300.00 - BRITANNIA 5" GAUGE James Perrier
by Jon Seabright 1
£2,500.00 - Drill Grinder - for restoration
by Nigel Graham 2
£0.00 - WARCO WM18 MILLING MACHINE
by Alex Chudley
£1,200.00 - MYFORD SUPER 7 LATHE
by Alex Chudley
£2,000.00 - More "For Sale" Ads...
Latest "Wanted" Ads
- D1-3 backplate
by Michael Horley
Price Not Specified - fixed steady for a Colchester bantam mark1 800
by George Jervis
Price Not Specified - lbsc pansy
by JACK SIDEBOTHAM
Price Not Specified - Pratt Burnerd multifit chuck key.
by Tim Riome
Price Not Specified - BANDSAW BLADE WELDER
by HUGH
Price Not Specified - More "Wanted" Ads...
Get In Touch!
Do you want to contact the Model Engineer and Model Engineers' Workshop team?
You can contact us by phone, mail or email about the magazines including becoming a contributor, submitting reader's letters or making queries about articles. You can also get in touch about this website, advertising or other general issues.
Click THIS LINK for full contact details.
For subscription issues please see THIS LINK.
Digital Back Issues


Donate

 Register
 Log-in
Model Engineer Magazine
- Percival Marshall
- M.E. History
- LittleLEC
- M.E. Clock

ME Workshop
- An Adcock
- & Shipley
- Horizontal
- Mill

Subscribe Now
- Great savings
- Delivered to your door

Pre-order your copy!
- Delivered to your doorstep!
- Free UK delivery!
All Forum Topics > Stationary engines > Stirling Engine : Laura