How do I disassemble Vickers dual metric/imperial dial?
| Russ B | 06/10/2020 22:26:32 |
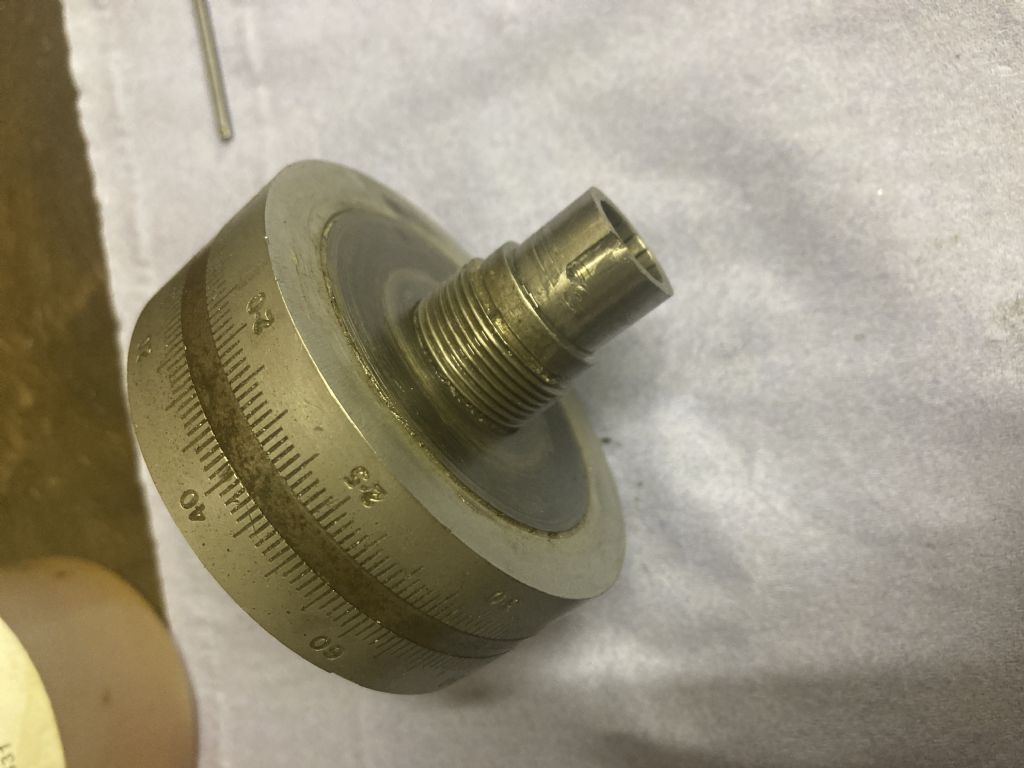
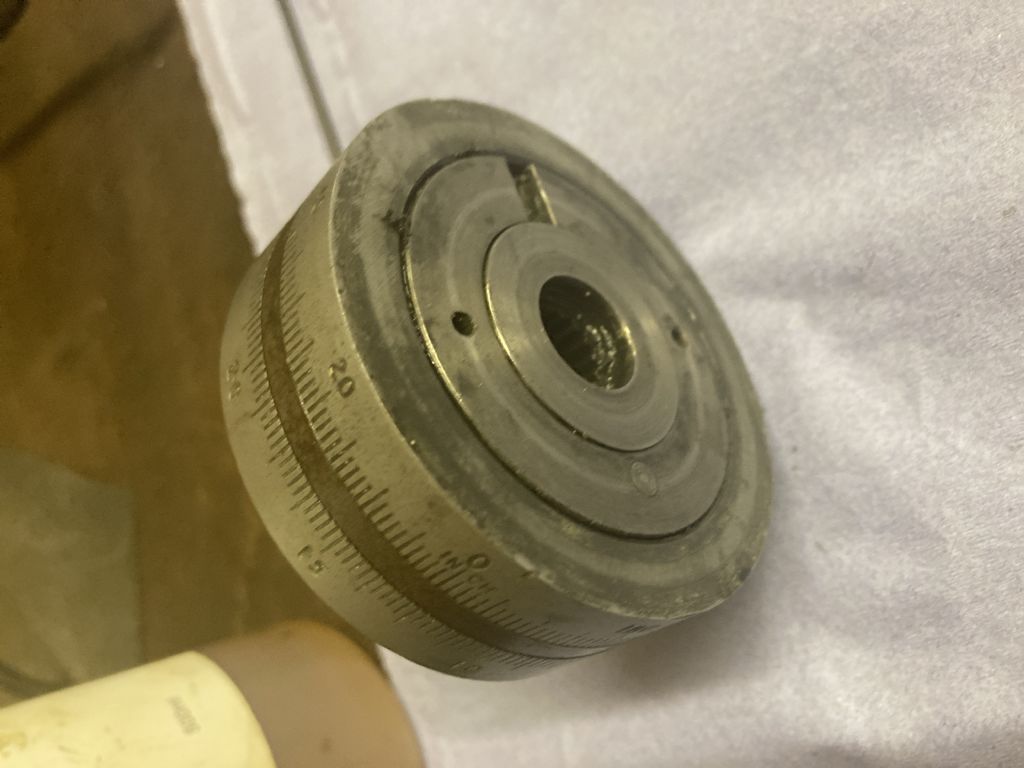
| 635 forum posts 34 photos | To cut to the chase, hows this come apart!!? I don’t want to force anything but my reason for stripping it, is that it’s already seized solid, and I can’t zero the dial even with the lock ring backed right off. This, it’s hard to tell what should and shouldn’t be forced. Those two holes, are possibly tapped, and m3 screw fits but i’m sure it’s imperials as the grub screws were. Its a vickers dual metric/imperial dial and it’s been jammed since I bought this lathe. No doubt one of the planet gears (more likely, the only planet gear) is damaged. It wouldn’t be a problem as I don’t tend to use imperial (it’s a metric machine) but when I loosen the lock nut to zero the dial, it’s jammed solid, and I like to zero especially with these dials as the major and minor graduations are a bit odd! |
| Steviegtr | 06/10/2020 23:19:53 |
2668 forum posts 352 photos | Looking at your 2nd pic it looks like the 2 holes that are opp to each other would accept a spanner similar to the ones used for removing a grinding wheel. Not sure of the name Steve. |
| Emgee | 06/10/2020 23:39:48 |
| 2610 forum posts 312 photos | Perhaps if you add screws to the holes and turn in they may act as drawers/pullers to remove the end plate, I don't think they are for a pin spanner because of the threads. Emgee |
| Oily Rag | 07/10/2020 00:03:05 |
550 forum posts 190 photos | Hello Russ, These are very nice bits of kit. I have some NOS ones of these and will dig them out to check the disassembly method. I think there are some instructions I have on fitting and maintenance, but will need to dig them out tomorrow. From a very cloudy memory there is a hub held in by a snap ring (eared external circlip style) which should be on the outer side from your photos - the side visable in the photo is the machine side rather than the handle side. The slot between the two holes takes a pin (set in the, say, cross slide casting for example) which is the restraint for the centre hub. I believe there are two planet wheels, one for each of the dials and the clever bit from memory was that they were identical tooth wheels but of slightly differing diametral pitch so giving a differential gearing. Be patient and I'll get back to you ASAP!
Regards, Martin Edited By Oily Rag on 07/10/2020 00:10:50 |
| not done it yet | 07/10/2020 06:41:46 |
| 7517 forum posts 20 photos | Never seen one of them, but... Bend, something like a pin, to put a small hook on the pointy end and rub it in the hole. Threads would be fairly evident, if there, or rather obvious if not. Looks like a simple peg spanner application to me. Like common use on angle grinders for the disc holding flanges. |
| DC31k | 07/10/2020 07:46:42 |
| 1186 forum posts 11 photos | Posted by Oily Rag on 07/10/2020 00:03:05:
...the clever bit from memory was that they were identical tooth wheels but of slightly differing diametral pitch so giving a differential gearing. I think your memory is perhaps deceiving you. If the tooth wheels are identical, how is the imperial to metric conversion done? In the Gamet ones, fitted to Colchester lathes, the two internal gears have different tooth counts (125 and 127), but cut on the same pitch circle so they mesh with a common planet pinion gear. FWIW, the Gamet patents are available online, with patent-style exploded diagrams so this may give some insight into how the OP's one could work. Also FWIW, it seems that Vickers offered these dials for Bridgeport mills, so some searching around this area might assist. E.g. https://www.ebay.co.uk/itm/Bridgeport-mill-dual-dial-conversion-250-6mm-new-old-stock-imperial-metric-/233580651017 https://www.ebay.co.uk/itm/Bridgeport-mill-dual-dial-conversion-200-5mm-new-old-stock-imperial-metric-/233580652006 |
| Russ B | 07/10/2020 11:36:22 |
| 635 forum posts 34 photos | Posted by Oily Rag on 07/10/2020 00:03:05:
Hello Russ, These are very nice bits of kit. I have some NOS ones of these and will dig them out to check the disassembly method. I think there are some instructions I have on fitting and maintenance, but will need to dig them out tomorrow. From a very cloudy memory there is a hub held in by a snap ring (eared external circlip style) which should be on the outer side from your photos - the side visable in the photo is the machine side rather than the handle side. The slot between the two holes takes a pin (set in the, say, cross slide casting for example) which is the restraint for the centre hub. I believe there are two planet wheels, one for each of the dials and the clever bit from memory was that they were identical tooth wheels but of slightly differing diametral pitch so giving a differential gearing. Be patient and I'll get back to you ASAP!
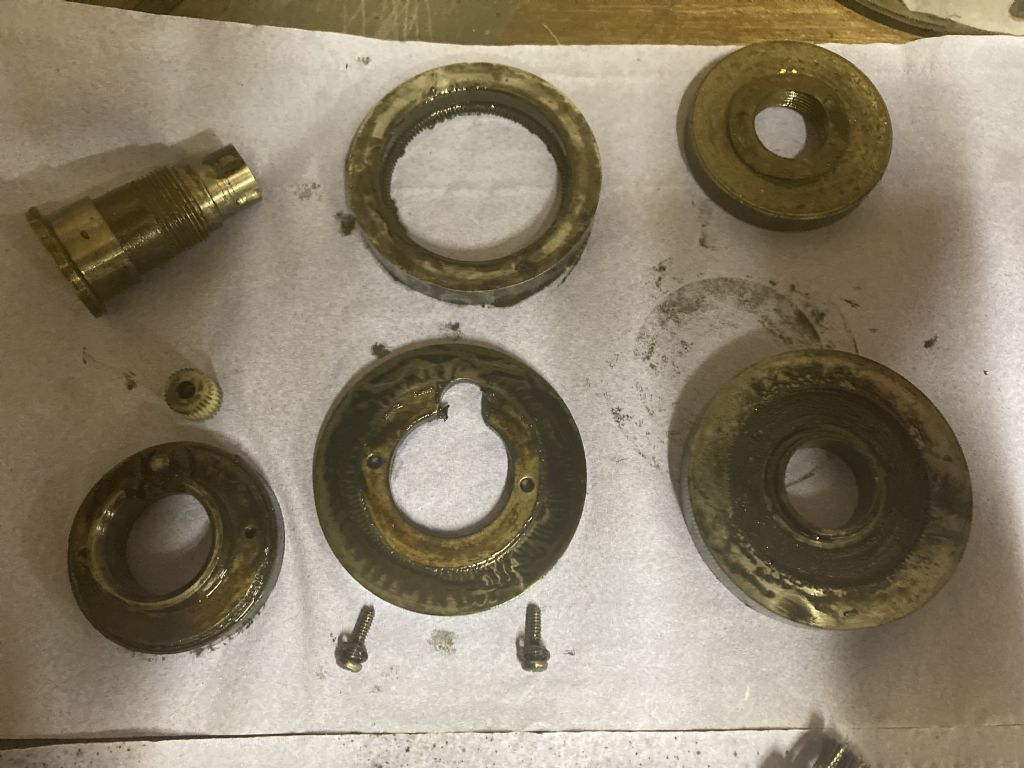
Regards, Martin Edited By Oily Rag on 07/10/2020 00:10:50 Martin I look forward to your reply. I have now managed to get in to it. The two tapped holes are a red herring, they secure the centre steel plate to the backplate retaining the driven gear/dial.
It was simple a case of tapping the threaded end of the shaft back though the assembly. It was incredibly tight due to damage and burs on the shaft from a previously botched repair. To worsen matters the black steel hub which is a press fit into the driver gear/dial has been beaten to death with a hammer on the inside spigot which is a close fit inside another shaft, which caused it to seize.
Add to this that the press fit hub isn’t pressing all the way in, and they are the main causes of the issue. Someone’s had a go at fixing it, and beaten it to death. I’ve done my best to dress it up with a file and stone but Vickers really put some close tolerances on these things so it’s still drags slightly here or there. I need to determine why the hub isn’t pressing all the way in tonight because it’s causing the driver gear/dial to rub on the steel centre part (which is secured with those 2 internal screws). The plastic gear inside is toast but I’d be happy just removing it for now if this press fit weren’t rubbing and seizing. Currently the only way to use the machine is to loosen the lock but fully and allow the graduated metric ring to spin freely, which makes it hard making things to a dimension! |
| Russ B | 07/10/2020 11:38:19 |
| 635 forum posts 34 photos | |
| Oily Rag | 07/10/2020 12:09:50 |
550 forum posts 190 photos | DC31k - I did say "From a very cloudy memory" as it was 40 odd years ago since I had one apart! Russ - Right I have assumed yours is the 2 1/4" diameter dial. I have 2 1/4" and a 3 1/4" dials. The differences are that on the 3 1/4" unit the threaded holes are not opposed diametrically so suggesting a different internal assembly. I have stripped the 2 1/4" unit and taken photographs which I will post in a following action. The news is that the threaded portion that has been assumed to be for a face pin spanner are in fact retainers threads for the internals. I think the 2 1/4" is a 4BA thread, the 3 1/4" unit is definitely 3/16" x 32 BSF. Photos to follow. |
| Oily Rag | 07/10/2020 12:24:24 |
550 forum posts 190 photos | Whoops - should have checked for updates! I see you have stripped it - I'll still post the photos for clarity of a 'new' unit. |
| Oily Rag | 07/10/2020 12:45:14 |
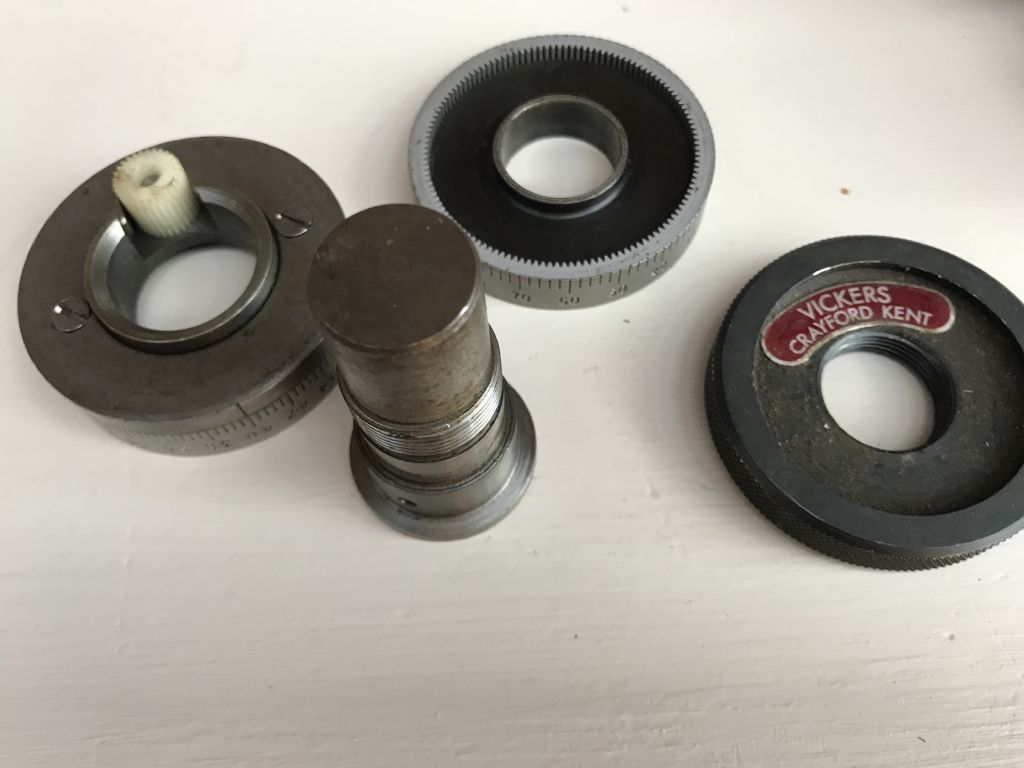
550 forum posts 190 photos | Here is the strip of my unit - more photos in my album "Vickers dual dial handwheel indicator" for those that are interested. edited for 'spellin mistakh' Edited By Oily Rag on 07/10/2020 12:46:24 |
| Russ B | 07/10/2020 12:46:22 |
| 635 forum posts 34 photos | Yes the photos would still be very useful considering mine still doesn’t work on reassembly! As i’ve said i think the steel hub isn’t pressed all the way into the driver/dial. This steel hub locates against the face of the first step on the shaft and because the gear/dial is standing proud it’s locking against the middle fixed steel plate when there should be a very small clearance I had initially wondered if I was missing a shim, but given the close tolerances of everything, Vickers probably didn’t need to shim anything! Edited By Russ B on 07/10/2020 12:48:10 |
| Oily Rag | 07/10/2020 12:47:54 |
550 forum posts 190 photos | If there are any measurements or close ups you require - Just ask! |
| Russ B | 07/10/2020 13:01:35 |
| 635 forum posts 34 photos | Those photos confirm no shim. Is the driver dials steel hub pressed flush with the graduated gear ring (the side against the table in your photo) Does anyone know where the little plastic gears can be sourced. Size wise i’m not sure how big mine is. I’d say they functional top slide one is about 1.1/2” maybe 1.3/4” and the troublesome cross slide is maybe 2.1/4 ish, from memory which just looking at post seems to make sense. The fixed steel mid section is thicker on yours with countersunk screws, mines just a plate with regular pz2 screws (not metric) |
| Oily Rag | 07/10/2020 14:04:48 |
550 forum posts 190 photos | Russ, Starting from the rear of the assembly (i.e the face which abuts to the machine slide) the centre hub has a 0.010" stand proud, the rear satin chrome ring - metric grads is 0.0075" less than the 'hub'. Holding the hub and rotating the satin chrome ring the plastic gear wheel spins freely. Assembling the Imperial graduated satin ring onto the centre shaft the rings become locked to each other when turning one against the other - as you would expect as the nylon gear interferes. The plastic gear protrusion prior to assembly is 0.1225" and the depth of the internal ring gear in the Imperial dial is 0.1245" measured from the dial periphery. Measured to the hub centre spigot it is 0.130" Just to clarify this is the measurement from central hub spigot to the bottom of the recess - think this then allows the dials clearance to spin freely when the hub and centre shaft are clamped by the black knurled outer ring. This makes the black ring the dial unclamp/clamp system. The black knurled outer ring - retained by the thread and a circlip releases the assembly to allow the dials to spin to a zero position (depending on whether you want Metric or Imperial). The plastic gear is 0.476" dia x 0.4305" long with a 0.1876" hole (measured by pin gauge) the teeth are 30 (or 31! - need to get my eyepiece out) which makes them either 67DP or 69DP probably a modified 68DP? might be reproducable by my instrument restorer?! and made in brass?? I'll take some more photos of these points and put into the album later, bit busy at the moment so apologies for the delay. Hope this is helpful Regards, Martin Edited By Oily Rag on 07/10/2020 14:08:13 for clarification Edited again to add bit about instrument restorer making a new gear Edited By Oily Rag on 07/10/2020 14:15:00 |
| Oily Rag | 07/10/2020 19:01:09 |
550 forum posts 190 photos | Russ, "The fixed steel mid section is thicker on yours with countersunk screws," My mid section (the one with the 'zero' line scribed) is 0.177" (4.5mm) thick. The nylon gear is 29 teeth! after repeat counts and confirmed by putting on a shadow graph. The tooth form looks straight sided. After discussing this with my instrument restorer he thinks this is normal for such a small internal meshing gear. He has a cutter which I can check to see if it is suitable. I assume the nylon gear tooth count is not important so long as it translates to both the inner gear counts within the dials to effect the 5.08/5.00 (probably 254t / 250t internal teeth - don't fancy counting them!) turn ratio needed to give the required differential. What are your graduations? Mine are:- Metric = 5.0mm defined by 0.2mm large divisions subtended by 5 intermediate divisions (0.04mm) Imperial = 0.200" defined by 0.010" large divisions subtended by 5 intermediate divisions (0.002" ) I guess that on a 10 TPI leadscrew this could be read as reduction on diameter. I'll make a dimensioned sketch of all the important components if it helps. Martin Edited to get rid of winking emoji! and define probable internal gear tooth counts. Edited By Oily Rag on 07/10/2020 19:05:27 |
| Michael Gilligan | 07/10/2020 19:10:14 |
23121 forum posts 1360 photos | Posted by Oily Rag on 07/10/2020 19:01:09: […] The nylon gear is 29 teeth! after repeat counts and confirmed by putting on a shadow graph. The tooth form looks straight sided. After discussing this with my instrument restorer he thinks this is normal for such a small internal meshing gear. He has a cutter which I can check to see if it is suitable.
. I believe the ‘straight sided’ form of the gear is necessary because it meshes with two different tooth counts of the same pitch diameter. MichaelG. |
| Oily Rag | 07/10/2020 19:43:32 |
550 forum posts 190 photos | It certainly looks that way Michael - Problem with the shadowgraph is the small size of the gear in relation to the length of the tooth which causes an 'out of focus' blur around the tooth form, I'm looking at making an imprint and then shaving it to about 2 or 3 mm to give better definition. If we are going to make one we need to get the angle correct for the tooth flanks - I suppose CAD could be the answer, but I was asleep in class for that part of the lesson! In fact I'm so old I may be the only one who knows what a chisel point HB is when it comes to tech drawing. |
| Michael Gilligan | 07/10/2020 21:42:34 |
23121 forum posts 1360 photos | Posted by Oily Rag on 07/10/2020 19:43:32:
[…] Problem with the shadowgraph is the small size of the gear in relation to the length of the tooth which causes an 'out of focus' blur around the tooth form, I'm looking at making an imprint and then shaving it to about 2 or 3 mm to give better definition. […] . You might also try putting it on a flat-bed scanner, at 1200 dpi ... The results can be very satisfactory. MichaelG. |
| Russ B | 07/10/2020 22:07:44 |
| 635 forum posts 34 photos | So, my steel mid section is actually thicker than yours, exactly 3/16” in the centre. It’s obviously been rubbing this for some time as it’s worn down a thou around the edges. I’ve determined from careful measurement and sketches an interference between the steel mid plate and driver wheel of 0.1305mm or 5 thou, it’s right there on paper, double checked the dimensions and laid it out twice. No way around it, it just doesn’t work. If my mid steel plate was 4.5mm like yours, I’d have exactly 5 thou clearance..... sounds comfortable to me. I need to get some 4.5mm plate or find someone with a small surface grinder!! This where I got the idea maybe I was missing a shim on the shaft, to space the wheel off the steel plate slightly. Edited By Russ B on 07/10/2020 22:11:27 |
Please login to post a reply.
Want the latest issue of Model Engineer or Model Engineers' Workshop? Use our magazine locator links to find your nearest stockist!
Sign up to our newsletter and get a free digital issue.
You can unsubscribe at anytime. View our privacy policy at www.mortons.co.uk/privacy
- hemingway ball turner
04/07/2025 14:40:26 - *Oct 2023: FORUM MIGRATION TIMELINE*
05/10/2023 07:57:11 - Making ER11 collet chuck
05/10/2023 07:56:24 - What did you do today? 2023
05/10/2023 07:25:01 - Orrery
05/10/2023 06:00:41 - Wera hand-tools
05/10/2023 05:47:07 - New member
05/10/2023 04:40:11 - Problems with external pot on at1 vfd
05/10/2023 00:06:32 - Drain plug
04/10/2023 23:36:17 - digi phase converter for 10 machines.....
04/10/2023 23:13:48 - More Latest Posts...
- View All Topics
- Reeves** - Rebuilt Royal Scot by Martin Evans
by John Broughton
£300.00 - BRITANNIA 5" GAUGE James Perrier
by Jon Seabright 1
£2,500.00 - Drill Grinder - for restoration
by Nigel Graham 2
£0.00 - WARCO WM18 MILLING MACHINE
by Alex Chudley
£1,200.00 - MYFORD SUPER 7 LATHE
by Alex Chudley
£2,000.00 - More "For Sale" Ads...
- D1-3 backplate
by Michael Horley
Price Not Specified - fixed steady for a Colchester bantam mark1 800
by George Jervis
Price Not Specified - lbsc pansy
by JACK SIDEBOTHAM
Price Not Specified - Pratt Burnerd multifit chuck key.
by Tim Riome
Price Not Specified - BANDSAW BLADE WELDER
by HUGH
Price Not Specified - More "Wanted" Ads...
Do you want to contact the Model Engineer and Model Engineers' Workshop team?
You can contact us by phone, mail or email about the magazines including becoming a contributor, submitting reader's letters or making queries about articles. You can also get in touch about this website, advertising or other general issues.
Click THIS LINK for full contact details.
For subscription issues please see THIS LINK.
Model Engineer Magazine
- Percival Marshall
- M.E. History
- LittleLEC
- M.E. Clock
ME Workshop
- An Adcock
- & Shipley
- Horizontal
- Mill
Subscribe Now
- Great savings
- Delivered to your door
Pre-order your copy!
- Delivered to your doorstep!
- Free UK delivery!


 Register
 Log-in


