Member postings for Justin Thyme
Here is a list of all the postings Justin Thyme has made in our forums. Click on a thread name to jump to the thread.
| Thread: Milling Advice |
| 20/09/2023 11:05:52 |
Posted by JasonB on 20/09/2023 10:09:59:
0.2mm is a bit shallow and will tend to just wear the very corners of the cutter, What was the total depth you wanted to remove? it is a wedge shape, so 0.5 off one end and 2.5 off the other. at 0.2mm it seems to cut with consummate ease. at 0.3mm there seemed to be a bit of viabration, it all seemed a little less happy. |
| 20/09/2023 10:07:48 |
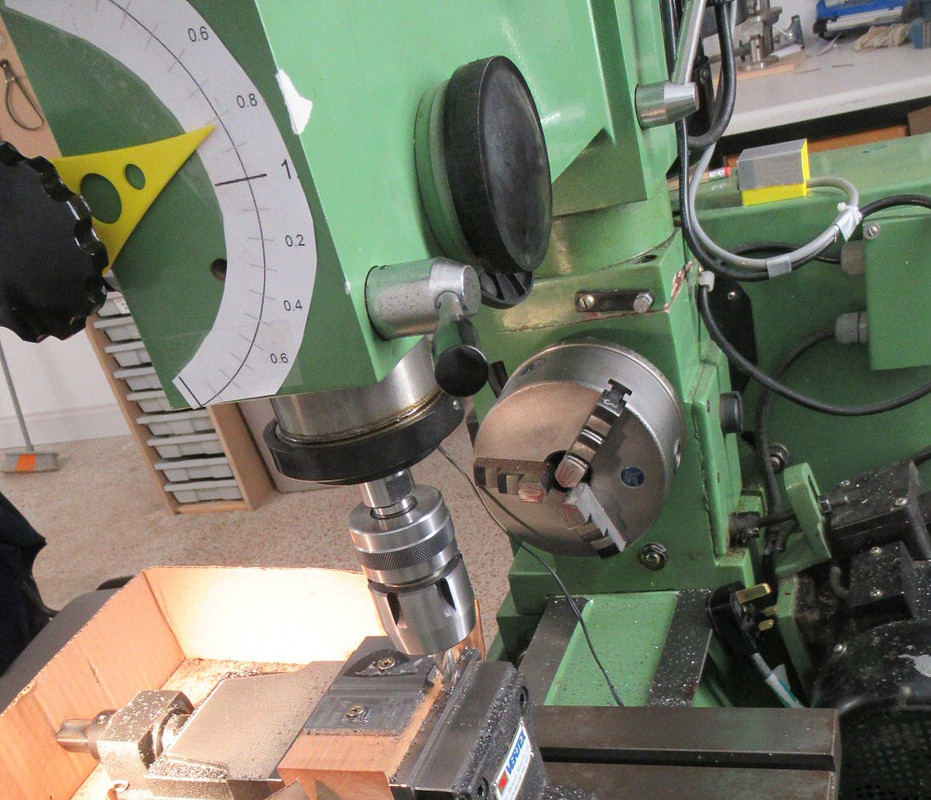
What about depth of cut? I used 0.2mm for each pass, is this about right? And on the subject of depth, this machine does not seem to give any real means of adjust depth accurately - hence the print out and dial that I have stuck on the end |
| 20/09/2023 09:19:50 |
I think it is a tungstan carbide cutter, but will check (how would I know, I don't see how all those flutes could be?) Yes the quill is locked. but I was not locking the x axis hen moving the Y. would that make a difference ?
not sure waht you mean about ridges between the lines - it is mainly visual, although I can feel a roughness with my fingernail.
Edited By Justin Thyme on 20/09/2023 09:36:41 |
| 20/09/2023 08:55:37 |
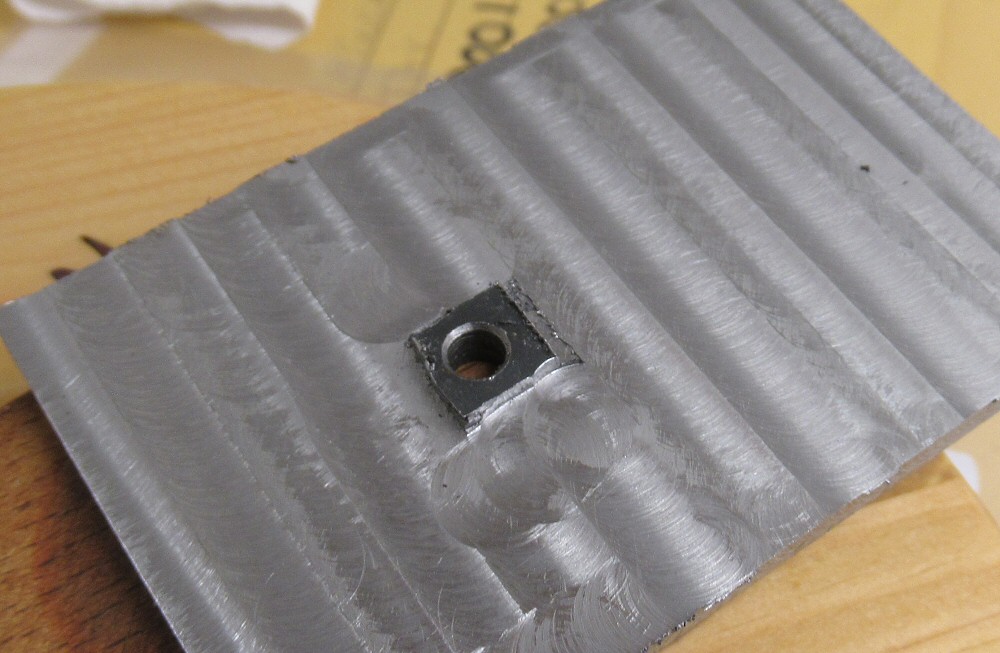
Could anyone offer some advice on how to improve the finish, it isn't too rough, you couldn't peel tatties with it but I would have hoped for a better finish (i still thing it will polish up ok with some wet and dry) speed 2000 rpm, 10mm 4 flute, used cutting oil.
|
| Thread: The crumbly concrete problem |
| 02/09/2023 14:40:34 |
Is it the same or simlliar to what used to be known as Concrete Cancer? The steel reinforcement within the concrete rusts and expands thus destroying the cement, so I would guess it can't really be stabilised. |
| Thread: Titanic submersible |
| 24/06/2023 07:27:10 |
Posted by derek hall 1 on 24/06/2023 07:12:08:
From the pic Hopper posted, it looks like the end cover was secured by a handful of m6 cap head bolts...! It does doesn't it. However I guess they only need to hold it loosely in place for the first few dozen fathoms, after that they are surplus to requirements. |
| 23/06/2023 08:04:16 |
Posted by John McNamara on 23/06/2023 02:23:04:
A sad day, a loss of 5 people affecting many families and friends. That is about the same number of people killed on the UK roads every day, and that rarely if ever makes the news. And most of those who die venturing onto our roads did not believe they were taking any risk, often killed by others breaking the law. The folk on this submersible were on a great adventure knowingly doing something phenomenally dangerous. I take my hat off to them for their spirit of adventure, but should we feel more sadness than we do for all the other deaths As usual the media is sweeping us along, controlling what we think and what we should be sad about. |
| Thread: Making a large washer. |
| 20/06/2023 06:37:44 |
with the thought that carbide is brittle and can shatter. Would it be safer to at least start this 'interrupted' cut with a HSS bit ? Since I'm going to do this job now, I will use a HSS bit (if they fit the tool holder) , but be interested in your thoughts if this is a valid concern |
| 19/06/2023 21:15:25 |
Posted by Nick Wheeler on 18/06/2023 13:31:23:
Were the four bolt holes in the original request? Because they change how you make the part: Start with a piece of stock big enough to create the piece Mark the centre of all three(centre hole, outside edge and PCD) circles. Draw the centre and outside edges with dividers. Mark out the PCD. Drill the PCD Bolt the piece to a (sacrificial)faceplate using the PCD, and ensure it runs true to the centre mark Machine the inner and outer edges.
You make several pieces by bolting them to the faceplate at the same time
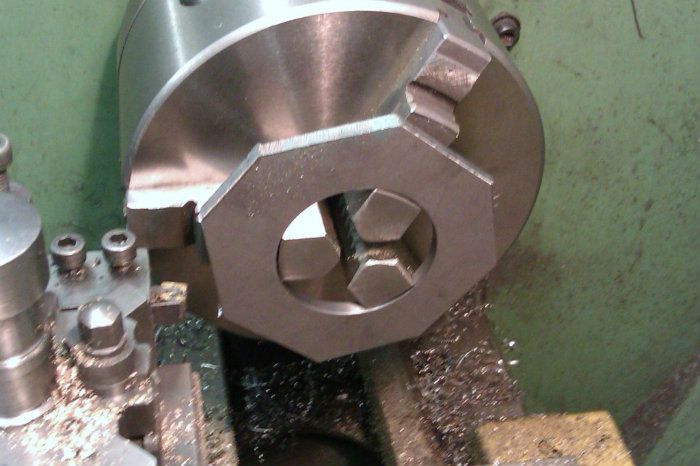
Ooop's, yes I seem to have omitted that important spec.. I did mark out all the three circles before I started. The problem arose when I used the pillar drill to bore the centre hole out with the hole saw, the pillar drill is so unconcentric it managed to get the not very round hole in the wrong place. See my first image, you can see the scored line .
Never mind, I managed to mount it on the milling machine, and with an edge finder on the inside of the hole I worked out where the centre would be. from here it was very straight forward to get the holes drilled accurately (within a few thou, I quite surprised myself) I was then able to score a line to where the outer edge will be. From there I have hacksawed and angle grinded it down to a roundish shape. I'm going to have a good think about how I will lathe this down to its 89mm dia - it's non-roundness is a concern. What speed should I start with? When doing such things turning wood I will keep the speed very low until it gets fairly round. Will I use the same tactic on steel ? I did spin it and felt 100-150 rpm seemed OK, not sure though I could get a 3rd bolt in to hold the plated together, should I bother, it seems very secure |
| 18/06/2023 13:15:52 |
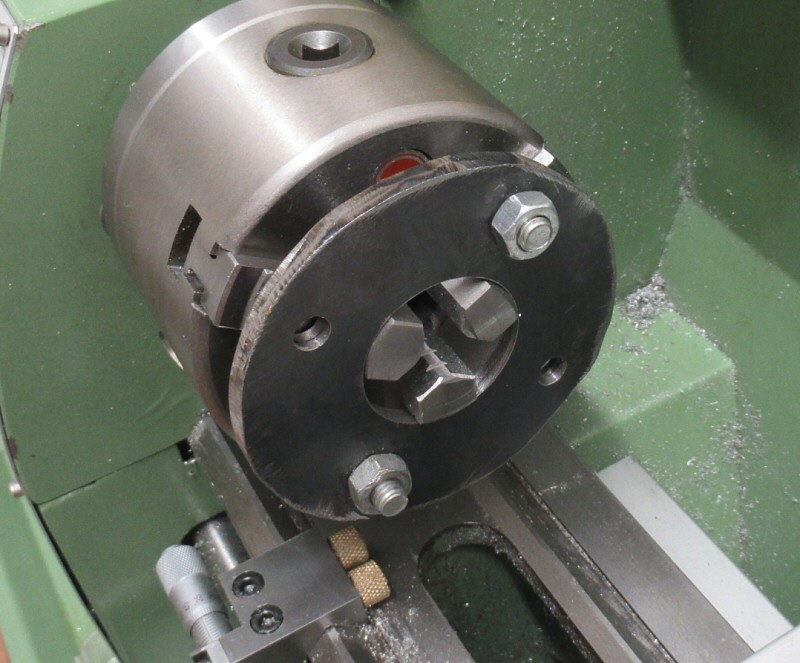
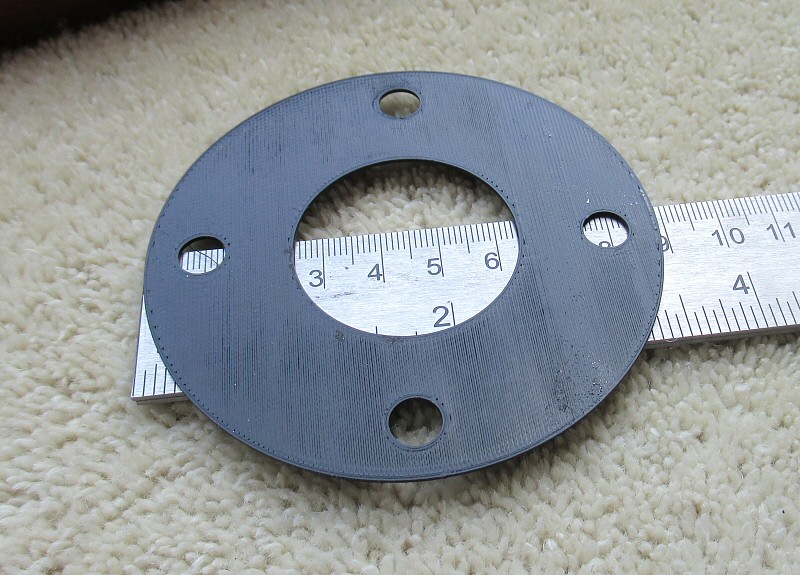
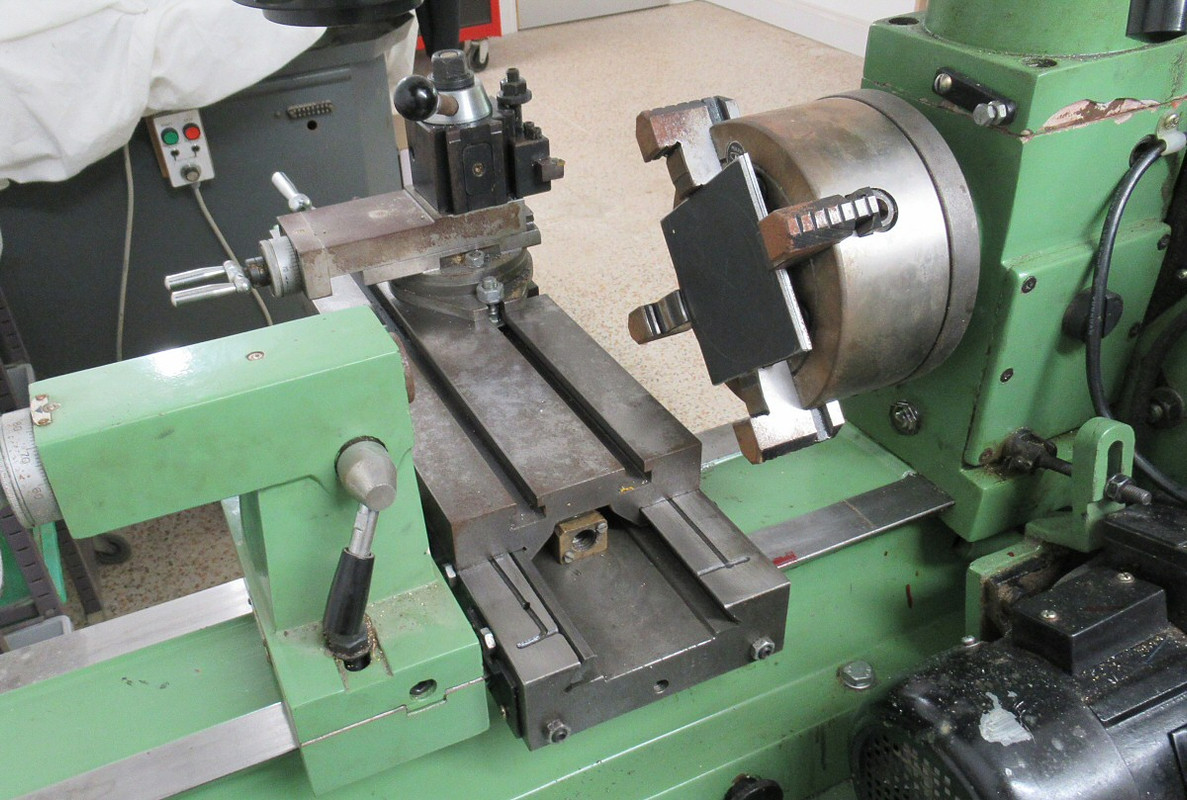
Yes Nicholas, that is exactly what I was going to do, there would have been plenty room with the cross slide off, but I would have need to form a bit of plywood to protect the base from dirt, fillings etc, then would I need to readjust the gibs when reassembling, seemed like a lot of work , so did'nt bother. But it certainly could have been done if it was important, and this isn't. Anyway, moving on. I now have the two squarish plates with a 39mm hole in the middle. I now need to create an outer edge of 89mm dia concentric to the inner hole, and also 4 evenly spaced 8mm holes 35mm from the center.as per this 3d printed one The plan is to mount it into the chuck as per JasonB's earlier picture
My plan is to then score two circular marks, one with a dia of 70 and the other 89mm. The 70 mm dia line will allow me to mark out and drill the four 8mm holes and the 89 mm dia line will be a guide to cut and grind down to before remounting the piece in the chuck and precisely turning it down to 89mm But how do I accurately measure the two circles, how will I work out where the exact centre is? The smaller lathe has a digital readout, but how do I zero this? Should I start off with another piece of round bar and establish a zero point off that - or do I simply score a ine at say roughly 95mm, then if that measures manually at 94.7 would I use that as a ref and work from there. There is room on the chuck, so do I turn them at the same time ? should I hot melt glue them together, or may if there is enough room, drill the holes first and bolt them together. ?
|
| 18/06/2023 11:09:01 |
Posted by Hopper on 18/06/2023 10:52:04:
Posted by Justin Thyme on 18/06/2023 10:29:51:
Posted by Nicholas Farr on 18/06/2023 06:54:47:
Hi Justin, don't you have a self centring three jaw chuck as shown in JasonB's second photo? Regards Nick. Edited By Nicholas Farr on 18/06/2023 06:58:06 Yes, but they don't take square bits, and even if I rounded the outside first they would not be big enough. If you look at Jason's pic, the three-jaw chuck is holding the job by the round hole in the middle. But you need to have the reverse jaws for your 3-jaw to do this.
Aye, but I needed to create the hole in the plate first, I was wishing to do this on the lathe. I had wanted an excuse to use the 4 jaw chuck. Now the hole is created (on the pillar drill) I can move on to the three jaw chuck to form the outer edge. (and yes I can soon get it into reasonable roundness with the angle-grinder before machining on the lathe As for downloading books, I got a box full of books along with the lathes, I find books hard going for some things. and was hoping to ask things not easily found in reference books on here. For instance, as I asked earlier, would removing the cross slide so as to do a job be a common practice. I didn't think it worth the time and effort for this job, but would that be something others would consider or would it be a big No No.
|
| 18/06/2023 10:43:55 |
Posted by not done it yet on 18/06/2023 08:24:32:
I am needing to form what can best described as a large washer out of 3mm mild steel late.. 39mm dia centre hole, with a 89mm outer edge. I am suspecting that ‘(p)late’ is actually 5mm, not 3mm? I’m certainly hoping it is not two unattached pieces measuring a total of 6mm! That could be positively dangerous! If two pieces, please securely fix them together before machining. Drilling/boring and affixing to an arbor might well allow clearance over the cross slide, if those corners were sawn off or removed with an angle grinder. Indeed it was two 3mm plates. In what way could it be dangerous, it seemed very secure. I'm sure I would be soon aware if there was any looseness, and once the hole saw was engaged then the work piece would be trapped between chuck and tail stock ? |
| 18/06/2023 10:36:32 |
Posted by JasonB on 18/06/2023 07:02:38:
Could you not have held it by the outer step in the jaws? That would mean none stick out beyond the body of the chuck, might need a bit of packing if the jaws meet in the middle before they tighten onto the work As for clocking the hole true. I did show a 3 jaw which will not really need clocking unless it is well out or you are after high accuracy. If using the 4-jaw with a thin piece like this you could put the dti onto each jaw face, when they are true the work should be too. Thicker work can be done by initially gripping half the depth of the work so you have an uninterupted surface to run the dti on then move it back for machining Yes it was too small for the outer jaws, packing would have seemed a bit precarious. As for the centring of the hole, this, by luck was not necessary, however I was curious if I could have centred it, had I need to enlarge or improve the hole - something I may need to do in the future. |
| 18/06/2023 10:29:51 |
Posted by Nicholas Farr on 18/06/2023 06:54:47:
Hi Justin, don't you have a self centring three jaw chuck as shown in JasonB's second photo? Regards Nick. Edited By Nicholas Farr on 18/06/2023 06:58:06 Yes, but they don't take square bits, and even if I rounded the outside first they would not be big enough. |
| 17/06/2023 23:49:40 |
Got a start on it today, as ever, it didn't quite go according to plan. As you can see the slide thing (whats it called?) was in the way and too big to go under the chuck, and this meant that I could not get the tailstock any where near the work piece. I could have removed the top part of the slide thing so as to get it under the chuck, but it seemed like a lot of effort. What should I have done ? So what I did do was drill out the centre holes on the pillar drill, here I was very luck, the hole saw is supposed to be 36mm, but our hideous pillar drill is so unconcenteric (is that a word) that the hole turned out to be very nearly 39mm, a little bit of work with a file and it was perfect. The other prob that I encountered (and I'm hoping for a bit of advise) I tried to put the plate after the 39mm hole was created, but just could not get it centred, I have one of those dial things for checking concentricity, but couldn't set it up on the inside of the hole.
|
| Thread: Cutting Oil Fumes |
| 17/06/2023 20:07:25 |
Posted by SillyOldDuffer on 17/06/2023 19:04:03:
Ventilation is the best answer. The worst thing to do is breath fumes through a lit cigarette. Dave
I used to smoke heavily when working with asbestos, (the monkey dung variety), I guess the asbestos would not have become more dangerous after passing through the red glow of the fag end - LOL Edited By Justin Thyme on 17/06/2023 20:08:00 |
| 16/06/2023 06:28:40 |
Posted by Andrew Johnston on 15/06/2023 19:52:07:
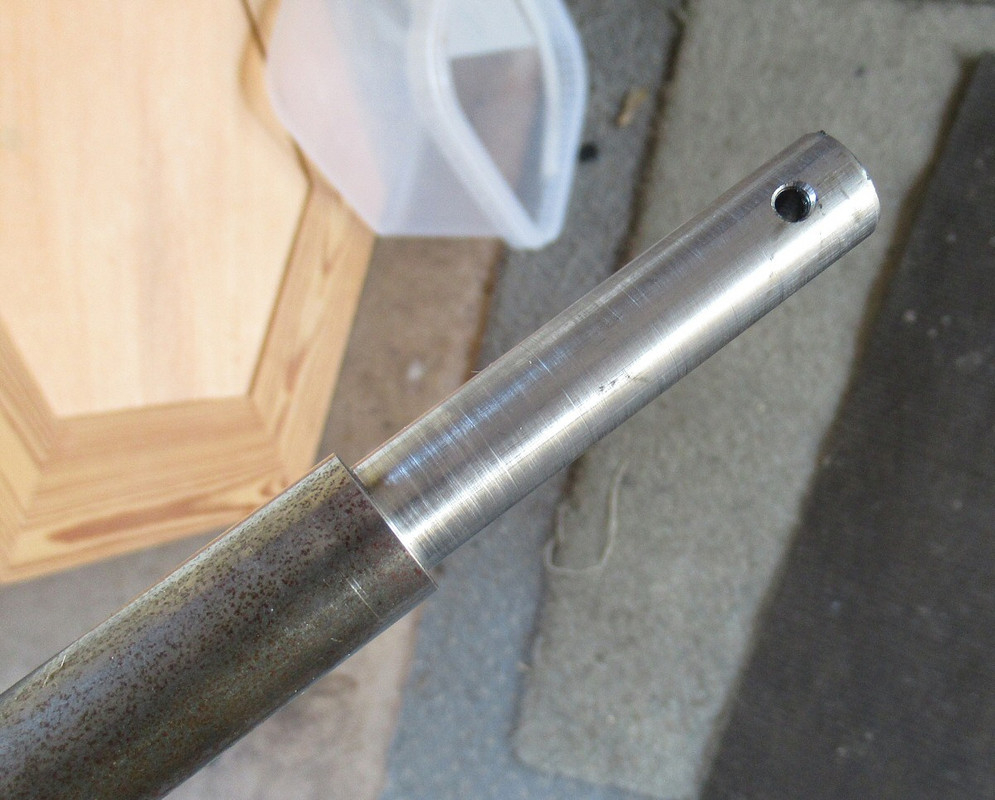
The part shown will be fine as sackbarrow axle, but the finish isn't particularly good. What is the provenance of the steel and the carbide insert? What speeds, feeds and depth of cut were being used? Andrew I have no idea where the insert come from (other than it was in with the lathe stuff) and the bright steel is an off cut from a local fabricator. (I only do free stuff) I will get the speed, cut depth etc (inc some pics of the carbide bit, angle of attack) later today. then may be you could advise on how to do it better. I'm utterly cluelss in what I'm doing, guess work. (but all the same, what I made will work well, so I'm well chuffed) |
| 15/06/2023 18:12:12 |
Just reviving this old thread. First real go at using the lathe (at least first time making something for purpose) And was a bit disappoint at the smoke it was creating, seems pretty obvious it would be unwise to be breathing this stuff in, although I did today. I was cutting back 70mm from the end of a bit of 20mm dia bright steel bar to 15mm. I was told to apply a dab of cutting oil to the surface before each cut. It was fair smoking, The cutting could be described a bluish spirals. I may be should have worn my forced ventilation ffp2 helmet that I use for wood tuning, (not sure if ffp2 is useful against smoke?) Creating ventilation could be a problem (unless I start using it a lot) However I read this thread with great interest - as I was using a carbide cutter (or at least I think I was, brass coloured diamond shpaed bit), may be I need not have used any cutting oil (or may be just some for the final cut) So to my question - Is it fairly agreed that not using any cutting oil is OK when using a carbide or tungstan Carbide bit on mild steel ? and here it is (a new axle for a sack barrow) quite proud of it.
|
| Thread: ChatGPT incoming |
| 14/06/2023 07:41:00 |
Just asked Bard & Chat GPT for 36mm bi metal hole saw speed in mild steel. Bard suggests 500-700 and . GPT goes for 150-200. An internet search suggests to me 250-300 so I will need real people on an engineering forum to tell me the facts, who will also be able to add some other useful tips and not obsess about safety glasses. |
| Thread: 1st 3d Print(er) |
| 12/06/2023 08:37:27 |
Posted by John Doe 2 on 05/06/2023 14:46:37:
3D printing is just brilliant. I can wake up with an idea in my head, then CAD it and set it printing to be ready that afternoon or the next morning. Even silly little things, such as A replacement lid for our bird feeder; Brackets to repair the clothes drying horse; A jockey wheel for a child's toy caravan, A holder for a set of specialised plumbing tool sockets which have a round profile but a large flat on one side, New plastic soft jaws for my crab clamp....The list goes on, and be warned; it gets addictive ! To make those in a machine shop would require a workshop and thousands of pounds worth of lathes, mills and tooling, plus I don't have the skills, experience or accuracy to work in metal. I don't know how you would even begin to cut the shapes for the plumbing sockets.
it is isn't it. can make so many clever little things that otherwise would never be attempted. Just from this weekend, we need to add a vent to a machine, so was able to make a 6" to 4" connector and a little bracket to hold the 4 inch pipe to the wall.
|


Magazine Locator
Want the latest issue of Model Engineer or Model Engineers' Workshop? Use our magazine locator links to find your nearest stockist!
Sign up to our Newsletter
Sign up to our newsletter and get a free digital issue.
You can unsubscribe at anytime. View our privacy policy at www.mortons.co.uk/privacy
Latest Forum Posts
- *Oct 2023: FORUM MIGRATION TIMELINE*
05/10/2023 07:57:11 - Making ER11 collet chuck
05/10/2023 07:56:24 - What did you do today? 2023
05/10/2023 07:25:01 - Orrery
05/10/2023 06:00:41 - Wera hand-tools
05/10/2023 05:47:07 - New member
05/10/2023 04:40:11 - Problems with external pot on at1 vfd
05/10/2023 00:06:32 - Drain plug
04/10/2023 23:36:17 - digi phase converter for 10 machines.....
04/10/2023 23:13:48 - Winter Storage Of Locomotives
04/10/2023 21:02:11 - More Latest Posts...
- View All Topics
Support Our Partners


Shopping Partners
Subscription Offer

Latest "For Sale" Ads
- Reeves** - Rebuilt Royal Scot by Martin Evans
by John Broughton
£300.00 - BRITANNIA 5" GAUGE James Perrier
by Jon Seabright 1
£2,500.00 - Drill Grinder - for restoration
by Nigel Graham 2
£0.00 - WARCO WM18 MILLING MACHINE
by Alex Chudley
£1,200.00 - MYFORD SUPER 7 LATHE
by Alex Chudley
£2,000.00 - More "For Sale" Ads...
Latest "Wanted" Ads
- D1-3 backplate
by Michael Horley
Price Not Specified - fixed steady for a Colchester bantam mark1 800
by George Jervis
Price Not Specified - lbsc pansy
by JACK SIDEBOTHAM
Price Not Specified - Pratt Burnerd multifit chuck key.
by Tim Riome
Price Not Specified - BANDSAW BLADE WELDER
by HUGH
Price Not Specified - More "Wanted" Ads...
Get In Touch!
Do you want to contact the Model Engineer and Model Engineers' Workshop team?
You can contact us by phone, mail or email about the magazines including becoming a contributor, submitting reader's letters or making queries about articles. You can also get in touch about this website, advertising or other general issues.
Click THIS LINK for full contact details.
For subscription issues please see THIS LINK.
Digital Back Issues


Donate

 Register
 Log-in
Model Engineer Magazine
- Percival Marshall
- M.E. History
- LittleLEC
- M.E. Clock

ME Workshop
- An Adcock
- & Shipley
- Horizontal
- Mill

Subscribe Now
- Great savings
- Delivered to your door

Pre-order your copy!
- Delivered to your doorstep!
- Free UK delivery!