Member postings for Graham Meek
Here is a list of all the postings Graham Meek has made in our forums. Click on a thread name to jump to the thread.
| Thread: Emco FB2 Quirks and Additions |
| 03/07/2020 10:06:23 |
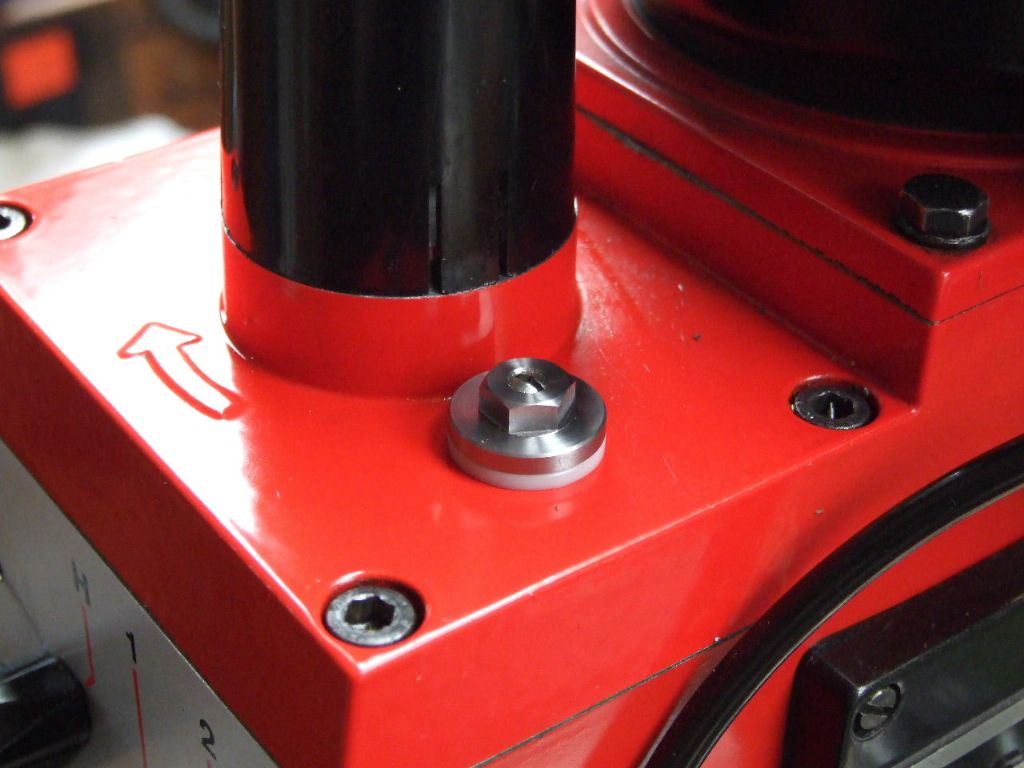
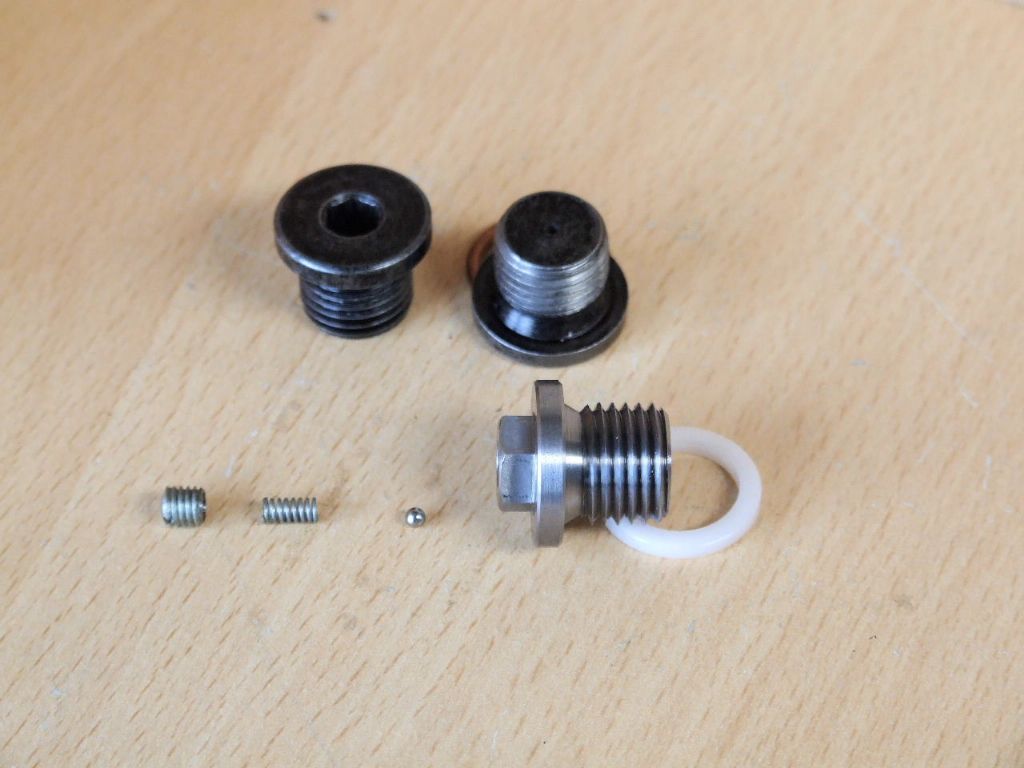
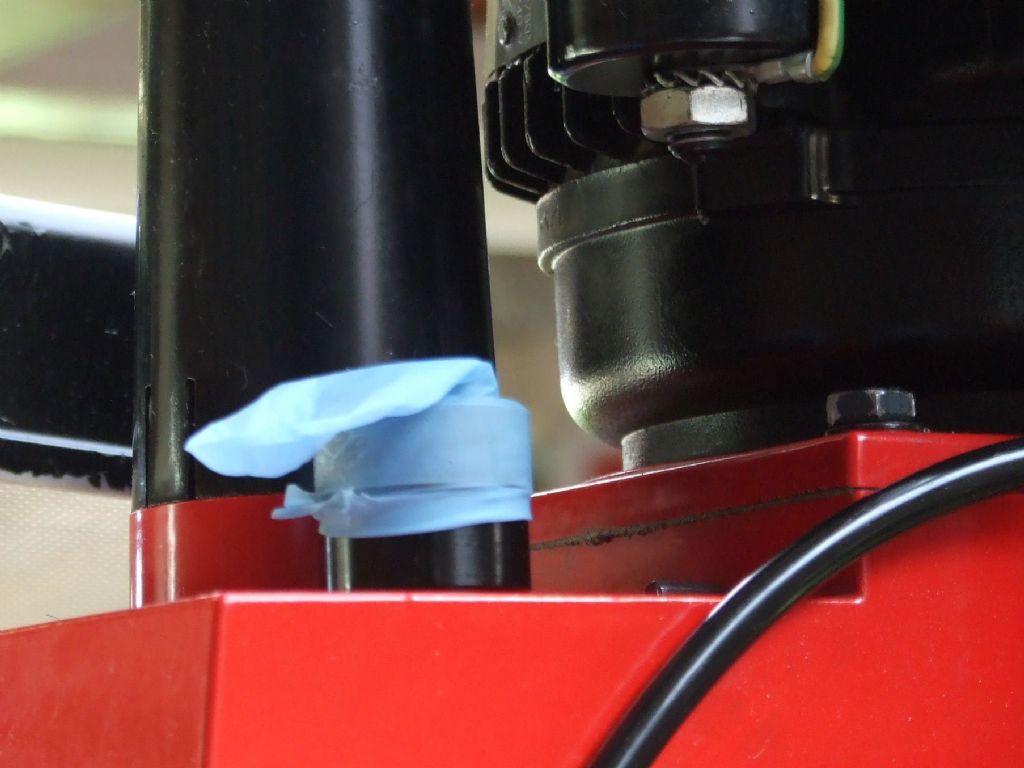
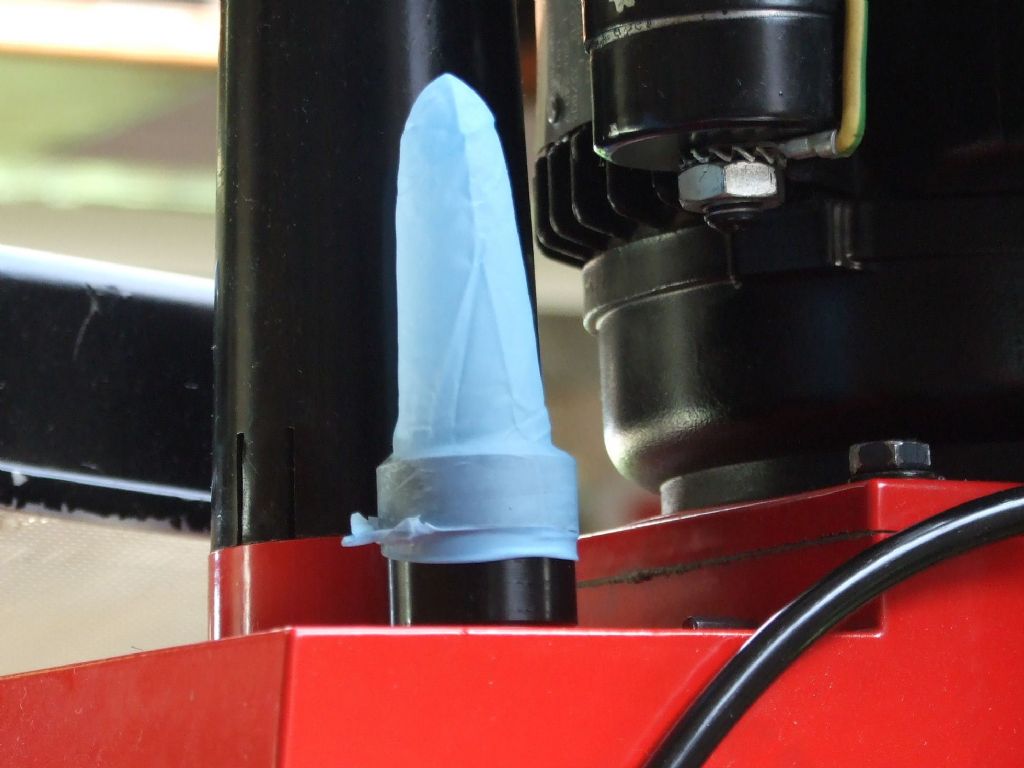
I have recently received many emails from around the world for more details on the various attachments and advice on owning an Emco FB2. While a lot of my attachments have appeared in print, there are some who have never read these articles. Thus I thought it would be a good idea to get a catalogue of some of the quirks, problems and attachments listed somewhere. One thing that needs to be sorted is the confusion about the FB2, Several adverts seen over the years list the 4 Speed "Mentor Mill" with its grease filled milling head as an FB2, which incidentally has a 6 speed Oil filled milling head and replaced the Mentor Mill. The number of speeds is the dead give away, as is the integral motor of the Mentor Mill, which in my experience were always Hammerite Blue, or Green. One recurring quirk or problem with the FB2 is that of Oil leakage from the Milling head. Many who have purchased a used machine automatically think it is due to a failed Oil Seal or O-ring. Of the latter there are 5 on the FB2, one large one on the Quill and two each on the shafts of the Speed change levers. Two running seals made by INA are fitted, one to the top cover and one is recessed within the Quill assembly. In the 34 years I have owned these machines I have yet to have any of these seals fail, despite near constant usage. By far the biggest culprit for oil leakage is pressurisation of the gearbox. I first noticed this when one morning after receiving the above mill. A small pool of oil appeared over night on the milling table. As the machine was only a few days old it could not be a failed seal. Leaving the filler plug slightly open cured this leak. Leaving this plug open to the atmosphere allowed the pressure inside to escape. Not being happy with the open filler I modified the standard Emco plug, then designed and fitted the plug shown below, which is basically a snifter valve. Since fitting this valve I have not suffered any further oil leaks on either of my machines. There are however some who doubt that the head does pressurise. To this end I recently carried out a simple experiment using the finger from a Nitrile glove. This is slipped over a modified sealing washer. The next photograph was taken 1 minute later after running light at 2000 RPM Leaving the "indicator" in-situ while carrying on working saw the finger disappear to the far corner of the workshop. Those who have not successfully tied up a Party Balloon will know the score here. I intend to add to this post from time to time. Regards Gray, |
| Thread: Meek Type Dog-Clutch for Denford |
| 27/06/2020 11:08:22 |
Nice work Will, This machine will benefit from the attachment and you will wonder how you ever managed without it before. Regards Gray,
|
| Thread: ML10 - racking of carriage? |
| 25/06/2020 16:05:07 |
Glad my advice worked out, with errors like that I would leave well enough alone and modify my method of working. A Clock (DTI) is truly a wonderful thing, as are feeler gauges which are very often over looked. A clock in skilful hands can save a lot of worry when it comes to machine tools and wear. One thing I would do is make some felt wipers with metal protectors for that bed. These will slow down any future wear and keep the bedway lubricated for longer. Regards Gray, |
| 24/06/2020 19:10:37 |
You have to remember that you are exaggerating the error by having the clock extended. There is a back up plan, and the lathe can always be salvaged. Odd items for ML 10's always appear for sale. Regards Gray, |
| 24/06/2020 16:44:41 |
Posted by Ignatz on 24/06/2020 15:48:13:
Graham, interesting point about the rear dovetail on the carriage. Is there any way to check that without disassembling and applying bluing? You could start with a feeler gauge either side of the saddle, but do not move the carriage during the test as you may be rocking the saddle and get a false reading. If you cannot get a 0.0015" or 0.04 mm feeler gauge into any gap this can only be good news. If the blade does enter, check if it goes in by the same amount each side. This will tell you if the wear is equal. I would expect the greatest wear on the right-hand side, but you might be lucky and have it symmetrical. You can go to town with micrometer blue if you feel confident. Provided you have found wear then I would scrape the central portion before I put on any blue. Ideally setting the Saddle up vertically such that a short ground roller resting in the dovetail, can be used in conjunction with a clock to check where to scrape. If the back face of the saddle is machined you could get away with a micrometer and a roller, after removing any paint. Getting right into the corner can be difficult if the scraper is not thin enough. A lot depends on how big the flat is on the corner of the bedway dovetail. Regards Gray. |
| 24/06/2020 15:35:04 |
From what you say I would say the rear Dovetail of the Saddle that bears against the rear of the bed is worn such that the dovetail is higher in the middle of the slideway than on the two ends. This lathe comes with no felt wipers on the saddle to bed interface and with the ingress of debris the inevitable wear is a problem. To rectify the error the dovetail needs to be scraped in the central portion to remove the high spot. Preferably taken a little below. This will retain oil and allow the ends to wear down to the new surface. However if you are not experienced in scraping dovetails I would leave well enough alone and adopt a different style of working as John suggests above. Regards Gray, |
| Thread: Weeds in a 'lawn' |
| 21/06/2020 11:29:42 |
I have found cutting the lawn too short encourages weeds. Scarifying the lawn for a moss infestation is a good start. The lawn will also benefit from forking every 100 mm, 4" to get some air into the soil and improve drainage. Lawn sand brushed onto a lawn after forking will help with the drainage. Moss loves a water logged lawn. I have found a Weed and Feed by Vitax, (usual disclaimer), to be very effective at controlling what weeds I get and improving the colour. I do think though that you will need to do some reseeding before you can apply this. Vitax cannot be applied on a new lawn, and that goes for many of the other preparations. I have used in the past a product by Westfield this is a weed and feed, but it has grass seed included. This product is very environmentally, pet and children friendly. Regards Gray, |
| Thread: HSS/Tungsten Tool Honing Machine |
| 18/06/2020 09:26:03 |
|
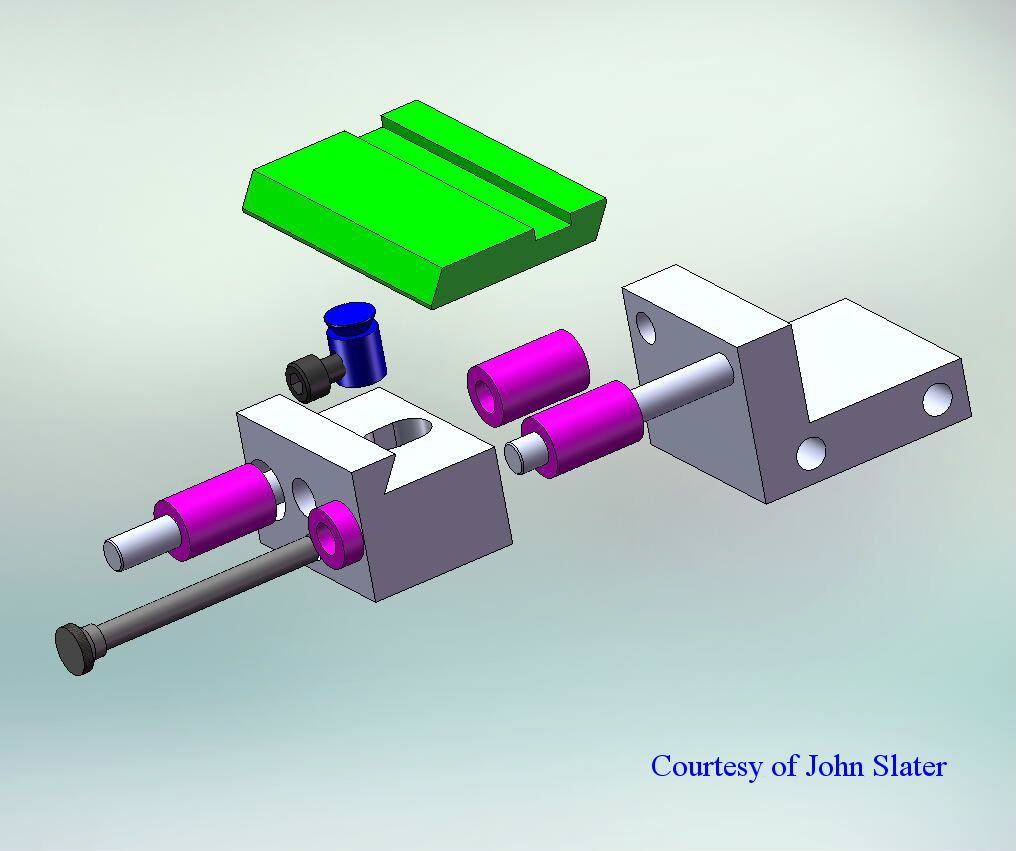
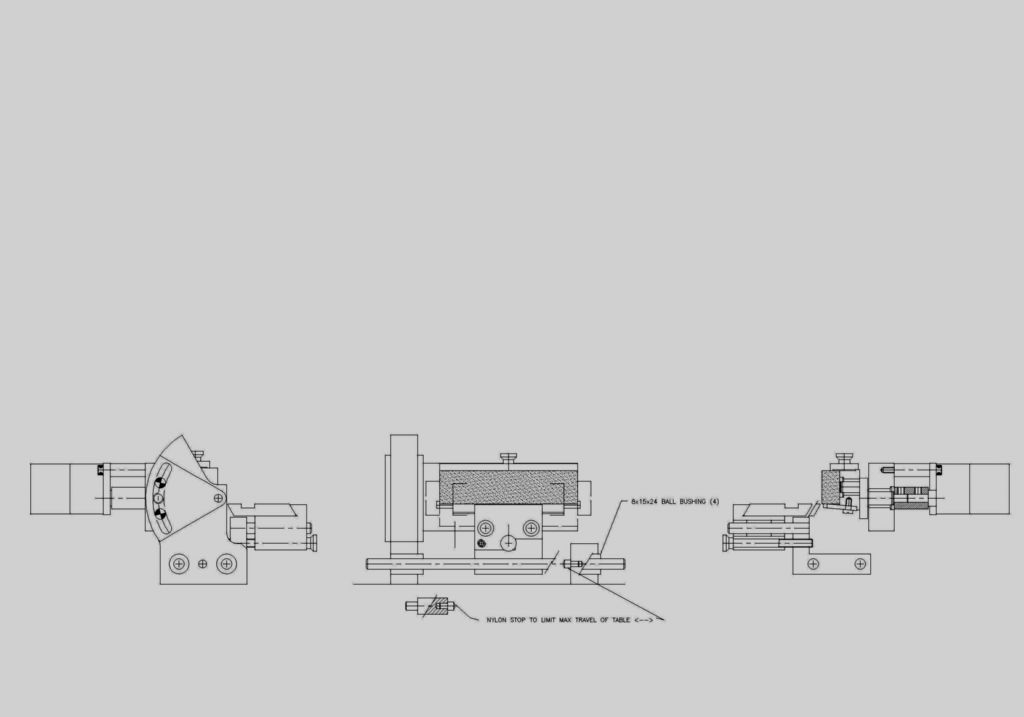
Thanks Michael, but I do not always get things right, no one ever gets to see my scrap box. The break through, if I can call it that, came when I thought about having separate dedicated tables for each function. The radius attachment needs a setting fixture and this too took some simplifying, the last thing I wanted was a very complex tool. To set a radius accurately merely requires the use of the appropriate sized feeler blade, but more on that again. Regards Gray, Edited By Graham Meek on 18/06/2020 09:26:50 Edited By Graham Meek on 18/06/2020 09:28:22 |
| 17/06/2020 12:10:13 |
|
I have just started the manufacture of a Project which has been 8 years in the design stage. Certain features which I wanted to include in the machine were proving difficult to fit into the space available, but I think I have done it now, thanks to help from John Slater. There have been many times I have needed to put a very fine radius on a tool, and while I have managed to do this free hand it would have been so much easier with a dedicated piece of tooling. Which presented the tool to the Hone in a repeatable manner. The recent post on Boring Bars brought out a piece of information from the Sandvik web site concerning the tip radius on a boring tool, with regards to the depth of cut taken. Sandvik recommend that this radius should never be larger than the depth of cut. This has spurred me into getting this machine up and running if only to prove the above works in practice. I hope over the coming months to keep you informed of my progress. Regards Gray, |
| Thread: Evolution of a Boring and Facing Head |
| 11/06/2020 10:59:14 |
|
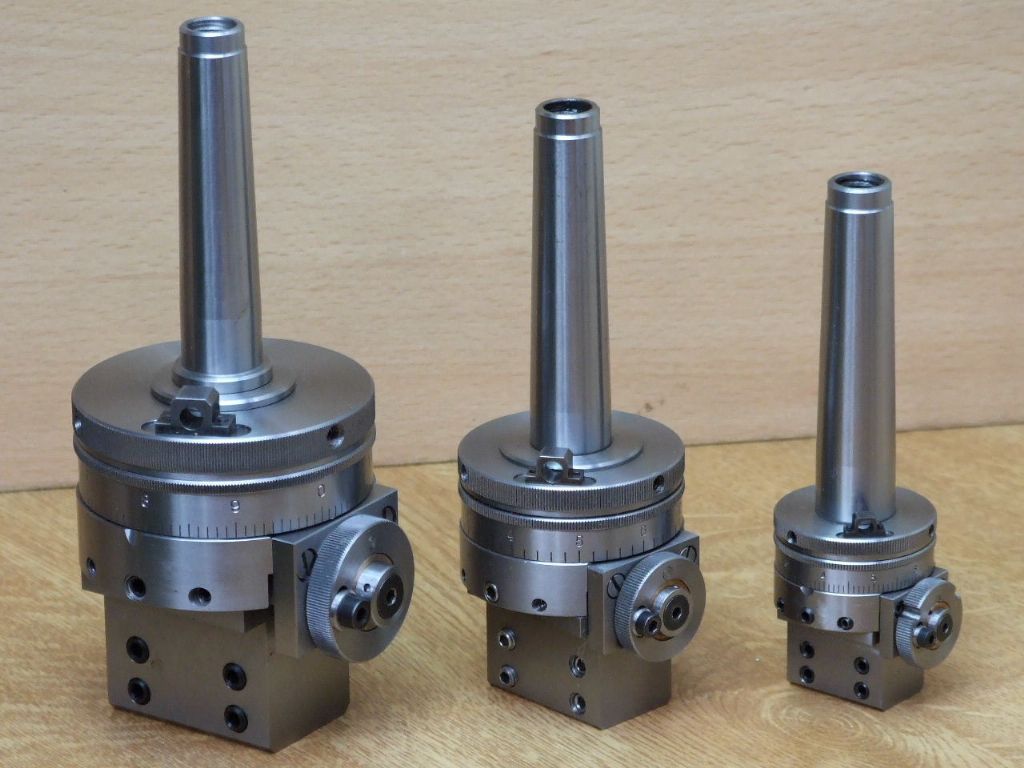
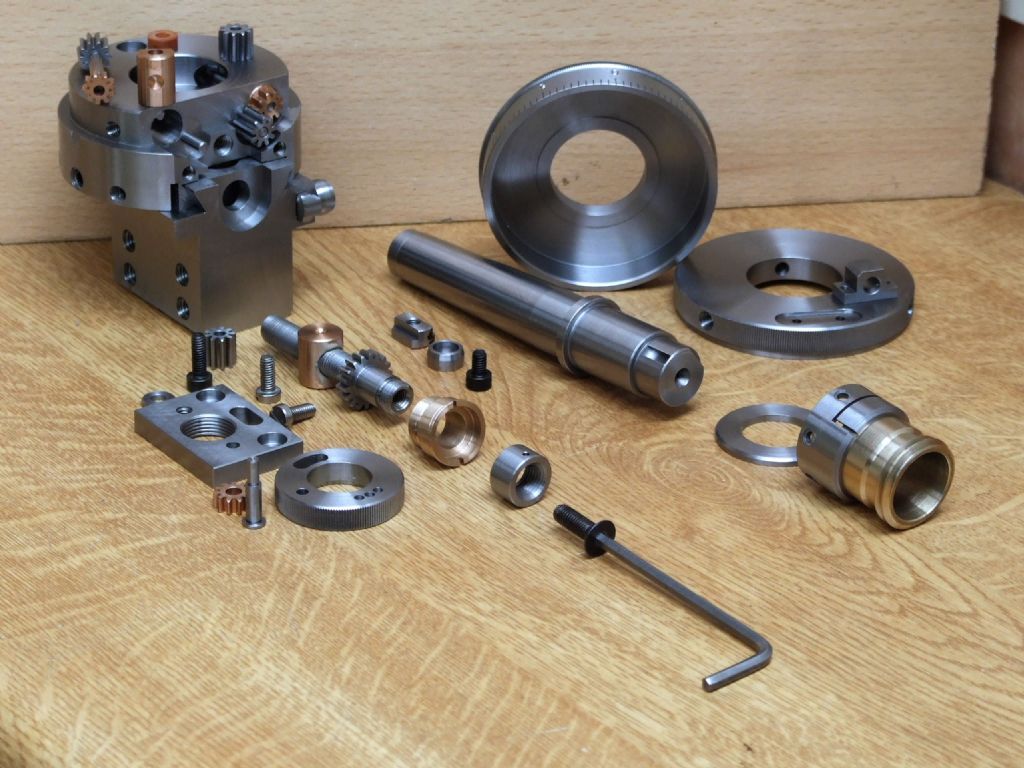
Following numerous requests for drawings of a larger version of the 36 mm and 50 mm Concentric Dial B&F Heads. Of a size along the lines of my original 66 mm design that appeared some years ago. I have recently completed this design of a 66 mm Concentric Dial version and thought I would share this with the Forum. I have also included a view of the component parts prior to assembly. The worm drive for this version is a modified 2.5 mm pitch screw thread and the helical worm gears are 30 degree Pressure Angle. Many have asked how the drive is achieved in previous postings on this Forum, and elsewhere, so this should give those wishing to know most of the answers Articles on all three versions are either in hand, or already away at the publishers. Regards Gray,
|
| Thread: Replacement key for Emco stand cupboards |
| 06/06/2020 18:11:00 |
Glad I could be of help. I am afraid I cannot answer that one, but of the Emco FB 2 mills that I have had, all three have had different keys. The current key I have is "0" and this machine was one of the last machines to be made in Austria. Regards Gray,
|
| 05/06/2020 12:22:28 |
|
Gone one better and made a drawing, Regards Gray, |
| 04/06/2020 17:17:43 |
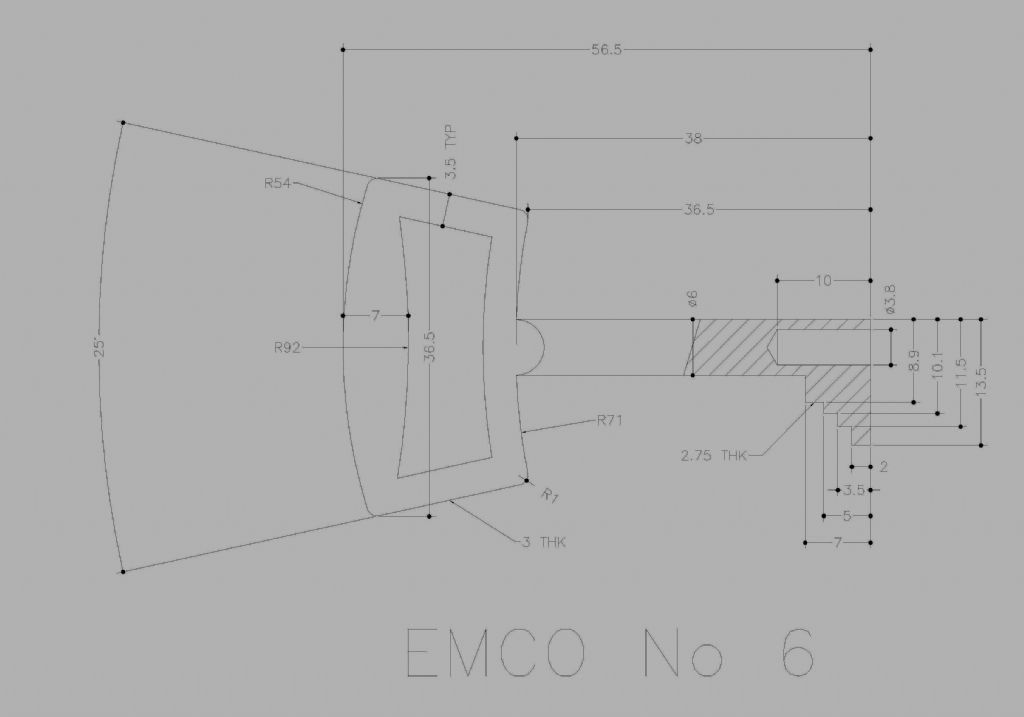
Quite by chance the die cast key on my lathe cabinets is a No 6. The round body of the key is 6 mm diameter with a 3.8 mm hole by 10 mm deep in the end. The blade is 2.75 mm thick and measures 7 mm long from the end of the key. The over all projection including the 6 mm key body is 13.5 mm. There are 4 steps in the blade just like a staircase. Top step is on the end of the key and is the 13.5 mm height. The bottom step is 8.9 mm across the 6 mm body of the key and 5 mm from the front end of the blade. The next step is 10.1 mm from the back of the 6 mm body and 3.5 mm from the end of the blade. The last step but one is 11.5 from the back of the body and 2 mm from the end of the blade. I made new keys for my lathe and mill years ago. The steps were produced on the lathe after fabricating the blanks out of brass. Regards Gray, |
| Thread: Myford S7 Cutting Barrel Shaped Cylinders |
| 02/06/2020 18:49:48 |
Mike, On the vertical alignment test that you did, you have the test mandrel running plus at 0.068 mm. Given the bedway is sloping down towards the spindle nose by approximately 0.05 mm. If the spindle and test bar were truly horizontal. Then this reading should have been -0.05 mm. This is assuming you set the clock to zero at the spindle nose, and not at the free end! If the clock was set at zero near the spindle. Then your spindle is pointing skywards. This in itself would turn a taper with a perfectly flat bedway. By inducing a twist in the bedway to get the two ends the same size. Another taper has been induced by this action but the opposite way. The result is the part is larger in the middle. Until you start with a flat bedway you will continually chase yourself around in circles. A piece of silver steel in the chuck as I first posted would be my first put now. Regards Gray, |
| 31/05/2020 16:08:24 |
Hi Martin, Your analogy concerning the rear bedway pivot point would be correct if the surface of the bedway was indeed flat between the two points. If they were I would be forced to agree with you. However having done several plots across the bedways given the bed wear shown in Mike's photograph the surface at each point approximates to a curve. The radius of this curve varies with the bed wear at each point of measurement. From my plots I get radii for the curvature ranging from 36 to 75 feet. The centres of these radius are below the bedway and their positions vary laterally with regard to the Spindle centre. As the centreline of the lathe is very approximately at the top of these radii, any vertical, or lateral movement is going to have very little effect on the workpiece. Working with these radii and a bit of Pythagoras I got an average for the figure mentioned above. Also as a point of interest. From the drawings on the S7 Screwcutting clutch I make the spindle centreline slightly less then 2" (50.27 mm) from the rear vertical face of the rear bedway. Regards Gray, |
| 30/05/2020 15:40:27 |
Posted by Mike Donnerstag on 30/05/2020 13:21:45:
Measuring again, apart from the last 2 inches of the bed, the bed width across both shears shows no more than 1thou of wear (not bad at all!), according to my digital calipers (the only micrometer I have is 0-1&rdquo
Hi Mike, According to the above we are dealing with ONE Thou of wear generally across the bedways. This is the generating surface for parallel parts. With an additional maximum wear of FIVE and a bit Thou in the thickness of the bedways. The FIVE Thou of wear extends the entire length of the front way, where you were turning your test piece, but at the same time the wear on the rear way is roughly FOUR Thou give or take Half a Thou. Thus the tool will drop only ONE and a bit Thou, which will increase the diameter by 0.000002". This is not the 0.0015" you mention at the beginning of the post. Just for reference the tool will need to drop 0.027" in centre height to produce an increase in diameter of 0,0015". Plus this drop would need to be in the middle of the test piece, ("Barrel Shaped" The wear is as we have established fairly constant along the front edge, with no gradual 0.027" drop. Assuming that the Gib is adjusted correctly across the bedway then I am leaning towards the spindle adjustment. I do however think that the bed adjustments to get the two ends the same diameter originally may need revisiting, once the spindle has been checked out. Regards Gray,
|
| 30/05/2020 13:27:47 |
Mike, Thanks for the info on the Bed, it does show she has had a hard life. I would hazard at a guess that the Universal Parting Tool has been used quite a bit on this lathe. There are slight nicks showing in the rear bedway which makes me think this is all Hacksaw damage. Having previously owned such an example. Luckily for me mine was not so bad and at the time I had access to the necessary equipment. An hour on the Snow Surface grinder soon had the bed back to new. The question then has to be asked why was the Hacksaw used in the first place, Inexperience perhaps? or Chatter due to a sloppy or worn bearing? Looking at the wear across the bedways then on average you have roughly 1 thou more wear on the front edge when compared to the back edge at that station. This does not concern me as the tool height will only be effected by this. A sloping tool path should produce a Hyperboloid of Rotation, that is the opposite to what you are getting. (For those wanting more information on this then Page 88 Part Two, of Workshop Technology, by W.A.J. Chapman, Third Edition. The chapter also covers machine tool accuracy and alignments) The wear pattern across the ways is more important to me at the moment, and can you tell me if you have a wide bedway bearing saddle. Regards Gray, Generally, Installing a complete workshop during a move of premises for one employer proved to be a good learning curve in installing used and abused machine tools. My training means I never take anything for granted, but check everything at least twice. Regards Gray,
|
| 30/05/2020 09:32:29 |
Hi Jason, Thanks for explaining the dimensions, I would have liked to have heard from the OP. I was aware the DTI will not stay on the crest of the bar, due to the wear across the bed ways. The amount of "drop off" on the Clock will depend on two things. The diameter of the test bar and the distance moved off centre, let us assume it to be the full 0.005". Simple Pythagoras shows that for a 5/8" test bar the clock will drop 0.00004", too small for me to worry about and a mere fraction of the error found. (It would be less again with a larger diameter test bar.) What we are not told, and which would be extremely helpful is how this wear progresses down the bedways. The 0.005" could be over just the last 2" of the bed nearest the headstock. It could however be over 10", we are not told this. This is why the bar test method mentioned initially would show up this wear. Plus as I said earlier, If the the clock is so arranged that the carriage is operating on a less worn part of the bedways then the OP would be avoiding the severity of the wear and proving that there is, or is not, any twist present. This is also why I initially mentioned the use of the Engineers Level as my first choice. As this method does not involve any machine movements and wear can be very simply compensated for. Once twist is ruled out then we can move on to the other checks. An un-twisted bed should give 0.010" taper during the turning test, if the 0.005" wear is progressive down the bed. If it is isolated as I suspect, then there might be a very different answer. Regards Gray, Generally, Like Martin I think the spindle needs looking at, but lets sort one thing out at a time. Otherwise should the lathe miraculously start turning parallel after altering several things we will be none the wiser as to which was the culprit. When Myford's started building this lathe it was with a flat bed plane. From this everything else is added. It was not assembled and then checked by turning a test piece. Tweaking this and that, to get it to turn parallel and round. The Test Sheets show they went about in a systematic way. This is the fundamental way all machine tools are built. Regards Gray,
|
| 29/05/2020 20:57:09 |
Posted by JasonB on 29/05/2020 18:15:59:
Posted by Graham Meek on 29/05/2020 17:30:31:
Hi Mike, I am a little confused by the XXX "mm" readings which in some instances are larger by a factor of 10, from what I would want to see, taking the 0.068 mm on the Headstock Alignment-Vertical as an example. If as the opening post suggests then it is like ft ?? that the carrage and dti are going down as they are moved away from the headstock due to the 5thou wear in the bed, any of these readings that involve moving the carrage along the bed surely can't read zero. Hi Jason, Now I am even more confused, where do "ft" come from. The point I was asking was where does the "0,068 mm" come from when there is another entry written below on the Vertical Alignment Test which is more in keeping with the required dimension which Myford stipulate. As regards the "5 thou", I take this to be wear across the bedways and as such will have very little effect on the vertical alignment. Yes there is a measured 0.0025" wear on the bed surface but as this wear only affects the tool height it will not give the effect to the barrel shape that has been found. It might have some effect on the Vertical Alignment if the saddle was under a loading similar to that imposed by a turning tool. In the free state I think the error will not be worth worrying about. The wear to the vertical face will not extend completely down the bedway, otherwise the lathe would be turning parallel. Thus by using the setting bar technique and running a clock along the side there should be an error which replicates the wear. However there should come a point along the setting bar when the clock reads a fairly constant reading. Further if a clock is mounted such that the carriage is only working on the less worn portion of the bedway then, the clock should read pretty well zero along its length, provided there is no twist. My concern at the moment is that there is a twist in the bed, coupled with a semi floating spindle, combined with too long a test piece. Unless the problem is approached in a logical manner then Mike might as well role a dice and pick just any of the replies. Regards Gray,
|
| 29/05/2020 17:30:31 |
Hi Mike, I am a little confused by the XXX "mm" readings which in some instances are larger by a factor of 10, from what I would want to see, taking the 0.068 mm on the Headstock Alignment-Vertical as an example. Did you check the Test Mandrel for concentricity before you used it? It might be new but it would not be the first time I have experienced one that was wrong. Placed on dead centres in the lathe and spun by hand under a clock will prove this to be a good one, or otherwise. Clock at the small end of the taper, the large end, the plain diameter next to the lager end of the taper and at the tailstock end. There should be Zero error at any location, Plus the test diameter should be exactly parallel. If it is then I think you need to inspect the mandrel taper socket for cleanness and for any damage. As the spindle is hard there should be no damage, but you never know. I know of one individual who decided to try and drill out his spindle to take a larger bar. I had to internally grind the damage out so that the Morse taper would seat properly. During these tests above, have you tried clocking the mandrel with the belts under tension. Or have your checks been done in the free state? Too much tension will accelerate wear and if the spindle front bearing is out of adjustment then the belt tension will influence any readings. A clock on the mandrel chuck register will show if the belts are lifting the spindle as the belt tension is applied. Adjusting the bearings is not a hard thing to do, but I would like to see what the answers are to the Test Mandrel concentricity test as well as the mandrel taper socket, belt tension etc, before I say any more. Regards Gray,
|
Want the latest issue of Model Engineer or Model Engineers' Workshop? Use our magazine locator links to find your nearest stockist!
Sign up to our newsletter and get a free digital issue.
You can unsubscribe at anytime. View our privacy policy at www.mortons.co.uk/privacy
- *Oct 2023: FORUM MIGRATION TIMELINE*
05/10/2023 07:57:11 - Making ER11 collet chuck
05/10/2023 07:56:24 - What did you do today? 2023
05/10/2023 07:25:01 - Orrery
05/10/2023 06:00:41 - Wera hand-tools
05/10/2023 05:47:07 - New member
05/10/2023 04:40:11 - Problems with external pot on at1 vfd
05/10/2023 00:06:32 - Drain plug
04/10/2023 23:36:17 - digi phase converter for 10 machines.....
04/10/2023 23:13:48 - Winter Storage Of Locomotives
04/10/2023 21:02:11 - More Latest Posts...
- View All Topics
- Reeves** - Rebuilt Royal Scot by Martin Evans
by John Broughton
£300.00 - BRITANNIA 5" GAUGE James Perrier
by Jon Seabright 1
£2,500.00 - Drill Grinder - for restoration
by Nigel Graham 2
£0.00 - WARCO WM18 MILLING MACHINE
by Alex Chudley
£1,200.00 - MYFORD SUPER 7 LATHE
by Alex Chudley
£2,000.00 - More "For Sale" Ads...
- D1-3 backplate
by Michael Horley
Price Not Specified - fixed steady for a Colchester bantam mark1 800
by George Jervis
Price Not Specified - lbsc pansy
by JACK SIDEBOTHAM
Price Not Specified - Pratt Burnerd multifit chuck key.
by Tim Riome
Price Not Specified - BANDSAW BLADE WELDER
by HUGH
Price Not Specified - More "Wanted" Ads...
Do you want to contact the Model Engineer and Model Engineers' Workshop team?
You can contact us by phone, mail or email about the magazines including becoming a contributor, submitting reader's letters or making queries about articles. You can also get in touch about this website, advertising or other general issues.
Click THIS LINK for full contact details.
For subscription issues please see THIS LINK.
Model Engineer Magazine
- Percival Marshall
- M.E. History
- LittleLEC
- M.E. Clock
ME Workshop
- An Adcock
- & Shipley
- Horizontal
- Mill
Subscribe Now
- Great savings
- Delivered to your door
Pre-order your copy!
- Delivered to your doorstep!
- Free UK delivery!
 . This includes the visibly worn area on the top of the front shear. The final 2” measures 1.5-2thou above that, which accounts for my initial wear measurement of 3.5thou.


 Register
 Log-in


