Forum sponsored by:

Polly Models AGE
Anyone made one?
| steamdave | 03/04/2012 20:07:41 |
| 526 forum posts 45 photos | Has anyone made the Polly Models Atmosheric Gas Engine and got it to run successfully? It looks an interesting little engine but I understand it can be a real challenge to get it to run because the original design from the 1900s on which it is based used coal gas as fuel. Dave The Emerald Isle |
| NJH | 03/04/2012 21:14:16 |
 2314 forum posts 139 photos | I don't know about that one Dave but I can't get a squeak out of my Scott Vacuum engine! They assure me that it does wok so maybe I'm not persistant enough. The making was fun anyway. Regards Norman |
| JasonB | 03/04/2012 21:27:01 |
 25215 forum posts 3105 photos 1 articles | Norman have a look on Madmodder for John (Bogstandards) build of the Scott, he did several mods and it runs. http://madmodder.net/index.php?topic=4219.0
Dave, can't help either. J Edited By JasonB on 03/04/2012 21:29:31 |
| steamdave | 03/04/2012 22:50:52 |
| 526 forum posts 45 photos | Norman I made the Scott a couple of years ago and it fired up first time, much to my surprise for a flame licker. One change I made is to ease the flame path into the cylinder by arranging the graphite valve block to drop down to close the port, rather than lifting to close, as shown on the drawings. I am trying to strip it down at the moment because I used antifreeze as a coolant and everything not painted has corroded quite badly. (I kept it in its own wooden travelling box and that exacerbated the problem). I thought antifreeze was supposed to stop that sort of problem? One mod I read about somewhere that I intend to try is to bevel the inside of the intake port. Don't know whether it will have any effect, positive or otherwise, but it's worth a try. Dave The Emerald Isle |
| NJH | 04/04/2012 08:35:39 |
2314 forum posts 139 photos | Hi Guys Well that's encouraging! I have spoken to several folk about this engine and the reply has always been :- " I haven't heard of anyone getting one of those to run ." I bought this a couple of years ago as a quick project to make on a recently aquired new lathe. Apart from the vast amount of cast iron swarf generated all over my machine I enjoyed the build and all fitted well and moved smoothly. Your experiences prompt me to dig it out and try again to breath some life into it! I too will rearrange the carbon block as you suggest. One question for now - how much tension do you have in the springs? I assume that the carbon block needs to be held firmly in place but excessive friction must be avoided. Regards Norman Edited By NJH on 04/04/2012 08:36:38 |
| steamdave | 04/04/2012 12:39:58 |
| 526 forum posts 45 photos | Norman Minimum friction in all moving parts is essential to success. Spring tension needs to be the bare minimum to keep the block against the cylinder head. The springs are too stiff as supplied, but take care and don't stretch them too much. If that has happened, cut off a couple of turns and try again. Guess how I found out! Dave The Emerald Isle
|
| steamdave | 04/04/2012 12:46:45 |
| 526 forum posts 45 photos | John Hope you manage to get back to the Scott quite soon. I had a look at your work over on MM and was mightily impressed. Don't let it gather too much dust! It is. or in my case now, was a very interesting runner. Mine looks very sad at the moment with all the corrosion on the bare parts. Dave The Emerald Isle
|
| Ian S C | 04/04/2012 13:18:02 |
 7468 forum posts 230 photos | Theres a picture of a drawing from ME of a vacuum engine in my album, thats all I had to build a good working motor. The other year I built Jan Ridder's little motor, it still won't work, I think a rebuild might be the only answer. On my working motor the valve is a strip of cast iron 3/8" wide X 1/16" thick lapped to the valve area on the cylinder head, no springs, it holds to the head by suction. Ian S C |
| steamdave | 04/04/2012 23:22:50 |
| 526 forum posts 45 photos | Here's a picture of the modified head. I took the opportunity to put the bevel on the inside of the port while the head was off for the engine overhaul.
Dave The Emerald Isle |
| NJH | 05/04/2012 10:50:23 |
2314 forum posts 139 photos | John Thanks for the video. That immediately shows a difference to mine - hopefully the reason yours runs and mine doesn't! Whilst the shape of the burner in your vid. is the same as mine your flame is blue whilst mine is yellow!! ( I had expected blue - as in bunsen burner ) I've rechecked my construction with the drawing and it seems OK - tube length, venturi in the correct position, holes in the right place. Any ideas where I might start looking please? Norman |
| JasonB | 05/04/2012 13:10:21 |
25215 forum posts 3105 photos 1 articles | Norman look at the link I posted earlier to Johns build he gives details of the burner which if I recall were not as pollys drawings.
J |
| NJH | 05/04/2012 19:16:04 |
2314 forum posts 139 photos | Hmmm Yes thanks Jason This is a comprehensive and interesting build diary - shame I didn't see it before I made my engine! ( Note to self - in future search web before starting!) I will check my burner further but is seems pretty much like John's except that his has a No. 5 jet whilst mine is a No. 8. Would this make much difference do you know? Regards Norman Edited By NJH on 05/04/2012 19:16:43 |
| NJH | 06/04/2012 11:49:53 |
2314 forum posts 139 photos | Thanks John I will order a No.5 jet next week. I like your valve linkages. They are much nicer than mine which are just as the plans. If I can get the beastie to show signs of life I will remake them. I should say that to get it running would be good. I explained to my young Grandson the principles of its operation so the ability to demonstrate that would save a bit of face! I guess if it comes to it, and I fail, I will show him your video - but I can just hear him say "But why doesn't yours work.........!" Norman
Edited By NJH on 06/04/2012 11:50:37 |
| NJH | 06/04/2012 16:07:27 |
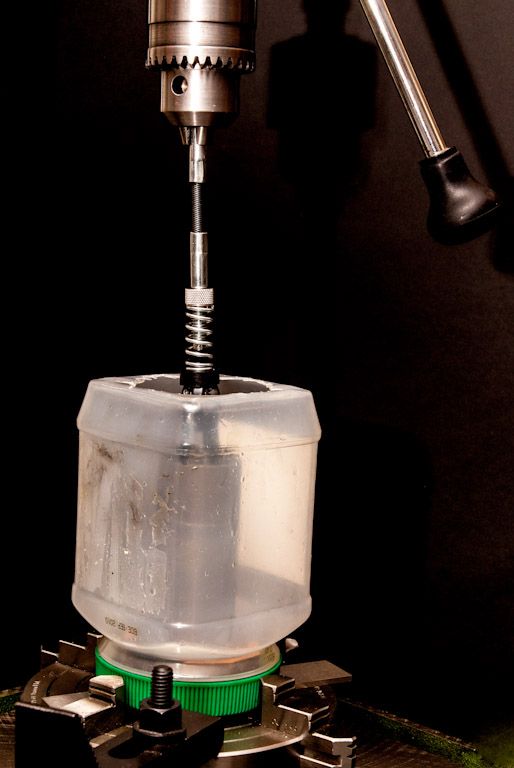
2314 forum posts 139 photos | Hi John Well it looks more finished than mine does! You are quite right about pinning the joints on the valve linkage. I have already done this on the actuating lever / shaft as I was finding it slipping. I guess I will do the others when (note not IF now thanks to your encouragement!) it is working. I note the honing sequence on your thread. This was something new to me and I was a bit concerned about spraying oil all around the workshop. My solution was thus:-
It contained all the oil, allowed progress to be observed ,made it easy to keep the hone moving smoothly, squirt in oil as necessary and provided some nice peaches as a bonus! As I say I didn't know what to expect or how long it would take but was quite easy in the end. Cheers
Norman Edited By NJH on 06/04/2012 16:08:27 Edited By NJH on 06/04/2012 16:10:16 |
| NJH | 06/04/2012 16:17:46 |
2314 forum posts 139 photos | Dave I'm sorry - I seem to have hi-jacked your thread but it looks as if either nobody has made the Atmospheric Gas Engine - or maybe they are just too depressed to talk about it! If you do give it a go I would be interested to follow your progress - it is a nice looking engine. Regards Norman |

Please login to post a reply.
Magazine Locator
Want the latest issue of Model Engineer or Model Engineers' Workshop? Use our magazine locator links to find your nearest stockist!
Sign up to our Newsletter
Sign up to our newsletter and get a free digital issue.
You can unsubscribe at anytime. View our privacy policy at www.mortons.co.uk/privacy
Latest Forum Posts
- *Oct 2023: FORUM MIGRATION TIMELINE*
05/10/2023 07:57:11 - Making ER11 collet chuck
05/10/2023 07:56:24 - What did you do today? 2023
05/10/2023 07:25:01 - Orrery
05/10/2023 06:00:41 - Wera hand-tools
05/10/2023 05:47:07 - New member
05/10/2023 04:40:11 - Problems with external pot on at1 vfd
05/10/2023 00:06:32 - Drain plug
04/10/2023 23:36:17 - digi phase converter for 10 machines.....
04/10/2023 23:13:48 - Winter Storage Of Locomotives
04/10/2023 21:02:11 - More Latest Posts...
- View All Topics
Support Our Partners


Shopping Partners
Subscription Offer

Latest "For Sale" Ads
- Reeves** - Rebuilt Royal Scot by Martin Evans
by John Broughton
£300.00 - BRITANNIA 5" GAUGE James Perrier
by Jon Seabright 1
£2,500.00 - Drill Grinder - for restoration
by Nigel Graham 2
£0.00 - WARCO WM18 MILLING MACHINE
by Alex Chudley
£1,200.00 - MYFORD SUPER 7 LATHE
by Alex Chudley
£2,000.00 - More "For Sale" Ads...
Latest "Wanted" Ads
- D1-3 backplate
by Michael Horley
Price Not Specified - fixed steady for a Colchester bantam mark1 800
by George Jervis
Price Not Specified - lbsc pansy
by JACK SIDEBOTHAM
Price Not Specified - Pratt Burnerd multifit chuck key.
by Tim Riome
Price Not Specified - BANDSAW BLADE WELDER
by HUGH
Price Not Specified - More "Wanted" Ads...
Get In Touch!
Do you want to contact the Model Engineer and Model Engineers' Workshop team?
You can contact us by phone, mail or email about the magazines including becoming a contributor, submitting reader's letters or making queries about articles. You can also get in touch about this website, advertising or other general issues.
Click THIS LINK for full contact details.
For subscription issues please see THIS LINK.
Digital Back Issues


Donate

 Register
 Log-in
Model Engineer Magazine
- Percival Marshall
- M.E. History
- LittleLEC
- M.E. Clock

ME Workshop
- An Adcock
- & Shipley
- Horizontal
- Mill

Subscribe Now
- Great savings
- Delivered to your door

Pre-order your copy!
- Delivered to your doorstep!
- Free UK delivery!
All Forum Topics > I/C Engines > Polly Models AGE