Sieg SX2.7L tramming advice?
| Gordon B | 28/04/2023 19:31:40 |
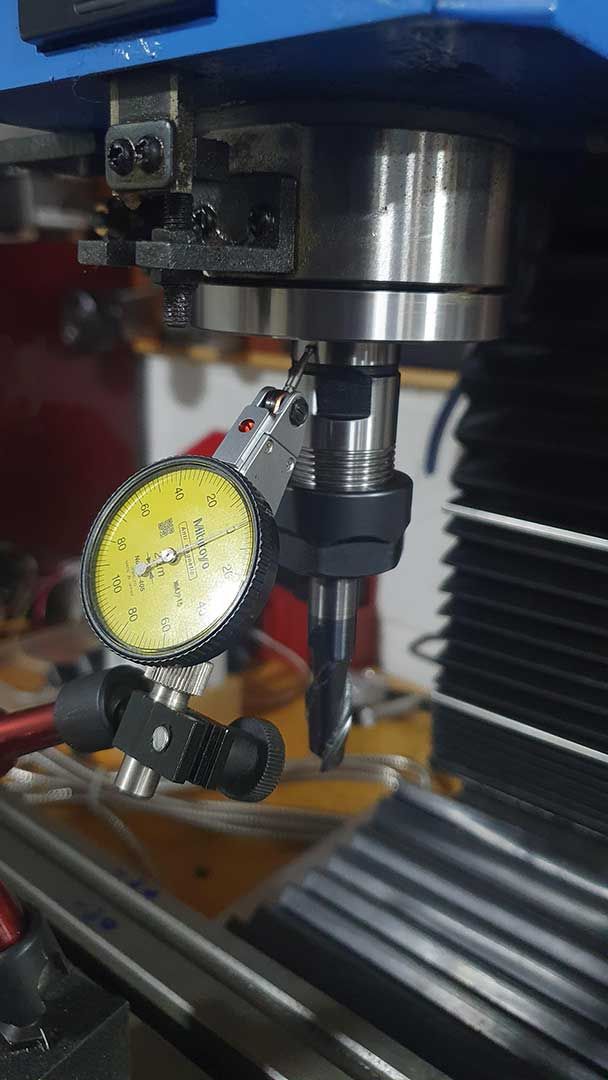
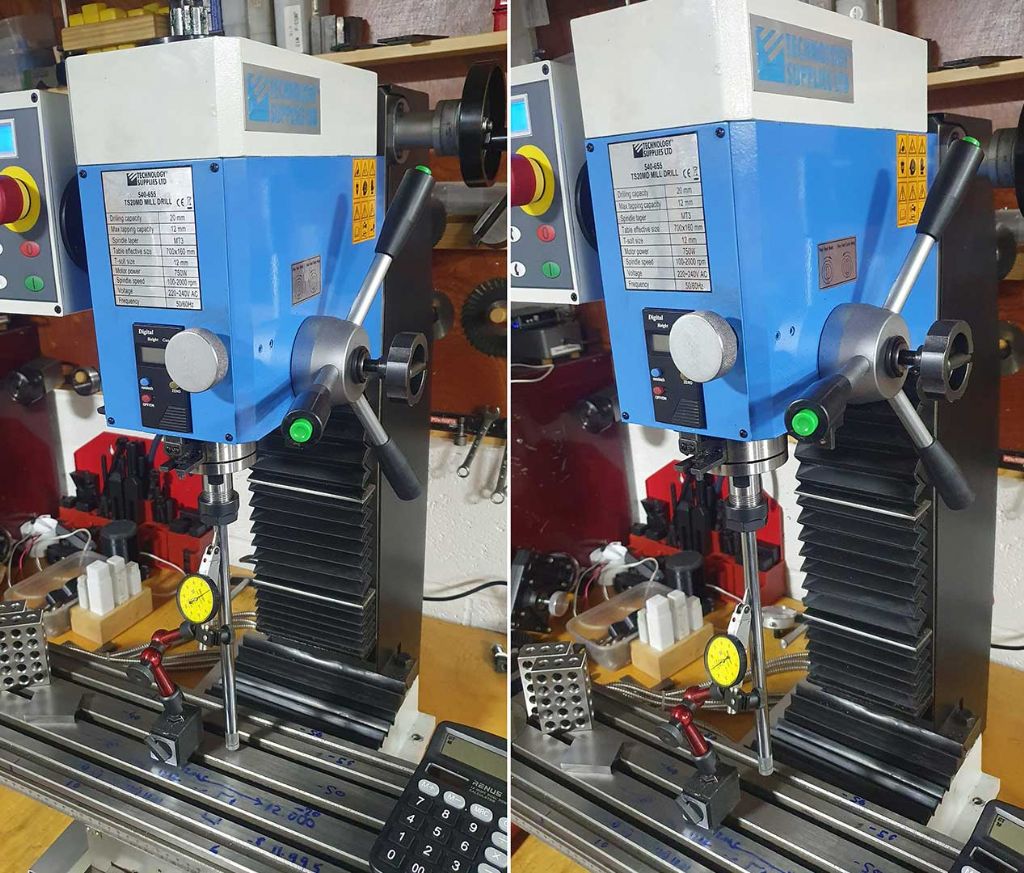
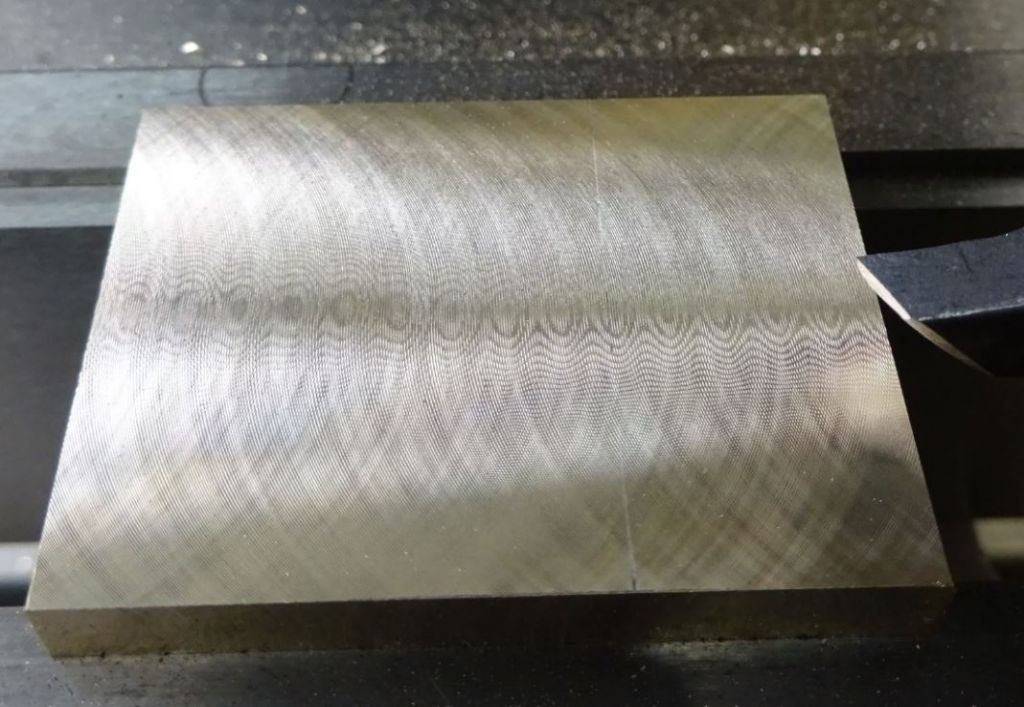
| 11 forum posts 11 photos | I've recently acquired a Sieg SX2.7L clone, which I believe was built in 2019. The first job I ended up needing it for was fly cutting, with a large diameter (approx 13cm / 5" I first checked the spindle runout with a DTI touching an MT3 ER collet mounted in the spindle (see image below). This showed 0.004mm of runout, so I'm assuming this is not of concern.
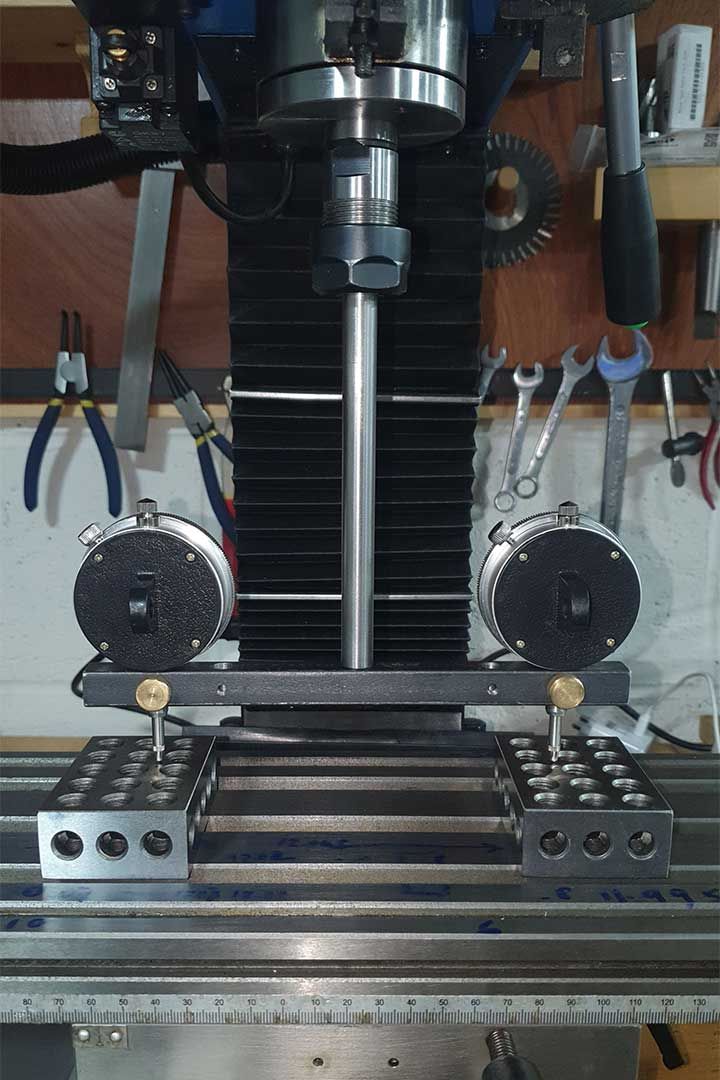
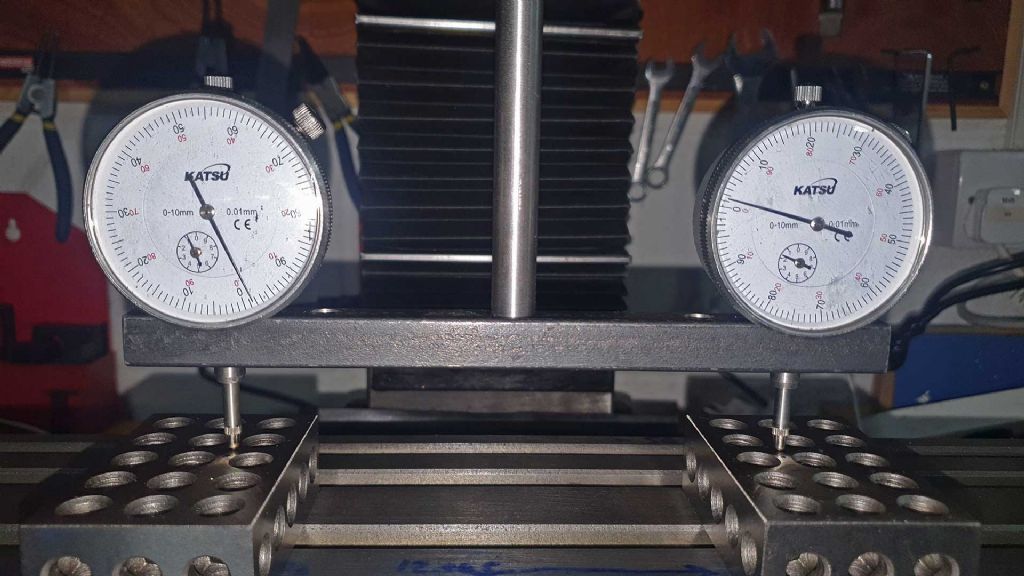
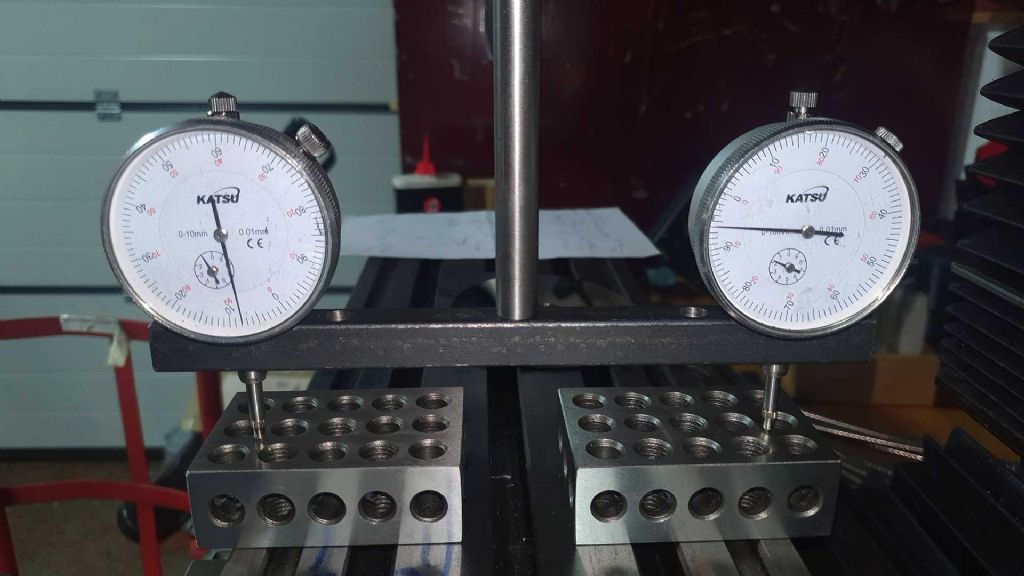
Next I clocked the spindle across the length of table. Two indicators approx 150mm (6"
Turning the spindle 180 degrees shows around 0.015mm of deviation. As the left side of the table is low, right side high; I assume this means the column is tilted slightly to the right.
I then took the same measurement across the width of table. That appears to show that the front of the table is high and the rear is low (by approx 0.06mm to 0.08mm). I assume this means the column is also tilted forward.
However, I next swept a rod in the spindle along a DTI by raising the mill head up the column. As the head rose, the DTI reading dropped (rod moving away from the DTI) by 0.1mm over a distance of about 43mm of vertical travel.
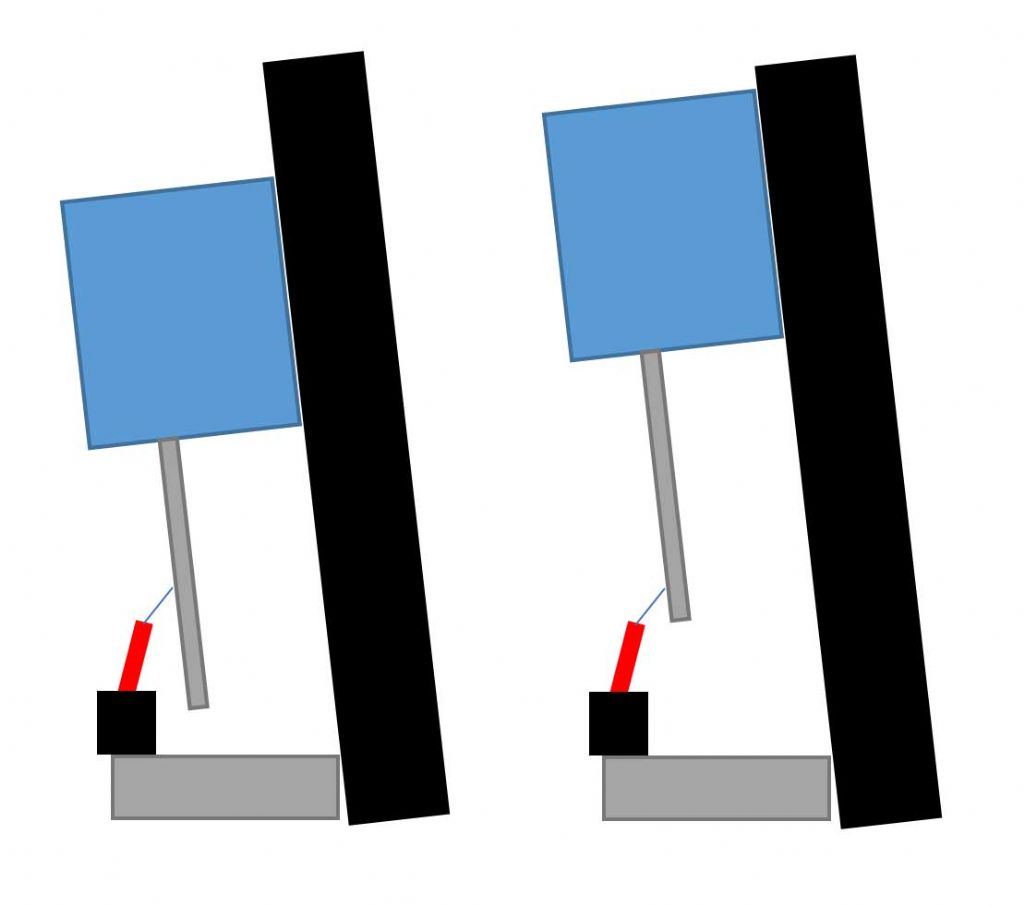
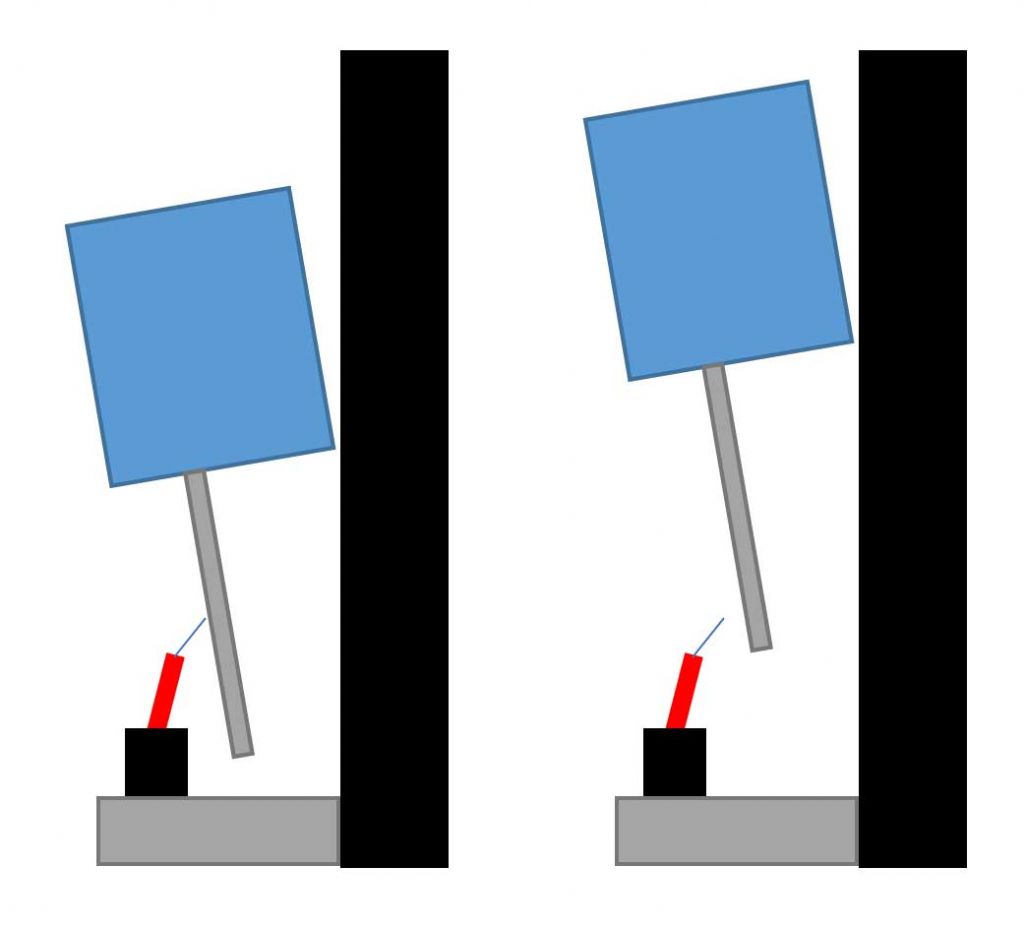
If I understand correctly, if just the column were out of square this reading would not change (see below for a very out of square column, with the head moving up, but the rod-to-DTI distance remaining constant). However, it would change if the head were nodded forward on the column; e.g. for a very out of square head, with the rod-to-DTI distance increasing as the head moves up the column. I repeated this test with the DTI to the side of the rod, and it showed essentially no change when the head was raised up the column; so I assume this means the head is not tilted left/right, and the 0.015mm deviation across the length of the table must be down to the column alignment. Assuming I'm taking the above measurements correctly (do tell me if I'm not), it looks as though the main/first issue is the nod on the head. How do I (can I?) correct the head nod on this machine? BTW for all tests so far the spindle has been fully raised; I'll check it once the head/column looks OK. |
| JasonB | 28/04/2023 20:49:57 |
25215 forum posts 3105 photos 1 articles | Look at the head taper gib for a start if you feel it is the head nodding on the column, make sure both screws are in contact with the gib strip ends Out of interest have to clocked the end of that rod to see if it is running true that far out of the collet chuck?
Edited By JasonB on 28/04/2023 20:51:56 |
| Gordon B | 28/04/2023 21:32:09 |
| 11 forum posts 11 photos | Good point - I haven't checked if that gib needs snugging up. I'll look at it in the morning; many thanks. That rod isn't actually running particularly true, but it was clearer for the photos. I ended up taking measurements on the rod for the tool that holds the two clocks; which is much closer to true. I did also repeat the measurements after rotating the spindle by 180 degrees; which I assume would have reversed the error if it were actually down to the rod being bent? |
| Gordon B | 29/04/2023 15:38:16 |
| 11 forum posts 11 photos | Jason - I think tightening the gib has helped. I removed the gib screw for the vertical axis and confirmed that the head does make contact with the gib wedge. I then tightened it until I can just feel a little drag when raising and lowering the head on the column. With a DTI mounted on the table and a rod in the spindle I raised and lowered the head again. Rotating the spindle 180 degrees and repeating measurement was pretty consistent; so I assume the rod is straight. That gave me a reading of just under 0.08mm over 100mm of column travel. My earlier measurement of 0.1mm over 43mm would equate to 0.23mm over 100mm; so it's certainly improved. If I read the inspection record for the mill correctly, it claims 0.10mm over 100mm; so I'm within the claimed spec. Whether that's "good enough" for a home mill I've no idea. Putting the DTI on the spindle then sweeping it around the table indicates the front to back height discrepancy is under 0.01mm over a sweep diameter of 130mm. Given that the inspection record claims 0.03mm over 100mm I can't complain. From that same test I appear to now have about 0.03mm discrepancy (over the same 130mm diameter) from the left to the right. Again that's within the claimed spec (0.03mm over 100mm), but I might risk torqueing the column bolts to see if I can reduce it a bit, then I'll check the spindle squareness. Overall though, I guess that's starting to look acceptable for a budget home mill. I don't really know what is "good" for this class of machine. Is there a general rule of thumb for how well trammed a machine needs to be to achieve a good fly cut finish (for a certain diameter of fly cutter sweep)? |
| JasonB | 29/04/2023 16:09:25 |
25215 forum posts 3105 photos 1 articles | You were probably swinging a cutter that is quite a bit larger than a 2.7 is meant for which will have magnified any errors. With these machines it is always a juggling act to get the three things exact - tram of spindle around table - head movement and quill movement. Add in the fact it will probably change a bit depending on what axis are locked and the loading on the machine means you are unlikely to get all three spot on. Main thing for good flycutting is how the spindle is when you swing the dti around the table, get it good and you end up with a hologram effect but some prefer a slight lean to one side that just gives arc shaped cutter marks You say gib screw, there is a second one that should bear against the opposite end, if it does not you can find the gib moves up and down as the head is raised and lowered making it tighter as it is raised and looser when lowered so make sure that is snugged up too
|
| Gordon B | 29/04/2023 22:06:48 |
| 11 forum posts 11 photos | Definitely was a big fly cutting diameter; around 130mm total. I was going to say that I couldn't see a second gib screw, but checking the manual the parts diagram indicates there is one present - but I think it's hidden under a plate on the bottom of the head, so I'll take a look tomorrow. You're right about locking an axis having an effect; I swept a DTI around the table with and without the vertical axis locked, and it measurably causes the head to twist slightly. However, just moderately locking the axis results in a pretty good reading; around 0.01mm over 130mm across the length of the table, and 0.006mm across the width. I'll take that. I tried to check the spindle for squareness but I'm not sure that my cheap 123 blocks are that square. Regardless, the worst I saw was under 0.03mm of deviation over the 70mm spindle stroke. Again if I read the inspection report correctly that's within the claimed tolerance so I can't complain. |
| JasonB | 30/04/2023 06:53:51 |
25215 forum posts 3105 photos 1 articles | Yes the bellows to plate will need it's two small screws undoing so it can be slid down the column to access the bottom gib adjuster. |
| not done it yet | 30/04/2023 11:53:46 |
| 7517 forum posts 20 photos | Any out-of-tram will result in a curved surface finish, to some extent. JB’s hologram finish is the ideal. Pillar-tilt should be cheched when the head is locked to the column, too? |
| JasonB | 30/04/2023 13:02:49 |
25215 forum posts 3105 photos 1 articles | I've always wondered why the Myford fans say a concave surface when facing is desirable bit not on a milled surface |
| mgnbuk | 30/04/2023 13:12:21 |
| 1394 forum posts 103 photos | I've always wondered why the Myford fans say a concave surface when facing is desirable bit not on a milled surface Why single out "Myford fans" Jason ? Surely it is normal accepted practice for all lathes (irrespective of maker) to face on the silgtly concave side of dead flat ? Nigel B. |
| JasonB | 30/04/2023 13:33:07 |
25215 forum posts 3105 photos 1 articles | It is the only lathe that I have heard it mentioned about on this forum, hence why I mentioned it But still the question of why is it OK on a faced part but seen as undesirable on a milled one? |
| old mart | 30/04/2023 16:07:39 |
| 4655 forum posts 304 photos | As already mentioned, the gibs have some affect and it might be useful to check any differences made when locking the movements. The double testing at 180 degrees should give identical results even if the tramming device is not perfectly straight. With a shorter tramming spindle you could repeat the tests with the head lower. Edited By old mart on 30/04/2023 16:10:46 |
| DiogenesII | 30/04/2023 16:45:17 |
| 859 forum posts 268 photos | Posted by JasonB on 30/04/2023 13:33:07:
It is the only lathe that I have heard it mentioned about on this forum, hence why I mentioned it But still the question of why is it OK on a faced part but seen as undesirable on a milled one? ..probably explains why Myford put a swivel on the bottom of their milling slide... |
| Robert Butler | 30/04/2023 17:58:03 |
| 511 forum posts 6 photos | Jason, I've read somewhere it is to avoid a component which sits on a flat surface from rocking. I also recall that the amount was miniscule and definately with reference to Myford only. Robert Butler |
| Martin Connelly | 30/04/2023 18:19:20 |
2549 forum posts 235 photos | Had a look through this thread for the first time today. Couldn't see any mention of this. It is not usual to put a round rod in the mill and move it up and down as any out of tram will result in the DTI giving unpredictable readings as it moves around the curved surface. As a result I advise you do what is more usual. Put the DTI in the spindle and move it over a vertical plane surface (angle plate or 123 blocks for example) on the mill table. Rotate the vertical surface 180° and repeat in case the surface is not perfectly vertical. Average out the two readings unless they are the same. Martin C |
| JasonB | 30/04/2023 18:20:35 |
25215 forum posts 3105 photos 1 articles | Yes I understand it is to stop things rocking so why desirable to not have a turned item rock but seems undesirable for milled surfaces not to rock? |
| Gordon B | 30/04/2023 21:06:59 |
| 11 forum posts 11 photos | Posted by JasonB on 30/04/2023 06:53:51:
Yes the bellows to plate will need it's two small screws undoing so it can be slid down the column to access the bottom gib adjuster. Got it - thanks. Fiddly to get to. It's slightly disconcerting that if I remove that bottom screw and then wind the top screw in (so it pushes the wedge gib a long way down) I can still raise and lower the column. I would have expected that at some point it would have locked the column movement? I've put it back together, albeit with the wedge gib a little lower than it was before. I'm still seeing around 0.08mm deviation with 100mm vertical column travel though. Tomorrow I'll try Martin Connelly's advice of running a DTI against a vertical surface; though I don't know that my 123 blocks are particularly square. I spent a bit more time today sweeping a DTI over the table and gently tightening and loosening the 4 column head bolts. Mostly I just ended up chasing my tail, and ended up with worse results than what I had yesterday
|
| old mart | 30/04/2023 21:26:49 |
| 4655 forum posts 304 photos | You should set the gibs so that the movement is slightly restricted but not tight throughout the full travel. The blocks can be checked against each other sitting on the mill bed, if they are not square you will see a gap when they are one way round. Keep bringing them together and with a decent steel rule or straight edge you can also check the lengths, by using a torch looking for any light showing. I bought a pair of 246 blocks which caused problems until I chanced to see a gap at the top when the bottoms were sitting together on the surface plate. They were reground for free, but now they are square, but slightly different sizes. As they improved for free, I did not say anything and knowing them now I can compensate. |
| Gordon B | 02/05/2023 09:20:45 |
| 11 forum posts 11 photos | Posted by old mart on 30/04/2023 21:26:49:
You should set the gibs so that the movement is slightly restricted but not tight throughout the full travel. The blocks can be checked against each other sitting on the mill bed, if they are not square you will see a gap when they are one way round. Keep bringing them together and with a decent steel rule or straight edge you can also check the lengths, by using a torch looking for any light showing. I bought a pair of 246 blocks which caused problems until I chanced to see a gap at the top when the bottoms were sitting together on the surface plate. They were reground for free, but now they are square, but slightly different sizes. As they improved for free, I did not say anything and knowing them now I can compensate. Gibs; yes, that's what I would have thought would happen (I've not had a machine with tapered gibs before). However, even if I remove the bottom gib screw and wind the top screw way down (I assume massively overtightening the gib) the column still moves with no noticeable extra drag. Seems a bit odd. I'll check the 123 blocks for squareness when I next get into the garage. |
| JasonB | 02/05/2023 09:47:04 |
25215 forum posts 3105 photos 1 articles | I have heard of another where the gib was loose, I think I'm right in saying the spare gib strips are longer and can be trimmed to fit by cutting a bit off the bottom if they go in a long way. |
Please login to post a reply.
Want the latest issue of Model Engineer or Model Engineers' Workshop? Use our magazine locator links to find your nearest stockist!
Sign up to our newsletter and get a free digital issue.
You can unsubscribe at anytime. View our privacy policy at www.mortons.co.uk/privacy
- *Oct 2023: FORUM MIGRATION TIMELINE*
05/10/2023 07:57:11 - Making ER11 collet chuck
05/10/2023 07:56:24 - What did you do today? 2023
05/10/2023 07:25:01 - Orrery
05/10/2023 06:00:41 - Wera hand-tools
05/10/2023 05:47:07 - New member
05/10/2023 04:40:11 - Problems with external pot on at1 vfd
05/10/2023 00:06:32 - Drain plug
04/10/2023 23:36:17 - digi phase converter for 10 machines.....
04/10/2023 23:13:48 - Winter Storage Of Locomotives
04/10/2023 21:02:11 - More Latest Posts...
- View All Topics
- Reeves** - Rebuilt Royal Scot by Martin Evans
by John Broughton
£300.00 - BRITANNIA 5" GAUGE James Perrier
by Jon Seabright 1
£2,500.00 - Drill Grinder - for restoration
by Nigel Graham 2
£0.00 - WARCO WM18 MILLING MACHINE
by Alex Chudley
£1,200.00 - MYFORD SUPER 7 LATHE
by Alex Chudley
£2,000.00 - More "For Sale" Ads...
- D1-3 backplate
by Michael Horley
Price Not Specified - fixed steady for a Colchester bantam mark1 800
by George Jervis
Price Not Specified - lbsc pansy
by JACK SIDEBOTHAM
Price Not Specified - Pratt Burnerd multifit chuck key.
by Tim Riome
Price Not Specified - BANDSAW BLADE WELDER
by HUGH
Price Not Specified - More "Wanted" Ads...
Do you want to contact the Model Engineer and Model Engineers' Workshop team?
You can contact us by phone, mail or email about the magazines including becoming a contributor, submitting reader's letters or making queries about articles. You can also get in touch about this website, advertising or other general issues.
Click THIS LINK for full contact details.
For subscription issues please see THIS LINK.
Model Engineer Magazine
- Percival Marshall
- M.E. History
- LittleLEC
- M.E. Clock
ME Workshop
- An Adcock
- & Shipley
- Horizontal
- Mill
Subscribe Now
- Great savings
- Delivered to your door
Pre-order your copy!
- Delivered to your doorstep!
- Free UK delivery!

 . I noticed that the cutter was taking more material on the trailing edge; which I understand would indicate the machine is slightly out of tram.


 Register
 Log-in


