Metric thread dimension wanted.
| mark costello 1 | 30/07/2021 19:35:21 |
800 forum posts 16 photos | I needed to make a somewhat standard Metric thread for a electric motor brush holder. It is 14mm x 1.0. I made the OD 14mm minus a little clearance and made the thread depth less than 25 tpi, which is bigger. Then it was cut until it fit. There is no data available in Imperial measurements I can find. How would this be calculated? I have an idea but would like to hear it from the Gents here as sometimes I introduce a wild rabbit to chase. Comments or advise appreciated. |
| Andrew Johnston | 30/07/2021 19:56:59 |
7061 forum posts 719 photos | Posted by mark costello 1 on 30/07/2021 19:35:21:
....There is no data available in Imperial measurements..... Err, there won't be, it's a metric thread. It's seem so obvious that this must be a trick question - I'd look up the thread depth in metric and divide by 25.4 to get imperial? Andrew |
| Tony Pratt 1 | 30/07/2021 19:59:42 |
| 2319 forum posts 13 photos | I just deleted my first answer but my 2nd is just Google the data, or get a Zeus book or similar. Tony |
| Pete Rimmer | 30/07/2021 20:00:04 |
| 1486 forum posts 105 photos | How deep you cut depends on what cutting tool you are using. If you're using a pointed 60-degree bit you need to cut deeper from touching-off than if you have a nose flat/radius. Not sure what you mean by no data avilable in imperial measurements. Metric threads are specified in metric units if you have inch dials just divide any mm measurements by 25.4 for dimensions in inch. |
| JasonB | 30/07/2021 20:01:27 |
25215 forum posts 3105 photos 1 articles | A lot will depend on the shape of your tool, if just a ground 60deg V tool then you will have to go in deeper than one with the correct nose radius. If you look at the first page of this PDF you will see that for 1mm pitch the height of the thread h3 is 0.613mm but that is with the correct radius. If using a pointed tool then you will have to add H/6 to that |
| Martin Connelly | 31/07/2021 08:41:14 |
2549 forum posts 235 photos | The rule for drilling a hole for metric tapping is the diameter of the thread minus the pitch. So the tapping size for your 14x1 thread would be Ø13mm. This means the depth of the thread is about half the pitch or about 0.5mm.. Cut a little less than this depth then start the cut until fit process. Take into account the amount undersize you have turned your material down in the first place. Unless you have a perfectly formed point on your tool made to suit the pitch you are cutting you will always have to adjust the depth of your cutting process. Martin C |
| Howard Lewis | 31/07/2021 08:54:02 |
| 7227 forum posts 21 photos | With the Metric thread form being 60 degrees, the rule is that the Tapping size should be (Nominal - pitch ). so for a 14 x 1 Tapping as, Martin said, the tapping size will be 13 mm. If you are cutting a male 14 x 1, the OD will be a little less, say 13.9 mm, with the thread depth being 0.5 mm, making allowance for slight truncation of, say, 0.05 mm, So having made contact, the final cut would be taken to bring the total infeed to 0.45 mm. Howard |
| JasonB | 31/07/2021 13:52:02 |
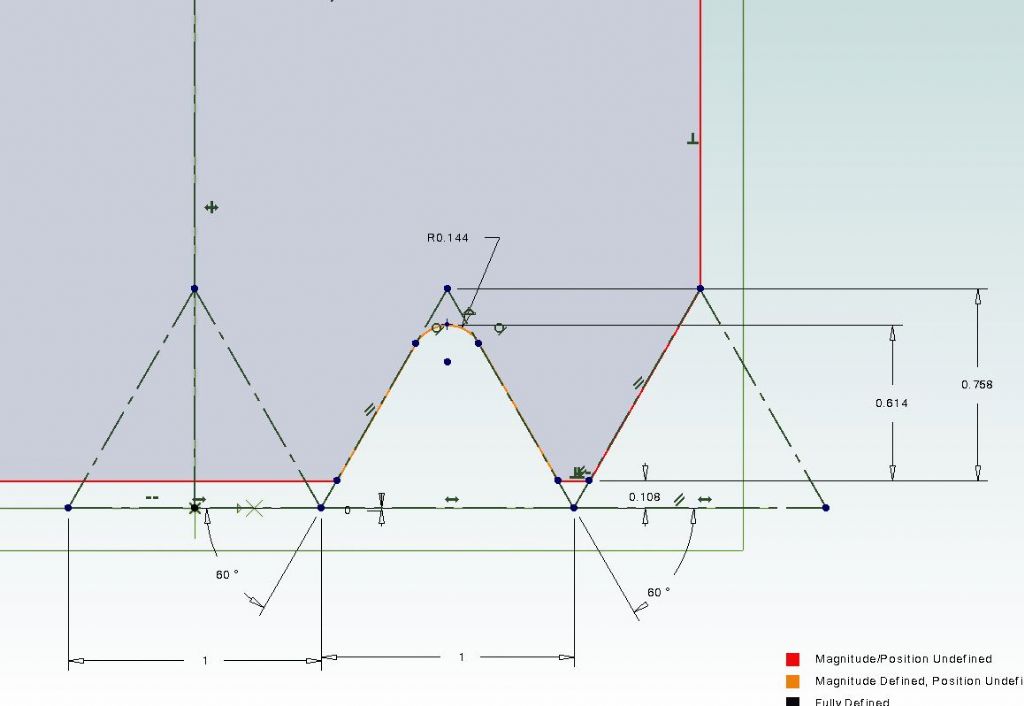
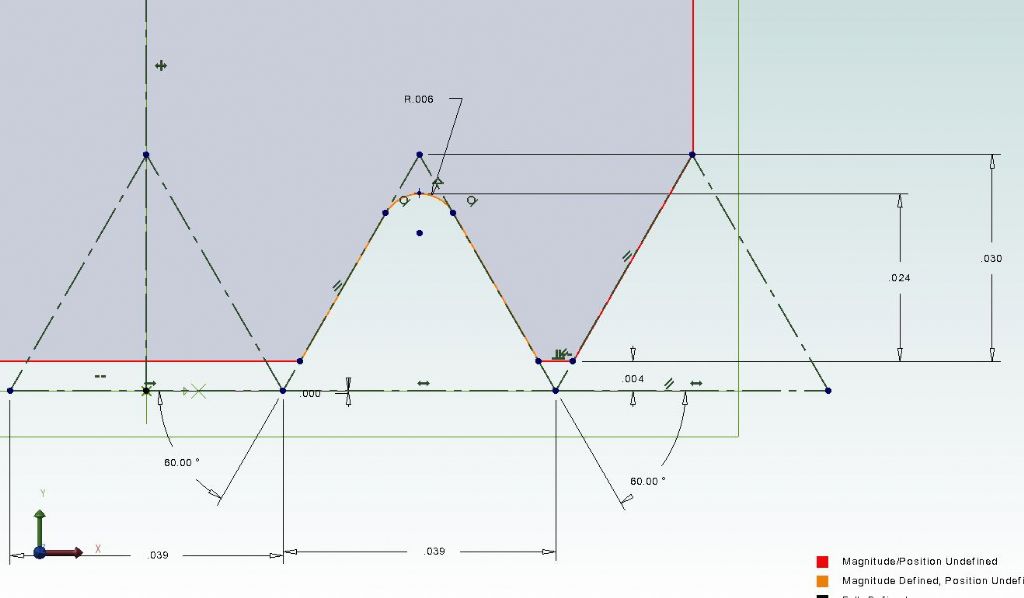
25215 forum posts 3105 photos 1 articles | Although the OD less pitch is a good way to work out a tapping drill size I don't think it gives a fell depth of thread, more like about 80% which is why the 0.45 to 0.5mm figures in the last two posts don't match the thread data that I posted a link to which can also be found in Zeuz book and all over the net.. The OP asked how it can be calculated well one way is to draw it out in CAD. Here I have shown a series of three 1mm edge length triangles at a 1mm pitch which gives the correct flank positions that would be what a thread wire would measure against. I have then drawn in the root radius and also the flat to the crest. It is then just a case to measure how deep the root is from the OD and I get 0.614mm which is probably rounding up a bit somewhere from the published 0.613mm. I have also shown the dimension you would need to go in if the tool were pointed this being 0.758mm. So depending on your tool geometry you will need to feed in somewhere between 0.613 to 0.758mm from nominal 6mm dia. Figure scan easily be checked for correct depth as Major dia less Minor Diameter is 4.773mm and half that is 0.6135. Click image to enlarge. And for those who need to convert to imperial just alter the CAD Edited By JasonB on 31/07/2021 13:52:28 |
| Andrew Johnston | 31/07/2021 14:15:54 |
7061 forum posts 719 photos | All the information needed is in Machinery's Handbook. The theoretical depth of the full triangle (H) for a given pitch (P) is: H=0.866P aka H=sin(60)P By definition the thread depth of an ISO metric thread is: 0.625H or 0.541P So for a 1mm pitch thread the thread depth will be 0.541mm or 21.3 thou. Simples! Andrew |
| JasonB | 31/07/2021 14:28:25 |
25215 forum posts 3105 photos 1 articles | Andrew what would be the reason that Machinery's has it as 0.541 and Zeuz etc have it at 0.613mm? Or are you quoting for a female thread and Op is cutting an external one? Zeuz does give 0.541mm as depth of Female thread. |
| Andrew Johnston | 31/07/2021 15:17:08 |
7061 forum posts 719 photos | Posted by JasonB on 31/07/2021 14:28:25:
..........what would be the reason that Machinery's has it as 0.541 and Zeuz etc have it at 0.613mm? No idea. The ISO standard doesn't distinguish between internal and external thread depths. Clearance is achieved by a tolerance class which specifies the amount above, or below, a reference line for the internal and external threads. The thread depth is the same for internal and external, simply moved up, or down, a bit. I've got a set of Zeus tables but haven't used them in over 40 years because they don't explain where their numbers come from, or why, so I don't trust them. Andrew |
| JasonB | 31/07/2021 15:31:13 |
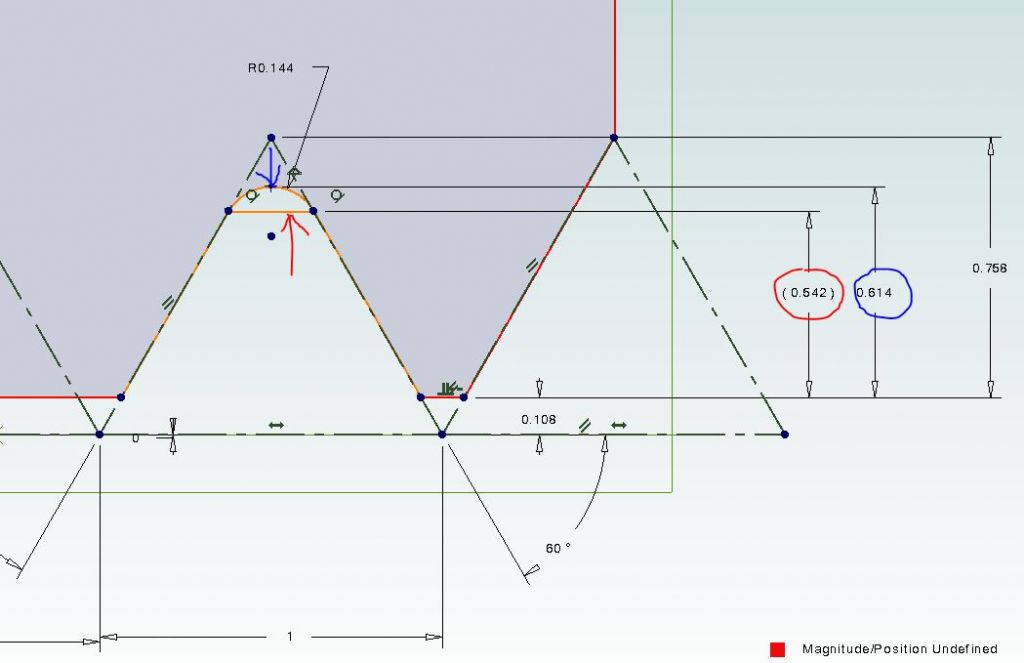
25215 forum posts 3105 photos 1 articles | Adding a line across the tangent points of the tangent points of teh root radius you can measure the siz eyou give that matches the "flat" profile that Machinery's shows and the deeper cut needed for a fully radiused tool, which brings us back to mine and Pete's original comment that it depends on your tool. You might want to ask Ketan to sell you a "Metric Revision" Zeuz book as it has a similar diagram to my earlier link which shows all the details that the older books lack including depth of external thread as 17/32H which happens to equal 0.613mm That's for a tool with a rounded nose much like a full form insert and insert makers charts also show depth of 0.613mm for 1mm pitch.
Edited By JasonB on 31/07/2021 16:01:41 |
| JasonB | 31/07/2021 16:21:42 |
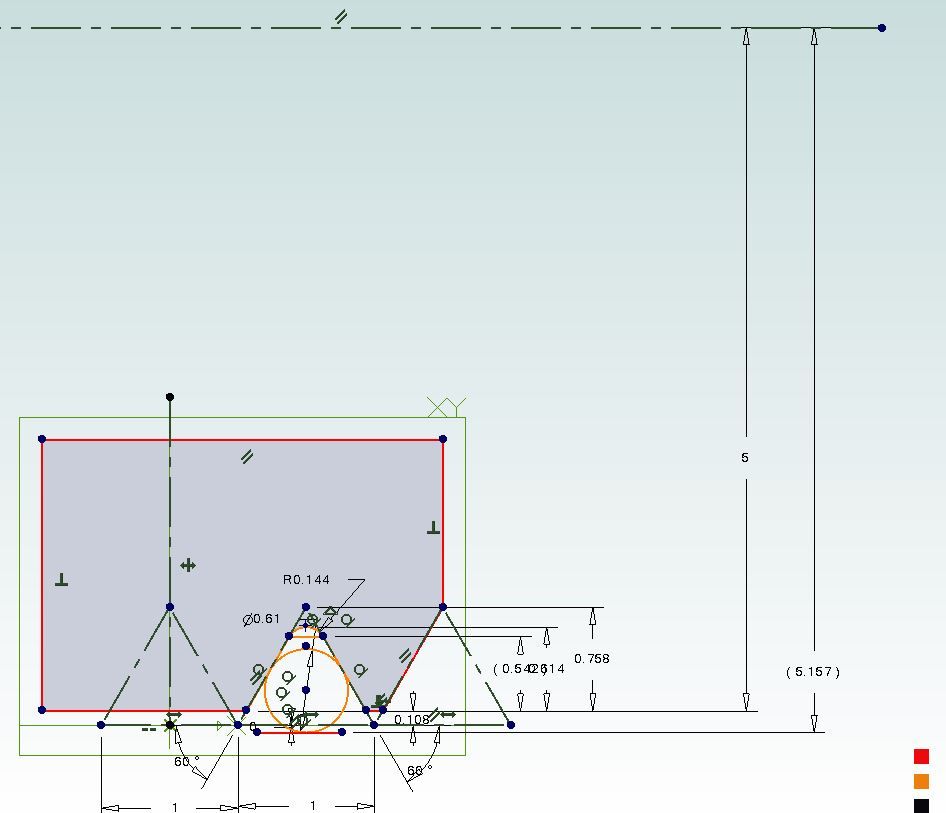
25215 forum posts 3105 photos 1 articles | As A final check of my drawing I added a circle to represent a thread wire, only measured to ctr line of a nominal 10mm dia bolt and got half what the thread wire distance is eg 0.313mm over nominal. So looks like if using a full form external insert for 1mm pitch metric thread and nominal major diameter ( I don't reduce the stock dia) then you need to feed in 0.613mm, partial form or hand ground will differ. Edited By JasonB on 31/07/2021 16:37:53 |
| mark costello 1 | 31/07/2021 20:48:56 |
800 forum posts 16 photos | I have an early version of the Machinist hand book. Printed before Metric was common over here. Many thread charts, much Google. Zeus Book is rare over here, never seen one. |
| mark costello 1 | 31/07/2021 21:06:34 |
800 forum posts 16 photos | Found the Presto Counselor and Down loaded it. MaryLand Metric used to be My go to source but the Company went bust and several places publish the charts and caution is advised. |
| Martin Connelly | 01/08/2021 08:36:41 |
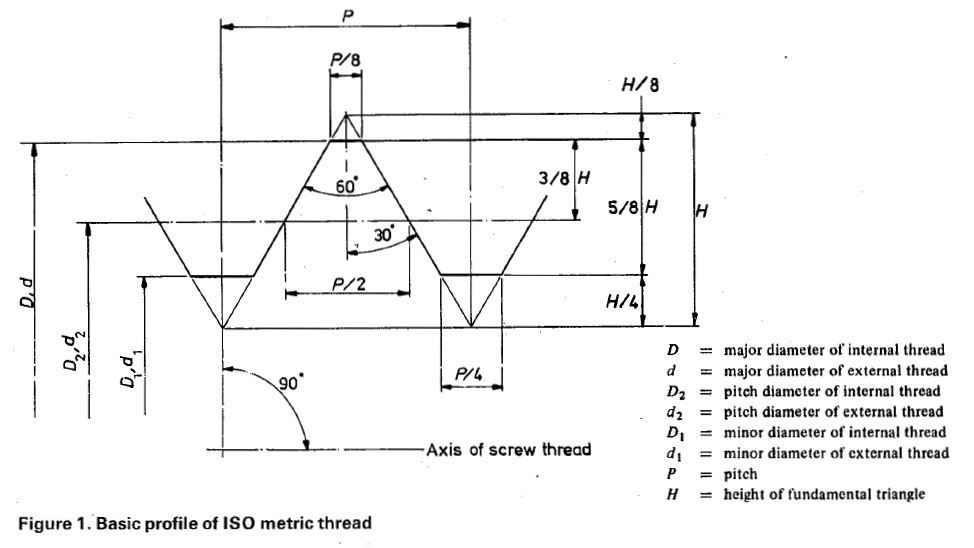
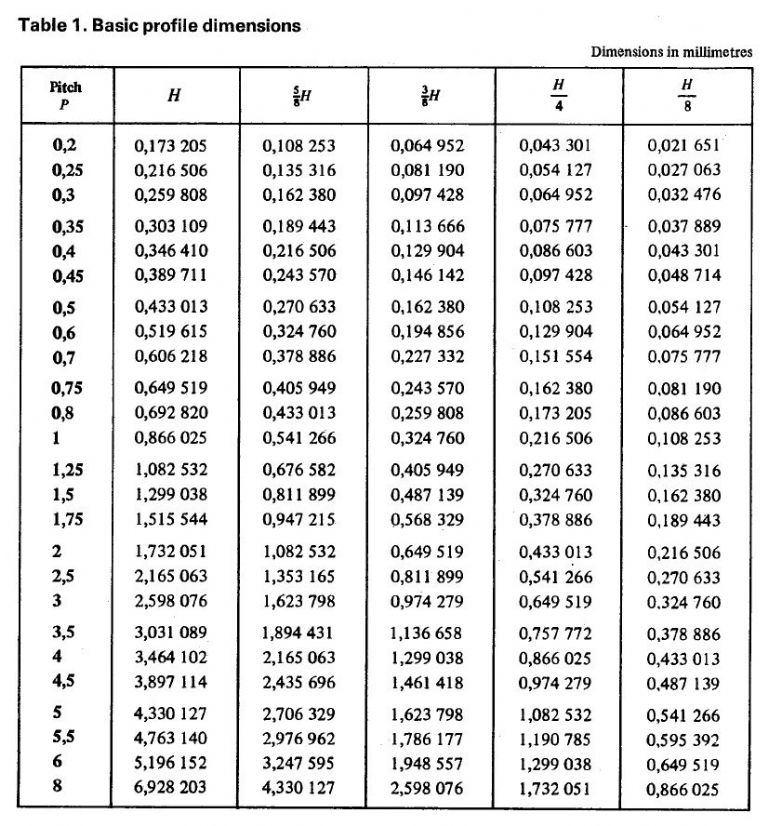
2549 forum posts 235 photos | From the ISO Standard Here are the tables needed for doing this. They show that for a pointed tool you need a depth of H x 7/8 and for a truncated tool with a point width of P/4 the depth of cut is H x 5/8. This latter one would probably bind and is the absolute minimum. Note on the diagram where the "Axis of the screw thread" label is. It shows which is internal thread form and which is external thread form. The profile of a home ground tool would be an unknown factor and is more likely to be a rounded form than a really sharp point since a sharp point will soon wear away. It is this unknown that results in the need to cut and test as you progress. Martin C
Edited By Martin Connelly on 01/08/2021 08:48:22 |
| Pete Rimmer | 01/08/2021 08:52:09 |
| 1486 forum posts 105 photos | That's a handy look-up table but it's rather rediculous giving the dimensions in a millionth of a millimeter. |
| DC31k | 01/08/2021 10:30:47 |
| 1186 forum posts 11 photos | Posted by Pete Rimmer on 01/08/2021 08:52:09:
That's a handy look-up table but it's rather ridiculous giving the dimensions in a millionth of a millimeter. There are many potential users of a Standard, from someone messing about in their garage, though gauge makers to someone like a UKAS calibration laboratory. If the Standard is to cater for all of them, it needs to be written in that way. You can ignore figures that are beyond your required precision, but you cannot just assume figures if the stated precision is not enough. What is the alternative? A Standard for ISO threads for garage tinkerers, another one for those with more exacting requirements and a third one for UKAS? |
| Pete Rimmer | 01/08/2021 11:41:07 |
| 1486 forum posts 105 photos | A gauge even if it could be made to 1nm tolerance would be useless. Using it one single time would put it out of tolerance. |
| SillyOldDuffer | 01/08/2021 13:35:14 |
| 10668 forum posts 2415 photos | Posted by Pete Rimmer on 01/08/2021 11:41:07:
A gauge even if it could be made to 1nm tolerance would be useless. Using it one single time would put it out of tolerance. Which is why the metre is defined in terms of wavelengths of light, not a physical lump of metal. Turns out copies of the last batch of physical metre standards are all measurably different now they've aged, and they are all changing size at different rates. What's the smallest technology being made at the moment? I think it's transistors, the smallest of which at the moment are about 70 silicon atoms across, roughly 14 nanometres, but research is pushing hard to make them smaller. Electronics are easier to miniaturise than mechanical mechanisms, but considerable progress has been made with them too. A major problem with mechanics is scaling nature - as model engineers know, you can't just scale everything by the same factor and expect it to work! Nonetheless, though of limited functionality, Nanobots are down to about 100nm in diameter. They're not made on a lathe or measured with micrometers and slip gauges! Dave |
Please login to post a reply.
Want the latest issue of Model Engineer or Model Engineers' Workshop? Use our magazine locator links to find your nearest stockist!
Sign up to our newsletter and get a free digital issue.
You can unsubscribe at anytime. View our privacy policy at www.mortons.co.uk/privacy
- hemingway ball turner
04/07/2025 14:40:26 - *Oct 2023: FORUM MIGRATION TIMELINE*
05/10/2023 07:57:11 - Making ER11 collet chuck
05/10/2023 07:56:24 - What did you do today? 2023
05/10/2023 07:25:01 - Orrery
05/10/2023 06:00:41 - Wera hand-tools
05/10/2023 05:47:07 - New member
05/10/2023 04:40:11 - Problems with external pot on at1 vfd
05/10/2023 00:06:32 - Drain plug
04/10/2023 23:36:17 - digi phase converter for 10 machines.....
04/10/2023 23:13:48 - More Latest Posts...
- View All Topics
- Reeves** - Rebuilt Royal Scot by Martin Evans
by John Broughton
£300.00 - BRITANNIA 5" GAUGE James Perrier
by Jon Seabright 1
£2,500.00 - Drill Grinder - for restoration
by Nigel Graham 2
£0.00 - WARCO WM18 MILLING MACHINE
by Alex Chudley
£1,200.00 - MYFORD SUPER 7 LATHE
by Alex Chudley
£2,000.00 - More "For Sale" Ads...
- D1-3 backplate
by Michael Horley
Price Not Specified - fixed steady for a Colchester bantam mark1 800
by George Jervis
Price Not Specified - lbsc pansy
by JACK SIDEBOTHAM
Price Not Specified - Pratt Burnerd multifit chuck key.
by Tim Riome
Price Not Specified - BANDSAW BLADE WELDER
by HUGH
Price Not Specified - More "Wanted" Ads...
Do you want to contact the Model Engineer and Model Engineers' Workshop team?
You can contact us by phone, mail or email about the magazines including becoming a contributor, submitting reader's letters or making queries about articles. You can also get in touch about this website, advertising or other general issues.
Click THIS LINK for full contact details.
For subscription issues please see THIS LINK.
Model Engineer Magazine
- Percival Marshall
- M.E. History
- LittleLEC
- M.E. Clock
ME Workshop
- An Adcock
- & Shipley
- Horizontal
- Mill
Subscribe Now
- Great savings
- Delivered to your door
Pre-order your copy!
- Delivered to your doorstep!
- Free UK delivery!



 Register
 Log-in


