
DIY Anodising
What works for me...
| Andy_G | 06/01/2021 22:00:01 |
 260 forum posts | Following comments on a recent thread, I thought I would describe my DIY anodising setup. Traditional anodising uses sulphuric acid as the electrolyte which has become more difficult to obtain, and is generally not nice stuff to have around. I watched a Youtube video by Mark Presling (link below) that showed the use of sodiumbisulphate as an electrolyte instead. (Sodiumbisulphate is readily available as a pH reduced used for swimming pool maintenance.) I have basically copied his process and have been extremely pleased with the results that I have achieved, and how straightforward and consistent it has been. This is offered very much as a 'what works for me', rather than a 'this is how it should be done'. This is my setup:
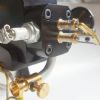
2% sodium hydroxide solution (40g of NaOH granules in 1.96 litres of de-ionised water) for the pre-anodising etch. Anodising bath with 20% sodium bisulphite solution (750g NaHSO4 in 3 litres of de-ionised water) . Opposite sides of the container lined with lead sheet (electrically linked together). Spray bottle of de-ionised water for rinsing. Not shown is an old metal pan that I boil water in for sealing the anodising. View of lead cathodes with their electrical connection:
I use a lab power supply to provide the anodising current:
The power supply has an adjustable current limit - anodising is a current driven process, and I aim to try and keep the current constant through the anodising process (which would mean adjusting the voltage manually if the limit could not be set on the PSU). I use a current equivalent to 6A per square foot (=6mA / cm^2) of immersed area and am quite diligent about working this out beforehand. (I have a spreadsheet that I use to calculate what the actual current should be for a given set of parts). Typical currents for what I've done are 0.3 - 1.5A, I have found that I often need just over 20 volts, towards the end of the process especially. This is a bit higher than the ~16 to 17 volts that Mark Presling uses. I have only used commercial black dye for colouring anodised parts. The dye solution lives in another sealable container which is immersed in a water bath at 55°C when needed.
The process: 1) Clean and scrub parts under running water. I use fairy liquid and it seems to work OK provided the parts have been rinsed in de-greaser first. I sometimes use Scotchbrite or fine micromesh abrasive to grey the surface. I wear gloves for this to avoid grease on the parts. After cleaning I leave them under (tap) water 2) The cleaned parts are mounted on aluminium or titanium wires which are connected to the main busbar
(The green tape was as attempt to mask the inner surface of that part.) I still handle them with gloves and keep them wet. I set up my etch and anodising baths outside the house and drop the power supply leads through a nearby window 3) Etch for ~2 minutes in the 2% sodium hydroxide. The parts should be fizzing nicely and white with small bubbles by the end. Rinse off with DI water spray at the end of this time and transfer them immediately to the anodising bath.
(different parts, I know...) 4) Connect up the power (negative to the lead, positive to the busbar carrying the parts) and adjust the current limit to the calculated value. Check there are fine bubbles coming from the parts. I leave them anodising at the required current for 2 hours. They get an occasional gentle swish around to try and shift any trapped bubbles. Rinse with DI water at the end of the time. 5) Transfer to the dye bath if colour is required (I use 30 mins @55°C for the black) then rinse with DI water and transfer to the sealing bath. 6) Seal in a pan full of tap water on a gentle rolling boil for 20 mins before rinsing with tap water and buff dry with a soft cloth.
I am still using the original solutions that I made up last April(?). They just live in their plastic containers in the meantime. I hope that is of interest,
Andy
Edited By Andy_G on 06/01/2021 22:04:16 |
| Andy_G | 06/01/2021 22:02:46 |
260 forum posts | Mark's video: |
| Ramon Wilson | 06/01/2021 22:15:26 |
 1655 forum posts 617 photos | Thanks for posting this interesting account Andy - very much of interest. I did similar several years ago and described it in MEW. I was interested to see your use of the sodium bisulphate - I do have some of 'the other stuff' but that sounds much safer all round. Your results certainly speak for it's viability. I never had any real success with ali hangars but saw a remarkable improvement using titanium and my best colour results were with using ordinary writing inks - Parker, Waterman etc. Regards - Tug |
| noel shelley | 06/01/2021 22:18:37 |
| 2308 forum posts 33 photos | Thank you, very good ! I'm surprised that the current is so low. Noel |
| Andy_G | 06/01/2021 22:30:16 |
260 forum posts | Some things that have gone wrong: 1) Bad cleaning
Despite (I thought) scrubbing the 'feet' thoroughly, the one on the left didn't anodise properly. I don't think this has happened if I've rinsed the parts in solvent before water cleaning. Cleaning is the biggest bug-bear.
2) Bubbles
If you look at the area on the inside of the rim, there's an area at about 4 O'Clock where the dye hasn't taken properly. This handwheel was held roughly vertical during anodising and this area was at the top. The fine bubbles created during the anodising process have been trapped under the rim which has reduced the depth of anodising here. 3) Not enough anodising
The handwheel was done at my usual 2 hours. As an experiment, I tried reducing the time to 1 hour for the knurled handle. The colour is nowhere near as deep as the handwheel - it might show better here (it doesn't look this bad in real life, but you can tell it's different):
4) Too hot and / or too much current I simultaneously put a large area of parts in for anodising on a hot day and miscalculated the current by 50%. When the parts came out, they had a brown, crusty deposit on them. I suspect that this was due to the bath getting too hot (it was noticeably warm at the end), but could just have been too much current. The deposit mostly rinsed off, but you can see staining on the surface where it was:
It was annoying, but I was only anodising a toolpost spindle to stop it getting dinged up.
I've since taken to standing the anodising bath in a bucket of water if the weather is warm or I'm using over about 2 amps of current. I haven't seen the effect since. The whole process is (IMHO) easy to do and amazingly consistent (barring mistakes) and produces a very hard coating. I encourage anyone to give it a try! Andy
|
| Andy_G | 06/01/2021 22:50:42 |
260 forum posts | Posted by noel shelley on 06/01/2021 22:18:37:
Thank you, very good ! I'm surprised that the current is so low. Noel Thank you! The current is low compared to commercial operations, but this seems to avoid a number of other issues (I think mainly heat related). I did a lot of reading around before I started, and "6A/ sq foot" seemed as good a place as any to start, and because it worked, I just stuck with it. I should give a theoretical 25µm / 0.001" thickness in 2 hours. I've since become aware that this is probably 'LCD' (low current density) anodising - there is quite a lot of information on it by Caswell. |
| Andy_G | 06/01/2021 23:00:14 |
260 forum posts | Posted by Ramon Wilson on 06/01/2021 22:15:26:
I was interested to see your use of the sodium bisulphate - I do have some of 'the other stuff' but that sounds much safer all round. Your results certainly speak for it's viability. I never had any real success with ali hangars but saw a remarkable improvement using titanium and my best colour results were with using ordinary writing inks - Parker, Waterman etc. Regards - Tug Thank you! I must find out how 'nasty' sodium bisulphite really is - I don't think it's as nasty as the acid, but it is still corrosive. I *think* that the chemistry is actually just the same as using H2SO4. I find it easier to 'spring' parts onto titanium hangers, but I need to get some thicker wire. I found aluminium OK, but I use a fresh wire every time (or sometimes end-for-end them) - stripping previously anodised aluminium wires got boring very quickly! I have had a few parts drop off part way through the process which is very annoying! |
| Pete. | 06/01/2021 23:43:41 |
 910 forum posts 303 photos | Hi again Andy, thanks for taking the time to write this up, it'll give me something to reference when I get around to having a go, I'll probably ask you a few more questions when that is, I like the substitution of sulphuric acid, don't really want that around. |
| Sandgrounder | 07/01/2021 08:08:32 |
| 256 forum posts 6 photos | As other posters have said, to be able to dispense with sulphuric acid is safer, but sodium hydroxide is also quite nasty, would a sodium carbonate etch solution although slower be satisfactory? I realise that it's only a 2% solution you're using but you have to start off with 100%. John |
| Ramon Wilson | 07/01/2021 09:30:38 |
1655 forum posts 617 photos | Andy - thorough cleaning is, without doubt, a most important part of the process and something difficult to see if it has been accomplished fully. I only used a solvent for the initial clean before the caustic bath and not during the process I found heating the caustic soda bath to be much more effective and then used two containers of DI water to swirl the part in before the ano tank It may be that the drying of the cleaning process has left a virtually invisible streak that will show itself in the anodising as your pic. Inconsistency of colour take up is a constant problem - I found even two or more parts of identical material, identical ano time and identical time in colour could give different results difficult to quantify. One thing I did find that was totally unexpected was that when using writing ink the colour take up was virtually instantaneous. The ink has to be diluted considerably before that effect diminishes. Tug PS I found some titanium welding wire on eBay - personally wouldn't use ali hangars again, just too much problem with those anodising at the same time with the constant reduction of conductivity to allow for too Edited By Ramon Wilson on 07/01/2021 09:34:45 |
| SillyOldDuffer | 07/01/2021 09:46:09 |
| 10668 forum posts 2415 photos | Posted by Andy_G on 06/01/2021 23:00:14:
Posted by Ramon Wilson on 06/01/2021 22:15:26:...
... I must find out how 'nasty' sodium bisulphite really is - I don't think it's as nasty as the acid, but it is still corrosive. I *think* that the chemistry is actually just the same as using H2SO4. ... Typo I think - Sodium Bisulphate rather than Bisulphite. (Which might work too?) Sodium Bisulphate is sometimes described as 'half-neutralised Sulphuric Acid', which gives an idea. It was once the constituent of Harpic Lavatory Powder, ie a domestic cleaning product, fairly safe. Even safer diluted with water. You don't want to get it in your eyes, leave splashes on your skin, or splash it about because it's moderately corrosive. It's OK to pour it down an ordinary drain. It doesn't have any of the strong characteristics that make Sulphuric Acid a controlled substance. As a precaution I'd wear rubber gloves, a plastic apron, and eye-protection but it's not a chemical likely to need an ambulance! If spilled, wash off with plenty of cold water - unlikely to be a drama. Dave
|
| Andy_G | 07/01/2021 11:17:43 |
260 forum posts | Posted by SillyOldDuffer on 07/01/2021 09:46:09:
Typo I think - Sodium Bisulphate rather than Bisulphite. .. Dave
Typo, yes (I must have got my home brew and my anodising mixed up [*] - could have been worse! For the avoidance of doubt: Sodium Bisulphate (NaHSO4)
(I don't know if sodium carbonate would work for the etch, but it may. I'm not too bothered about having 2% NaOH around though - it is a very weak solution) Tug - yes, cleaning is the problem. I don't attempt to do any cleaning during the process (I can't see it being very successful) . I also avoid drying the parts after cleaning if I possibly can - get it clean & keep it wet!
Thanks all. Edited By Andy_G on 07/01/2021 11:18:09 [*] That would be sodium metabisulphite! Edited By Andy_G on 07/01/2021 11:21:20 |
| noel shelley | 07/01/2021 12:07:52 |
| 2308 forum posts 33 photos | Ramon, raised a very good point about the breakdown of conductivity caused by aluminium wire also anodising and becoming non conductive. Noel. |
| Andy_G | 07/01/2021 12:52:45 |
260 forum posts | Posted by noel shelley on 07/01/2021 12:07:52:
Ramon, raised a very good point about the breakdown of conductivity caused by aluminium wire also anodising and becoming non conductive. Noel. That's why I use fresh wire every time if using aluminium wire (or at least the non-anodised end of a previously used wire) - when the parts are first mounted on fresh wire, you have bare aluminium against bare aluminium which gives good electrical contact. This doesn't change through the process as the physical contact prevents anodising where the wire and the part touch. (This is potentially an issue in itself as the contact spots won't take colour - Where possible, I aim to mount the parts such that these spots end up on hidden surfaces.) One only gets problems if the parts move on the wire during anodising or if one tries to re-use aluminium wire that has previously been through the anodising process without first stripping or otherwise removing the anodising (which can be done, if one is so inclined). One can still get conductivity problems with titanium wires if the part slips during the process - the partially anodised part surface is sufficient to prevent electrical contact with the wire. The beauty of titanium is that the wires can be re-used with just a wipe over with Scotchbrite. I take the view that one needs to be careful not to disturb the parts during the anodising stage, and by and large it has worked remarkably consistently for me. I've had a few parts drop off their wires, but I haven't (as yet) had one that has had contact problems. (That's guaranteed to happen next time now!)
Andy |
| Ramon Wilson | 07/01/2021 13:17:13 |
1655 forum posts 617 photos | Andy - just another thought - do you agitate the ano bath during anodising? I have a small aquarium pump bubbling the fluid - not directly near the parts but enough to keep the fluid in motion throughout the process. It helps those micro bubbles that form on the parts to dissipate. Like you I keep parts wet out of the cleaner wash and into the ano tank but if it's small and doesn't get in right away that water can start to evaporate quite quickly in a warm atmoshere. Regards - Tug
|
| Andy_G | 07/01/2021 16:54:05 |
260 forum posts | Posted by Ramon Wilson on 07/01/2021 13:17:13:
Andy - just another thought - do you agitate the ano bath during anodising? Hi - no, I don't. I have seen that some people do this, but it seemed to work well enough without, so I didn't bother. |


Please login to post a reply.
Want the latest issue of Model Engineer or Model Engineers' Workshop? Use our magazine locator links to find your nearest stockist!
Sign up to our newsletter and get a free digital issue.
You can unsubscribe at anytime. View our privacy policy at www.mortons.co.uk/privacy
- hemingway ball turner
04/07/2025 14:40:26 - *Oct 2023: FORUM MIGRATION TIMELINE*
05/10/2023 07:57:11 - Making ER11 collet chuck
05/10/2023 07:56:24 - What did you do today? 2023
05/10/2023 07:25:01 - Orrery
05/10/2023 06:00:41 - Wera hand-tools
05/10/2023 05:47:07 - New member
05/10/2023 04:40:11 - Problems with external pot on at1 vfd
05/10/2023 00:06:32 - Drain plug
04/10/2023 23:36:17 - digi phase converter for 10 machines.....
04/10/2023 23:13:48 - More Latest Posts...
- View All Topics


- Reeves** - Rebuilt Royal Scot by Martin Evans
by John Broughton
£300.00 - BRITANNIA 5" GAUGE James Perrier
by Jon Seabright 1
£2,500.00 - Drill Grinder - for restoration
by Nigel Graham 2
£0.00 - WARCO WM18 MILLING MACHINE
by Alex Chudley
£1,200.00 - MYFORD SUPER 7 LATHE
by Alex Chudley
£2,000.00 - More "For Sale" Ads...
- D1-3 backplate
by Michael Horley
Price Not Specified - fixed steady for a Colchester bantam mark1 800
by George Jervis
Price Not Specified - lbsc pansy
by JACK SIDEBOTHAM
Price Not Specified - Pratt Burnerd multifit chuck key.
by Tim Riome
Price Not Specified - BANDSAW BLADE WELDER
by HUGH
Price Not Specified - More "Wanted" Ads...
Do you want to contact the Model Engineer and Model Engineers' Workshop team?
You can contact us by phone, mail or email about the magazines including becoming a contributor, submitting reader's letters or making queries about articles. You can also get in touch about this website, advertising or other general issues.
Click THIS LINK for full contact details.
For subscription issues please see THIS LINK.


 Register
 Log-in
Model Engineer Magazine
- Percival Marshall
- M.E. History
- LittleLEC
- M.E. Clock

ME Workshop
- An Adcock
- & Shipley
- Horizontal
- Mill

Subscribe Now
- Great savings
- Delivered to your door

Pre-order your copy!
- Delivered to your doorstep!
- Free UK delivery!