Forum sponsored by:

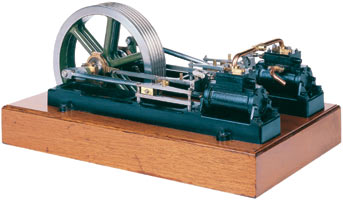
Stuart Twin Victoria (Princess Royal) Mill Engine
| Dr_GMJN | 01/11/2020 22:22:39 |
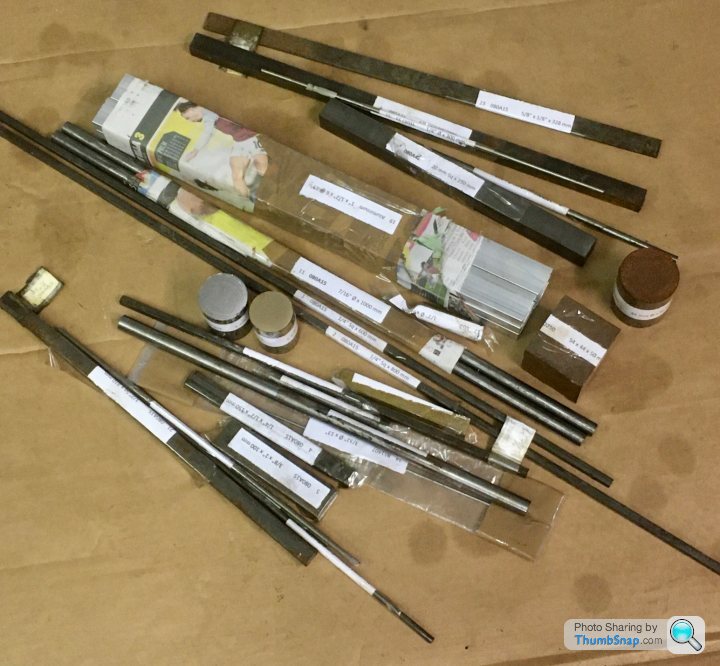
 1602 forum posts | This will be my second model engineering project after the 10V: https://www.model-engineer.co.uk/forums/postings.asp?th=161327 https://www.model-engineer.co.uk/forums/postings.asp?th=168605 I've opted to buy only the castings. I will fabricate the beds from aluminium, and make the rest from stock materials, which I've already got from a local supplier: |
| Ramon Wilson | 01/11/2020 22:57:51 |
 1655 forum posts 617 photos | That's a good start Doc - nothing like getting prepared. I'm doing the same thing but not quite in the same quantity. Looks like we will both be starting new projects around the same time. Good luck with yours Hope you get your lathe and mill sorted out successfully
Regards - Ramon |
| Dr_GMJN | 01/11/2020 23:39:37 |
1602 forum posts | Posted by Ramon Wilson on 01/11/2020 22:57:51:
That's a good start Doc - nothing like getting prepared. I'm doing the same thing but not quite in the same quantity. Looks like we will both be starting new projects around the same time. Good luck with yours Hope you get your lathe and mill sorted out successfully
Regards - Ramon Thanks Ramon. I’m just finalising the CAD for the beds, with some input from Jason. I’ve got the materials and fasteners, so they will be the first bits to make. I’ll get castings after Christmas - things get expensive at this time of year: 2 birthdays, Christmas and car insurance due! I just converted the ML7 to wide bed, and had to dress the front slideway to eliminate a couple of thou wear. It’s much smoother now - I can get full saddle travel without having to adjust the gibs half way! Just need to machine the other slides for bearings and re-settable dials. Using it should be a much nicer experience. Then to start on the mill and it’s issues... |
| Dr_GMJN | 09/11/2020 12:30:13 |
1602 forum posts | Re. the JB Weld epoxy for joints, and simulating casting fillets; there are a few types on Amazon, is this the correct stuff? |
| JasonB | 09/11/2020 12:59:06 |
 25215 forum posts 3105 photos 1 articles | That's the one, the "original formula" avoid the rapid or marine versions. |
| Ramon Wilson | 09/11/2020 13:10:18 |
1655 forum posts 617 photos | Yes as Jason says that's the one Doc - just make sure you mix it really thoroughly and homogenise it well - just stirring it in to each other will provide a much weaker material. As said before it can be quite runny especially where fillets are concerned. A drop of this ''stuff' mixed with it will thicken it considerably. I don't know for certain if that has a diminishing effect on it's tensile strength or it's temperature resistance but it certainly hasn't been an issue on my D10 (on steam). Regards - Ramon Jason - I'm having real problems staying logged in - yes I tick the box but it is very intermittant. Is there something else I need to do?
Edited By Ramon Wilson on 09/11/2020 13:10:45 |
| Dr_GMJN | 09/11/2020 21:43:27 |
1602 forum posts | Thanks guys. I've got a load of "Microballoons" for fibreglass model glider wings, but I guess that's the opposite of what I want as a thickener for this application... |
| Ramon Wilson | 09/11/2020 22:25:32 |
1655 forum posts 617 photos |
Doc, as you are aware microballoons are a filler - used them a lot mixed with F/G resin for fillets on C/L aerobatic model wing roots. The higher the loading in the mix the less JB you have. Definitely not the same as the silica. It's primary use is for making epoxy resins thixotropic. You don't use very much of it to get the effect of thickening. The 25 gm tub would last a lifetime Ramon
Jason, if you are reading this, that's the fourth time I've had to log in today despite clicking the 'remember me' box -any thoughts? Edited By Ramon Wilson on 09/11/2020 22:26:33 |
| JasonB | 10/11/2020 06:54:42 |
25215 forum posts 3105 photos 1 articles | Have you been looking in on another device such as a phone that may still have the forum "open" even if not on the active screen. That can sometimes be the problem |
| DiogenesII | 10/11/2020 07:49:42 |
| 859 forum posts 268 photos | Ramon, if your browser is set to delete all cookies on exiting, that will also "close the forum door" each time, although you can probably exempt it in the browser settings.. |
| Ron Laden | 10/11/2020 07:54:58 |
 2320 forum posts 452 photos | Also worth noting that the original J-B Weld also machines well, I have milled, turned, drilled and even tapped it and it was fine, a very good metal filled epoxy. |
| Dr_GMJN | 10/11/2020 11:39:15 |
1602 forum posts | Posted by Ron Laden on 10/11/2020 07:54:58:
Also worth noting that the original J-B Weld also machines well, I have milled, turned, drilled and even tapped it and it was fine, a very good metal filled epoxy.
Thanks all. |
| Dr_GMJN | 10/11/2020 21:26:08 |
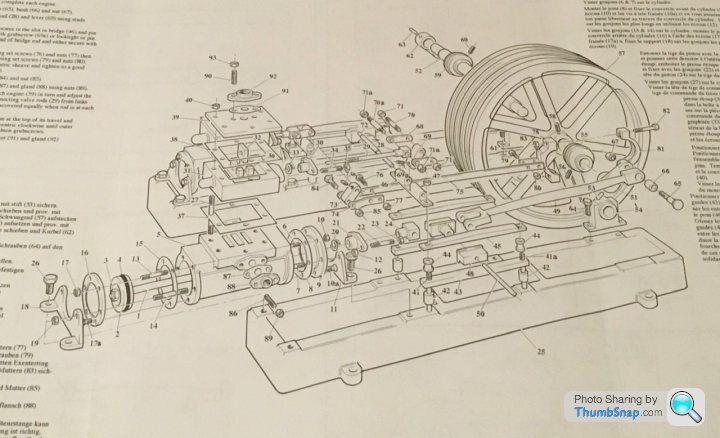
1602 forum posts | I’m wondering what the best way of machining the cylinder recesses in the feet strips is? I’ve got 12” of 1/2” square steel (as specified), but I can’t make out the machining method photos. Not sure if in fact he used square plate with a central hole. I was thinking maybe somehow attaching each strip to a faceplate in the correct position, and turning the arc with a boring bar. Perhaps even do three or four at once, if they fit. I want to machine them, not file them. Thanks.
|
| Ramon Wilson | 10/11/2020 21:58:19 |
1655 forum posts 617 photos | If you have a boring head for the mill you could use that after establishing the correct throw but clamping the individual parts against fixed stops on an angle plate bolted to the face plate will ensure uniformity. You may have to drill and tap some holes for the stops and may not want to but if they are positioned uniformly and the stops made to suit they can be used for all sorts of future set ups. Edited By Ramon Wilson on 10/11/2020 21:59:04 |
| Dr_GMJN | 10/11/2020 22:10:09 |
1602 forum posts | Thanks Ramon. Unfortunately I don’t have a boring head. Maybe I should get one from Arc - looks like they do R8 versions for the SX2P. Any other way you can think to do it? |
| Dominic Bramley | 10/11/2020 22:33:09 |
| 60 forum posts 1 photos | In the magazine I think he has soldered 3 strips of 1/2 inch bar together and then bored through them - so the outer two strips will have the correct profile.
|
| Ramon Wilson | 10/11/2020 22:44:04 |
1655 forum posts 617 photos | Boring heads are 'nice to have' when really needed but I find rarely used. The one I have for my Linley mill is a really cheap one but it does the business. The other, a more expensive one bought when I bought the Amadeal mill five years ago has never been used. There are several ways you can machine these parts - you could use a rotary table of course as another option but personally I would use the lathe and angle plate set up. You can use the model bolt holes for holding the parts to a simple fixture fixed to the angle plate - once you have established the centre of the radius you can either rough all four to with say ten thou then return them and finish them all at the same setting or complete each one separately. Given that these radii won't need to be 'accurate' to any degree probably the latter is the better way to proceed. The former though would bring them close to being identical with more certainty. This is one part where you will see how cold rolled steel reacts to large cuts on one side! Ramon PS the method as has just been described is yet another option! Edited By Ramon Wilson on 10/11/2020 22:45:44 |
| Dr_GMJN | 10/11/2020 23:15:28 |
1602 forum posts | Posted by Dominic Bramley on 10/11/2020 22:33:09:
In the magazine I think he has soldered 3 strips of 1/2 inch bar together and then bored through them - so the outer two strips will have the correct profile.
Right. I’ve not got the drawings to hand, but does that give the correct offset by default? Thanks. |
| Dr_GMJN | 10/11/2020 23:17:01 |
1602 forum posts | Posted by Ramon Wilson on 10/11/2020 22:44:04:
Boring heads are 'nice to have' when really needed but I find rarely used. The one I have for my Linley mill is a really cheap one but it does the business. The other, a more expensive one bought when I bought the Amadeal mill five years ago has never been used. There are several ways you can machine these parts - you could use a rotary table of course as another option but personally I would use the lathe and angle plate set up. You can use the model bolt holes for holding the parts to a simple fixture fixed to the angle plate - once you have established the centre of the radius you can either rough all four to with say ten thou then return them and finish them all at the same setting or complete each one separately. Given that these radii won't need to be 'accurate' to any degree probably the latter is the better way to proceed. The former though would bring them close to being identical with more certainty. This is one part where you will see how cold rolled steel reacts to large cuts on one side! Ramon PS the method as has just been described is yet another option! Edited By Ramon Wilson on 10/11/2020 22:45:44 OK understood. I don’t have a rotary table either! I do have an angle plate though. I was only thinking the other day that it’s the one thing in the tooling cabinet that Ive not used yet... |
| JasonB | 11/11/2020 07:05:00 |
25215 forum posts 3105 photos 1 articles | By soldering 3 pieces of the 1/2" square stock together that will give you a distance from ctr of hole to "bottom" of the outer two pieces of 3/4" which is the required distance. Note that you may not quite have 0.500" stock but the 1/2" is not the critical size its ctr line to the notch that sits on the frame that matters. This notch would be best machined after JBWelding it together as you can't be accurate glueing to the cast surface. Another option would be to do them on the cross slide with a between ctrs boring bar, a simple block to bring the blank to height and screw them to would make it fairly simple but I think the soldered method will be quicker.
Edited By JasonB on 11/11/2020 07:49:00 |

Please login to post a reply.
Magazine Locator
Want the latest issue of Model Engineer or Model Engineers' Workshop? Use our magazine locator links to find your nearest stockist!
Sign up to our Newsletter
Sign up to our newsletter and get a free digital issue.
You can unsubscribe at anytime. View our privacy policy at www.mortons.co.uk/privacy
Latest Forum Posts
- *Oct 2023: FORUM MIGRATION TIMELINE*
05/10/2023 07:57:11 - Making ER11 collet chuck
05/10/2023 07:56:24 - What did you do today? 2023
05/10/2023 07:25:01 - Orrery
05/10/2023 06:00:41 - Wera hand-tools
05/10/2023 05:47:07 - New member
05/10/2023 04:40:11 - Problems with external pot on at1 vfd
05/10/2023 00:06:32 - Drain plug
04/10/2023 23:36:17 - digi phase converter for 10 machines.....
04/10/2023 23:13:48 - Winter Storage Of Locomotives
04/10/2023 21:02:11 - More Latest Posts...
- View All Topics
Support Our Partners


Shopping Partners
Subscription Offer

Latest "For Sale" Ads
- Reeves** - Rebuilt Royal Scot by Martin Evans
by John Broughton
£300.00 - BRITANNIA 5" GAUGE James Perrier
by Jon Seabright 1
£2,500.00 - Drill Grinder - for restoration
by Nigel Graham 2
£0.00 - WARCO WM18 MILLING MACHINE
by Alex Chudley
£1,200.00 - MYFORD SUPER 7 LATHE
by Alex Chudley
£2,000.00 - More "For Sale" Ads...
Latest "Wanted" Ads
- D1-3 backplate
by Michael Horley
Price Not Specified - fixed steady for a Colchester bantam mark1 800
by George Jervis
Price Not Specified - lbsc pansy
by JACK SIDEBOTHAM
Price Not Specified - Pratt Burnerd multifit chuck key.
by Tim Riome
Price Not Specified - BANDSAW BLADE WELDER
by HUGH
Price Not Specified - More "Wanted" Ads...
Get In Touch!
Do you want to contact the Model Engineer and Model Engineers' Workshop team?
You can contact us by phone, mail or email about the magazines including becoming a contributor, submitting reader's letters or making queries about articles. You can also get in touch about this website, advertising or other general issues.
Click THIS LINK for full contact details.
For subscription issues please see THIS LINK.
Digital Back Issues


Donate

 Register
 Log-in
Model Engineer Magazine
- Percival Marshall
- M.E. History
- LittleLEC
- M.E. Clock

ME Workshop
- An Adcock
- & Shipley
- Horizontal
- Mill

Subscribe Now
- Great savings
- Delivered to your door

Pre-order your copy!
- Delivered to your doorstep!
- Free UK delivery!
All Forum Topics > Work In Progress and completed items > Stuart Twin Victoria (Princess Royal) Mill Engine