Forum sponsored by:

Assembling laser cut cabs
| Lainchy | 04/06/2020 10:55:40 |
 273 forum posts 103 photos | Hi forum, I'm looking for info regarding the assembly of laser cut cabs and tanks... rivetting, soft soldering etc. Any hints? Any youtube clips etc? I 'm looking for the best way of doing it as we have a RobRoy that will need doing soon, and indeed... eventually, my Juliet build. I've had a look with a search, but can't find the right search string! Many thanks Ian |
| Neil Wyatt | 04/06/2020 11:06:29 |
 19226 forum posts 749 photos 86 articles | I cut the cab/bodywork of my shunter out by hand. All 1/32 rivets(!) Most useful things were: Using a dolly made out of a length of 3/8" bar with dimples in it and rounded and square edges/corners then held in the vice was essential. Making supports, just lumps of wood/mdf to support the body when drilling through. I drilled the outer holes accurately in the flat, but spotted through the jigged together body. Even with care I got through a whole packet of ten 1/32" drills. I used coper rivets as ease of riveting was more important than strength Half a dozen really in accessible rivets just had their tails bent over. Neil |
| Lainchy | 04/06/2020 11:14:27 |
273 forum posts 103 photos | Cheers Neil. So, You riveted the panels together, then did you soft solder? Apparently, the Model Engineers Laser panels have tabs to aid the assembly. Not got mine yet, but does this mean that they should be soldered while being butted together? This is a whole new world to me as a beginner, but I'm trying to do as much research as I can.
Ta |
| Brian Baker 1 | 04/06/2020 12:23:59 |
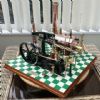
 229 forum posts 40 photos | Greetings, some pre cut cabs can be MIG welded, and as I understand it the one from Model engineer laser are made to be TIG welded, with just enough metal protruding from the take to avoid the use of a filler rod. If you are nervous of welding, they can be soft soldered, but might need a few angle brackets for strength. This cab was MIG welded, starting life as a Winson kit. Regards
|
| Lainchy | 04/06/2020 12:28:31 |
273 forum posts 103 photos | Cheers Brian. I doubt I'll be doing any welding on the cabs of my little 3.5 Juliet So, the suggestion of brass angle? and soft solder? I will need the rivets of course as Neil has stated above. Heating with a torch? Will electrical solder do the job or am I using plumbers type and a separate flux... bearing in mind that this is a small cab. Ta |
| Phil H1 | 04/06/2020 13:10:15 |
| 467 forum posts 60 photos | I asked a similar question on a 3 1/2" gauge Betty locomotive tender because I was concerned about heat distortion of the platework. These were the tips I received - by the way, I haven't tried any of them yet; 1. Try and get some lead solder with a low melt point because the newer lead free variety has a higher melting temperature. The higher the temperature, the greater the distortion risk. You can still get hold of it from some suppliers. 2. Tin the parts first and check that brass angle is truly 90 degrees - sometimes it isn't. 3. One tip included assembling the parts, painting it with solder paste and at least pre-warming the assembly in a domestic oven. Take the wrapped parts out of the oven and use an electric iron to run along the joints. Put it back in the oven between sections and return it to the cooling oven after you have finished so the whole assembly cools down at the same rate - hence preventing distortion. I am also building Rob Roy and the cabs and tanks of the real don't appear to have lines of snap head rivets on the outside. The smokebox and buffer beams appear to be heavily riveted but the platework appears to be flush. Another tip. Take care if you rivet the plates with the snap heads on the inside of the platework. My Betty tender was done like that in accordance with the so called words and music and a very neat job has been done of it. Unfortunately, even very careful riveting from the previous builder has left a very noticeable 'dimple' on the outside of the platework at every single rivet position. It can probably be put right with car body filler but it is something else to bear in mind. Phil H |
| Phil H1 | 04/06/2020 13:16:02 |
| 467 forum posts 60 photos | By the way, I thought about buying the laser cut tank kits for Rob Roy but I am thinking of doing them using thicker brass with traditional angle and but joints. I will use the tinned parts and consider the oven tip (when my wife is out - tricky at the moment). Phil H. |
| Lainchy | 04/06/2020 13:25:38 |
273 forum posts 103 photos | Thanks Phil. Sounds like fun ! I believe the sheets will be 0.9mm half hard cz108. Juliet calls for 16 or 20g sheet, I think the 0.9 is 20G. Hmmmmm. I beginning to think hearth and some weight... and letting it warm gently. AND, plenty of test pieces
Ian |
| duncan webster | 04/06/2020 15:37:12 |
| 5307 forum posts 83 photos | Why is it traditional to make platework from brass? Expensive and not easy to paint. Apart from tanks I've used steel on my locos. Then rivets and angle in the corner joints |
| Weary | 04/06/2020 16:21:41 |
| 421 forum posts 1 photos | Model Engineers Laser will cut the parts in your choice of material and thickness using their 'standard' drawings if you ask. Obviously if you change the thickness then tab slots and corresponding tab thickness will be incorrect. Regards, Phil. |
| Phil H1 | 04/06/2020 17:09:45 |
| 467 forum posts 60 photos | A chap from the club just down the road from me has built a superb version of Lion in 7 1/4" gauge. He used steel for the tender tank. When asked about corrosion, he said he would give it a coat of Hammerite to seal and protect it!! Phil H |
| Dave Smith 14 | 04/06/2020 20:05:19 |
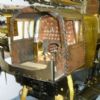
| 222 forum posts 48 photos | Providing you protect the steel properly then there is no issue with using steel for any plate work including tanks, after all the prototype uses it and some of those have been around an awful long time. My Aspinall with the exception of the tender flares all of it is in mild steel. It is all laser cut with slot and tab construction, to my own design and was done at work just before I retired ,being chief designer had its perks!. Assembly is with silver solder using an oxy-propane kit. The tender tank has access plates in the bottom with the whole top plate also removable, which enables it to be properly protected from corrosion. As it cost me nothing rather than £200 plus in brass it was a no brainer. 1st phot shows typical construction. 2nd shows completed tender awaiting painting. 3rd shows some of the loco plate temporarily put together. The splashers are just held by the fit of the tabs in the slot. Dave
|


Please login to post a reply.
Magazine Locator
Want the latest issue of Model Engineer or Model Engineers' Workshop? Use our magazine locator links to find your nearest stockist!
Sign up to our Newsletter
Sign up to our newsletter and get a free digital issue.
You can unsubscribe at anytime. View our privacy policy at www.mortons.co.uk/privacy
Latest Forum Posts
- *Oct 2023: FORUM MIGRATION TIMELINE*
05/10/2023 07:57:11 - Making ER11 collet chuck
05/10/2023 07:56:24 - What did you do today? 2023
05/10/2023 07:25:01 - Orrery
05/10/2023 06:00:41 - Wera hand-tools
05/10/2023 05:47:07 - New member
05/10/2023 04:40:11 - Problems with external pot on at1 vfd
05/10/2023 00:06:32 - Drain plug
04/10/2023 23:36:17 - digi phase converter for 10 machines.....
04/10/2023 23:13:48 - Winter Storage Of Locomotives
04/10/2023 21:02:11 - More Latest Posts...
- View All Topics
Support Our Partners


Shopping Partners
Subscription Offer

Latest "For Sale" Ads
- Reeves** - Rebuilt Royal Scot by Martin Evans
by John Broughton
£300.00 - BRITANNIA 5" GAUGE James Perrier
by Jon Seabright 1
£2,500.00 - Drill Grinder - for restoration
by Nigel Graham 2
£0.00 - WARCO WM18 MILLING MACHINE
by Alex Chudley
£1,200.00 - MYFORD SUPER 7 LATHE
by Alex Chudley
£2,000.00 - More "For Sale" Ads...
Latest "Wanted" Ads
- D1-3 backplate
by Michael Horley
Price Not Specified - fixed steady for a Colchester bantam mark1 800
by George Jervis
Price Not Specified - lbsc pansy
by JACK SIDEBOTHAM
Price Not Specified - Pratt Burnerd multifit chuck key.
by Tim Riome
Price Not Specified - BANDSAW BLADE WELDER
by HUGH
Price Not Specified - More "Wanted" Ads...
Get In Touch!
Do you want to contact the Model Engineer and Model Engineers' Workshop team?
You can contact us by phone, mail or email about the magazines including becoming a contributor, submitting reader's letters or making queries about articles. You can also get in touch about this website, advertising or other general issues.
Click THIS LINK for full contact details.
For subscription issues please see THIS LINK.
Digital Back Issues


Donate

 Register
 Log-in
Model Engineer Magazine
- Percival Marshall
- M.E. History
- LittleLEC
- M.E. Clock

ME Workshop
- An Adcock
- & Shipley
- Horizontal
- Mill

Subscribe Now
- Great savings
- Delivered to your door

Pre-order your copy!
- Delivered to your doorstep!
- Free UK delivery!
All Forum Topics > Beginners questions > Assembling laser cut cabs