Forum sponsored by:

Myford Super 7 Tail stock problem
| Trevor Rushton 2 | 06/05/2020 19:30:46 |
 9 forum posts 5 photos | Good evening everyone; this is my first post on this forum so apologies if my question has already been covered (I could not find anything). I'm not an expert by any means but enjoy pottering with Stuart castings and such like. I have a Super 7 that has worked very well but at the weekend I somehow managed to disengage the tailstock quill from its screw. I could not seem to get the screw to re-engage so I took the end cap off to try and make things easier. The cap came off fairly easily but try as I might I cannot get it back again. I have cleaned the tailstock and the cap threads; they seem to be in good order with no signs of cross threading. I can rotate thecap for 1.5 turns by hand and a further half turn by using a tommy bar, but beyond that its virtually impossible without undue force.
I have: cleaned and checked the threads for signs of cross threading lightly oiled both parts run a fine point round the thread to make sure it was clean heated thetailstock casting with a hot air gun (this enabled me to get a couple more turns) Put the cap in the freezer for a short while (made no difference). Plan B would be to take a gnats eyebrow off the thread but I really don't want to go there - that seems the wrong thing to do. So I am stuck! 1.5 turns is enough for me to get the tailstock working but its obviously not the solution. Problem is I don't know what else to do! Any hits or tis would be welcome. I'll post a couple of pics to illustrate the problem.
Thanks
Trevor |
| Trevor Rushton 2 | 06/05/2020 19:46:25 |
9 forum posts 5 photos |
|
| Martin Cargill | 06/05/2020 20:42:37 |
| 203 forum posts | I don't know if this would help but one trick we use at work for situations like this is to use valve grinding paste. We use it when we have large threads that stick (because of minor thread damage) and are beyond the realms of the taps/dies or other solutions that we have available. In fact I used this just the other day on the cap of a hydraulic cylinder with a 100 mm dia x 2mm pitch thread. I tend to use the fine paste and apply it to the threads and then work it gently back and forth until the obstruction clears. Just make sure that you clean all of the paste out of the threads once you have finished.
Martin Edited By Martin Cargill on 06/05/2020 20:44:22 |
| Robert Butler | 06/05/2020 20:49:51 |
| 511 forum posts 6 photos | No don't do that, wait for better and more knowledgeable advice, if it fitted before without issue it can be reassembled without any tinkering. Robert Butler |
| Robert Butler | 06/05/2020 20:49:52 |
| 511 forum posts 6 photos | No don't do that, wait for better and more knowledgeable advice, if it fitted before without issue it can be reassembled without any tinkering. Robert Butler |
| Trevor Rushton 2 | 06/05/2020 21:42:47 |
9 forum posts 5 photos | Thank you Martin and Robert. I spent another couple of hours tonight and really dont get it. As Robert says, it came out okay but it beats my logic as to why it won't go back. I got it to go two full turns without force but thats about as far as I can get. I have got the thing working for the present and will weigh up the options if I get any more replies.
|
| Michael Gilligan | 06/05/2020 21:47:09 |
 23121 forum posts 1360 photos | If the cap came off ‘fairly easily’ it should go back with similarly little effort. [ you know how much that is, but unfortunately we don’t ] This indicates that you ‘must’ have a tiny burr, or some debris, in male and/or female thread[s] MichaelG.
|
| ega | 06/05/2020 22:00:54 |
| 2805 forum posts 219 photos | Obviously you will want to check carefully before resorting to trimming the thread (the cap won't be straightforward to grip truly). It sounds as though your mating parts are at each end of the tolerance range. I just measured the OD of my cap which is around 0.003" under the nominal 1.375" dimension. I take it you are using a well-fitting tommy bar or spanner?
|
| Michael Gilligan | 06/05/2020 22:04:39 |
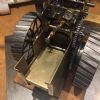
23121 forum posts 1360 photos | Posted by Trevor Rushton 2 on 06/05/2020 19:46:25:
. Forgive me please, if I am preaching, Trevor ... But I’m pretty sure thatI can see burrs or debris in that male thread from here ! Any of those could be sufficient to jam a closely toleranced screw. MichaelG. Edited By Michael Gilligan on 06/05/2020 22:07:45 |
| Trevor Rushton 2 | 06/05/2020 22:06:46 |
9 forum posts 5 photos | Thanks Michael The "fairly" means it needed a bit of a tug to get it to move to start with but after that it unscrewed okay albeit with a tormmy bar. I have looked hard and cannot see anything on the threads and have cleaned them as well as I can. The only thing is that the female part is perhaps not as bright as the male part (cap). I think you must be right; its such a close fit there is no margin for error. Just seems very strange though.
|
| ega | 06/05/2020 22:12:28 |
| 2805 forum posts 219 photos | PS Your problem reminds me of wrestling with the old-style bearing cups on cycle bottom brackets; they were often difficult to start but for some reason became easier to move once the cup had entered by a few turns. One way to clean the threads by hand might be to run the appropriate blade of a screw pitch gauge around them; more likely to pick up any debris than a single point tool. Good luck! PPS Having seen your photo I would take some light oil and a tooth brush to that male thread and perhaps follow up with a blast of air (bike pump if you have no compressor). Edited By ega on 06/05/2020 22:15:55 |
| Trevor Rushton 2 | 06/05/2020 22:12:32 |
9 forum posts 5 photos | The thread does look as though its got debris or burrs in it I agree, but I cleaned it before I tried again and satisfied myself that it was clear.Perhaps I just need a better pair of glasses! I will have a look at the tailstock again tomorrow; its not so easy to see the thread there. I think I may have underestmated the effect of tiny defects. |
| Trevor Rushton 2 | 06/05/2020 22:27:17 |
9 forum posts 5 photos | Thanks Ega, I did try that method but I did not persevere with it. i have also tried compresssed air , a toothbrush and finally tissue - the latter being a bit silly because it just leaves tiny fibres behind. A friend suggested running around the thread with a junior hacksaw blade but I am really not excited about that and it will probably simply deposit more tiny fragments. In some respects cleaning the male part is or ought to be easier because you can get at it. I think that I have a lead now on the problem; the issue is how to clean it Any ideas for thread cleaning welcome! |
| Brian Abbott | 06/05/2020 22:30:46 |
 523 forum posts 95 photos | Hi Trevor. Make sure it's not the anti-rotation key at the front of the tailstock stopping the quill from going in and engaging on the screw. |
| Trevor Rushton 2 | 06/05/2020 22:42:41 |
9 forum posts 5 photos | Thanks Brian, The quill was another problem it took me ages to get that back in again but I am happy that its not affecting the fit of the cap - I tried fitting that before I re-assembled it. I had to get the quill scrupulously clean and polished before I could get it back in. I'm niot taking it apart again! |
| Michael Gilligan | 06/05/2020 23:31:51 |
23121 forum posts 1360 photos | Posted by Trevor Rushton 2 on 06/05/2020 22:27:17:
[…] Any ideas for thread cleaning welcome! . The tip of a Stanley Knife blade, applied with care as a scraper often works for me.
MichaelG. . Edit: dimensioned drawing available here: https://www.thingiverse.com/thing:2539104 ... I didn’t expect to find that ^^^ Edited By Michael Gilligan on 06/05/2020 23:37:17 |
| Kiwi Bloke | 07/05/2020 08:59:33 |
| 912 forum posts 3 photos | I've had similar experiences, although not in this application. Fine female threads in cast iron seem to have a magic ability to harbour tiny pieces of metal where they shouldn't be - swarf, presumably, from manufacture. The tiny bits seem to stick in the female thread, not the male thread. Presumably it's because of the concave shape of the recess, along the line of the thread. Thus, the male thread, as it advances, meets the edge of the 'bit', and progresses over the main body of the 'bit', which is spanning the hollow of the thread, and compresses it. [I don't think I've explained what I meant very well - too much strenuous work on the land today...]. As you work the male thread into the female, the 'swarf' is compressed and deforms so that any obvious edge that you could see or feel with a probe is blended into the thread's 'hollow'. What works for me is to drag a sharp, bent scriber around the thread, applying as much outward radial pressure as possible. Even if you shave a little from the root of the thread, it doesn't matter, does it? With luck, and some strong words, you'll be rewarded by the offending bit coming free. Good luck. |
| Trevor Rushton 2 | 07/05/2020 09:26:07 |
9 forum posts 5 photos | Dear Michael and Kiwi Bloke Many thanks - I like that cool blade holder - I might make one of those. Kiwi Bloke thanks for your note; made perfect sense; I did try a scraper yesterday but I think I concentrated on the male thread more than the female one. I will try the various suggested methods and see which one works for me. I may also try a wire brush on my Proxxon although I will test that first as I can see that leaving tiny bits of metal behind. This forum has been very helpful, thanks everyone - it might seem like an obvious thing, but I had not really appreciated the degree of precision needed. I am relatively new to this hobby, most of my experience has been with tree wood which of course is far more forgiving. I will try again today and let you know what happens.
Trevor |
| Graham Meek | 07/05/2020 10:27:38 |
| 714 forum posts 414 photos | Hi Trevor, From what I can see in the tailstock housing photo the thread seams to be full of small particles of swarf. One thing I would do is with a single point internal screw cutting tool, is to clean out the thread with this. A single point tool used methodically will show up any defect in the thread which can be scarped away using the tool. Then it needs to be clean, really clean. Start with an old tooth brush dipped in white spirit regularly. Mop up the accumulation from the bottom of the bore as you go, don't allow this to flow towards the tailstock barrel. If you have, Isopropyl, brake drum degreaser use this with the tooth brush afterwards, but watch the paint on the body of the tailstock. It might be wise to wrap some masking tape over this and around the edge to protect it. Finally with some cotton material from an old Tee shirt, wrap a strip several times around a piece of small diameter, plastic, or steel bar. Work this around the thread to remove the last bits of debris. This might need doing several times. My hunch is the female thread is at fault, but just to be on the safe side, put the male housing on a mandrel in the lathe. Running in backgear with a half round Swiss needle file run up the flanks of the thread using the flat of the file. Then pay attention to the crests of the thread again with the flat of the file. You are looking to remove damage not a load of material. Coating the thread with felt tip marker will show where you are taking material/damage off. Don't be tempted to use a 3 square or Triangular Swiss needle file, this is the wrong included angle, and please be sure to have some protection on the Swiss needle file handle. I saw one lad at school with the handle of the file under the skin of his right palm like a large thorn. Then clean this thread as above. A trial assembly without any oil should see the thread screw in further than before. If this happens replace the feedscrew and then lightly oil the thread which should go fully home now. If you have to use the Tommy bar it needs more work I am afraid. My feeling is that when you unscrewed the thread it actually "picked up", not your fault these things are sent to test us. As you say you had to use the Tommy bar to release the housing. Once the housing had been released it should have unscrewed by hand, the grease nipple providing all the leverage needed. Regards Gray, Edited By Graham Meek on 07/05/2020 10:30:09 |
| KWIL | 07/05/2020 10:46:46 |
| 3681 forum posts 70 photos | +1 for Gray's method. This cap is intended to be a close fitting item and ANY defect in handling may cause it to stick. Even not putting the item down carefully can just turn the thread start. If it came out smoothly it will be possible to put it back in the same manner. My own S7 tailstock caps are a snug fit.
PLEASE take no notice of non expert advice that suggests attacking the item with a hacksaw blade, butchery to say the least Edited By KWIL on 07/05/2020 10:49:58 |


Please login to post a reply.
Magazine Locator
Want the latest issue of Model Engineer or Model Engineers' Workshop? Use our magazine locator links to find your nearest stockist!
Sign up to our Newsletter
Sign up to our newsletter and get a free digital issue.
You can unsubscribe at anytime. View our privacy policy at www.mortons.co.uk/privacy
Latest Forum Posts
- *Oct 2023: FORUM MIGRATION TIMELINE*
05/10/2023 07:57:11 - Making ER11 collet chuck
05/10/2023 07:56:24 - What did you do today? 2023
05/10/2023 07:25:01 - Orrery
05/10/2023 06:00:41 - Wera hand-tools
05/10/2023 05:47:07 - New member
05/10/2023 04:40:11 - Problems with external pot on at1 vfd
05/10/2023 00:06:32 - Drain plug
04/10/2023 23:36:17 - digi phase converter for 10 machines.....
04/10/2023 23:13:48 - Winter Storage Of Locomotives
04/10/2023 21:02:11 - More Latest Posts...
- View All Topics
Support Our Partners


Shopping Partners
Subscription Offer

Latest "For Sale" Ads
- Reeves** - Rebuilt Royal Scot by Martin Evans
by John Broughton
£300.00 - BRITANNIA 5" GAUGE James Perrier
by Jon Seabright 1
£2,500.00 - Drill Grinder - for restoration
by Nigel Graham 2
£0.00 - WARCO WM18 MILLING MACHINE
by Alex Chudley
£1,200.00 - MYFORD SUPER 7 LATHE
by Alex Chudley
£2,000.00 - More "For Sale" Ads...
Latest "Wanted" Ads
- D1-3 backplate
by Michael Horley
Price Not Specified - fixed steady for a Colchester bantam mark1 800
by George Jervis
Price Not Specified - lbsc pansy
by JACK SIDEBOTHAM
Price Not Specified - Pratt Burnerd multifit chuck key.
by Tim Riome
Price Not Specified - BANDSAW BLADE WELDER
by HUGH
Price Not Specified - More "Wanted" Ads...
Get In Touch!
Do you want to contact the Model Engineer and Model Engineers' Workshop team?
You can contact us by phone, mail or email about the magazines including becoming a contributor, submitting reader's letters or making queries about articles. You can also get in touch about this website, advertising or other general issues.
Click THIS LINK for full contact details.
For subscription issues please see THIS LINK.
Digital Back Issues


Donate

 Register
 Log-in
Model Engineer Magazine
- Percival Marshall
- M.E. History
- LittleLEC
- M.E. Clock

ME Workshop
- An Adcock
- & Shipley
- Horizontal
- Mill

Subscribe Now
- Great savings
- Delivered to your door

Pre-order your copy!
- Delivered to your doorstep!
- Free UK delivery!
All Forum Topics > Help and Assistance! (Offered or Wanted) > Myford Super 7 Tail stock problem