Forum sponsored by:

minnie 1" scaled to 2"
general questions
| james huxstep | 06/01/2017 12:14:29 |
 91 forum posts 24 photos | hi there fairly new to model engineering just bought myself a boxford BUD lathe to replace the chester one i had and i am looking at building the minnie in 2" scale. Do i take it that you just double everything up [bar the boiler] from the 1" plans? Are there drawings out there somewhere for a minnie 2" boiler?as i gather the 1" version doubled would not be right and or safe? Any help on this matter would be greatly welcome
James |
| Neil Wyatt | 06/01/2017 14:59:00 |
 19226 forum posts 749 photos 86 articles | Hello James, I think Jason can advise on this. A larger Minnie also offers you the chance to add extra detail. Neil |
| pgk pgk | 06/01/2017 15:15:34 |
| 2661 forum posts 294 photos | As Neil says .. Jason's the guy for that question. I suppose it also depends on whether you're planning on building your own boiler of buying in.. in which case the boiler builder may well have suitable plans they like to follow. As someone struggling to finish his own 1" minnie boiler it's been a heck of a learning curve although I'd fancy considering a crack at making a 2" boiler (for myself) with benefit of this build. Starting with a 2" boiler would have been a really expensive learning curve with some on the bog-ups I managed along the way.... Other considerations are the rear wheels at 12" won't be machined on your lathe unless you build some riser system and commercial 2" minnie gear set is a breathtaking £540 + vat and post from blackgates - although in the scheme of things that's just a small part of the total cost. (gear making is next on my list of skills to learn) |
| JasonB | 06/01/2017 16:24:49 |
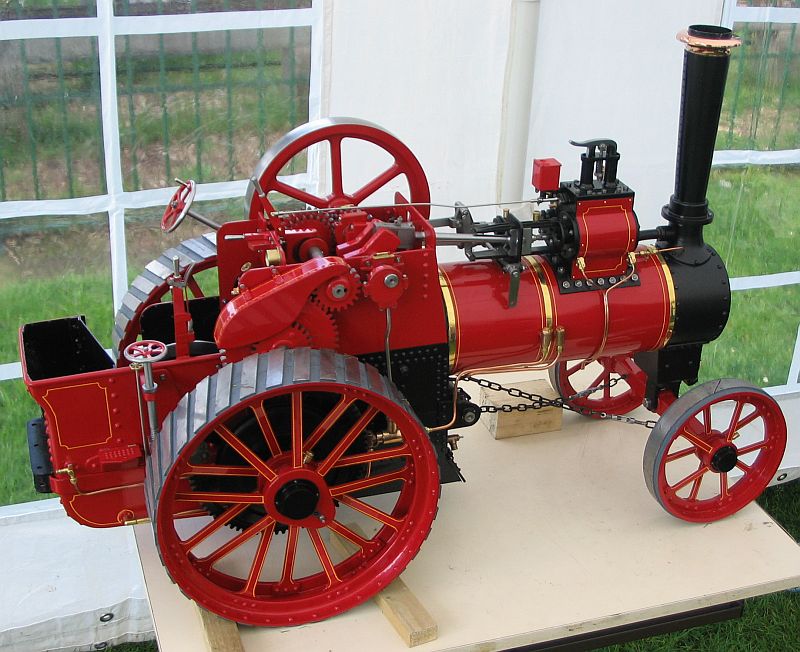
 25215 forum posts 3105 photos 1 articles | You can just double everything up if you want to except the boiler but you will end up with quite a chunky looking engine if you do so. A lot of the parts on the Minnie are from 1/16 sheet and flat bar but could infact be made from 3/32" quite happily on the 2" version. Also things like the tender rivits will look a bit heavy if just doubled up, a better option is to stick with 1/16" ones but use twice as many eg don't double the spacing. As Neil says there are a lot of extra details that can also be added if you are so inclined, this is one of the nicest looking 2" Minnies about and was well detailed by Kevin it's builder. Note the water pump has been moved from the boiler side to the hornplate which is well worth doing.
The boiler will benifit from more tubes of less than double the size of the 1", separate supply from the Manifold to the water gauge and pressure gauge and also worth thinking about adding an injector as you reallly need to have the two water feeds on this size engine and the boiler expector is likely to want to see that too. Rear wheels can be rolled and welded from a flat strip and then the two legs of the tee welded in so you won't need to swing a 12" wheel. J
|
| james huxstep | 06/01/2017 16:31:25 |
91 forum posts 24 photos | Thanks It is a very nice looking engine in 2", just feel like a 2" inch would be more useful to use and 'play' with.The only thing that scares me is the boiler. is it worth buying the pre flanged kits?or flange it yourself, or does that leave just more room for error?Can you do this size boiler with blow lamps? or do you need more heat?dont mind spending more money on kit, if its gonna make the boiler build much more smoother.
thanks
james |
| pgk pgk | 06/01/2017 18:52:25 |
| 2661 forum posts 294 photos | With the advice of more experienced guys on here and cupalloys I bought a 23kw gas torch for my 1" boiler and even with that I struggled at first until the advice finally sunk in about really insulating the copper from heat losses to get it hot enough for soldering. The mass of a 2" boiler in copper would doubtless be more challenging and likely need a more powerful nozzle which then leads to issues like actually getting gloved hands close enough to manipulate the solder rods without toasting yourself. Insulation for heat loss seems to be the key. Specially if following directions and trying to use different temperature solders. The 24% silver was a pig, the 38% not so bad in my hands and the 55% lots easier I didn't find flanging too much of a learning curve compared to the rest of the job and quite satisfying for some reason though preflanged may save a ruined piece of copper and some time making the formers and re-annealing the sheet - depends on the cost penalty, I started out accepting I was likely going to make a mess of my first attempts at boiler bashing/brazing and bought enough copper for 2 boilers - and used most of it and realistically was prepared to consider making a third boiler before accepting defeat (or that boiler making isn't for me). I've also used/wasted a lot of flux and solder along the way. It's worth the experience and fun of having a go albeit with the usual frustrations when trying something new. |
| Durhambuilder | 06/01/2017 19:01:19 |
| 77 forum posts 5 photos | Insulation is definitely key to successful boiler making. I did a 5" loco boiler with a single 25mm dia sievert torch and an insulating chimney liner, see my album for photos. |
| james huxstep | 06/01/2017 20:04:00 |
91 forum posts 24 photos | Wow! U really are insulating it!are they special fire bricks? So the general idea that im getting is keeping the copper hot enough, hence the insulation. So would doing the whole thing in a garage as well as insulation help? I take it you re edit the insulation when u need to reach another joint? If i was to buy one torch for model boiler making, what would it be? Cheers James |
| pgk pgk | 06/01/2017 22:26:25 |
| 2661 forum posts 294 photos | 25mm torch is about 8kw. I certainly don't have the skill or experience to use one that small but it would allow better hand access. It takes a while for me to get the whole thing to temp with pretty good insulation and a bigger burner and I still tend to run into flux exhaustion. But guys around here are pretty smart. Vermiculite fire bricks and fire blankets cut and shaped as necessary are your friend. I tried to find his chimney liner on line..nearest i found was pumice based which is probably another form of vermiculite. I asked all the same questions last year at the beginning of my minnie thread **LINK** There's also pics of my assorted hearth build-ups in that thread... and my errors |
| julian atkins | 06/01/2017 23:24:01 |
 1285 forum posts 353 photos | I was going to post this on pgk pgk's thread but might be more relevant here perhaps as the subject has been brought up by him. He has used completely the wrong fire bricks, using the heavy heat absorbing bricks. I buy what is now the successor to Thermalite blocks from the builders merchants. They are now grey whereas Thermalite was white. I still have quite a few Thermalite blocks. After a heat up on a boiler you can pick up these blocks by hand after a few minutes. They reflect the heat, not absorb it. pgk pgk's thread exemplifies how not to build a silver soldered copper boiler. The 2" scale Minnie boiler is much smaller than most 5"g loco boilers and ought to be a doddle, and no tapered barrel or belpaire firebox. How pgk pgk has made such a mess of of a much smaller boiler continues to be a mystery, and he has ignored all advice provided. I even offered to go to his home in mid wales and help him out, or he could have come here and have the benefit of my indoor workshop etc for silver soldering. Cheers, Julian |
| pgk pgk | 07/01/2017 06:09:30 |
| 2661 forum posts 294 photos | Julian, I've never shied away from being criticised and yes, I do recall you offering your direct help but the whole point of this was for me to try and do it myself. If you say I'm using the wrong blocks then please provide a tradename because I'm using light, grey thermalte type blocks as the basic surround/wind break and then vermiculite immediately surrounding the boiler itself. If there's anything else specific I'm doing wrong or advice I've ignored then please share for discussion and my education. pgk |
| JasonB | 07/01/2017 07:35:46 |
25215 forum posts 3105 photos 1 articles | Yep as someone in the construction trade I can confirm that PGK is using lightweight aerated blocks that go by trade names such as Celcon, Thermalite etc as his outer hearth. Which I seem to remember telling him to use early on in his build so he took that bit of advice. And the inner bricks look to be scamolex or similar compressed vermiculite.
|
| JasonB | 07/01/2017 08:22:43 |
25215 forum posts 3105 photos 1 articles | On the question of soldering the boiler in a garage or workshop it really depends on how quickly you wish to be overcome by CO2 poisoning. The big burners needed will soon eat up all the oxygen and leave none for you! There is the added problem of propane producing water vapour which will condense on any cold metal surfaces in your workshop and promote rust. And the last photo on this page shows what the build up of heat can do.
As for torches, I would say somethiong with a 26 or even 35Kw burner as that 4mm thick copper will take some heating, the Sievert ones are good but pays to shop around. Also worth reading the "best practice" on that site. |
| james huxstep | 07/01/2017 15:21:32 |
91 forum posts 24 photos | So if i was going to make a bullet point guide to sucessfull boiler making it would start somthing like this 1/always clean (acid and water solution) before every 'cook up' 2/insulate the work (with the appropiate brick) 3/dim lights a bit, to make the dull red colour more visible 4/plenty of flux 5/plenty of heat(possibly standard blow lamp close for holding ambient temperature, plus the higher wattage torch for the specific part of job Anything else? |
| pgk pgk | 07/01/2017 16:09:52 |
| 2661 forum posts 294 photos | Since I'm obviously doing it all wrong you should ignore all my 'advice'. One of many things you will find is tthat these burners use up so much O2 that getting it close to the work doesn't leave enough access for fresh air and it flames out. I keep an ordinary small torch lit on the bench for a relight if necessary. I'd guess that a smaller torch aimed at the work with intent to keep some heat in will likely just be extinguished by the larger torch using all air I do my soldering outside the shed door.. at night, with shed floodlight illuminating. Equally if you plan on dropping hot stuff into an acid bath then it's better done outside standing upwind unless you plan on holding your breath and escaping the shed pronto while everything in there dissolves. you also have the problem of handling annealed soft copper that's still hot.
|
| JasonB | 07/01/2017 16:45:39 |
25215 forum posts 3105 photos 1 articles | Not much point in using a small blowlamp for general heating, you would have more success using the big burner to bring the whole thing upto temp and then using a mapp or similar blowlamp to chase round the joints as the solder flows but as PGK says you will have a job getting close enough with a blowlamp once the main torch is roaring away. If you can find a friend then have them use the big torch and run a second propane torch with a cyclone burner which is longer as draws its air further from the work so won't put itself out. Use this cyclone one to chase the bead of liquid solder along the joint. Do it outside, not in bright sunlight or under a lean to roof if likely to rain |
| Neil Wyatt | 07/01/2017 21:39:19 |
19226 forum posts 749 photos 86 articles | Julian, Please try and mind your manners. Thank you. Neil |
| pgk pgk | 07/01/2017 22:37:14 |
| 2661 forum posts 294 photos | Posted by Neil Wyatt on 07/01/2017 21:39:19:
Julian, Please try and mind your manners. Thank you. Neil Neil, That's unnecessary. I don't have a problem with Julian voicing an opinion (and I'd hate him to think I'd made any complaint) I appreciate all the help on this site and when I stuff-up I'm happy to be advised accordingly..preferably with explanations of what and why.
pgk |
| julian atkins | 07/01/2017 23:23:35 |
1285 forum posts 353 photos | Jason is quite correct in that pgk pgk is using the Celcon blocks that I use (the big grey blocks on the outside of his pic of pgk pgk's set up), but pgk pgk has used heat absorbing quite heavy vermiculite blocks around the boiler. The celcon blocks cost a quid a piece and are also easy to cut up with an old wood saw to exact sizes to fit into the firebox etc . Had pgk pgk used just Celcon only he might have got better results. I have always silver soldered my boilers indoors with the workshop door open. A curtain covers the doors and workshop window if the sun comes out. Celcon is not quite as good as the thermalite white blocks, but the best available atm. Hi James, I think you have it pretty much correct except as Jason says the secondary heat. I scrub the assemblies in hot soapy water after pickling - it is amazing how much more dirt comes off on this stage. To remove hard deposits of flux I use a different method. Cheers, Julian |
| Roderick Jenkins | 08/01/2017 00:00:02 |
 2376 forum posts 800 photos | Posted by julian atkins on 07/01/2017 23:23:35:
Jason is quite correct in that pgk pgk is using the Celcon blocks that I use (the big grey blocks on the outside of his pic of pgk pgk's set up), but pgk pgk has used heat absorbing quite heavy vermiculite blocks around the boiler. Hmm.....
Looks like I've made the same mistake - astonishing that my boiler brazing seems to be going OK
Cheers, Rod |


Please login to post a reply.
Magazine Locator
Want the latest issue of Model Engineer or Model Engineers' Workshop? Use our magazine locator links to find your nearest stockist!
Sign up to our Newsletter
Sign up to our newsletter and get a free digital issue.
You can unsubscribe at anytime. View our privacy policy at www.mortons.co.uk/privacy
Latest Forum Posts
- *Oct 2023: FORUM MIGRATION TIMELINE*
05/10/2023 07:57:11 - Making ER11 collet chuck
05/10/2023 07:56:24 - What did you do today? 2023
05/10/2023 07:25:01 - Orrery
05/10/2023 06:00:41 - Wera hand-tools
05/10/2023 05:47:07 - New member
05/10/2023 04:40:11 - Problems with external pot on at1 vfd
05/10/2023 00:06:32 - Drain plug
04/10/2023 23:36:17 - digi phase converter for 10 machines.....
04/10/2023 23:13:48 - Winter Storage Of Locomotives
04/10/2023 21:02:11 - More Latest Posts...
- View All Topics
Support Our Partners


Shopping Partners
Subscription Offer

Latest "For Sale" Ads
- Reeves** - Rebuilt Royal Scot by Martin Evans
by John Broughton
£300.00 - BRITANNIA 5" GAUGE James Perrier
by Jon Seabright 1
£2,500.00 - Drill Grinder - for restoration
by Nigel Graham 2
£0.00 - WARCO WM18 MILLING MACHINE
by Alex Chudley
£1,200.00 - MYFORD SUPER 7 LATHE
by Alex Chudley
£2,000.00 - More "For Sale" Ads...
Latest "Wanted" Ads
- D1-3 backplate
by Michael Horley
Price Not Specified - fixed steady for a Colchester bantam mark1 800
by George Jervis
Price Not Specified - lbsc pansy
by JACK SIDEBOTHAM
Price Not Specified - Pratt Burnerd multifit chuck key.
by Tim Riome
Price Not Specified - BANDSAW BLADE WELDER
by HUGH
Price Not Specified - More "Wanted" Ads...
Get In Touch!
Do you want to contact the Model Engineer and Model Engineers' Workshop team?
You can contact us by phone, mail or email about the magazines including becoming a contributor, submitting reader's letters or making queries about articles. You can also get in touch about this website, advertising or other general issues.
Click THIS LINK for full contact details.
For subscription issues please see THIS LINK.
Digital Back Issues


Donate

 Register
 Log-in
Model Engineer Magazine
- Percival Marshall
- M.E. History
- LittleLEC
- M.E. Clock

ME Workshop
- An Adcock
- & Shipley
- Horizontal
- Mill

Subscribe Now
- Great savings
- Delivered to your door

Pre-order your copy!
- Delivered to your doorstep!
- Free UK delivery!
All Forum Topics > Beginners questions > minnie 1" scaled to 2"