Forum sponsored by:

Modded 1" Minnie Progress
| Richard S2 | 04/04/2021 22:36:11 |
 237 forum posts 135 photos |
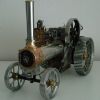
Productive weekend with some assembly work. Fittings on the Backhead area installed. Additional floor plate extends to a closer point to the backhead. Oil boxes have filter screens inside -
Rather tricky to assemble and fit the tender what with the additions and changes, but went ok with just a few touch up areas to the black paint. Altered bolting pattern between tender/hornplates and I produced a raised chequer pattern, rather than cut it into the steps-
Tender was made with 20swg steel sheet (from a 1970s fridge freezer back plate) riveted to 5/16" brass angle. The tank is lined with brass sheet and a stainless floor plate. Rivet are 3/64". Also managed some more painting of parts today, so for me it was productive for a change. Regards |
| Richard S2 | 30/05/2021 21:00:56 |
237 forum posts 135 photos |
Well, nearly 2 months of frustrating delays to the painting/assembly due to unfavourable weather conditions. Finally able to set up yesterday and apply the penultimate coat of semi matt black over hot bits at the front end. The chimney saddle and exhaust pipe were painted separately as it is bolted on. This enabled me to apply a consolidation coat over all the Cylinder block joints, stud heads and nuts without access issues, having satisfied myself with the valve timing setting etc (he says with fingers crossed). Assembly began today of the respective front end parts, some of which are embellished with a bit more detail like the flanged and bolted exhaust at the cylinder end-
Bolt heads to paint, followed by a final black spray touch in around the saddle/smokebox joint. A Clean up of the raised lettering to do. I settled for a cylindrical locknut on the valve rod with 2 flats on it, which to me anyway, looks less bulky or obvious than a 5 ba nut. The extended regulator rod and gland at the front of the cylinder is dummy of course. I found that there was so much spare metal on the casting, that I decided to turn and file this bit up to give it some detail. Yet to make 2 14ba studs and nuts for it yet (before I put the chimney on) -
I did manage at least to get the flywheel painted last month and really pleased with the finish. Gib key lightly fitted as it has to come off again -
Boiler barrel cladding (nickel silver) has had the top coat flatted down and ready for clear coat, along with the rear hubcaps. So hopefully more progress soon.
|
| vic francis | 31/05/2021 15:49:58 |
| 125 forum posts 21 photos | Great work of art ,Richard Forget the mower restoration!let the grass grow long!! Vic |
| Jon Lawes | 31/05/2021 16:15:25 |
 1078 forum posts | What beautiful work. |
| Former Member | 31/05/2021 16:48:16 |
| 1085 forum posts | [This posting has been removed] |
| Jeff Dayman | 31/05/2021 16:51:51 |
| 2356 forum posts 47 photos | Outstanding Richard, it looks great! |
| Nigel Graham 2 | 31/05/2021 21:02:02 |
| 3293 forum posts 112 photos | Magnificent! Thank you for showing us. How did you make the proper chequer-plate profile? |
| Richard S2 | 01/06/2021 10:40:21 |
237 forum posts 135 photos |
Thank you very much gentlemen for the positive responses. It's becoming a race where it's a challenge with the old hand joints locking up and the eyesight needs more assistance- Posted by vic francis on 31/05/2021 15:49:58:
Great work of art ,Richard Forget the mower restoration!let the grass grow long!! Vic Thanks Vic, I have avoided them up to last week where the Museum has just asked me to sort 2 engines, one is a Stuart Turner N2 1933 and the other is a little J.A.P 2a 1940s, So my summer has been allocated for me. Be easier to deal with larger nuts and bolts etc though! (then there is also the Treshing Machine). Posted by Nigel Graham 2 on 31/05/2021 21:02:02:
Magnificent! Thank you for showing us. How did you make the proper chequer-plate profile? Thanks Nigel, appreciated. I took the process a stage further and made an embossing block from gauge plate. Put the diamond hatching in with a slitting saw with 0.025" blade and about as deep. I then used that to press the pattern into well annealed brass sheet pieces by hitting it with a 1.1/2lb hammer on a block of railway track (my anvil, as I didn't have a press then). After the first impression hit, the cuts line up with the impression to get a 'register' for the next hit (again annealed). Had to put a screwdriver slot in the side to prise the plates apart, as the fit is very close. 3 hits and they were of good impression. I also tinned the top of the hatching so that I might wear the paint away a bit and it will show as looking like steel, rather than brass. I still have the block I made over 30 years ago, as I might need it again-
This is the best shot I can get with my old camera to give a better view of the step(s) -
Thanks again. Regards.
Edited By Richard S2 on 01/06/2021 10:40:50 |
| Steviegtr | 01/06/2021 10:55:18 |
 2668 forum posts 352 photos | Absolutely stunning. You should be proud showing that off. Steve. |
| Richard S2 | 08/06/2021 18:07:27 |
237 forum posts 135 photos | Posted by Steviegtr on 01/06/2021 10:55:18:
Absolutely stunning. You should be proud showing that off. Steve. Thank you Steve, Having been a bit apprehensive about painting this, it's coming together better than I had anticipated. Just about finished the front end now, except for fitting the chimney and one stud/nut to replace the c/sunk screw on the top slidebar. The hand wheel for the blower valve was all drilled and filed by eye, so not perfect.-
I made some changes to the design of the chain drum to reflect more full size practice which is now fitted. This drum is flanged each end and the chain bolts pass through these, rather than the drum itself. The worm wheel fixture is secured by a separate grub screw. finish is just oil blackening-
The redesigned feed pump is now fitted and tucks away nicely behind the rear wheel to disguise the out of scale size. I have to sort a tiny high spot on 2 teeth on the 2nd and 3rd shaft gears(spotted in red). only an issue of slight resistance when they merge, so I can't leave it-
Getting there. Regards.
|
| Jon Lawes | 08/06/2021 19:08:51 |
1078 forum posts | Proper model engineering. |
| Phil H1 | 09/06/2021 13:39:04 |
| 467 forum posts 60 photos | Posted by Jon Lawes on 08/06/2021 19:08:51:
Proper model engineering.
I agree Jon. This really is a very nice build. Phil H
|
| Richard S2 | 10/11/2021 17:09:04 |
237 forum posts 135 photos | Thanks Jon & Phil. Rather a long pause with progress report, had 86 days of hell with replacement windows and scaffolding. Spent 2 days last week masking and painting the rim sides and strakes to finish the rim faces-
Didn't want to paint the strakes, looks a bit tidier. I managed to make the Regulator Reach Rod dead straight and able to make/fit a crutch fork on the spectacle plate to support it. Still doing odd parts, but nearly there with main assembly after painting. Oil blackened the steering worm gear to blend in. No fancy lining etc, I want it basic and plain like a general purpose should be-
Not fussed with trying to equalise the band spacing on the barrel. Minor failure with the cladding, have a short gap of 0.4mm at the front of the cylinder pad and the L/h cladding sheet somehow?-
Need to dull the front wheel faces off and various retaining clips & pins to make next. Regards |
| Joseph Noci 1 | 10/11/2021 17:27:02 |
| 1323 forum posts 1431 photos | Wonderful Talent you have. A superb piece of art and Engineering. Rather envious of your ability! Joe |
| Jeff Dayman | 10/11/2021 18:14:25 |
| 2356 forum posts 47 photos | Looks excellent Richard, well done! |
| Jon Lawes | 10/11/2021 19:01:01 |
1078 forum posts | Beautiful! The main reason I've been missing shows is the opportunity to see things like this in the flesh. The only problem being it makes my work feel clumsy in comparison! Excellent stuff. |
| Richard S2 | 29/04/2022 15:58:23 |
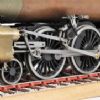
237 forum posts 135 photos | It's been a while since my last effort with the race to finish this. Thanks to Joseph, Jeff and Jon for their compliments. Thanks to medication, I can manage short periods working on smaller detail again, so pressed on with finshing the pins and clips. Had to come up with a method to cross drill 3/64th (1.2mm) pins (rivets) with a nbr 78 (0.4mm) hole for the 14 thou stainless wire clips (0.35mm). Worked fine using WM16 Mill and Peatol/Taig and a jig. 3 different widths for the cross hole point, one for the damper flap/rod and one each end of the regulator reach rod. Reg rod ends-
Also finished the drive pin retainers and clips giving a more detailed finish to the rear hub layout-
Regards |
| Phil H1 | 01/05/2022 13:19:06 |
| 467 forum posts 60 photos | Really nice work. |
| Harry Wilkes | 01/05/2022 16:08:18 |
 1613 forum posts 72 photos | nice job H |


Please login to post a reply.
Magazine Locator
Want the latest issue of Model Engineer or Model Engineers' Workshop? Use our magazine locator links to find your nearest stockist!
Sign up to our Newsletter
Sign up to our newsletter and get a free digital issue.
You can unsubscribe at anytime. View our privacy policy at www.mortons.co.uk/privacy
Latest Forum Posts
- hemingway ball turner
04/07/2025 14:40:26 - *Oct 2023: FORUM MIGRATION TIMELINE*
05/10/2023 07:57:11 - Making ER11 collet chuck
05/10/2023 07:56:24 - What did you do today? 2023
05/10/2023 07:25:01 - Orrery
05/10/2023 06:00:41 - Wera hand-tools
05/10/2023 05:47:07 - New member
05/10/2023 04:40:11 - Problems with external pot on at1 vfd
05/10/2023 00:06:32 - Drain plug
04/10/2023 23:36:17 - digi phase converter for 10 machines.....
04/10/2023 23:13:48 - More Latest Posts...
- View All Topics
Support Our Partners


Shopping Partners
Subscription Offer

Latest "For Sale" Ads
- Reeves** - Rebuilt Royal Scot by Martin Evans
by John Broughton
£300.00 - BRITANNIA 5" GAUGE James Perrier
by Jon Seabright 1
£2,500.00 - Drill Grinder - for restoration
by Nigel Graham 2
£0.00 - WARCO WM18 MILLING MACHINE
by Alex Chudley
£1,200.00 - MYFORD SUPER 7 LATHE
by Alex Chudley
£2,000.00 - More "For Sale" Ads...
Latest "Wanted" Ads
- D1-3 backplate
by Michael Horley
Price Not Specified - fixed steady for a Colchester bantam mark1 800
by George Jervis
Price Not Specified - lbsc pansy
by JACK SIDEBOTHAM
Price Not Specified - Pratt Burnerd multifit chuck key.
by Tim Riome
Price Not Specified - BANDSAW BLADE WELDER
by HUGH
Price Not Specified - More "Wanted" Ads...
Get In Touch!
Do you want to contact the Model Engineer and Model Engineers' Workshop team?
You can contact us by phone, mail or email about the magazines including becoming a contributor, submitting reader's letters or making queries about articles. You can also get in touch about this website, advertising or other general issues.
Click THIS LINK for full contact details.
For subscription issues please see THIS LINK.
Digital Back Issues


Donate

 Register
 Log-in
Model Engineer Magazine
- Percival Marshall
- M.E. History
- LittleLEC
- M.E. Clock

ME Workshop
- An Adcock
- & Shipley
- Horizontal
- Mill

Subscribe Now
- Great savings
- Delivered to your door

Pre-order your copy!
- Delivered to your doorstep!
- Free UK delivery!
All Forum Topics > Traction engines > Modded 1" Minnie Progress